Game Day Jalapeño Popper Dip Hearty Flavorful Treat


Get ready for the ultimate game day treat! This Game Day Jalapeño Popper Dip packs bold flavors that will make your taste buds dance. Creamy cheese, spicy jalapeños, and a crunchy topping create a snack you can’t resist. Whether you’re hosting a party or just watching the game, this dip is sure to impress. Let’s dive in and make this hearty delight that everyone will love!
Why I Love This Recipe
- Comforting Creaminess: This dip combines the rich flavors of cream cheese and sour cream, creating a deliciously smooth texture that is irresistible.
- Spicy Kick: With fresh jalapeños, this recipe packs a flavorful punch, making it perfect for those who love a little heat in their snacks.
- Cheesy Goodness: The blend of cheddar and pepper jack cheeses adds a melty, gooey element that is sure to please cheese lovers at your gathering.
- Easy to Prepare: This dip comes together quickly, making it a go-to recipe for game day or any casual get-together.
Ingredients
Required Ingredients
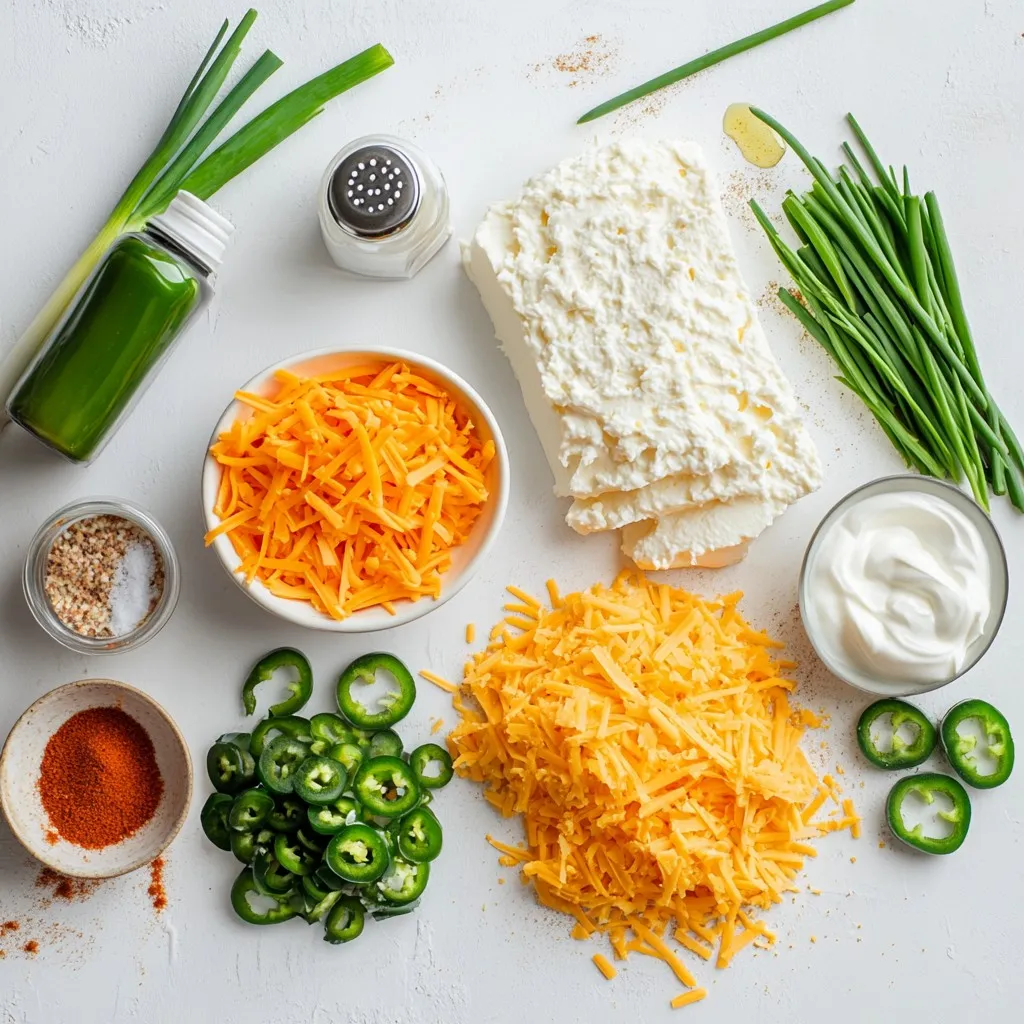
– 8 oz cream cheese
– 1 cup sour cream
– 1 cup shredded cheddar cheese
– 1 cup shredded pepper jack cheese
– 4-5 fresh jalapeños
– 1/2 cup green onions
– Spices and Condiments
– 1 teaspoon garlic powder
– 1 teaspoon onion powder
– 1/2 teaspoon smoked paprika
– Salt and black pepper to taste
To make a hearty Game Day Jalapeño Popper Dip, you need a few key items. First, cream cheese is the base. It gives the dip its rich and creamy texture. Sour cream adds tanginess and helps balance the flavors. Two types of cheese make it extra cheesy: cheddar and pepper jack. These cheeses melt well and add depth to the dip.
Now, fresh jalapeños bring heat. You can adjust the spice by adding more or fewer jalapeños. Green onions add a fresh crunch and color. Finally, a few spices like garlic powder and smoked paprika give the dip a warm flavor.
Optional Ingredients
– 1/2 cup panko breadcrumbs
– 2 tablespoons olive oil
– Additional garnishes (more green onions for topping)
If you want a crispy topping, panko breadcrumbs are the way to go. Mixing them with olive oil helps them brown nicely in the oven. This adds a fun texture to the dip. You can also choose extra garnishes like more green onions to make it pop.
Step-by-Step Instructions
Preparation Steps
– Preheat your oven to 350°F (175°C). This helps the dip bake evenly.
– Take a large mixing bowl and blend the cream cheese and sour cream. Use a hand mixer or a spatula. Mix until the texture is smooth and creamy.
Combining Ingredients
– Now, add the shredded cheddar cheese and pepper jack cheese. Mix in the garlic powder, onion powder, smoked paprika, salt, and black pepper.
– Next, stir in the finely diced jalapeños and sliced green onions. Make sure everything is well combined for great flavor.
Baking Process
– Pour the creamy dip mixture into a medium baking dish. Spread it out evenly using a spatula.
– If you want a crunchy topping, mix panko breadcrumbs with olive oil in a small bowl. Sprinkle this mixture over the dip.
– Place the baking dish in the oven and bake for 25-30 minutes. Look for bubbling and a golden brown top.
– When done, let the dip cool for about 5 minutes. This makes it easier to serve.
Tips & Tricks
Recipe Pro Tips
– To ensure a creamy texture, mix the cream cheese and sour cream well. Use a hand mixer for best results.
– Balancing flavors is key. Adjust spices to your taste. Add more smoked paprika for depth or garlic powder for punch.
Serving Suggestions
– Serve this dip hot with crispy tortilla chips or fresh veggies. They add a nice crunch.
– For gatherings, use a colorful dish. Garnish with sliced green onions for extra flair and flavor.
Time-Saving Tips
– Prep the dip in advance. You can mix the ingredients and store them in the fridge.
– For quick baking, set your oven to preheat while you prepare the dip. This saves time before your guests arrive.
Pro Tips
- Choose Your Heat Level: Adjust the number of jalapeños based on your heat preference. For a milder dip, remove the seeds and membranes thoroughly or use fewer jalapeños.
- Make Ahead: Prepare the dip in advance and store it in the refrigerator. Just bake it when you’re ready to serve for a quick and easy game day snack!
- Experiment with Cheeses: Feel free to mix different cheeses. Adding a bit of mozzarella can give a stringy texture, while a touch of feta can provide a tangy flavor.
- Garnish for Color: Enhance the presentation by garnishing with fresh cilantro or diced tomatoes along with the green onions right before serving.

Variations
Ingredient Substitutions
You can change the cheese in your dip. Try using gouda or mozzarella. These cheeses add a different taste. If you want more heat, use more jalapeños. If you prefer mild, pick sweet peppers instead.
Cooking Method Variations
You can make this dip in a slow cooker. Just mix all the ingredients and cook on low for 2-3 hours. This method gives a nice, warm dip. An air fryer is also a great choice. Cook it for about 15 minutes at 350°F (175°C). This will give you a crispy top.
Dietary Alternative Suggestions
For a gluten-free option, skip the panko breadcrumbs. The dip tastes great without them. You can also make this dip vegan. Use plant-based cream cheese and sour cream. Swap the cheeses for vegan versions too. This way, everyone can enjoy the dip!
Storage Info
Storing Leftovers
– Refrigeration tips: Store any leftover dip in an airtight container. It stays fresh for up to three days in the fridge. When you are ready to eat it, just take it out and let it sit for a few minutes before reheating.
– Freezing options: You can freeze the dip if you want to keep it longer. Place the dip in a freezer-safe container. It can last up to three months. When you are ready to use it, thaw it overnight in the fridge.
Reheating Guidelines
– Best methods for reheating: Reheat your dip in the oven for the best results. Set your oven to 350°F (175°C) and bake it for about 15-20 minutes. You can also use the microwave, but be careful not to overheat it. Heat in short bursts until warm.
– Maintaining texture and flavor: To keep the dip creamy, stir it gently while reheating. If it seems too thick, mix in a little sour cream or cream cheese. This helps restore its smooth texture and rich flavor.
FAQs
Common Questions
How long does jalapeño popper dip last in the fridge?
Jalapeño popper dip can last about 3 to 5 days in the fridge. Store it in an airtight container. This keeps it fresh and tasty.
Can I make jalapeño popper dip ahead of time?
Yes, you can make the dip ahead. Prepare it, then cover and chill it in the fridge. Bake it right before serving for the best flavor.
What can I serve with jalapeño popper dip?
You can serve this dip with tortilla chips, crackers, or fresh veggies. It’s great for scooping and adds a nice crunch.
Cooking Related Queries
Can I use canned jalapeños?
Yes, you can use canned jalapeños. They save time and still add flavor. Just drain them well before mixing.
How do I make the dip spicier?
To make the dip spicier, add more fresh jalapeños or include some cayenne pepper. You can also use a spicier cheese.
Ingredient Questions
Can I substitute low-fat cream cheese?
Yes, you can use low-fat cream cheese if you want. It will change the taste a bit, but it still works well.
What is the best cheese for jalapeño popper dip?
The best cheese is a mix of cheddar and pepper jack. This combo gives creamy texture and spice. You can also mix in other cheeses for fun flavors.
This blog post covers making a delicious jalapeño popper dip from scratch. We discussed the key ingredients, steps for preparation, and tips for perfecting the recipe. You learned about optional ingredients, variations, and how to store leftovers.
Making this dip is easy and fun. You can change it to fit your taste or serve it in many ways. Enjoy this tasty treat at your next gatherin

Game Day Jalapeño Popper Dip
Ingredients
- 8 oz cream cheese, softened to room temperature
- 1 cup sour cream
- 1 cup shredded cheddar cheese
- 1 cup shredded pepper jack cheese
- 4-5 pieces fresh jalapeños, seeded and finely diced
- 1/2 cup green onions, sliced (reserve some for garnish)
- 1 teaspoon garlic powder
- 1 teaspoon onion powder
- 1/2 teaspoon smoked paprika
- to taste salt and black pepper
- 1/2 cup panko breadcrumbs (optional, for a crispy topping)
- 2 tablespoons olive oil (if using panko)
Instructions
- Begin by preheating your oven to 350°F (175°C). This will ensure it's ready to bake when your dip mixture is prepared.
- In a large mixing bowl, combine the softened cream cheese and sour cream. Use a hand mixer or a spatula to blend them together until you achieve a smooth and creamy consistency.
- To the cream cheese and sour cream mixture, add the shredded cheddar cheese, shredded pepper jack cheese, finely diced jalapeños, sliced green onions, garlic powder, onion powder, smoked paprika, and a pinch of salt and pepper. Stir thoroughly until all ingredients are evenly mixed together.
- Pour the creamy dip mixture into a medium-sized baking dish, spreading it out evenly with a spatula for consistent baking.
- If you opt for a crunchy topping, in a small bowl, mix the panko breadcrumbs with olive oil until each crumb is lightly coated. Sprinkle the panko mixture evenly over the surface of the dip to create a delightful crispy topping.
- Place the baking dish in the preheated oven and bake for 25-30 minutes, or until the dip is bubbling and the top has turned a beautiful golden brown.
- Once baked, remove the dip from the oven and allow it to cool for about 5 minutes. This will help it set slightly and make it easier to serve.

![- 2 large cucumbers, diced into bite-sized cubes - 3 medium tomatoes, diced into equal-sized pieces - 1 red bell pepper, diced Fresh vegetables are the heart of a Greek salad. Cucumbers add crunch and hydration. Tomatoes provide sweetness and color. Red bell peppers add a nice crunch and a touch of sweetness. Together, they make a refreshing mix. - 1 cup Kalamata olives, pitted and halved - 1 red onion, thinly sliced into rings - 1/3 cup feta cheese, crumbled (omit for a vegan version) Next, we have Kalamata olives. They bring a salty, rich flavor to the salad. Red onion adds a sharp bite that balances the sweetness of the other veggies. Feta cheese adds creaminess and a tangy taste. If you prefer a vegan salad, simply leave out the feta. - 1/4 cup extra virgin olive oil - 2 tablespoons red wine vinegar (use apple cider vinegar for a unique flavor twist) - 1 teaspoon dried oregano, preferably Mediterranean The dressing ties everything together. Extra virgin olive oil makes it rich and smooth. Red wine vinegar adds a nice tang. Dried oregano brings a hint of earthiness. This simple dressing enhances the fresh flavors without overpowering them. You can find the full recipe online for detailed steps. Start by washing all your fresh vegetables. Clean them well to remove any dirt. Next, dice the cucumbers and tomatoes into small, even pieces. This helps make each bite enjoyable. Add these diced vegetables to a large mixing bowl. Then, chop the red bell pepper and halve the Kalamata olives. Thinly slice the red onion into rings. Mix all these vibrant ingredients together in the bowl. This colorful blend makes your salad look great! In a small bowl, mix the extra virgin olive oil and red wine vinegar. Whisk them together until they blend well. Add in the dried oregano for that nice Mediterranean flavor. Season your dressing with salt and freshly ground black pepper. This adds taste and balance to the salad. Taste your dressing and adjust the salt if needed. Now, pour the prepared dressing over the bowl of vegetables. Gently toss everything together with a large spoon or salad tongs. Make sure all the vegetables are covered in the dressing. If you want feta cheese, sprinkle the crumbled cheese on top. Toss it lightly again to mix the feta in with the salad. Finally, garnish with chopped fresh parsley for a pop of color. Enjoy your healthy Greek salad! For the complete recipe, see [Full Recipe]. To make your Greek salad shine, start with high-quality olive oil. This oil adds rich taste and depth. Look for extra virgin, as it has the best flavor. A simple drizzle makes a big difference. Next, add a squeeze of fresh lemon juice. This brightens the salad and adds zing. The citrus lifts the flavors and makes each bite refreshing. Use it right before serving for the best taste. When it comes to serving, think about your style. You can serve in a large bowl for a family meal. This lets everyone help themselves. Or, you can serve in individual bowls for a fancy touch. This makes each portion feel special. Garnishes also help with presentation. Fresh herbs like parsley add color. A slice of lemon on the side gives a nice look. These small touches make your salad more inviting. Want to boost the health factor? Add more vegetables. You can include radishes, carrots, or even spinach. Each veggie adds unique nutrients and flavors. More colors mean more vitamins! If you're watching your fat intake, think about cheese options. Use low-fat feta or skip the cheese entirely for a vegan choice. You still get a tasty salad without the extra calories. This way, you can enjoy a healthy Greek salad without worry. For the full recipe, check out the Mediterranean Bliss Greek Salad. {{image_4}} You can easily change the Greek salad to fit your diet. For a vegan version, swap feta cheese with tofu or avocado. Tofu adds protein and a nice texture. Avocado gives a creamy flavor without dairy. Both are great choices. This salad is also gluten-free. All the ingredients are naturally gluten-free. You can enjoy it without worry if you have gluten sensitivities. To add more flavor, think about adding protein. Chickpeas are a great option. They are filling and nutritious. Grilled chicken is another tasty choice if you prefer meat. It adds a smoky taste that pairs well with the salad. You can also introduce different herbs and spices. Fresh dill or mint can brighten the dish. A pinch of red pepper flakes can add a nice kick. Each tweak gives the salad a unique twist. Feel free to switch up the vegetables too. Grape tomatoes are sweeter and add a pop of color. You can also try different colored bell peppers for a vibrant look. Another fun swap is with olives. While Kalamata olives are classic, green olives can give a tangy taste. Each type of olive brings its own flavor, making your salad exciting. For the full recipe, check out the Mediterranean Bliss Greek Salad. To keep your Healthy Greek Salad fresh in the fridge, follow these tips: - Use an airtight container to seal in moisture and flavors. - Place a paper towel inside the container to absorb extra moisture. - Store the salad in the fridge for up to three days. For long-term storage, keep the salad ingredients separate. Here’s how: - Store the vegetables in their own container. This keeps them crisp. - Keep dressing in a small jar or bottle. You can freeze extra dressing for later use. To tell if your salad is no longer fresh, watch for these signs: - Look for wilted greens or soggy vegetables. - Check for an off smell or sour taste. - Discard any ingredients showing mold or discoloration. Proper disposal methods include throwing spoiled food in the trash or composting if safe. Enjoy the Healthy Greek Salad fresh, and savor every bite! For the full recipe, check out the Mediterranean Bliss Greek Salad. Greek salad is full of fresh veggies. These ingredients give many health benefits. Cucumbers keep you hydrated with their high water content. Tomatoes are rich in vitamins A and C, which are good for your skin. Red bell peppers provide antioxidants that help fight disease. Kalamata olives offer healthy fats, which are good for your heart. Feta cheese adds calcium for strong bones, but you can skip it if you prefer vegan options. The dressing made with olive oil is also good for heart health. Eating this salad can help you feel full and satisfied without many calories. Yes, you can prep your Greek salad ahead of time. To keep it fresh, chop the veggies but store them separately from the dressing. This way, they stay crisp and colorful. You can mix the dressing in another bowl. When you are ready to eat, combine everything. This keeps the salad tasting fresh and not soggy. If you want to add feta, do this right before serving, so it stays creamy. Absolutely! This salad is perfect for meal prep. You can easily make a big batch and store it in your fridge. Use airtight containers to keep it fresh. The veggies will stay good for about three days. If you want to eat it later, avoid adding the dressing until just before serving. This keeps the flavors bright and the textures right. Greek salad pairs well with many dishes. You can serve it with grilled chicken for added protein. It also goes great with pita bread or hummus for a light meal. If you are looking for a heartier option, try it with grilled fish. Adding some quinoa or brown rice on the side is also a nice touch. This makes for a balanced meal that is both tasty and healthy. You can find the Full Recipe for a Mediterranean Bliss Greek Salad to try today! In this article, we explored how to make a fresh and healthy Greek salad. I covered the ingredients and steps, plus tips for flavor and presentation. You learned about variations and storage to keep your salad fresh. Remember, this dish is not just tasty but also packed with nutrients. Whether you enjoy it as a side or main dish, its flavors and colors will impress everyone. By adding your twist, you can make it your own. Happy salad making!](https://joymealplan.com/wp-content/uploads/2025/06/c94f07f9-b700-4cfc-a1be-56f301f39c39-768x768.webp)