
Japanese Egg Sandwich Tamago Sando Delight Recipe


Are you ready to elevate your sandwich game? In this guide, I’ll show you how to make the delightful Japanese egg sandwich, known as Tamago Sando. With creamy eggs, rich mayo, and a pinch of soy sauce, this sandwich is a treat for your taste buds. We’ll cover everything from ingredients to cultural significance, ensuring you can whip up this tasty dish at home. Let’s dive into the delicious world of Tamago Sando!
Why I Love This Recipe
- Comforting Flavor: This Tamago Sando offers a rich, creamy texture that feels like a warm hug in every bite, making it perfect for any time of day.
- Quick and Easy: With minimal ingredients and simple steps, this recipe is perfect for busy mornings or a quick lunch fix.
- Customizable: You can easily adjust the flavors by adding different spices or toppings, making it versatile for everyone’s palate.
- Great for Meal Prep: These sandwiches hold up well in the fridge, making them an excellent choice for prepping ahead for the week.
Ingredients
List of Main Ingredients
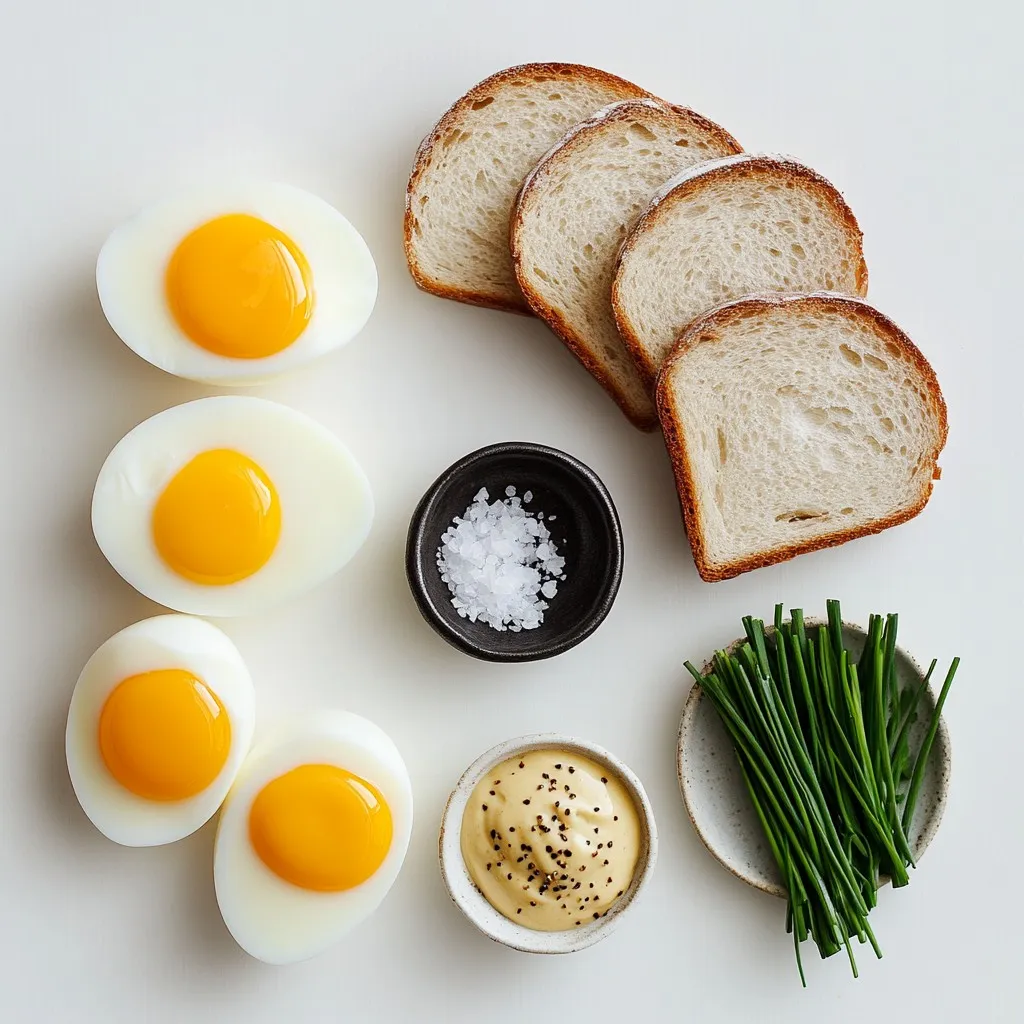
– 4 large eggs: These are the star of the show. They create a rich, creamy filling.
– 2 tablespoons mayonnaise: Japanese mayo is best for its smooth texture and flavor.
– 1 teaspoon soy sauce: This adds a salty depth that enhances the egg.
– 1 teaspoon mirin: This optional ingredient gives a touch of sweetness.
– Salt and pepper: Use these to season the egg mixture to taste.
– 4 slices of soft white bread: Choose your favorite bread for a fluffy base.
– 1 teaspoon mustard: This optional ingredient adds a nice tang to the sandwich.
– Fresh chives: Finely chopped, they bring color and a fresh flavor.
Recommended Ingredient Brands
For mayonnaise, I highly recommend Kewpie. It is creamy and flavorful, making it perfect for Tamago Sando. For bread, look for soft, fluffy white bread. Brands like Wonder Bread or any bakery-style white bread work well.
Substitutions and Alternatives
If you want to replace eggs, you could use tofu. Silken tofu can create a similar creamy texture. For bread, feel free to try whole wheat or gluten-free options. Each will give a different taste and texture, but they can all work in this delightful sandwich.
Step-by-Step Instructions
Cooking the Eggs
To start, place four large eggs in a pot filled with cold water. Make sure the water covers the eggs completely. Heat the pot on medium-high until the water boils. Once it boils, lower the heat to a simmer. Let the eggs cook for 9 to 10 minutes. This timing helps create a firm yolk without being overcooked. After the time is up, move the eggs to an ice bath. Fill a bowl with ice and cold water. Leave the eggs in the ice bath for 5 minutes. This step stops the cooking and cools the eggs quickly.
Preparing the Egg Mixture
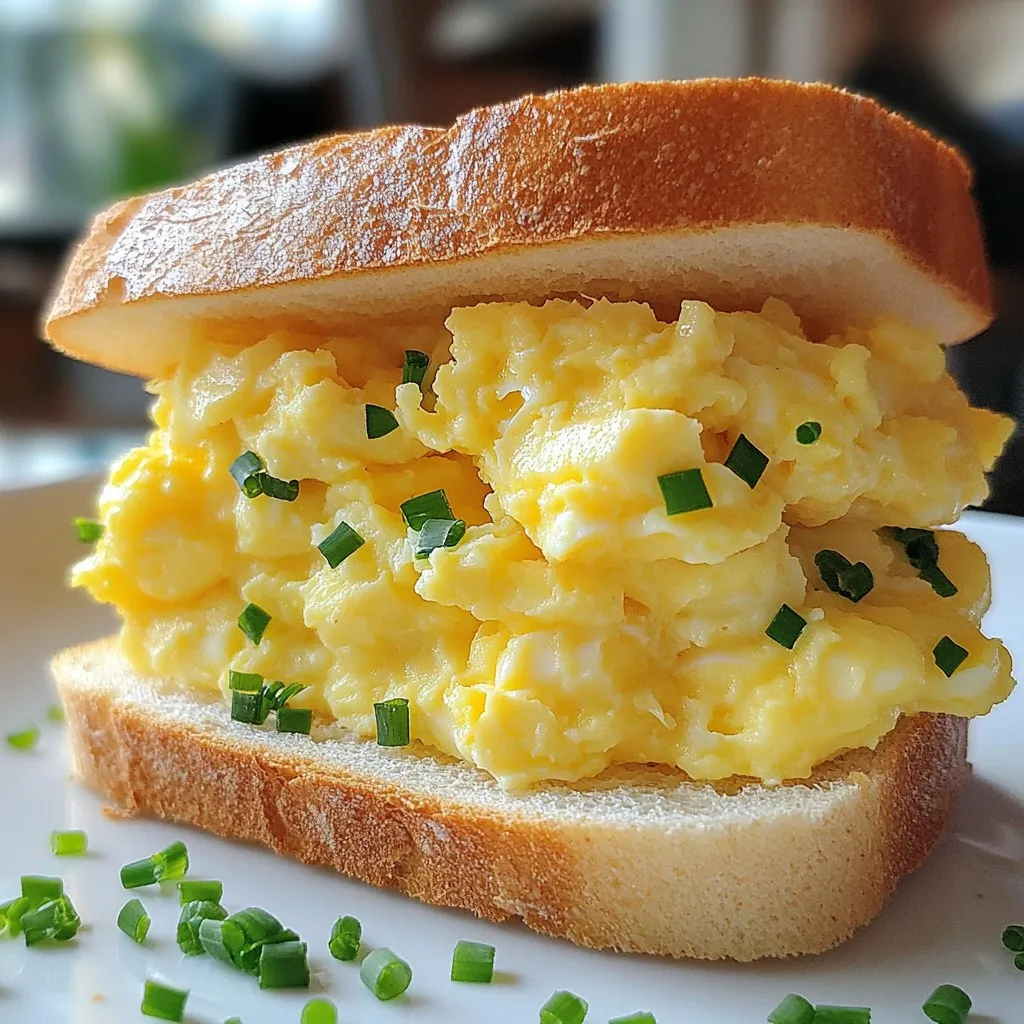
Now, it’s time to peel the eggs. You can do this under running water to make it easier. Once peeled, place the eggs in a medium bowl. Use a fork to mash the eggs until they are smooth. Aim for a creamy texture without large chunks. Next, add in two tablespoons of Japanese mayonnaise. This will give the mixture a rich and creamy taste. Then, stir in one teaspoon of soy sauce and mirin if you choose. Season with salt and pepper to your liking. Mix everything together until it’s smooth and well-combined.
Assembling the Sandwich
For extra flavor, you can spread a thin layer of mustard on one side of each slice of bread. This adds a nice tangy bite. Next, take two slices of bread and divide the egg mixture evenly on each slice. Spread the mixture all the way to the edges. Place the other two slices of bread on top to create sandwiches. If you want, you can trim the crusts for a clean look. Now, slice each sandwich into halves or quarters, depending on how you want to serve it. Finally, sprinkle some finely chopped chives on top for a pop of color and fresh flavor. Enjoy your delicious Tamago Sando!
Tips & Tricks
Perfecting the Egg Mixture
To make the perfect egg mixture, focus on the texture. After boiling your eggs, cool them in ice water. This helps them peel easily. Mash the eggs until creamy. You want a smooth consistency, so there are no large chunks.
Adding Japanese mayonnaise gives a rich and creamy taste. Mix in soy sauce for a savory depth. If you like sweet, add mirin. Season with salt and pepper to enhance the flavor. A well-mixed egg filling makes every bite delightful.
Serving Suggestions
For serving, think about fun garnishes and sides. Fresh chives add color and a hint of onion flavor. You can also try adding thin slices of cucumber for crunch.
Serve your Tamago Sando on a nice platter. Adding a small bowl of pickles or chips can make the meal more exciting. These sides offer different textures and tastes that pair well with the egg sandwich.
Storing Leftovers
If you have extra sandwiches, store them the right way. Keep them in an airtight container in the fridge. This helps maintain freshness.
You can enjoy them within two days for the best taste. If you want to keep the bread soft, wrap each sandwich in plastic wrap. This keeps them from getting dry or hard.
Pro Tips
- Egg Cooking Perfection: For perfectly cooked hard-boiled eggs, start with cold water and remove them from heat immediately after simmering to avoid overcooking.
- Texture Matters: For a creamier filling, use a fork to mash the eggs thoroughly, ensuring no large chunks remain for a smooth consistency.
- Flavor Boost: Experiment with different mustards or add a pinch of garlic powder to the egg mixture for an extra flavor kick!
- Presentation Counts: Trim crusts for a refined look, and serve your sandwiches on a colorful platter with a side of pickles for a pop of color.
Variations
Creative Twists on the Classic
You can easily make Tamago Sando your own. Here are some fun ideas:
– Avocado: Add mashed avocado for creaminess and healthy fats.
– Sriracha: Mix in a bit of Sriracha for a spicy kick.
– Curry Powder: A dash of curry powder gives a warm, unique flavor.
– Pickles: Chopped pickles add crunch and a tangy taste.
– Cheese: A slice of cheese can make it even richer.
These twists can change the taste while keeping it simple and fun!
Dietary Modifications
If you want a vegan or gluten-free Tamago Sando, you can adapt the recipe:
– Vegan: Use mashed chickpeas or tofu instead of eggs. Mix with vegan mayo and seasonings.
– Gluten-Free: Choose gluten-free bread or lettuce wraps. This keeps the sandwich light and fresh.
These options let everyone enjoy this tasty treat, no matter their diet!
International Influences
Tamago Sando has inspired many global variations. Here are a few:
– Korean Style: Mix in kimchi for a spicy, tangy flavor.
– Mexican Twist: Add jalapeños and cilantro for a zesty touch.
– Italian Influence: Include pesto and sun-dried tomatoes for a fresh taste.
These variations show how Tamago Sando can blend with other cuisines, making it even more exciting!
Cultural Significance
History of Tamago Sando
Tamago sando, or egg sandwich, has roots in Japan. It began as a simple snack in the early 20th century. The dish became popular in the post-war era as Japan adopted Western food trends. People loved its creamy filling and soft bread. Today, tamago sando is a staple in many Japanese cafes.
Tamago Sando in Japanese Cuisine
In Japanese cuisine, tamago sando holds a special place. You often find it in bento boxes. It is a go-to meal for busy people and children alike. Many enjoy it for lunch or as a light snack. It is also common at picnics and train rides. The sandwich pairs well with green tea or pickles, adding to its charm.
Global Adaptations
Around the world, tamago sando has inspired many variations. In some countries, people add ingredients like avocado or bacon. Others use different types of bread, like whole grain or sourdough. These adaptations show how food can connect cultures. Each version brings a unique twist while keeping the essence of the original dish.
FAQs
What type of bread is best for Tamago Sando?
For Tamago Sando, soft white bread works best. Its light texture makes the sandwich fluffy. You can also use milk bread or shokupan, which adds a slight sweetness. These breads soak up the egg filling well without falling apart. Avoid crusty or dense breads, as they can overpower the delicate flavors.
Can I make Tamago Sando ahead of time?
Yes, you can make Tamago Sando ahead of time. Prepare the egg filling and store it in an airtight container in the fridge. It will stay fresh for up to two days. Assemble the sandwiches just before serving for the best taste. If you prepare them early, keep the bread separate to avoid sogginess.
What are the best side dishes to pair with Tamago Sando?
Try serving Tamago Sando with pickles or chips for crunch. A side salad adds freshness and color. You can also pair it with miso soup for a warm touch. These sides enhance the flavors of the sandwich and create a balanced meal. You can mix and match based on your taste.
This blog post explored the tasty world of Tamago Sando. We covered key ingredients and brands, along with easy-to-follow steps for making the sandwich. I shared tips to perfect your egg mixture and suggested fun ways to serve and store leftovers. We also looked at unique variations and the rich history behind this beloved dish.
Tamago Sando is versatile and can fit many tastes and dietary needs. Enjoy making your own version and share it with friends and famil

Tamago Sando Delight
Ingredients
- 4 large eggs
- 2 tablespoons mayonnaise
- 1 teaspoon soy sauce
- 1 teaspoon mirin
- to taste salt and pepper
- 4 slices soft white bread
- 1 teaspoon mustard
- to taste fresh chives, finely chopped
Instructions
- Begin by placing the eggs in a pot filled with cold water. Bring the water to a boil over medium-high heat. Once boiling, reduce the heat to a simmer and cook the eggs for 9 to 10 minutes. After the time is up, transfer the eggs to an ice bath for 5 minutes.
- Once the eggs are cool, peel them carefully under running water if needed. In a medium bowl, use a fork to mash the peeled eggs until they reach a creamy consistency.
- Stir in the mayonnaise, soy sauce, and mirin into the mashed eggs. Season with salt and pepper to taste, mix thoroughly until all ingredients are well incorporated.
- For an extra layer of flavor, optionally spread a thin layer of mustard on one side of each slice of bread.
- Evenly divide the creamy egg mixture between two slices of bread, spreading it to the edges. Place the remaining two slices of bread on top.
- For a polished look, carefully trim the crusts off the sandwiches using a sharp knife.
- Using the knife, cut each sandwich into halves or quarters, adjusting based on your desire for serving size.
- For a finishing touch, sprinkle the tops with finely chopped chives.


![- 1 pound sirloin steak, cut into bite-sized cubes - 4 tablespoons unsalted butter - 4 cloves garlic, minced - Fresh herbs: rosemary and thyme - Salt and pepper for seasoning - Olive oil and soy sauce To make easy garlic butter steak bites, you need fresh and simple ingredients. The star of this dish is the sirloin steak. It’s tender and juicy, perfect for bite-sized pieces. The butter, garlic, and herbs create a rich sauce. You can taste the freshness in every bite. Using unsalted butter allows you to control the salt. Fresh rosemary and thyme add a nice touch of flavor. They give the steak bites a lovely aroma. Don’t forget to season well with salt and pepper. This step is key for great taste. - Fresh parsley, finely chopped Garnishing with parsley adds color and a hint of freshness. It makes your dish look more appealing. Plus, it gives a slight herbal taste that complements the steak. You can also use other herbs if you prefer. Thyme or chives can work well too. For the full recipe, check the details below. Enjoy cooking these steak bites! To start, heat the olive oil in a large skillet. Use medium-high heat until it shimmers slightly. This heat is key for a great sear. High heat helps lock in the juices and gives a nice crust. Next, season the steak cubes well. Use salt and freshly cracked black pepper. Make sure each piece is coated evenly. This step adds flavor and makes your bites tasty. Place the seasoned steak in the hot skillet in a single layer. Avoid overcrowding the pan. Let the steak sear undisturbed for about 2-3 minutes. This develops a rich, brown crust. Flip the cubes carefully using tongs or a spatula. Cook for another 2-3 minutes for medium-rare. Feel free to adjust the time for your desired doneness. Once done, remove the steak and set it aside. In the same skillet, lower the heat to medium. Add the butter and let it melt fully. Once melted, stir in the minced garlic, chopped rosemary, and thyme. Sauté for 1-2 minutes until fragrant. Be careful not to let the garlic burn. Now, return the seared steak bites to the skillet. Pour in the soy sauce and toss everything together. Make sure the steak is well-coated in the rich garlic butter sauce. Cook for another minute to heat through. This step blends the flavors beautifully. For the complete process, check the [Full Recipe]. To get steak bites just right, adjust the cooking time. For rare steak, aim for about 2 minutes per side. Medium-rare needs about 3 minutes per side. For medium, increase the time to 4 minutes. Always check the internal temperature. - Rare: 125°F (51°C) - Medium-rare: 135°F (57°C) - Medium: 145°F (63°C) Using a meat thermometer helps you avoid overcooking. If you want your steak well-done, cook it for about 5 minutes per side. Remember, everyone has different tastes. You can boost flavor with fresh herbs. Try using basil, oregano, or parsley. Each adds a unique twist. Fresh herbs bring bright tastes to the dish. You can also add a splash of vinegar or citrus. A bit of lemon juice or balsamic vinegar adds a nice zing. This lifts the flavors and makes the dish pop. For a different taste, think about garlic butter sauce variations. You can use shallots or different types of onions. Feel free to experiment and find what you like best. Check the [Full Recipe] for more details! {{image_4}} You can switch things up by using chicken or shrimp. They cook quickly, just like steak. For chicken, cut it into bite-sized pieces. Use boneless, skinless thighs or breasts for the best flavor and tenderness. Cook the chicken until golden and fully cooked, about 5-7 minutes. For shrimp, use large, peeled shrimp. They only need about 3-4 minutes to cook. Add them to the skillet after the garlic butter melts. Toss them until they turn pink and opaque. Adjust your cooking times based on the protein you choose. Remember, the key is to not overcook. If you need gluten-free options, swap soy sauce with tamari or coconut aminos. Both options provide savory flavor without gluten. You can also use homemade sauces with gluten-free ingredients. For low-carb adaptations, skip the soy sauce and focus on the garlic butter. Add more herbs for flavor. You can also serve these bites with low-carb veggies like zucchini noodles or cauliflower rice. These changes keep your meal tasty and fit your diet. To store your garlic butter steak bites, follow these steps: - Let the steak bites cool to room temperature. - Place them in an airtight container. - Keep them in the fridge for up to three days. This method helps keep the steak juicy and flavorful. Use glass or plastic containers with tight lids. They help prevent moisture loss and odors from mixing. When it comes to reheating, you want to avoid overcooking the steak. Here’s how to do it right: - Use a microwave on low power for a quick reheat. - Heat in 30-second intervals, checking often. - For better results, use a stovetop. - Heat a non-stick skillet over low heat. - Add a splash of water or broth to steam the bites. - Stir gently until warmed through. This method keeps your steak bites tender and tasty. To check if steak bites are done, look for a nice brown color. They should feel firm but slightly springy when pressed. A meat thermometer can help too. For medium-rare, aim for 130°F to 135°F. For medium, target 140°F to 145°F. If you like them well done, go for 160°F. This way, you can get your perfect level of doneness every time. Yes, you can make these steak bites ahead of time! Cook the steak bites and let them cool. Store them in an airtight container in the fridge for up to three days. For best taste, reheat them in a skillet. This keeps the flavors fresh and the texture intact. Garlic butter steak bites pair well with many sides. Here are some tasty options: - Roasted vegetables - Mashed potatoes - Rice pilaf - A fresh green salad - Garlic bread These sides balance the rich taste of the steak bites and create a full meal experience. Absolutely! This recipe is great for meal prep. You can portion out the steak bites into meal containers. Add your favorite sides for a balanced meal. Just make sure to store them in the fridge. When you are ready to eat, reheat them as needed. Enjoy a quick, tasty meal all week long! This blog post shared a simple, tasty recipe for garlic butter steak bites. We covered the essential ingredients, step-by-step cooking instructions, and tips for perfect doneness. I also discussed variations using different proteins and dietary adjustments, plus how to store leftovers effectively. Cooking steak bites can be fun and satisfying. With the right techniques, you can impress any guest. Enjoy making these delicious bites, and feel free to experiment with flavors and sides!](https://joymealplan.com/wp-content/uploads/2025/07/6c147bbf-aecd-4f40-83f0-60b5a859338f-768x768.webp)