
Crispy Baked Ground Beef Tacos Delightful Dinner Idea


Looking for a fun and tasty dinner idea? Try my Crispy Baked Ground Beef Tacos! They’re simple to make and full of flavor. You’ll love how easy it is to prep and bake these crunchy delights. Plus, I’ll share tips on how to get that perfect crispiness. Let’s dive into the ingredients and steps to create a meal that your family will crave again and again!
Why I Love This Recipe
- Flavor Explosion: The combination of spices brings a fiesta of flavors that dance on your palate, making each bite a delightful experience.
- Easy Assembly: With simple steps and minimal prep, these tacos are perfect for a quick weeknight dinner or a fun gathering with friends.
- Customizable: Feel free to add your favorite toppings or adjust the spice levels to suit your taste, ensuring every taco is just how you like it.
- Family-Friendly: These crunchy tacos are a hit with both kids and adults, making them a go-to recipe for any family meal.
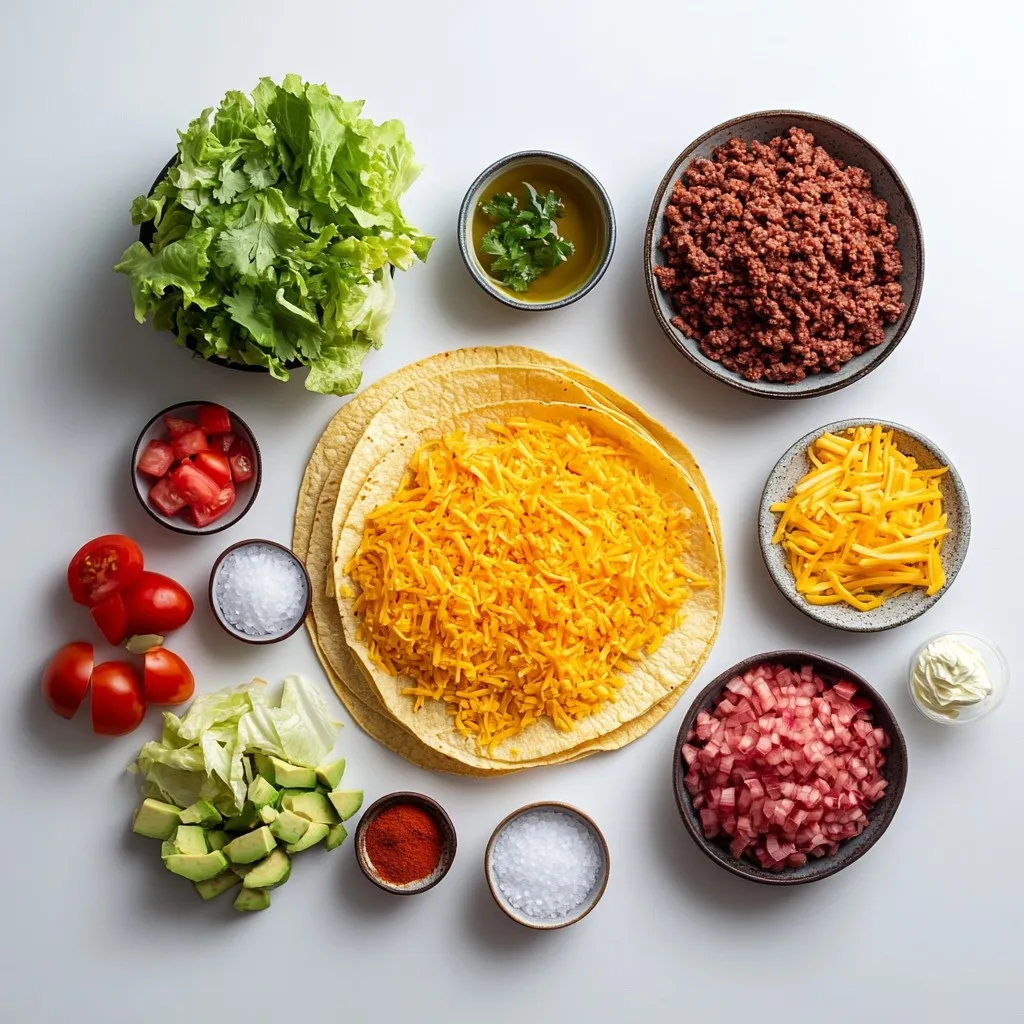
Ingredients
Detailed List of Ingredients
For crispy baked ground beef tacos, you need the following:
– 1 lb ground beef
– 1 small onion, finely chopped
– 2 garlic cloves, minced
– 1 tablespoon chili powder
– 1 teaspoon ground cumin
– 1 teaspoon smoked paprika
– Salt and pepper to taste
– 12 small corn tortillas
– 1 cup shredded cheese (cheddar or Mexican blend)
– 1 cup iceberg lettuce, finely shredded
– 1 medium tomato, diced
– 1 ripe avocado, diced
– ½ cup sour cream
– Fresh cilantro, chopped (for garnish)
– Olive oil for brushing
These ingredients combine to create a tasty and satisfying meal.
Alternatives for Special Diets
If you have dietary needs, consider these swaps:
– Use ground turkey or chicken for a leaner option.
– Replace cheese with dairy-free cheese for a vegan choice.
– Try lettuce wraps instead of tortillas for a low-carb meal.
– Use gluten-free tortillas if gluten is a concern.
These alternatives keep the dish delicious while fitting your needs.
Recommended Brands or Quality Tips
For the best taste, choose quality ingredients:
– Select 80/20 ground beef for rich flavor and juiciness.
– Opt for fresh, local produce for the best taste and nutrition.
– Use organic olive oil for a healthier fat option.
– Look for aged cheddar for a sharper flavor.
Using quality ingredients makes a noticeable difference in your tacos.
Step-by-Step Instructions
Preheat and Prepare
First, you need to preheat your oven to 375°F (190°C). This step helps the tacos bake evenly. While the oven heats, gather the ingredients. You want everything ready to go.
Cooking the Ground Beef Mixture
In a large skillet, add 1 pound of ground beef over medium heat. Cook it until it turns brown. As it cooks, break it apart with a spatula. Once the beef is browned, drain any fat. Next, toss in the finely chopped onion and minced garlic. Sauté them for about 3-4 minutes. You want the onion to become soft and clear. Then, stir in 1 tablespoon of chili powder, 1 teaspoon of ground cumin, 1 teaspoon of smoked paprika, salt, and pepper. Mix and cook for 2-3 more minutes. This helps the spices blend well with the beef, giving it a great flavor.
Assembling and Baking the Tacos
Now, let’s prepare the corn tortillas. Brush both sides of each tortilla with olive oil. This step makes them crispier when baked. Lay the tortillas on a baking sheet. Spoon the beef mixture into each tortilla. Make sure to add a good amount of shredded cheese on top. Carefully fold each tortilla in half. Press the edges gently to keep the filling inside. Arrange them on the baking sheet without overlapping. Bake in the oven for about 15-20 minutes. You want the tortillas to turn golden and crispy. Once done, take them out and let them cool for a few minutes. This way, they are easier to handle. Finally, top each taco with shredded lettuce, diced tomatoes, and avocado. Add a scoop of sour cream and sprinkle cilantro for a fresh touch. Enjoy your crispy baked tacos!
Tips & Tricks
How to Achieve the Perfect Crispiness
To make your tacos extra crispy, brush both sides of the corn tortillas with olive oil. This tiny step helps them crisp up in the oven. Make sure to bake them at 375°F (190°C) for about 15-20 minutes. Keep an eye on them to ensure they turn golden brown without burning.
Flavor Enhancements and Variations
You can add more flavor to your beef by using different spices. Try adding cayenne pepper for heat or oregano for a fresh taste. If you want to change up the cheese, use pepper jack for a spicy kick or queso fresco for a milder flavor. You can also add black beans or corn to the beef mixture for a fun twist.
Common Mistakes to Avoid
One common mistake is overfilling the tortillas. If you pack them too tight, they might rip or not bake evenly. Another mistake is not preheating the oven. Always preheat to ensure the tacos bake properly. Lastly, be careful with the oil. Too much can make the tacos greasy instead of crispy.
Pro Tips
- Use Fresh Ingredients: Fresh vegetables and herbs enhance the flavor and texture of your tacos. Opt for ripe avocados and crisp lettuce for the best results.
- Customize Your Spices: Adjust the spices to your taste. If you prefer more heat, add cayenne pepper or jalapeños to the beef mixture.
- Warm Your Tortillas: Slightly warming the tortillas before assembly makes them more pliable and helps prevent cracking when folding.
- Experiment with Fillings: Feel free to mix up the fillings! Try adding black beans, corn, or even grilled vegetables for a delicious twist.

Variations
Vegetarian or Meatless Alternatives
If you want a meatless option, try lentils or black beans. They add protein and fiber. Cook them with the same spices as the beef. You can even add some bell peppers for extra flavor. Use them in place of ground beef. This keeps the dish tasty and healthy.
Different Cheese and Sauce Options
Cheese can change the taco’s flavor. Try Monterey Jack or Pepper Jack for a kick. For a creamy touch, use queso fresco. You can also mix cheeses for more depth. As for sauces, salsa verde or chipotle mayo can spice things up. These options make your tacos more exciting and fun.
Creative Fillings for Customized Tacos
Get creative with your fillings. Try adding roasted veggies like zucchini or bell peppers. For a twist, use pulled jackfruit for a fun texture. You can also include beans, corn, or even quinoa. Top it off with fresh herbs like cilantro or green onions for added freshness. Making your tacos unique makes them more enjoyable.
Storage Info
How to Store Leftover Tacos
To store leftover tacos, let them cool down first. Place them in an airtight container. If you have toppings like lettuce or avocado, store them separately. This keeps everything fresh. You can keep them in the fridge for up to three days.
Freezing and Reheating Instructions
To freeze the tacos, wrap them in plastic wrap tightly. Then, place them in a freezer bag. They can stay in the freezer for up to three months. To reheat, remove the wrap and place them on a baking sheet. Bake at 350°F (175°C) for about 15 minutes. This will make them crispy again.
Best Practices for Keeping Ingredients Fresh
Keep your ingredients fresh by storing them properly. Store ground beef in the coldest part of your fridge. Use it within two days. For spices, keep them in a cool, dark place. Toppings like cheese and sour cream last longer in the fridge if sealed well. Use fresh produce within a week for the best taste.
FAQs
Can I use flour tortillas instead of corn?
Yes, you can use flour tortillas. Flour tortillas are softer and may not crisp up like corn ones. If you prefer a chewier texture, go for flour. Just remember to adjust cooking times, as they might bake faster.
How can I make these tacos spicier?
To add some heat, include diced jalapeños in the beef mix. You can also use spicy chili powder or hot sauce. Another option is to sprinkle some crushed red pepper on top before serving. Adjust the spice level to suit your taste.
What sides go well with crispy baked tacos?
Crispy baked tacos pair well with many sides. Consider serving them with:
– Mexican rice
– Refried beans
– Corn salad
– Guacamole
– Salsa
– A fresh green salad
These sides add flavor and balance to your meal. Enjoy your taco night!
This blog post covered everything you need for perfect tacos. We explored key ingredients, shared cooking steps, and offered tips for crispy results. You learned about alternatives for special diets, easy storage, and tasty variations. Remember, cooking is about fun and creativity. Use this guide as your taco adventure roadmap. Enjoy making your tacos just right, and don’t be afraid to try new flavors! Happy cookin

Crunchy Fiesta Ground Beef Tacos
Ingredients
- 1 lb ground beef
- 1 small onion, finely chopped
- 2 cloves garlic, minced
- 1 tablespoon chili powder
- 1 teaspoon ground cumin
- 1 teaspoon smoked paprika
- to taste salt and pepper
- 12 small corn tortillas
- 1 cup shredded cheese (cheddar or Mexican blend)
- 1 cup iceberg lettuce, finely shredded
- 1 medium tomato, diced
- 1 ripe avocado, diced
- 0.5 cup sour cream
- to taste fresh cilantro, chopped (for garnish)
- as needed olive oil for brushing
Instructions
- Preheat the Oven: Set your oven to 375°F (190°C) to prepare for baking the tacos.
- Cook the Beef: In a large skillet over medium heat, add the ground beef. Cook until browned, breaking it apart with a spatula as it cooks. Once browned, drain any excess fat from the skillet.
- Sauté Onions and Garlic: Add the finely chopped onion and minced garlic to the pan with the beef. Sauté for about 3-4 minutes, stirring occasionally, until the onion becomes soft and translucent.
- Add Spices: Stir in the chili powder, ground cumin, smoked paprika, salt, and pepper. Cook for an additional 2-3 minutes, letting the spices mingle with the meat for a deeper flavor. Remove from heat and set aside.
- Prepare Tortillas: In a separate bowl, lightly brush both sides of each corn tortilla with olive oil to help them crisp up nicely during baking.
- Assemble the Tacos: Lay the oiled tortillas flat on a baking sheet. Spoon an even portion of the savory beef mixture into the center of each tortilla and sprinkle generously with shredded cheese.
- Fold and Arrange: Carefully fold each tortilla in half, gently pressing the edges to secure the filling inside. Arrange the folded tacos on the baking sheet, ensuring they are not overlapping.
- Bake the Tacos: Place the baking sheet in the preheated oven and bake for about 15-20 minutes, or until the tortillas are golden and crispy, and the cheese has melted wonderfully.
- Cool Slightly: Once baked, remove the tacos from the oven and allow them to cool for a few minutes. This makes them easier to handle.
- Serve and Garnish: To serve, generously top each taco with shredded lettuce, diced tomatoes, and avocado. Add a dollop of sour cream on top, and finish with a sprinkle of freshly chopped cilantro for a burst of flavor and color.

![To make Easy Chicken Tikka Masala, gather these key ingredients: - 500g boneless chicken thighs, cut into bite-sized pieces - 1 cup plain yogurt - 2 tablespoons garam masala - 1 tablespoon ground cumin - 1 teaspoon ground coriander - 1 teaspoon paprika - 1 teaspoon turmeric - 1 tablespoon ginger, minced - 3 cloves garlic, minced - 1 onion, finely chopped - 1 can (400g) crushed tomatoes - 1 cup coconut milk - 2 tablespoons vegetable oil - Salt to taste - Fresh cilantro for garnish These ingredients create a rich, creamy sauce that brings the dish to life. The yogurt is key for tender chicken. The spices add depth and warmth, making every bite flavorful. You can customize your Chicken Tikka Masala with these optional ingredients: - Lemon juice for brightness - Green chili for heat - Bell peppers for crunch - Peas for color Adding these extras can change the flavor profile and make it your own. Feel free to mix and match based on your taste. If you have allergies, there are simple swaps you can use: - Use almond or soy yogurt instead of dairy yogurt. - Swap coconut milk for almond milk for a nut-free option. - Replace chicken with tofu or chickpeas for a vegan dish. These substitutions keep the dish delicious while catering to your dietary needs. Enjoy your cooking adventure! For the complete recipe, check out the Full Recipe link. First, grab a large bowl. Mix 1 cup of plain yogurt, 2 tablespoons of garam masala, 1 tablespoon of ground cumin, 1 teaspoon of ground coriander, 1 teaspoon of paprika, 1 teaspoon of turmeric, 1 tablespoon of minced ginger, 3 cloves of minced garlic, and a pinch of salt. Stir well until it’s smooth. Now, add 500g of bite-sized chicken thighs. Make sure each piece is coated well with the marinade. Cover the bowl with plastic wrap. Pop it in the fridge for at least 30 minutes. For the best taste, let it sit overnight. Next, heat 2 tablespoons of vegetable oil in a large skillet over medium-high heat. Once hot, add 1 finely chopped onion. Cook the onion for 5-7 minutes. You want it to turn golden brown and soft. This step adds a sweet flavor. After the onion is ready, add the marinated chicken. Cook it for about 8-10 minutes. Stir it occasionally to brown all sides evenly. Once the chicken is browned, it’s time to add more flavor. Pour in 1 can of crushed tomatoes. Stir gently to mix everything. Bring the mixture to a gentle simmer. Let it simmer for about 10 minutes. Stir it now and then to stop it from sticking. After that, slowly pour in 1 cup of coconut milk. Stir again to combine. Simmer for another 10 minutes. This makes the sauce thick and creamy. Taste and add more salt if needed. Finish by garnishing with fresh cilantro for a pop of color and taste. To get the best flavor in your Chicken Tikka Masala, start with fresh spices. Fresh spices give a robust taste that dried spices lack. Use whole spices when possible, and grind them yourself. This step unleashes their natural oils and aromas. Another key is the yogurt marinade. It adds tenderness and tang. Marinate your chicken for at least 30 minutes, but overnight is best. This waiting time allows the spices to soak in fully. For perfect chicken, cook it in batches. Overcrowding the pan steams the meat instead of browning it. Use medium-high heat to get a nice sear on the chicken. This creates a deep flavor that you want. Once you add the crushed tomatoes and coconut milk, let it simmer gently. This step helps the flavors meld together beautifully. You can make Chicken Tikka Masala ahead of time. Cook it fully, then let it cool. Store it in an airtight container in the fridge for up to three days. Reheat it on low heat, adding a splash of water if needed. This dish also freezes well. Portion it out and freeze it for up to three months. When you're ready, thaw it overnight in the fridge and reheat. For more details, check the Full Recipe. {{image_4}} You can easily make a vegetarian version of Chicken Tikka Masala. Replace the chicken with firm tofu or vegetables like bell peppers and zucchini. Tofu soaks up flavors well. Marinate it the same way as chicken. Cook it in the same sauce for that rich taste. This way, you keep the essence of the dish while making it meat-free. If you enjoy spicy food, add some heat to your Chicken Tikka Masala. You can include chopped green chilies or a pinch of cayenne pepper in the marinade. Adjust the spice level to your liking. Just remember, a little heat goes a long way! You can also serve it with a side of spicy chutney for an extra kick. You can swap chicken for other proteins too. Paneer, a fresh cheese, works great in this dish. Cut the paneer into cubes and marinate it just like the chicken. Cook it in the same way for a rich and creamy meal. Tofu and paneer both add their own unique texture and flavor to the dish. This makes it more exciting and diverse for your taste buds. For the complete recipe, check out the [Full Recipe]. To keep your Chicken Tikka Masala fresh, let it cool down first. Use an airtight container for storage. Place it in the fridge. It will stay good for about three to four days. For best results, store it without the rice or naan. To enjoy your Chicken Tikka Masala again, use the stove or microwave. If using the stove, heat it over low heat. Stir often to prevent sticking. If using the microwave, cover the dish and heat in short bursts. This way, it warms evenly. Always check the temperature to ensure it is hot throughout. You can freeze Chicken Tikka Masala if you want to save some for later. Place it in a freezer-safe container or bag. Make sure to leave some space for expansion. It can stay good for up to three months. When you’re ready to eat, thaw it in the fridge overnight. Reheat it on the stove or microwave, and enjoy this rich flavor again! For the full recipe, check the section above. You should marinate chicken for at least 30 minutes. For the best taste, let it sit overnight. This allows the spices to soak in deeply. The yogurt keeps the chicken tender while adding flavor. Yes, you can use bone-in chicken. It will add more flavor to your dish. Just be aware that it may take longer to cook. Adjust your cooking time to ensure the chicken is fully cooked. Serve Chicken Tikka Masala with fluffy basmati rice or warm naan. Both options soak up the rich sauce well. You can also add a side of cucumber salad for a fresh crunch. For the complete recipe, check out the Full Recipe section. You’ll find all the steps to make this rich, flavorful dish in no time! In this post, we covered the key ingredients for easy Chicken Tikka Masala, from marinade to sauce. I shared tips for perfect flavor and cooking techniques. You can even explore vegetarian options or different proteins like tofu. Storing leftovers properly ensures you enjoy this dish later. Remember, marinating the chicken is key, and you can customize it to your taste. With these steps, you’ll cook a delicious meal that’s sure to impress!](https://joymealplan.com/wp-content/uploads/2025/07/18c11e8b-b17f-4eb1-983f-851954d1111b-768x768.webp)
![- 1 cup orzo pasta - 2 tablespoons extra virgin olive oil - 4 cloves garlic, finely minced - 3 cups vegetable broth - 1 cup fresh spinach, chopped - 1/2 cup freshly grated Parmesan cheese - 1 teaspoon lemon zest - Salt and black pepper to taste - Fresh parsley for garnish The star of this dish is orzo pasta. It’s small and cooks fast. I love how it soaks up flavors. The extra virgin olive oil adds a rich taste. Garlic is key here too; it brings a warm aroma. I prefer fresh garlic, as it packs a punch. The vegetable broth makes this dish savory and adds depth. Fresh spinach gives color and nutrients. Parmesan cheese gives that creamy finish. Lemon zest brightens everything up. A dash of salt and pepper helps balance the flavors. - Red pepper flakes for added spice - Additional vegetables (e.g., cherry tomatoes, peas) If you like heat, add red pepper flakes. They give a nice kick. You can also toss in more veggies. Cherry tomatoes add sweetness, while peas bring a pop of color. These extras make the dish even more fun. - Caloric value per serving - Key nutrients present Each serving of Garlic Parmesan Orzo has around 250 calories. It's rich in carbohydrates, which gives you energy. The spinach adds iron and vitamins. Parmesan brings protein and calcium. This dish is not just tasty, it’s also good for you! For the full recipe, check out Garlic Parmesan Orzo Delight. 1. In a medium pot, bring 3 cups of vegetable broth to a rolling boil. 2. Once boiling, add 1 cup of orzo pasta. Cook it until al dente, which takes about 8-10 minutes. Stir it occasionally to prevent sticking. 1. While the orzo cooks, heat 2 tablespoons of extra virgin olive oil in a large skillet over medium heat. 2. Add 4 cloves of finely minced garlic to the skillet. Sauté it for about 1 minute. The garlic should smell fragrant, but don’t let it brown. 1. Once the orzo is cooked, reserve about 1/2 cup of the broth. Drain the rest. 2. Add the cooked orzo to the skillet with the garlic. 3. Pour in the reserved broth and stir gently to combine. 4. Next, add 1 cup of roughly chopped fresh spinach to the skillet. Cook for 2-3 minutes until the spinach wilts. 5. Remove the skillet from heat, then fold in 1/2 cup of freshly grated Parmesan cheese and 1 teaspoon of lemon zest. 6. Season to taste with salt and freshly cracked black pepper. 7. Transfer the garlic Parmesan orzo to a serving dish. Garnish with fresh parsley for a pop of color. For the full recipe, check out the detailed instructions above. Enjoy your flavorful and simple side dish! - How to avoid overcooking orzo: Keep a close eye on the orzo as it cooks. Stir it often to prevent sticking. Start checking for doneness a minute or two before the package time ends. You want it al dente, which means it should still have a little bite. - Tips for perfectly sautéed garlic: Use a medium heat for your skillet. Add minced garlic and stir constantly. Cook it for about one minute until it smells great. Be careful not to let it brown, as this can make it taste bitter. - Best practices for garnishing: Always garnish your dish right before serving. Fresh parsley adds a nice color and flavor. A sprinkle of extra Parmesan on top makes it even better. - Suggested pairings: Garlic Parmesan orzo pairs well with a light salad or grilled chicken. You can also serve it with roasted vegetables for a balanced meal. - How to store leftovers: Let the orzo cool to room temperature. Then, place it in an airtight container. Store it in the fridge for up to three days. - Reheating recommendations: When reheating, add a splash of vegetable broth to prevent it from drying out. Heat on low in a skillet or microwave until warm. For the full recipe, check out the Garlic Parmesan Orzo Delight. {{image_4}} You can easily adapt Garlic Parmesan Orzo to fit a vegetarian diet. One way is by substituting different greens. Instead of spinach, try kale or arugula. Both add unique flavors and textures. You can also boost protein by adding beans or tofu. These options make the dish heartier and more filling. Want to change the flavor profile? Experiment with herbs and spices. Fresh basil or thyme can bring a new twist. You can also add a splash of lemon juice for extra tanginess. This brightens the dish and enhances the garlic and cheese. Don't be afraid to get creative! If you need a gluten-free option, use gluten-free pasta. Many brands offer orzo made from rice or quinoa. Just remember to adjust the cook times. Gluten-free pasta may cook faster than regular orzo. Keep an eye on it to ensure it doesn’t get mushy. For the full recipe, check out [Full Recipe]. Garlic Parmesan Orzo is a tasty and easy side dish. It combines orzo pasta with garlic, cheese, and fresh spinach. This dish is perfect for any meal. You can enjoy it with chicken, fish, or even as a main dish. - Prep Time: 10 minutes - Total Time: 20 minutes - Servings: 4 Serve the orzo in warm bowls. This keeps it cozy and inviting. You can add extra Parmesan on top for flavor. A sprinkle of fresh parsley adds color. For a complete meal, pair it with a light side salad or grilled vegetables. You can also try it alongside roasted chicken or fish for a balanced plate! Making Garlic Parmesan Orzo is quick and easy. You will need about 10 minutes to prep. Cooking takes around 10 minutes. So, in total, it takes about 20 minutes. This dish is perfect for busy nights when you need a tasty side fast. Yes, you can make Garlic Parmesan Orzo ahead of time. Prepare it a few hours before serving. Just store it in an airtight container in the fridge. When you are ready to eat, reheat it gently on the stove. Add a splash of broth or water to keep it moist. Absolutely! This Garlic Parmesan Orzo works well for meal prep. You can portion it into containers. Store in the fridge for up to four days. It reheats easily, making it a great side for any meal. You can even add different proteins or veggies to mix things up! This blog post shared a simple Garlic Parmesan Orzo recipe. You learned about the main ingredients and optional add-ins. I detailed preparation and cooking steps to make your dish shine. Tips and variations catered to your taste and dietary needs. Cooking orzo should be fun and easy. You can experiment with flavors while enjoying a hearty meal. Remember, this recipe is flexible and can fit many diets. Enjoy making your orzo, and share it with friends and family!](https://joymealplan.com/wp-content/uploads/2025/07/b2d855f4-c1dc-4e96-adea-f1579eb882d3-768x768.webp)