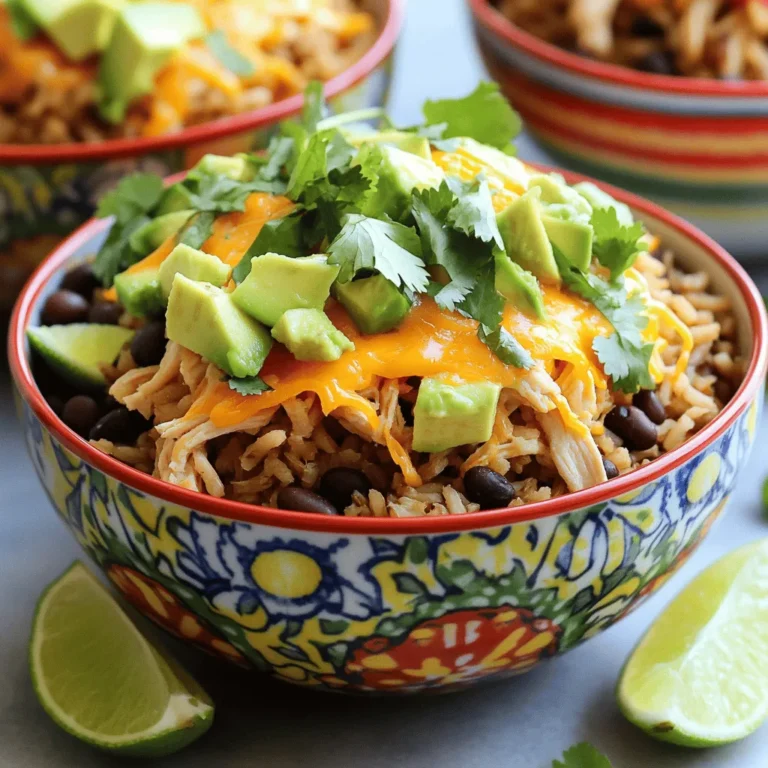
Tuscan White Bean Soup Flavorful Comfort Food Dish
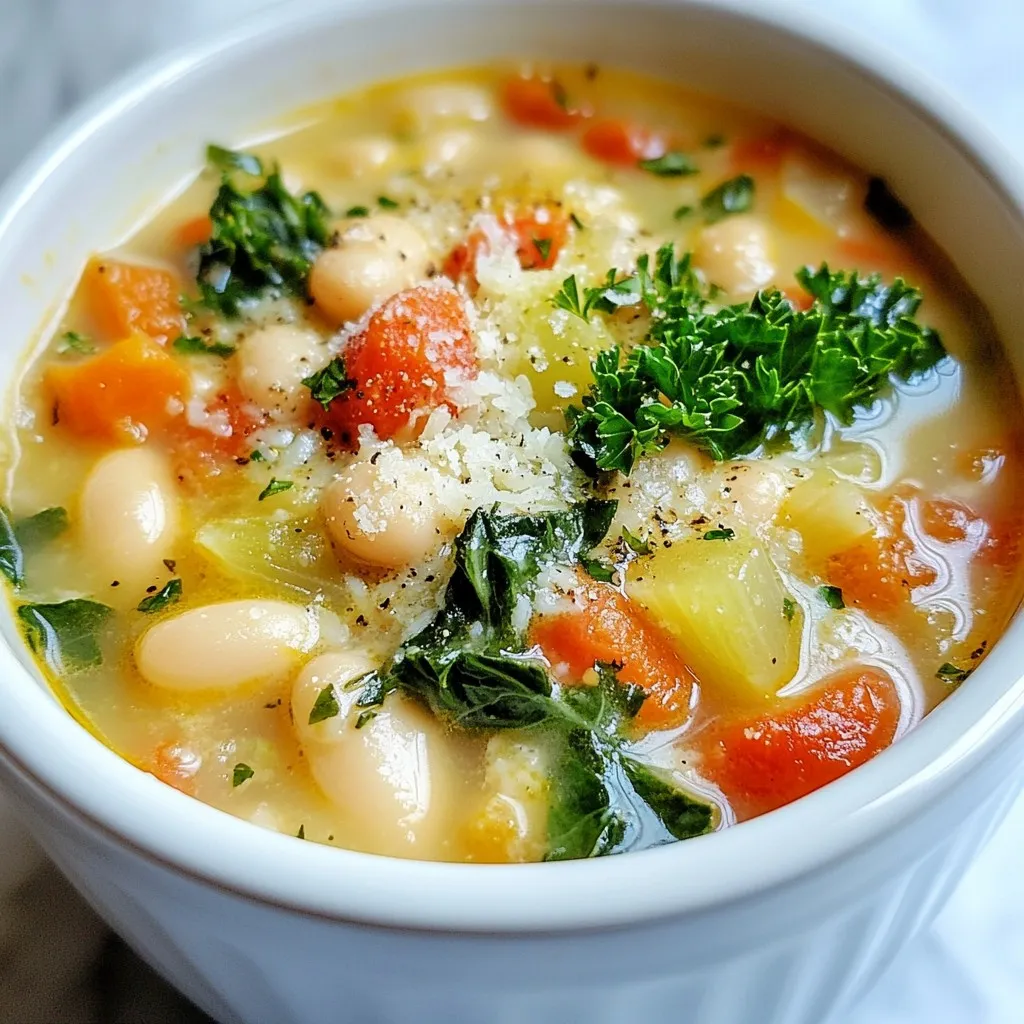

Looking for a cozy dish that warms both your heart and stomach? Tuscan White Bean Soup is your answer! This rich, flavorful comfort food is packed with nutrients and easy to make. In this article, I’ll guide you through the ingredients, cooking steps, and even offer tips for making it your own. Get ready to enjoy a delicious bowl of Italian-inspired goodness that will become a family favorite!
Why I Love This Recipe
- Comforting and Hearty: This soup is the ultimate comfort food, perfect for chilly days and satisfying enough to warm your soul.
- Nutritious Ingredients: Packed with white beans, kale, and fresh vegetables, this recipe is not only delicious but also offers a wealth of nutrients.
- Easy to Prepare: With simple steps and minimal prep time, this recipe is ideal for busy weeknights or a cozy weekend meal.
- Customizable Flavor: Feel free to adjust the herbs and spices to your liking, making it a versatile dish that can be tailored to suit any palate.
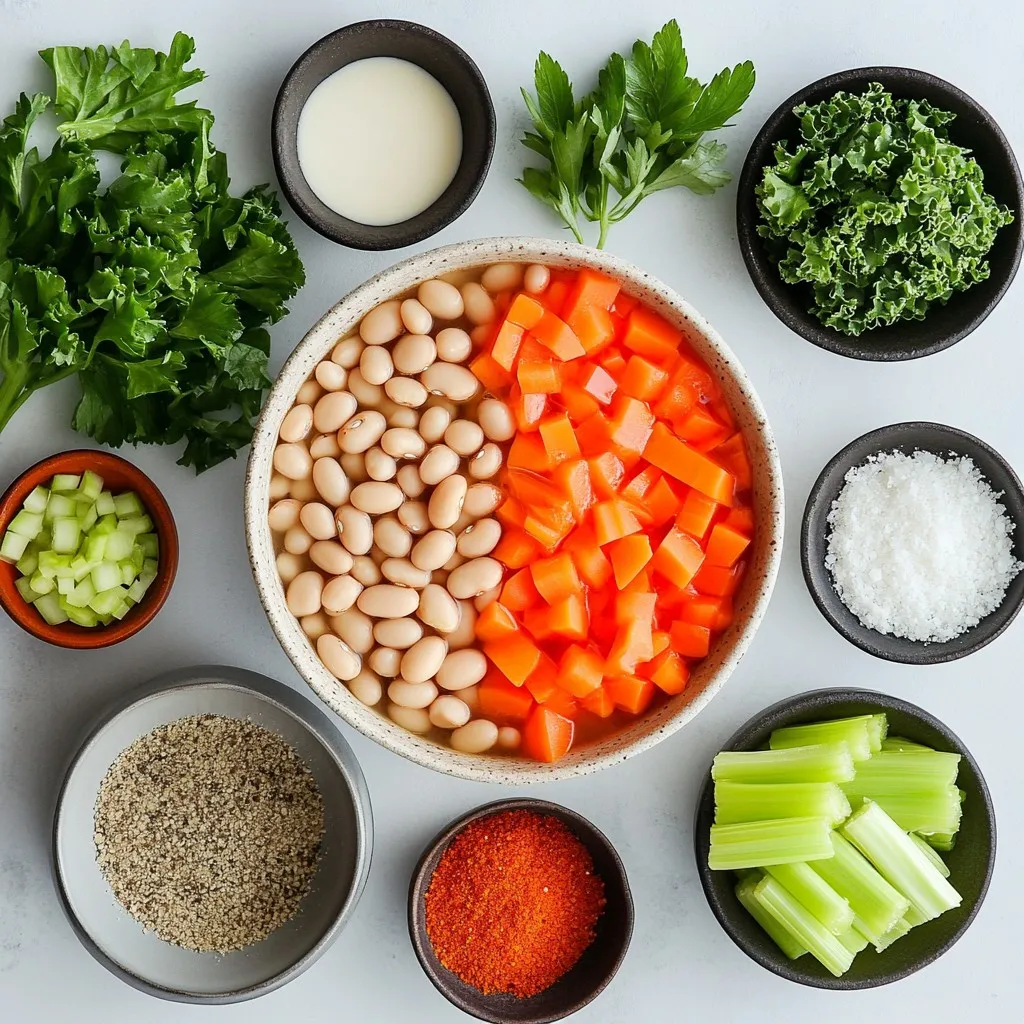
Ingredients
List of Ingredients
– 2 cups cooked white beans (cannellini or navy), drained
These beans give the soup a creamy texture. You can use other beans if you like.
– 1 tablespoon extra virgin olive oil
This oil adds flavor and helps cook the veggies. You can swap it with another oil.
– 1 large onion, finely diced
Onions bring sweetness to the soup. Shallots are a great substitute if needed.
– 2 cloves garlic, finely minced
Garlic adds a strong flavor. You can use garlic powder if fresh isn’t available.
– 2 medium carrots, peeled and diced
Carrots add sweetness and color. You can replace them with parsnips for a twist.
– 2 celery stalks, diced
Celery adds crunch and flavor. Fennel can be used as an alternative.
– 4 cups vegetable broth, low-sodium preferred
Broth is the soup’s base. Chicken broth works too if you’re not vegetarian.
– 1 can (14 oz) diced tomatoes, including juices
Tomatoes provide acidity and depth. Fresh tomatoes can be used instead.
– 1 teaspoon dried thyme
Thyme adds an earthy flavor. Oregano can be a good replacement.
– 1 teaspoon dried rosemary
Rosemary gives a woodsy note. You can skip it if you’re not a fan.
– 1 teaspoon red pepper flakes (adjust based on your heat preference)
These add heat. You can use black pepper instead for less spice.
– Sea salt and freshly ground black pepper, to taste
Season to your liking. Use garlic salt for a different twist.
– 2 cups fresh kale, stems removed and chopped
Kale adds nutrition and color. Spinach can be a nice substitute too.
– Fresh parsley, finely chopped, for garnish
Parsley brightens the dish. You can also use basil for a different flavor.
– Grated Parmesan cheese (optional, for serving)
Cheese adds richness. Nutritional yeast can be a great vegan option.
Step-by-Step Instructions
Preparation Steps
1. Start by gathering all your ingredients. This keeps the process smooth.
2. Rinse the cooked white beans in cold water. Drain them well.
3. Dice the onion finely. This helps it cook evenly.
4. Mince the garlic. Fresh garlic gives the best taste.
5. Peel and dice the carrots into small pieces.
6. Chop the celery into small bits. This adds crunch to the soup.
7. Wash and chop the kale. Remove the tough stems for tenderness.
Cooking Process
1. Heat the olive oil in a large pot over medium heat.
2. When the oil shimmers, add the onion. Stir and cook for 3-4 minutes until soft.
3. Next, add the garlic, carrots, and celery. Sauté for 5 minutes. Stir often for even cooking.
4. Add the drained beans, vegetable broth, diced tomatoes, thyme, rosemary, and red pepper flakes.
5. Season with sea salt and black pepper. Stir to mix all the flavors.
6. Increase heat to bring the soup to a gentle boil. This helps blend the flavors.
7. Reduce heat to low. Simmer uncovered for 20-25 minutes. Stir occasionally for best results.
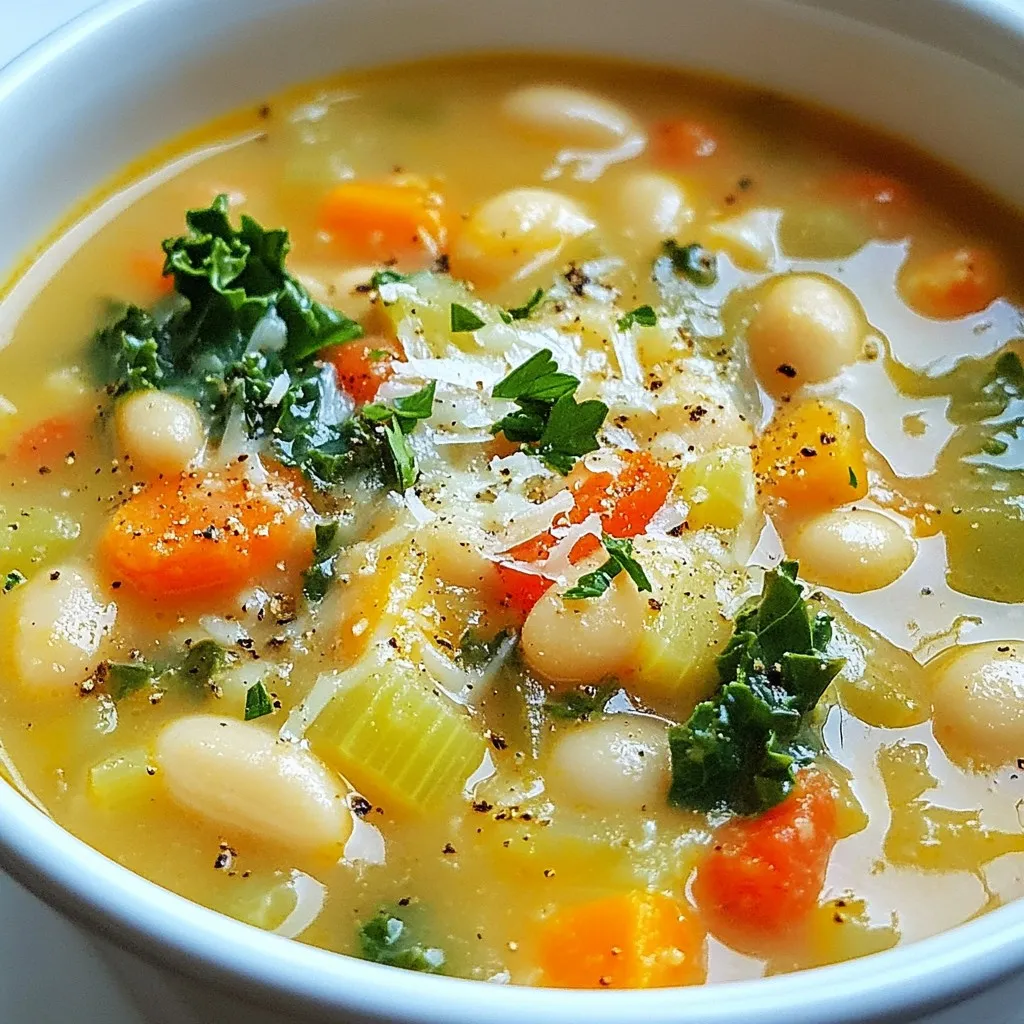
8. Five minutes before serving, stir in the chopped kale. This keeps it bright and fresh.
Final Touches
1. Taste the soup. Adjust seasoning as needed. More salt or pepper can enhance the flavor.
2. Ladle the soup into bowls. Garnish with chopped parsley for freshness.
3. If you like, add grated Parmesan cheese on top for extra richness.
4. Serve with a slice of crusty bread. This is perfect for dipping in the soup.
5. Consider drizzling a little olive oil on top for added flavor. Enjoy your meal!
Tips & Tricks
Flavor Enhancements
To make your Tuscan white bean soup even tastier, consider these tips:
– Fresh Herbs: Use fresh thyme and rosemary instead of dried. They pack a punch of flavor.
– Spices: Add a pinch of smoked paprika for a smoky note. It pairs well with the beans.
– Umami Boost: Stir in a spoonful of tomato paste for added depth. This makes the soup richer.
– Texture: Blend part of the soup for creaminess. This gives a lovely mouthfeel.
Cooking Methods
You can easily adapt this soup for different cooking tools:
– Slow Cooker: Sauté your veggies first, then add everything to the slow cooker. Cook on low for 6-8 hours.
– Instant Pot: Use the sauté function for the veggies. Then, add all ingredients and cook on high for 15 minutes. Let it naturally release.
– Bean Variations: If you use dried beans, soak them overnight. Adjust cooking times based on the type of bean used.
Serving Suggestions
Serve your Tuscan white bean soup with these ideas:
– Accompaniments: A slice of crusty bread works great. It’s perfect for dipping.
– Side Dishes: Pair with a light salad or roasted veggies for balance.
– Presentation: Ladle the soup into bowls and sprinkle fresh parsley on top. Add a drizzle of olive oil for a beautiful finish.
Pro Tips
- Use Dry Beans for Extra Flavor: Soaking and cooking your own beans from dry can enhance the flavor and texture of the soup.
- Customize Your Greens: Feel free to substitute kale with other greens like spinach or Swiss chard, depending on your preference.
- Make it a Meal: Add some cooked pasta or quinoa to the soup for a heartier version that can serve as a complete meal.
- Store for Later: This soup keeps well in the fridge for up to 5 days, and the flavors will deepen over time, making it even more delicious!
Variations
Vegan and Vegetarian Options
You can easily make this soup vegan or vegetarian. To do this, simply skip the Parmesan cheese. For a creamy texture, blend a portion of the soup. This gives a rich taste without dairy. If you want more protein, add chickpeas or lentils. Both options work well and boost nutrition.
Ingredient Swaps
Feel free to get creative with veggies! You can use zucchini, spinach, or bell peppers. They add color and flavor. For broth, a mushroom or chicken broth can enhance the taste. If you don’t have white beans, kidney or black beans are great substitutes.
Regional Twists
Tuscan White Bean Soup has roots in Italy but can change based on where you are. In some parts of Italy, they add pancetta for a smoky flavor. You can also mix in spices from other cuisines, like cumin or turmeric, for a unique twist. This soup is versatile and can reflect your culinary adventures!
Storage Info
Refrigeration Guidelines
Store any leftover Tuscan white bean soup in an airtight container. This keeps the soup fresh and tasty. It lasts in the fridge for about 3 to 4 days. When you want to eat it again, simply pull it out and reheat.
Freezing Instructions
You can freeze this soup for later! Use a freezer-safe container or bag. Make sure to leave some space at the top, as the soup will expand when frozen. It stays good in the freezer for about 3 months. To keep the texture nice, freeze the soup without the kale. Add fresh kale when you reheat it.
Reheating Tips
The best way to reheat this soup is on the stove. Pour the soup into a pot and heat over low to medium heat. Stir often to avoid sticking. If the soup seems too thick, add a splash of broth or water. Watch out for burning at the bottom. You can also reheat it in the microwave. Just use a microwave-safe bowl and cover it loosely. Heat in short bursts and stir in between. Enjoy it warm and flavorful!
FAQs
Common Questions
What beans can be used in Tuscan White Bean Soup?
You can use cannellini beans or navy beans. Both types add a creamy texture. If you want, you can try other white beans too. Just make sure they are cooked before adding them to the soup.
How can I make this soup spicier?
To spice it up, add more red pepper flakes. You can also add a chopped jalapeño or some hot sauce. Start with a little and taste as you go. This way, you can find the right heat for your taste.
Nutritional Info
Overview of health benefits
Tuscan White Bean Soup is packed with good nutrients. Beans are high in protein and fiber, which help keep you full. The vegetables add vitamins and minerals, making this soup a healthy choice. Kale provides antioxidants, which are great for your health.
Calorie count and serving size considerations
One serving of this soup has about 200 calories. This can change based on how much olive oil or cheese you add. A serving size is about one and a half cups. If you want a bigger meal, serve it with bread or a salad.
Serving Size and Adjustments
How to scale the recipe for larger groups
To serve more people, double or triple the ingredients. Keep the same cooking steps. Just use a bigger pot to fit everything. This soup also tastes great as leftovers, so it’s a good choice for meal prep.
Adjusting cooking times based on serving size
If you make a larger batch, the cooking time will stay about the same. Just make sure to keep an eye on it. You want the vegetables to be soft but not mushy. Stir occasionally and check for flavor as it simmers.
This blog post covered the key ingredients and steps to make a great Tuscan White Bean Soup. You learned about ingredient swaps and cooking methods for different diets. I shared tips for enhancing flavors and serving suggestions that will impress anyone. Proper storage and reheating tips ensure your soup tastes fresh later.
Embrace this recipe as a canvas for creativity. Enjoy making this soup your own while sharing it with loved ones. Happy cookin

Tuscan White Bean Soup
Ingredients
- 2 cups cooked white beans (cannellini or navy), drained
- 1 tablespoon extra virgin olive oil
- 1 large onion, finely diced
- 2 cloves garlic, finely minced
- 2 medium carrots, peeled and diced
- 2 stalks celery, diced
- 4 cups vegetable broth, low-sodium preferred
- 1 can (14 oz) diced tomatoes, including juices
- 1 teaspoon dried thyme
- 1 teaspoon dried rosemary
- 1 teaspoon red pepper flakes
- to taste sea salt and freshly ground black pepper
- 2 cups fresh kale, stems removed and chopped
- for garnish fresh parsley, finely chopped
- optional grated Parmesan cheese, for serving
Instructions
- Heat the extra virgin olive oil in a large pot over medium heat.
- Once the oil is shimmering, add the finely diced onion and sauté for approximately 3-4 minutes, or until the onion becomes soft and translucent.
- Next, incorporate the minced garlic, diced carrots, and diced celery into the pot. Continue to sauté for an additional 5 minutes, stirring occasionally, until the vegetables begin to soften.
- Add the drained white beans, vegetable broth, diced tomatoes (with their juices), dried thyme, dried rosemary, and red pepper flakes to the pot. Season generously with sea salt and freshly ground black pepper.
- Increase the heat and bring the soup to a gentle boil. Once boiling, reduce the heat to low and allow the soup to simmer uncovered for 20-25 minutes, stirring occasionally, to let the flavors meld beautifully.
- About 5 minutes before serving, add the chopped kale to the pot. Stir until the kale is wilted and tender, integrating it evenly throughout the soup.
- Taste the soup and adjust the seasoning with more salt or pepper, if needed, to ensure a well-rounded flavor.
- Ladle the hot soup into bowls, garnishing each bowl with a sprinkle of finely chopped fresh parsley and, if desired, a generous handful of grated Parmesan cheese.
![To make the Spicy Sriracha Noodles, gather these ingredients: - 8 oz rice noodles - 2 tablespoons Sriracha sauce - 1 tablespoon soy sauce - 1 tablespoon sesame oil - 1 red bell pepper, thinly sliced - 1 cup snap peas, trimmed - 3 green onions, finely chopped - 2 cloves garlic, minced - 1 tablespoon fresh ginger, grated - ½ cup fresh cilantro, roughly chopped - Juice of 1 lime - Salt to taste - Sesame seeds for garnish This recipe serves about 2 to 3 people. Each serving contains: - Calories: Approximately 350 - Protein: 10g - Carbohydrates: 55g - Fats: 12g - Fiber: 5g These noodles are a great choice for a quick, flavorful meal. They balance carbs and protein while being low in calories. You can customize this recipe easily. Here are some swaps: - Rice noodles: Use whole grain or egg noodles if you prefer. - Sriracha sauce: Try chili paste or hot sauce for a different heat. - Soy sauce: Use tamari for a gluten-free option. - Sesame oil: Olive oil or coconut oil can work too. - Red bell pepper: Any bell pepper or even carrots will add crunch. - Snap peas: You can swap these for green beans or broccoli. These substitutions keep your dish exciting while still delivering great flavor. For the full recipe, check out the complete guide. Start by boiling water in a large pot. Add the rice noodles and cook them for about 4-6 minutes, or until they are soft but still firm. Drain the noodles and rinse them with cold water. This stops the cooking process and keeps them from getting sticky. Set them aside to cool. Grab a large skillet or wok and pour in the sesame oil. Heat it on medium until it shimmers. Add minced garlic and grated ginger, stirring for about 30 seconds. The smell should make your mouth water! This step adds a tasty base to your noodles. Now, toss in the sliced red bell pepper and snap peas. Stir-fry these veggies for about 3-4 minutes. They should be bright and slightly tender. In a small bowl, mix Sriracha, soy sauce, and lime juice. Pour this sauce over the veggies, stirring well. Then, gently fold in the cooked noodles, making sure everything is coated evenly. Season with salt to taste. Stir-fry for another 1-2 minutes. Finally, add chopped green onions and cilantro for a fresh kick. Serve your spicy Sriracha noodles hot, garnished with sesame seeds from the recipe provided! To get the best texture for your noodles, cook them until they are al dente. This means they should be firm to the bite. Follow the package instructions closely. After cooking, drain and rinse them with cold water. This stops the cooking process and keeps them from getting too soft. Want to adjust the spice? You can! Add more Sriracha for a hotter dish. If you prefer it milder, use less Sriracha or mix in a little soy sauce. You can also add sugar to balance the heat. Taste as you go to find your perfect level of spice. Garnishing makes your dish pop! Use fresh cilantro and green onions for color. A sprinkle of sesame seeds adds a nice crunch too. You can also add lime wedges on the side. This gives a fresh touch and looks great on the plate. Serve your noodles hot to enjoy all the flavors! {{image_4}} You can add proteins to your spicy Sriracha noodles for extra flavor and nutrition. Tofu is a great choice for a vegetarian option. Cut firm tofu into small cubes, then sauté it until golden. Add it to the noodles at the end for a satisfying bite. If you like chicken, use thinly sliced breast. Cook it in the skillet before the veggies. Shrimp is another tasty option. Toss it in after the veggies cook. Shrimp only takes a few minutes to cook. This way, you get a quick and hearty meal. Feel free to swap in different vegetables for variety. Zucchini adds a nice crunch. Slice it into thin rounds and add it to the skillet with the bell pepper. Broccoli is another great option. Cut it into small florets and steam it slightly before adding to your dish. This keeps it bright and tender. You can mix and match any veggies you have. Spinach, carrots, or bell peppers work well too. The more colors, the better your dish looks and tastes. Making this dish vegetarian or vegan is easy. Just use vegetable broth instead of chicken broth. You can also swap out the honey or sugar for maple syrup. Many store-bought Sriracha sauces are vegan, but check the label. You want to keep the flavors bold and spicy while ensuring it fits your diet. Try adding more herbs or spices, like basil or cilantro, for extra depth. The main goal is to keep it fresh and flavorful. This dish can fit any diet with simple swaps. For the full recipe, check above. After enjoying your spicy Sriracha noodles, store any leftovers in an airtight container. Make sure to let them cool first. This helps keep the noodles fresh and tasty. Refrigerate them right away. They will stay good for up to three days. If you want to enjoy them later, it’s best to eat them within this time frame. When you’re ready to eat your leftovers, there are a few ways to reheat them. You can use a microwave or a skillet. For the microwave, place the noodles in a bowl. Add a splash of water to keep them moist. Heat them for about 1-2 minutes, stirring halfway through. If you choose the skillet, warm it over medium heat. Add a little oil and toss the noodles until they are hot. This method helps keep the texture nice. You can freeze these noodles if you want to save them for later. First, let them cool completely. Then pack them in a freezer-safe container or bag. Make sure to remove as much air as possible. The noodles can last up to two months in the freezer. When you’re ready to eat, thaw them in the fridge overnight. Reheat as mentioned above. This way, you can enjoy your spicy Sriracha noodles even after some time. For the full recipe, check out the previous section. You can easily make Spicy Sriracha Noodles vegetarian. Just skip any meat or seafood. Use vegetables like bell peppers, snap peas, and carrots. You can also add tofu for extra protein. Tofu soaks up the sauce well and adds a nice texture. Make sure to use soy sauce that is vegetarian to keep it meat-free. These noodles pair well with many sides. You could serve a light salad, like a cucumber salad, for a refreshing crunch. Spring rolls or dumplings also make great sides. You can also try some grilled veggies for a hearty touch. If you want something warm, a bowl of miso soup works wonderfully too. Yes, you can use different types of noodles. Rice noodles are great, but you can try egg noodles or udon noodles too. Each type will bring its own flavor and texture. Just cook them according to the package instructions. For the best results, pick a noodle that absorbs the sauce well. Check the [Full Recipe] for cooking tips. In this blog post, we explored key steps to make delicious spicy Sriracha noodles. We discussed ingredients, including nutritional info and possible swaps. You learned how to cook the noodles and sauté the aromatics for great flavor. Tips helped you achieve the perfect texture and customize spice levels. You can even add proteins or veggies for extra variety. Now, you can enjoy a tasty meal that fits your taste and needs. Happy cooking!](https://joymealplan.com/wp-content/uploads/2025/06/8df2442a-c8e4-418c-8d77-15c525c42243-768x768.webp)
![- 1 pound boneless, skinless chicken breasts - Marinade: 1 cup buttermilk - Breading elements: 1 cup panko breadcrumbs, 1/2 cup all-purpose flour - Seasonings: 1 teaspoon garlic powder, 1 teaspoon onion powder, 1 teaspoon smoked paprika, 1/2 teaspoon salt, 1/2 teaspoon black pepper, 1/4 teaspoon cayenne pepper (optional) - Cooking oil: 2 tablespoons extra virgin olive oil - Garnish: Fresh parsley, finely chopped I love using fresh, simple ingredients for my crispy baked chicken tenders. The chicken breasts are the star here. I always choose boneless and skinless for easy handling. This keeps them juicy and tender. For the marinade, I use buttermilk. It helps to make the chicken soft and adds great flavor. Soak the chicken for at least 30 minutes. You can go up to two hours for the best taste. Next comes the breading. I prefer panko breadcrumbs because they give the best crunch. The all-purpose flour helps the breadcrumbs stick. Mixing garlic powder, onion powder, smoked paprika, salt, and pepper adds a nice depth of flavor. I add cayenne pepper for those who like a bit of heat. It’s optional, but it gives a great kick. Finally, a drizzle of extra virgin olive oil helps the tenders bake to a golden brown. You can finish with fresh parsley for a pop of color. Want the full recipe? Check out the [Full Recipe]. It’s a delicious way to enjoy chicken! First, set your oven to 425°F (220°C). While it heats up, grab a baking sheet. Line it with parchment paper. This will help the chicken not stick. It also makes cleanup easy. Take a big bowl and pour in the buttermilk. Add the chicken strips. Make sure they are all covered. Cover the bowl with plastic wrap. Let it sit for at least 30 minutes. For even more flavor, you can marinate it for up to 2 hours in the fridge. In another shallow dish, mix the flour, garlic powder, onion powder, smoked paprika, salt, black pepper, and cayenne pepper. Whisk it well. In a separate bowl, place the panko breadcrumbs. This is what will give your chicken that crunchy outside. After marinating, take the chicken out of the buttermilk. Let the excess drip off. Next, coat each piece in the flour mixture. Make sure each strip is covered. Gently shake off the extra flour. For extra crunch, dip the chicken back into the buttermilk. Then, roll it in the panko breadcrumbs. Press down a bit to help the crumbs stick. Arrange the coated chicken on the lined baking sheet. Drizzle a little olive oil on top. This helps it get golden brown. Bake the chicken for 20-25 minutes. Check with a meat thermometer. It should reach 165°F (75°C). Once the chicken is baked, take it out of the oven. Let it rest for about 5 minutes. This helps keep the juices in. Finally, garnish with fresh parsley. It adds a nice touch. Serve hot with your favorite sauces. Don't forget to check the Full Recipe for all the details! For the crispiest chicken tenders, use panko breadcrumbs. Panko adds a light and airy crunch that regular breadcrumbs can't match. Their larger flakes create a wonderful texture. To take it up a notch, use the double-dipping technique. First, coat the chicken in flour, then dip it back into the buttermilk before rolling it in panko. This extra layer of breading will give you an amazing crunch. To make your chicken tenders more flavorful, add spices to the breading mix. Garlic powder, onion powder, and smoked paprika all work great. Feel free to adjust the amounts to fit your taste. You can also try different marinades. A simple mix of lemon juice and herbs can change the flavor profile entirely. Experiment with your favorites to find the perfect taste. If you want a healthier option, consider using an air fryer. It cooks the chicken tenders with less oil while still keeping them crispy. Adjust the cooking time to about 12-15 minutes at 400°F (200°C). Another great tip is to place the chicken tenders on a wire rack. This allows hot air to circulate around the tenders, leading to even cooking and a crispier finish. {{image_4}} You can easily change the flavor of your chicken tenders. Here are two fun ideas: - Lemon pepper chicken tenders: Add lemon zest and black pepper to the flour mix. This gives a bright and zesty taste that wakes up your meal. - BBQ chicken tenders: Brush the tenders with your favorite BBQ sauce before baking. This adds a sweet and tangy flavor that kids love. If you have dietary needs, you can still enjoy these tenders: - Gluten-free options: Use gluten-free breadcrumbs instead of regular. This way, everyone can enjoy the meal without any worry. - Low-carb alternatives: Swap regular flour with almond flour or coconut flour. Both options give you a nice crunch while keeping carbs low. Pair your chicken tenders with tasty sides and dips: - Suggested dipping sauces: Try ranch dressing, honey mustard, or spicy sriracha. Each adds a unique kick to your tenders. - Side dish pairings: Serve them with a fresh salad, crispy fries, or steamed veggies. These sides complete your meal and add more nutrition. For more ideas, check out the Full Recipe to explore different flavors and tips! To keep your chicken tenders fresh, store them right. First, let the cooked tenders cool. Then, place them in an airtight container. You can store them in the fridge for up to three days. If you want to keep them longer, freezing is a great option. Use containers that seal tightly. Glass or plastic containers work well. If you use plastic wrap, make sure it hugs the tenders closely. This way, they won’t dry out. When you want to enjoy your leftovers, reheating is key. The best way to keep them crispy is to use the oven. Preheat your oven to 375°F (190°C) and bake for about 10 to 15 minutes. This method makes the chicken hot and crispy again. You can also use an air fryer. Set it to 375°F (190°C) and heat for about 5 to 7 minutes. This method is quick and gives great results. You can freeze both uncooked and cooked chicken tenders. For uncooked tenders, place them on a baking sheet to freeze individually first. Once they are frozen, transfer them to a freezer bag. This keeps them from sticking together. For cooked tenders, let them cool, then store them in an airtight container. They can last up to three months in the freezer. When you are ready to eat, just reheat them as mentioned earlier. For more detailed cooking methods, check the Full Recipe. Bake chicken tenders for 20 to 25 minutes at 425°F. This time gives them a golden color and keeps them juicy. Always check their internal temperature; it should reach 165°F for safety. Yes, you can make these chicken tenders ahead of time. Prepare them fully and store them in the fridge for up to 24 hours. When you're ready to eat, just pop them in the oven to reheat. This way, you save time while still enjoying a tasty meal. If you don't have buttermilk, use regular milk with a splash of vinegar or lemon juice. Let it sit for about five minutes. This method mimics buttermilk's acidity and helps tenderize the chicken just as well. Check chicken tenders with a meat thermometer. They are done when they hit 165°F inside. If you don’t have a thermometer, cut one open. The meat should be white, not pink, and the juices should run clear. Yes, chicken thighs work well in this recipe. They are more flavorful and juicy than breasts. Just cut them into strips like you would with the chicken breasts. The cooking time may be similar, so keep an eye on them. Crispy baked chicken tenders are easy and tasty. You start with simple ingredients, like chicken, buttermilk, and spices. The steps are clear, from marinating to baking. I shared tips for extra crunch and tasty flavors. Finally, you can personalize these tenders with countless variations and sides. Whether it's for a family dinner or meal prep, these tenders will impress. Enjoy making them and exploring your options!](https://joymealplan.com/wp-content/uploads/2025/06/4bfc5954-182f-42e7-9a90-e67bfbd9568b-768x768.webp)
![- 12 oz pasta (penne, fusilli, or preferred variety) - 2 large red bell peppers - 1 cup raw cashews (soaked in water) - 1 tablespoon olive oil - 3 cloves garlic, minced - 1 cup vegetable broth - 1 tablespoon nutritional yeast - 1 tablespoon freshly squeezed lemon juice - Salt and pepper to taste - Fresh basil leaves for garnish For this vegan creamy roasted red pepper pasta, I love using red bell peppers. They bring sweetness and a lovely color. Start with 12 ounces of your favorite pasta. I prefer penne or fusilli, but any shape you like works. Next, grab two large red bell peppers. These will be roasted to bring out their flavor. Don’t forget the cashews! Use one cup of raw cashews. Soak them in water for at least two hours. This step makes them creamy when blended. Now, let’s talk about the extra ingredients. You’ll need one tablespoon of olive oil for cooking. Garlic adds great taste, so use three cloves, minced. For a nice base, use one cup of vegetable broth. We also need one tablespoon of nutritional yeast for a cheesy flavor. Add one tablespoon of freshly squeezed lemon juice to brighten the sauce. Season with salt and pepper to taste. Finally, fresh basil leaves will make a beautiful garnish. This recipe is easy to follow and packed with flavor. Check out the Full Recipe for more details and instructions! - Preheat your oven to 425°F (220°C). - Slice the red bell peppers in half and remove seeds and stems. - Place them cut side down on a baking sheet. - Roast for 20-25 minutes until the skins blister and char. - Let the peppers cool for a few minutes. - Peel off the skins and chop the peppers into small pieces. - In a large pot, bring salted water to a boil. - Add your pasta and cook until al dente, following package instructions. - Before draining, reserve about 1 cup of the pasta water. - Drain the pasta and set it aside for later. - In a blender, add the roasted peppers, soaked cashews, and garlic. - Pour in the vegetable broth, nutritional yeast, and lemon juice. - Season with a pinch of salt and pepper. - Blend until smooth and creamy, scraping the sides if needed. - Adjust the sauce consistency with reserved pasta water as desired. - Add the cooked pasta back into the pot. - Pour the creamy sauce over the pasta and mix well. - Gently heat the mixture on low for 2-3 minutes. - Taste and adjust seasoning with more salt and pepper if needed. This simple guide helps you create a delightful vegan creamy roasted red pepper pasta that bursts with flavor. For the complete recipe, check the [Full Recipe]. Enjoy cooking! To achieve perfect pasta texture, follow these simple steps. Always cook your pasta in salted water. This enhances flavor and ensures the pasta cooks evenly. Aim for al dente, which means firm to the bite. It should not be mushy. Reserve a cup of pasta water before draining. This water helps to adjust your sauce later. For roasting peppers effectively, preheat your oven to 425°F. Slice the red bell peppers in half and remove the seeds. Place them cut side down on a baking sheet. Roast them for about 20 to 25 minutes. You want the skins to blister and char lightly. This caramelizes their sugars and boosts sweetness. Adjusting seasoning is key for a balanced dish. Start with a pinch of salt and pepper, then taste your sauce. If it needs more flavor, add more salt or lemon juice. For creaminess, you can also add a splash of vegetable broth. Using fresh or dried herbs can elevate your dish. Fresh basil adds brightness. Dried oregano or thyme brings depth. Add these herbs during the blending process for a more integrated flavor. Garnishing can transform your dish. Fresh basil leaves add a pop of color and freshness. Sprinkle some nutritional yeast on top for a cheesy flavor. Crushed red pepper flakes can add a nice kick. For visual appeal, plate your pasta with care. Swirl the noodles for a nice shape. You can also arrange extra basil leaves artfully around the dish. Serve your Vegan Creamy Roasted Red Pepper Pasta hot for the best experience. Enjoy your meal! For the full recipe, check out the details above. {{image_4}} For the sauce base, you can swap the cashews with other nuts. Almonds or macadamia nuts work well. If you want a nut-free option, try using sunflower seeds. They blend into a creamy texture too. If you need gluten-free pasta, use brown rice pasta or chickpea pasta. Both these options taste great and keep the dish healthy. They also add a unique flavor to your pasta. You can make this dish even heartier by adding proteins. Chickpeas or lentils are great choices. They cook quickly and blend well with the sauce. Just stir them in after mixing the pasta with the sauce. If you prefer something meatier, try vegan sausage or tofu. Cook them separately, then mix in with the pasta. This adds a nice texture and extra flavor. This pasta pairs well with side salads or crusty bread. A simple green salad adds freshness and crunch. Garlic bread is a great choice to soak up the creamy sauce. For meal prep, store the pasta in airtight containers. You can make it ahead and reheat it for quick lunches. Just warm it gently on the stove or in the microwave. This dish stays delicious for days! For the full recipe, check out the complete guide. To store leftovers, let the pasta cool down first. Place it in an airtight container. This keeps it fresh for up to four days. When you want to eat it again, take out the amount you need. For reheating, I recommend using the stove. Add a splash of water or vegetable broth. Heat it gently over low heat. Stir often to avoid burning. You can also use the microwave. Just cover it and heat in short bursts. Stir in between to heat evenly. For freezing, I suggest separating the sauce from the pasta. Store the sauce in a freezer-safe container. It will last up to three months in the freezer. You can freeze the pasta too, but it may change texture. If you freeze it, store it in a separate bag. When you're ready to use, thaw the sauce in the fridge overnight. Reheat on the stove, adding a splash of broth if needed. For frozen pasta, boil it for a few minutes until warm. This keeps your vegan creamy roasted red pepper pasta delightful and fresh! For the full recipe, check out the previous sections. Yes, you can use different types of pasta. Here are some suggestions: - Penne: This shape holds sauce well. - Fusilli: The spirals trap sauce nicely. - Spaghetti: Classic choice that works with creamy sauces. - Gluten-free options: Look for rice or chickpea pasta. Feel free to choose your favorite! To add heat, try these tips: - Red pepper flakes: Sprinkle them in the sauce for a kick. - Cayenne pepper: Add a pinch to the blended sauce. - Hot sauce: Mix in your favorite brand to taste. These options let you control the spice level. No, this recipe contains cashews. However, you can make it nut-free. Here are some alternatives: - Sunflower seeds: They blend smoothly and add creaminess. - Pumpkin seeds: A great nut-free option with a slightly different flavor. - Silken tofu: This gives a creamy texture without nuts. These substitutes work well and keep the dish tasty. To make it nut-free, simply substitute the cashews. Here’s how: 1. Choose a nut-free base: Use sunflower seeds or silken tofu. 2. Blend the new ingredient: Just like the cashews, blend them smooth. 3. Adjust seasoning: You may need to tweak the flavors to balance the change. This way, you can enjoy the dish without nuts. For the full recipe, check out the details above. This blog covers a tasty, creamy pasta dish using roasted peppers and cashews. You learned about the ingredients, step-by-step cooking, and tips for best results. Variations give you flexibility with proteins and flavors. Plus, I shared easy storage methods for leftovers. Remember, cooking can be fun and creative! Try different ingredients to make it your own. Enjoy making this flavorful recipe and make it a family favorite. Your kitchen adventures await!](https://joymealplan.com/wp-content/uploads/2025/07/982ba21e-a058-40ff-b3d3-28c410105247-768x768.webp)