
Maple Glazed Carrots Simple and Tasty Side Dish

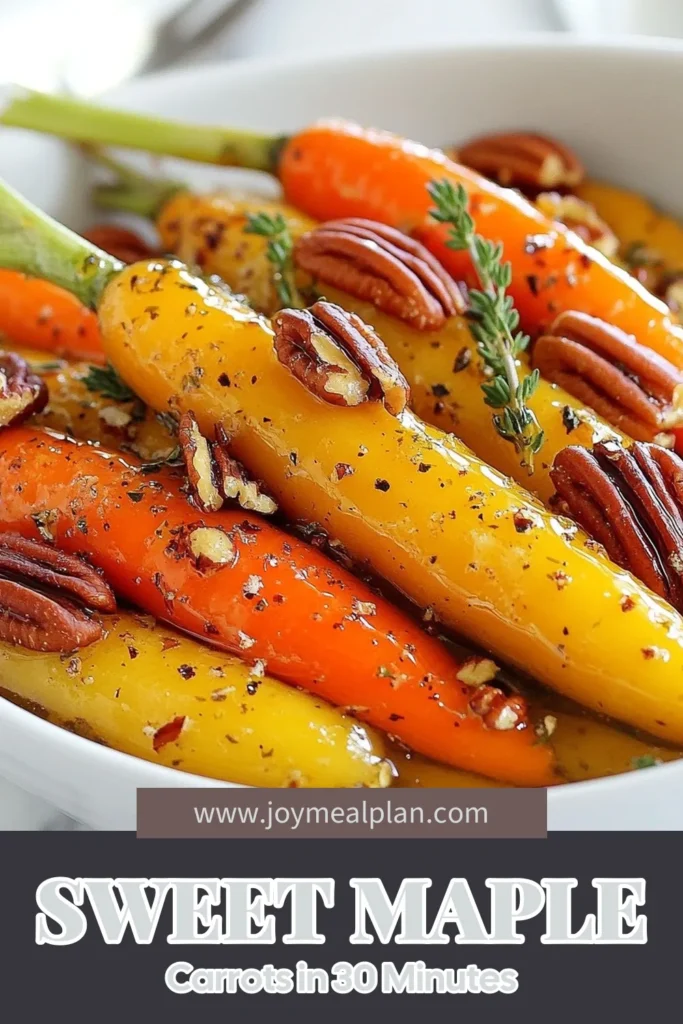
Are you looking for a simple yet delicious side dish? Maple glazed carrots are the perfect answer! They add a vibrant touch and a sweet flavor to any meal. In this post, I’ll share easy ingredients, step-by-step instructions, and tips to nail that perfect glaze. Whether you’re a novice or a seasoned cook, these carrots will be a hit at your table. Let’s get cooking!
Why I Love This Recipe
- Simple Preparation: This recipe requires minimal ingredients and steps, making it a quick and easy side dish for any meal.
- Deliciously Sweet: The combination of maple syrup and cinnamon gives the carrots a delightful sweetness that appeals to both kids and adults.
- Healthy Twist: Using baby carrots means you’re serving a nutritious vegetable dish packed with vitamins, while the glaze adds a gourmet touch.
- Versatile Side Dish: These sweet and sticky carrots complement a variety of main courses, making them a perfect addition to any dinner table.
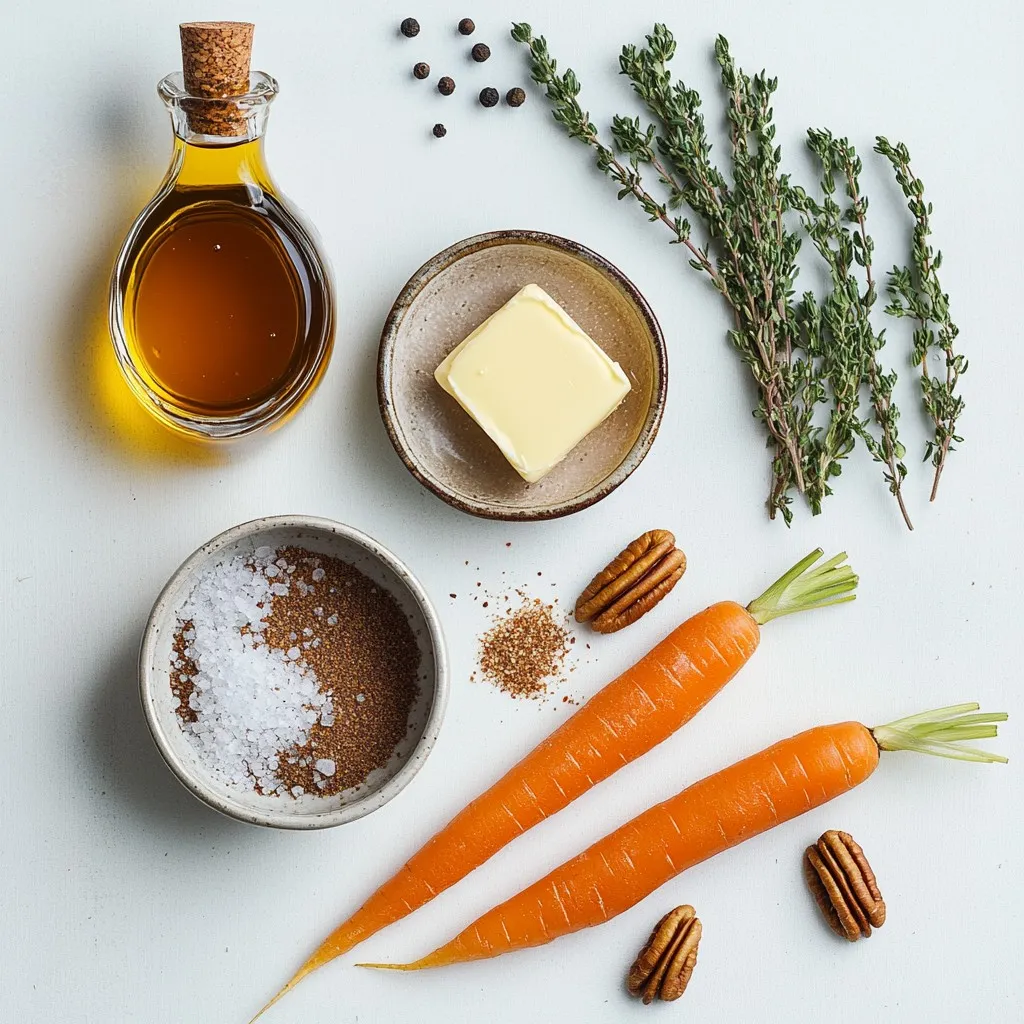
Ingredients
List of Ingredients
– 1 pound baby carrots, peeled
– 3 tablespoons pure maple syrup
– 2 tablespoons unsalted butter
– 1 tablespoon olive oil
– 1 teaspoon salt
– 1/2 teaspoon black pepper
– 1/2 teaspoon ground cinnamon
– 1 tablespoon fresh thyme leaves (or 1 teaspoon dried thyme)
– Optional: chopped pecans for garnish
Measurements and Substitutions
To make this dish, I use one pound of baby carrots. If you can’t find baby carrots, you can use regular carrots. Just slice them into 1/2-inch thick pieces. For the sweet glaze, pure maple syrup is key. You can try honey or agave syrup, but maple gives the best flavor. Use unsalted butter for a rich taste, but you can swap it with coconut oil for a dairy-free option. The thyme adds a nice earthy note, and fresh is best, but dried works too.
Tips for Choosing Carrots
When I pick carrots, I always look for bright, smooth skin. They should feel firm and not soft. Avoid carrots with dark spots or wrinkles. Fresh carrots have a sweet flavor and great crunch. If you can, buy organic carrots. They taste better and are often grown without chemicals.
Step-by-Step Instructions
Preparation of Carrots
Start by preparing your carrots. If you have whole carrots, slice them into diagonal pieces. Aim for about 1/2-inch thick slices. This helps them cook evenly. If you use baby carrots, simply peel them and leave them whole. The peeling step makes them nice and tender.
Mixing the Maple Glaze
Next, it’s time to mix the glaze. Grab a small microwave-safe bowl. Add the pure maple syrup, unsalted butter, and olive oil to the bowl. Then, sprinkle in the salt, black pepper, and ground cinnamon. Heat this mixture in the microwave for 20 to 30 seconds until the butter melts. Remove the bowl and stir until everything is well mixed. The glaze should look smooth and shiny.
Baking Process
Now, let’s bake those glazed carrots. Preheat your oven to 400°F (200°C). While it heats, place the prepared carrots into a large mixing bowl. Pour the maple glaze over the carrots. Toss them gently until every piece is covered in the sweet glaze.
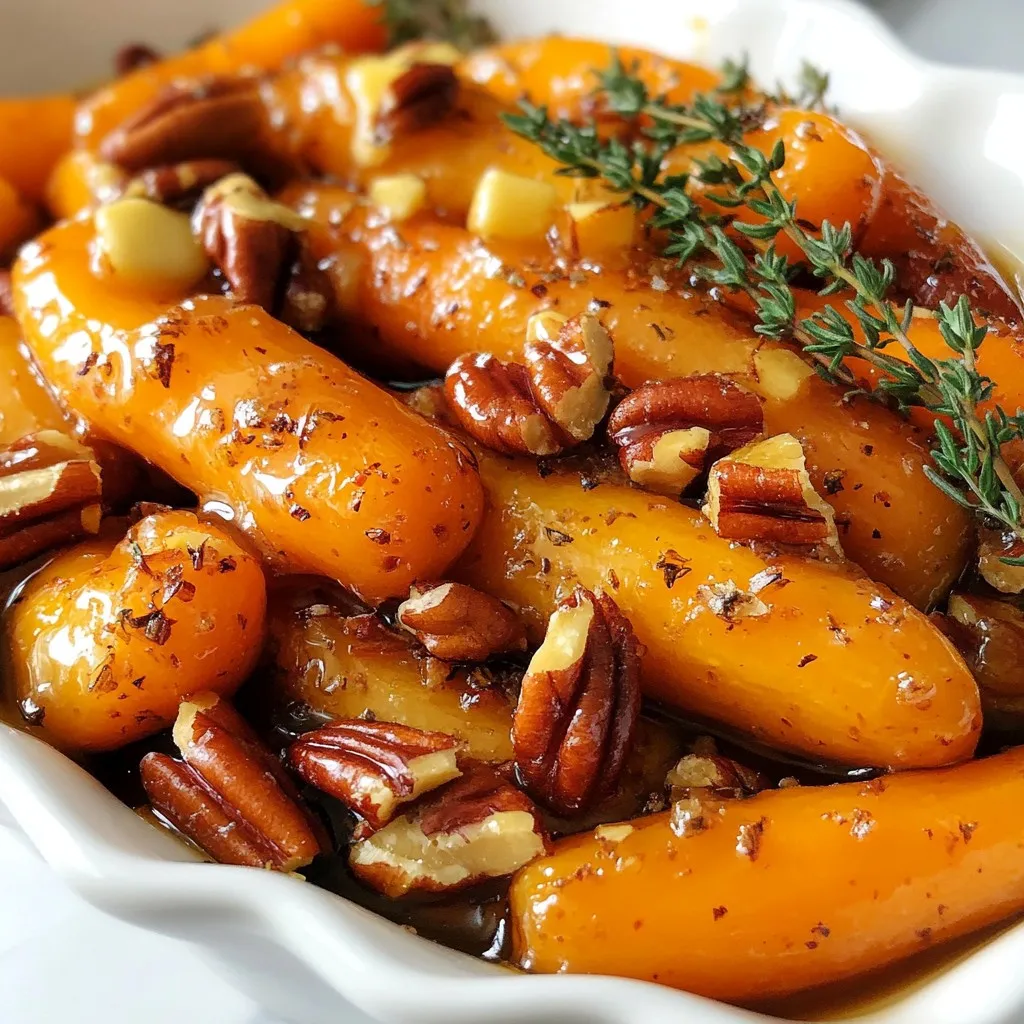
Transfer the carrots to a parchment-lined baking sheet. Spread them out in a single layer. This helps them roast nicely. Bake for 25 to 30 minutes. Halfway through, stir the carrots to ensure even cooking. They are done when they are tender and caramelized.
After baking, take the pan out of the oven. Sprinkle fresh thyme leaves over the carrots and toss gently to mix. Now they are ready to serve!
Tips & Tricks
How to Obtain Perfectly Glazed Carrots
To get the best glazed carrots, start with fresh baby carrots. They cook evenly and taste sweet. If you use whole carrots, cut them into 1/2-inch diagonal slices. This helps them cook faster. Preheat your oven to 400°F (200°C) so they roast well. Toss the carrots in the maple glaze until they are fully coated. Spread them out in a single layer on the baking sheet. This ensures they caramelize nicely and do not steam.
Adjusting Sweetness and Seasoning
If you want a sweeter flavor, add more maple syrup. Start with an extra half tablespoon. For a less sweet taste, reduce the syrup by one tablespoon. You can also play with spices. Try adding more cinnamon for warmth or a pinch of nutmeg for depth. Fresh herbs like thyme add great flavor, but feel free to swap them for rosemary or parsley. Taste as you go to find the right balance.
Common Mistakes to Avoid
One mistake is overcrowding the baking sheet. If the carrots are too close, they steam instead of roast. Another error is not stirring the carrots halfway through cooking. This helps them brown evenly. Make sure to check the carrots at 25 minutes. They should be tender and caramelized. If they are still firm, bake them for a few more minutes. Lastly, don’t skip the fresh herbs at the end. They add a burst of flavor that brightens the dish.
Pro Tips
- Use Fresh Herbs: Fresh thyme enhances the flavor of the carrots. If using dried thyme, add it earlier in the cooking process to allow the flavors to develop.
- Don’t Overcrowd the Pan: Make sure the carrots are in a single layer on the baking sheet. This promotes even roasting and caramelization.
- Adjust Sweetness: Feel free to adjust the amount of maple syrup based on your preference for sweetness. A little extra can enhance the glaze!
- Garnish for Texture: Chopped pecans not only add crunch but also complement the sweetness of the carrots. Toast them lightly for even more flavor.
Variations
Adding Different Herbs and Spices
You can change the flavor of your maple glazed carrots by adding herbs and spices. Fresh herbs like rosemary or parsley add a nice touch. You may also try spices like nutmeg or ginger for a warm flavor. Each herb or spice can change the dish’s taste, making it unique every time. Experiment with what you have at home to find your favorite mix.
Alternative Sweeteners
If you’re looking for a different sweetener, there are many options. Honey is a popular choice and adds a floral note. Brown sugar can also work well, giving a deeper flavor. Agave nectar is another sweetener that keeps the dish vegan. Each sweetener has its own taste, so feel free to swap it out based on what you enjoy.
Vegan and Vegetarian Swaps
This recipe is easy to adjust for vegan or vegetarian diets. Simply replace the unsalted butter with vegan butter or coconut oil. Both options will keep the rich taste of the dish. Ensure that all your other ingredients, like the maple syrup, are vegan-friendly. This way, you can enjoy the sweet and sticky goodness without missing out on dietary preferences.
Storage Info
How to Store Leftovers
To store your maple glazed carrots, let them cool first. Then, place them in an airtight container. You can keep them in the fridge for up to three days. Be sure to label the container with the date so you remember when you made them.
Reheating Instructions
When you’re ready to enjoy your leftovers, reheat them in a skillet. Add a splash of water to the pan to help steam the carrots. Heat on medium until warm, stirring gently. You can also use the microwave, but be careful not to overcook them.
Freezing Guidelines
If you want to freeze your glazed carrots, ensure they are fully cooled first. Place them in a freezer-safe bag, removing as much air as possible. They can last up to three months in the freezer. To eat, thaw in the fridge overnight and reheat as described above.
FAQs
Can I use frozen carrots for this recipe?
Yes, you can use frozen carrots. They cook faster than fresh ones. Just remember to thaw them first. Pat them dry to avoid excess moisture. This helps the glaze stick better. Frozen carrots may not be as crispy but will still taste great.
How do I make maple glaze thicker?
To thicken your maple glaze, heat it longer. Simmer it on low heat until it reduces. This way, it will become richer and stick better to the carrots. You can also add a small amount of cornstarch mixed with water. Whisk it in and heat until it thickens.
What dishes pair well with maple glazed carrots?
Maple glazed carrots go well with many dishes. They are great with roasted chicken or pork. You can also serve them alongside a hearty grain dish, like quinoa or rice. The sweetness of the carrots balances savory flavors. For a full meal, add a fresh salad for crunch.
This guide covered the key steps to make maple glazed carrots. You learned about important ingredients, cooking methods, and tips for the best results.
Think about adding your favorite herbs or sweeteners for a twist. Use these tips to avoid common mistakes and store leftovers properly. Enjoy great meals with your perfect glazed carrots. Now, you’re ready to impress everyone at your next mea
Sweet & Sticky Maple Glazed Carrots
Ingredients
- 1 pound baby carrots, peeled
- 3 tablespoons pure maple syrup
- 2 tablespoons unsalted butter
- 1 tablespoon olive oil
- 1 teaspoon salt
- 1/2 teaspoon black pepper
- 1/2 teaspoon ground cinnamon
- 1 tablespoon fresh thyme leaves (or 1 teaspoon dried thyme)
- to taste chopped pecans for garnish
Instructions
- Prepare the Carrots: If you are using whole carrots, slice them into diagonal pieces about 1/2-inch thick to ensure even cooking. For baby carrots, simply peel them and leave them whole.
- Preheat the Oven: Set your oven temperature to 400°F (200°C) and allow it to preheat fully before adding the carrots.
- Mix the Glaze: In a small microwave-safe bowl, combine the pure maple syrup, unsalted butter, olive oil, salt, black pepper, and ground cinnamon. Heat in the microwave for 20-30 seconds until the butter is melted. Remove from the microwave and stir the mixture until all the ingredients are well blended.
- Coat the Carrots: Place the prepared carrots into a large mixing bowl. Pour the maple glaze over the carrots and use a spatula or your hands to toss them until every carrot is evenly coated in the syrup mixture.
- Bake the Carrots: Transfer the glazed carrots to a parchment-lined baking sheet, ensuring they are spread out in a single layer for optimal roasting. Bake in your preheated oven for 25-30 minutes, stirring the carrots halfway through the cooking time, until they are tender and beautifully caramelized.
- Add Fresh Herbs: Once baked, take the baking sheet out of the oven. Sprinkle the fresh thyme leaves over the glazed carrots and give them a gentle toss to mix the flavors.
- Serve: Carefully transfer the sweet and sticky carrots to a serving dish. If you like, garnish with chopped pecans on top for an extra layer of crunch and flavor.
. - Preheat the oven to 400°F (200°C). - Line the sheet pan with parchment paper. - Whisk together olive oil, garlic, lemon juice, lemon zest, dill, salt, and pepper. - This mix adds flavor and moisture to your salmon. - Coat salmon fillets with the marinade. - Arrange cherry tomatoes and asparagus on the sheet pan. - Make sure the veggies are spread out for even cooking. - Transfer the pan to the oven and bake for 15-20 minutes. - The salmon will be done when it flakes easily with a fork. - Check that the asparagus is tender but still crisp. - Let the dish rest for a few minutes before serving. - Garnish with lemon slices and optional dill for a fresh look. I love how easy this dish is to prepare. You can find the Full Recipe for more details. To ensure salmon is perfectly cooked, use a fork to test it. When it flakes easily, it’s done. Aim for an internal temperature of 145°F. This way, your salmon will be moist and tender. Resting time is key after cooking. Let the salmon sit for about 5 minutes before serving. This helps the juices redistribute, making each bite more flavorful. Serving directly from the pan gives a cozy feel. It makes the meal feel more relaxed and invites everyone to dig in. For plating, use a large plate. Place a salmon fillet in the center. Arrange the asparagus and tomatoes around it. A touch of fresh dill on top adds color and flavor. To boost flavor, consider adding spices like paprika or smoked sea salt. Fresh herbs like basil or parsley can also work well. For marinades, try mixing honey with soy sauce for a sweet twist. You can also use a splash of white wine to elevate the dish. For the full recipe, check the links above. {{image_4}} You can easily swap salmon for other fish like trout or cod. These fish cook similarly and absorb flavors well. If you want a different protein, try chicken breasts. They work great too. For vegetarian or vegan options, use tofu or tempeh. Both can soak up the lemon garlic marinade and bring great taste. Using seasonal vegetables can brighten your dish. In spring, try green beans or baby carrots. Summer is perfect for zucchini or bell peppers. In fall, consider sweet potatoes or Brussels sprouts. Winter brings root vegetables like parsnips and turnips. If you want to switch out asparagus or tomatoes, don't hesitate. Broccoli or cauliflower can add nice crunch and flavor. Experimenting with herbs and spices opens new doors. Try fresh basil or parsley for a bright twist. If you want a bolder taste, use smoked paprika or cumin. You can also play with sweet and savory. Adding fruits like pineapple or peaches can bring a fun contrast to the dish. Mixing flavors can create a memorable meal! For the full recipe, check out the [Full Recipe]. Store any leftover salmon and veggies in the fridge. Use airtight containers to keep them fresh. Make sure the lid fits tightly. This helps maintain flavor and texture. It's best to eat leftovers within two days for the best taste. To reheat salmon, use low heat to avoid drying it out. You can use the oven or microwave. For the oven, set it to 350°F (175°C) and warm for about 10 minutes. If using the microwave, place salmon on a plate and cover it with a damp paper towel. Heat in short bursts of 30 seconds until warmed through. You can freeze cooked salmon and veggies for later. Wrap each piece tightly in plastic wrap, then place in a freezer bag. Be sure to remove as much air as possible. For thawing, move them to the fridge for a few hours or overnight. This keeps the salmon tasty and moist. How long to bake salmon at different temperatures? For salmon, the general rule is to bake it at 400°F for 15-20 minutes. If you choose 375°F, it may take 20-25 minutes. At 425°F, check it after 12-15 minutes. Cooking time varies with thickness and oven accuracy. Always check for doneness to avoid overcooking. Can I use frozen salmon for this recipe? Yes, you can use frozen salmon. Just be sure to thaw it first. Place it in the fridge overnight or use cold water for quicker thawing. Pat the salmon dry before adding the marinade. This helps it absorb the flavors better. What temperature should salmon be cooked to? Salmon should reach an internal temperature of 145°F. Use a meat thermometer to check. When done, it should flake easily with a fork. The color will change from bright pink to opaque. How can I tell when the salmon is done? You can tell salmon is ready when it flakes easily. Press it gently with a fork. If it breaks apart, it's done. The color should be a light pink with a slightly opaque appearance. What sides pair well with lemon garlic salmon? Great sides include rice, quinoa, or a fresh salad. Roasted potatoes or steamed veggies also work well. These sides complement the salmon's bright flavors. You might want to add a squeeze of lemon on top. Is it okay to substitute any ingredients? Yes, you can substitute ingredients. Use any firm fish if you don't have salmon. For veggies, try broccoli or zucchini. You can swap fresh herbs with dried ones, but use less. Adjust the flavors to suit your taste! For the complete recipe, check out the Full Recipe section. This blog post showed you how to make a delicious lemon garlic salmon dish. We covered the main ingredients, easy steps for cooking, and tips for great results. You learned about variations and storing leftovers for later. Cooking should be fun, and this recipe is simple and tasty. Try it out and enjoy your meal. Once you master this dish, feel free to experiment with your own flavors and sides. Happy cooking!](https://joymealplan.com/wp-content/uploads/2025/07/8e928ca0-d1e7-48e9-9001-0d995acac6dc-768x768.webp)
![To make the Pickle Ranch Pasta Bake, you need the following ingredients: - 8 ounces elbow macaroni - 1 cup dill pickles, chopped - 1 cup cooked chicken, shredded (optional for added protein) - 1 cup ranch dressing - 1 cup cheddar cheese, shredded - 1/2 cup cream cheese, softened - 1/2 teaspoon garlic powder - 1/2 teaspoon onion powder - 1/2 teaspoon black pepper - 1/2 cup breadcrumbs - Fresh dill for garnish (optional) These ingredients create a rich and fun dish. The elbow macaroni serves as the base, providing a nice bite. Dill pickles add a tangy crunch that surprises the taste buds. If you want more protein, shredded chicken works great. Ranch dressing brings a creamy flavor that ties it all together. Cream cheese makes it rich, while garlic and onion powders add depth. Shredded cheddar gives a gooey finish, and breadcrumbs add a crispy top. For garnish, fresh dill is a lovely touch. You can find the complete recipe in the Full Recipe section. - Preheat the oven to 350°F (175°C). - Cook the elbow macaroni until it is al dente. This means it should be firm but not hard. Follow the package directions for timing. After cooking, drain the pasta well and let it cool slightly. - In a mixing bowl, combine the softened cream cheese and ranch dressing. - Add garlic powder, onion powder, and black pepper. - Mix everything well until the sauce is smooth and creamy without any lumps. - In the bowl with the sauce, add the chopped dill pickles. If you want more protein, add shredded chicken too. - Gently fold in the cooked macaroni, ensuring all pieces are covered in sauce. - Grease a 9x13 inch baking dish with cooking spray or a bit of olive oil. - Pour the pasta mixture into the dish, spreading it out evenly. - Top it all with shredded cheddar cheese to create a nice, cheesy layer. - In a small bowl, mix the breadcrumbs with a tablespoon of olive oil until they are coated. - Sprinkle this breadcrumb mix over the cheese layer for a crunchy top. - Place the baking dish in your preheated oven and bake for 25-30 minutes. - Look for the cheese to be bubbly and the breadcrumbs to turn golden brown. Now you have a warm, hearty dish ready to serve. For more details, check the Full Recipe. To make your Pickle Ranch Pasta Bake shine, try different types of pickles. You can use sweet pickles for a fun twist or spicy ones for a kick. Each variety adds its unique taste. Always taste your dish as you cook. Adjust the seasoning to suit your preferences. More garlic powder? Add it! Need more zest? A touch of lemon juice can work wonders. For a creamier sauce, mix in a bit more cream cheese. This change makes the sauce rich and smooth. If you prefer a crunchy topping, add more breadcrumbs or even crushed potato chips. They will give the bake an exciting crunch that contrasts nicely with the soft pasta. Presentation matters! Serve the pasta bake right from the dish for a cozy look. For a pop of color, sprinkle fresh dill on top before serving. This not only looks good but also adds fresh flavor. Consider adding extra dill pickles on the side. They make a fun garnish and give guests a chance to customize their plates. For the full recipe, check out the [Full Recipe]. {{image_4}} You can switch out pasta types in this dish. Gluten-free pasta works well if you need it. You can also try whole wheat or penne for a twist. The dressing is flexible too. Use a ranch with herbs for more flavor. Different cheeses can change the taste. Try pepper jack or mozzarella for a new experience. This dish is fun because you can add more veggies or proteins. Bell peppers, spinach, or even corn can boost the flavor. You can add cooked bacon or sausage for extra heartiness. If you want a vegan option, use plant-based cream cheese and cheese. You can skip the chicken and still have a tasty meal. This pasta bake can fit many diets and tastes. To keep your Pickle Ranch Pasta Bake fresh, store leftovers in an airtight container. Place it in the fridge right after it cools. This helps keep it moist and tasty. Consume leftovers within three to four days for the best flavor. If you want to save some for later, freezing works great. First, let the pasta bake cool completely. Then, cut it into portions. Wrap each piece in plastic wrap, then place them in a freezer-safe bag. Label the bag with the date. It can last up to three months in the freezer. When it's time to enjoy your pasta bake again, you want it to taste just as good. The best way to reheat it is in the oven. Preheat your oven to 350°F (175°C). Place the portioned bake in a baking dish and cover it with foil. This keeps it from drying out. Heat for about 20 minutes or until it's warm throughout. If you're in a hurry, you can use a microwave. Place a piece on a microwave-safe plate. Cover it with a damp paper towel to keep moisture in. Heat on medium power for about two minutes. Check and stir if needed. Enjoy your delicious dish just like the first time! Yes, you can make this dish ahead of time. To do this, prepare the pasta and sauce as usual. Then, combine everything in the baking dish. Cover it tightly with foil or plastic wrap. You can store it in the fridge for up to 24 hours before baking. When you are ready to bake, remove the cover and heat your oven to 350°F (175°C). Bake for about 30 to 35 minutes. Check for bubbly cheese and a golden crust. This tip saves time during busy weeknights. Absolutely! The Pickle Ranch Pasta Bake is very kid-friendly. Kids often love the creamy texture and cheesy flavor. To make it even better for picky eaters, you can leave out the dill pickles. You might also want to reduce the ranch dressing. If your kids like it, you can try adding some cooked broccoli or peas. This adds color and nutrition without changing the taste too much. To add some heat, consider mixing in some diced jalapeños or crushed red pepper flakes. You can also use a spicy ranch dressing instead of the regular one. If you enjoy hot sauce, drizzle some over the top before baking. Just remember to taste as you go. This way, you can adjust the heat to your liking. Enjoy experimenting with flavors! This dish blends macaroni, ranch dressing, and pickles into a tasty bake. You can customize it with various ingredients and adjust flavors. For a creamy dish, mix the sauce well; for crunch, use more breadcrumbs. Store leftovers properly to enjoy later. You can make it ahead or cater to picky eaters with simple swaps. Overall, this recipe provides versatility and fun for your cooking adventures. Get creative and enjoy your delicious meal!](https://joymealplan.com/wp-content/uploads/2025/07/1b3a3990-0373-4e07-90bf-a46c97a9e002-768x768.webp)