
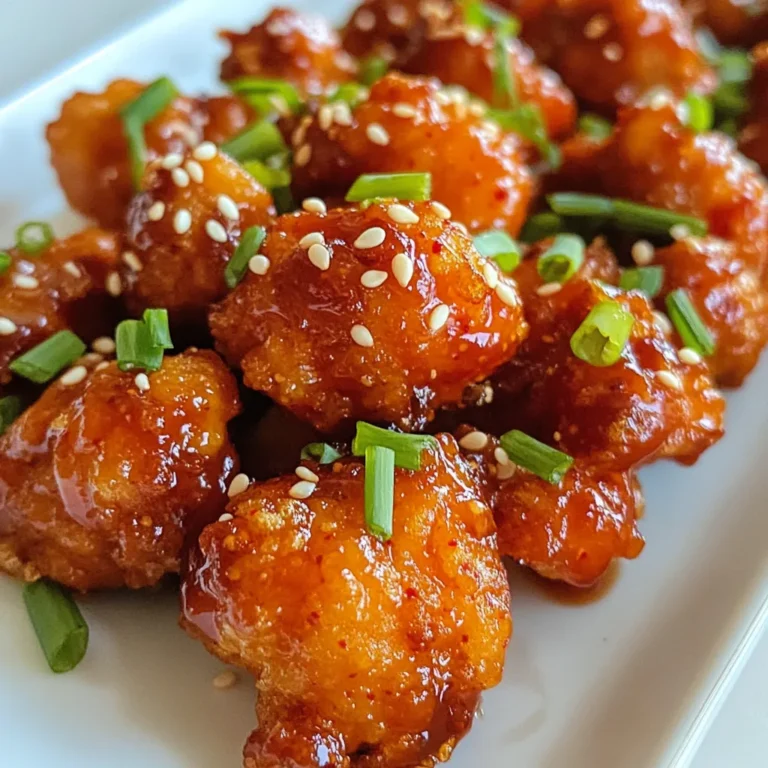
Crispy Air Fryer Chicken Tenders Easy Family Meal


Do you crave a quick and tasty meal? These crispy air fryer chicken tenders are your answer! You’ll find them easy to make and perfect for the whole family. I’ll share my secrets for marinating, breading, and cooking to get that golden crunch everyone loves. Say goodbye to fried grease—this method is healthier and still full of flavor. Let’s dive into this delicious recipe that’s sure to impress!
Why I Love This Recipe
- Flavorful Marinade: The buttermilk marinade infuses the chicken with incredible flavor and keeps it juicy.
- Crispy Texture: The combination of flour and panko breadcrumbs creates an irresistible crunch.
- Healthier Option: Air frying reduces the amount of oil used compared to traditional frying, making it a lighter choice.
- Quick and Easy: Ready in just over an hour, this recipe is perfect for a busy weeknight dinner.
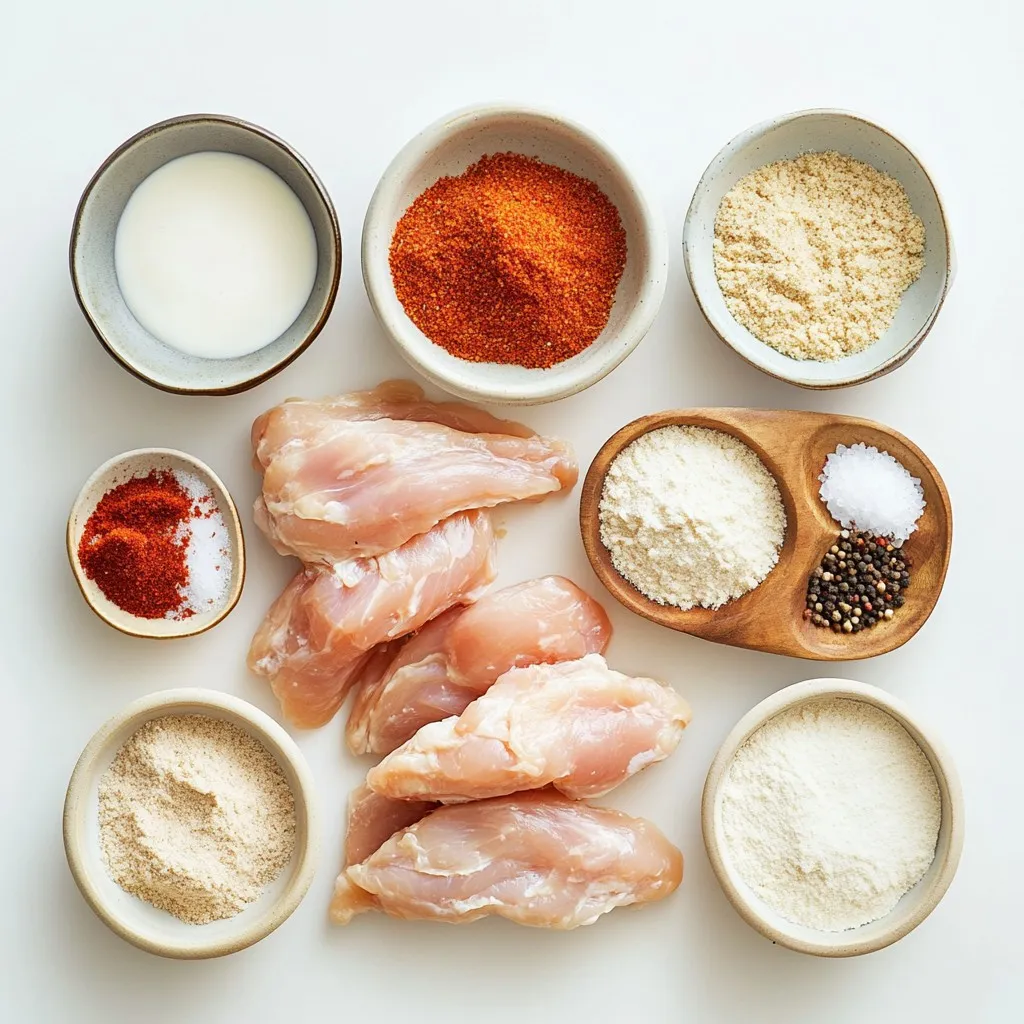
Ingredients
Main Ingredients
– 1 pound chicken tenderloins
– 1 cup buttermilk
– 1 teaspoon garlic powder
– 1 teaspoon onion powder
– 1 teaspoon smoked paprika
– 1 teaspoon kosher salt
– 1/2 teaspoon freshly cracked black pepper
– 1 cup all-purpose flour
– 1 cup panko breadcrumbs
– Cooking spray or olive oil spray
To make crispy air fryer chicken tenders, you need fresh chicken tenderloins. They are juicy and perfect for frying. Buttermilk is key for a tender and flavorful chicken.
The spices add depth. Garlic powder and onion powder bring savory notes. Smoked paprika gives a nice kick and color. Kosher salt enhances all the flavors, while black pepper adds a slight heat.
For the breading, all-purpose flour creates a base layer. Panko breadcrumbs add extra crunch. This makes the tenders crispy on the outside but soft inside.
Cooking Equipment
– Air fryer
– Mixing bowls
– Shallow dishes for breading
An air fryer is essential for this recipe. It cooks the chicken quickly and evenly. You will also need mixing bowls to prepare the marinade. Shallow dishes make breading easier and cleaner.
Using the right tools helps simplify the cooking process. With everything prepped, you can focus on making these crispy chicken tenders perfect for your family.
Step-by-Step Instructions
Prepare the Marinade
Start by whisking together the buttermilk, garlic powder, onion powder, smoked paprika, kosher salt, and black pepper in a large bowl. Make sure everything is mixed well. Marinating is key to great flavor. I recommend marinating the chicken for at least one hour. For even better taste, let it sit overnight.
Breading the Chicken
Set up your breading station with two shallow dishes. Pour flour in one dish and panko breadcrumbs in the other. This setup helps keep things neat. Next, take the chicken from the marinade, letting extra liquid drip off. Dip each tender into the flour first. Press gently to coat it well, then shake off any excess flour.
Now, return the floured chicken to the buttermilk. This step helps the panko stick better. Roll each tender in the panko breadcrumbs, pressing to make sure they stick. You want a nice, thick layer for the best crunch.
Air Frying
Before you start cooking, preheat the air fryer to 400°F (200°C) for about five minutes. This step ensures even cooking. Lightly spray the air fryer basket with cooking spray. Place the chicken tenders in a single layer. Make sure they aren’t touching each other.
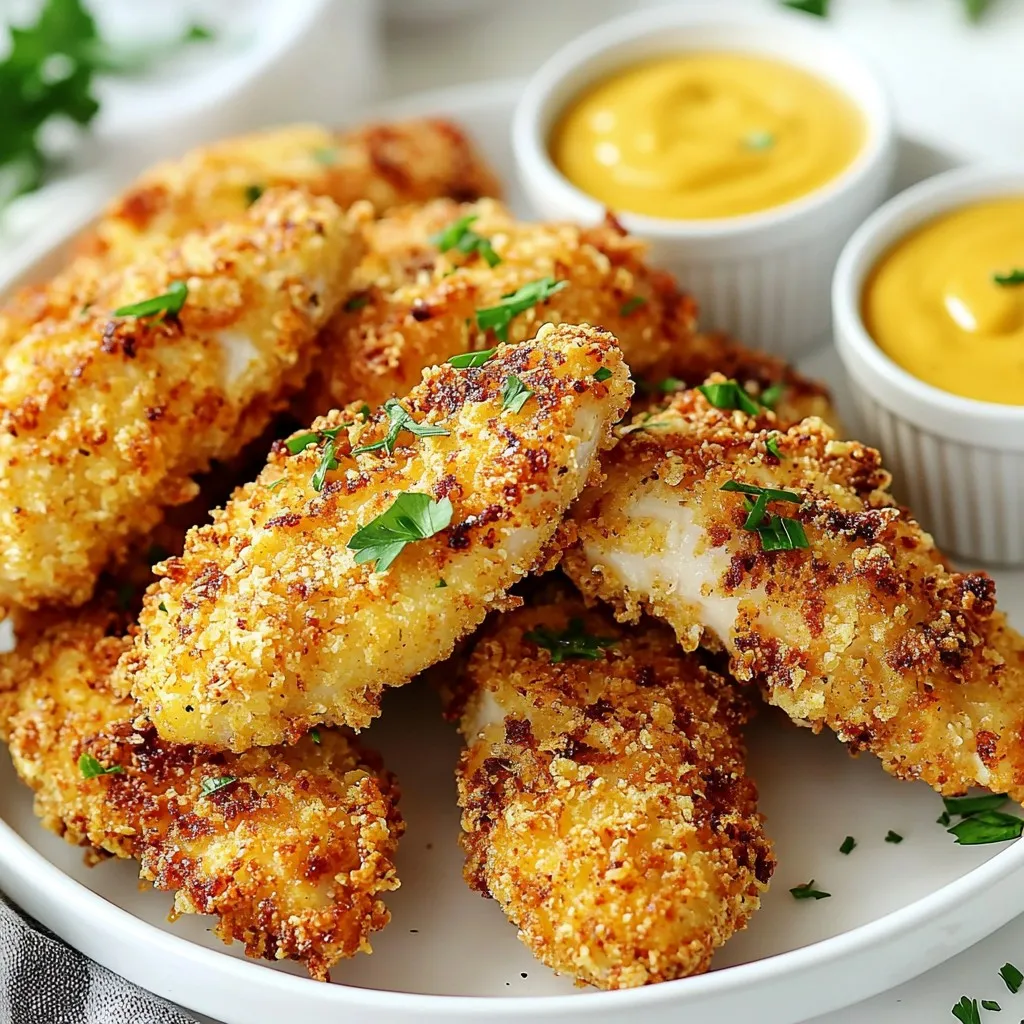
After you arrange the tenders, spray the tops lightly with cooking spray or olive oil. This gives them a golden color when cooked. Cook the chicken tenders for 10 to 12 minutes. Flip them halfway through to ensure they brown evenly. The chicken should be golden brown and reach an internal temperature of 165°F (75°C).
Tips & Tricks
Achieving Maximum Crispiness
To get the best crunch on your chicken tenders, use panko breadcrumbs. These are lighter and crispier than regular breadcrumbs. They create a great texture that everyone loves. A light misting of cooking spray or olive oil spray helps, too. This adds some moisture and encourages browning.
Best Practices for Marinating
Marinating overnight gives the chicken a deeper flavor. The longer you let it soak, the better it tastes. Make sure you coat each piece well. This ensures every bite is packed with flavor.
Serving Suggestions
For a fun presentation, serve your chicken tenders on a rustic wooden platter. You can also use a bright colored plate to make the dish pop. Pair the tenders with dips like honey mustard, ranch dressing, or BBQ sauce. A sprinkle of fresh parsley or chives adds a nice touch, too.
Pro Tips
- Marinate Longer for Flavor: For the best flavor, marinate the chicken tenders overnight. This allows the spices to penetrate deeply into the meat, resulting in a more flavorful bite.
- Use Panko for Extra Crunch: Panko breadcrumbs create a lighter and crunchier coating compared to regular breadcrumbs. Don’t skip this step for that satisfying crunch!
- Don’t Overcrowd the Basket: Cook the chicken tenders in a single layer without overlapping. Overcrowding can lead to uneven cooking and less crispiness.
- Check Temperature for Safety: Always use a meat thermometer to ensure the internal temperature of the chicken reaches 165°F (75°C) for safe consumption.
Variations
Flavor Enhancements
You can easily boost the flavor of your chicken tenders. Here are some ideas:
– Additional spices for a kick: Try adding cayenne pepper or chili powder for heat. You can also mix in some Italian seasoning for a herby twist.
– Marinating alternatives: Swap buttermilk for yogurt to add tang. Lemon juice can brighten the flavor, too.
Dietary Modifications
If you have dietary needs, don’t worry! You can make these tenders fit your diet:
– Gluten-free options: Use gluten-free flour and breadcrumbs. They still taste great and stay crispy!
– Substitutions for dairy-free: Use almond or coconut milk instead of buttermilk. There are dairy-free yogurt options, too.
Cooking Alternatives
If you want to try different cooking methods, here are a few:
– Oven-baking instructions: Preheat your oven to 425°F (220°C). Place the breaded tenders on a baking sheet. Bake for 15-20 minutes, flipping halfway.
– Pan-frying method: Heat oil in a skillet over medium heat. Add the tenders in batches and cook for 5-7 minutes on each side.
Storage Info
Storing Leftovers
To keep your chicken tenders fresh, place them in an airtight container. Refrigerate them right away. They stay tasty for about 3 days. Make sure they cool down before sealing. This helps avoid moisture build-up.
When reheating, the goal is to keep the crispiness. Use the air fryer or oven for this. Preheat the air fryer to 375°F. Heat for about 5 to 7 minutes. This method keeps the outside crunchy while warming the inside. You can also use a regular oven at 375°F for 10 minutes. Avoid the microwave, as it makes them soggy.
Freezing Chicken Tenders
You can freeze chicken tenders before or after cooking. If you freeze them raw, make sure to marinate first. Place them in a single layer on a baking sheet. Freeze until firm, then transfer to a freezer bag. This prevents them from sticking together.
If you freeze cooked tenders, let them cool completely first. Store them in an airtight container or freezer bag. They will last about 2 to 3 months in the freezer.
To thaw, place them in the fridge overnight. For quick thawing, use the microwave on defrost. After thawing, reheat using the air fryer for best results. This keeps them crispy and delicious.
FAQs
How do I know when chicken tenders are done?
To check if chicken tenders are done, you need to measure the internal temperature. Use a meat thermometer. The safe temperature is 165°F (75°C). This ensures the chicken is fully cooked.
You can also look for visual cues. The chicken should be golden brown. The juices should run clear when you cut into them. If there’s any pink, it needs more time.
Can I use frozen chicken tenders?
Yes, you can use frozen chicken tenders! However, you need to adjust the cooking time. Frozen tenders will take longer to cook. Add about 5 to 7 extra minutes to your cooking time. Always check the internal temperature to be sure they are safe to eat.
What dips pair well with chicken tenders?
Chicken tenders taste great with many dips. Some popular options include honey mustard, ranch dressing, and BBQ sauce. These add flavor to every bite.
You can use store-bought sauces for convenience. If you want to make your own, try mixing mayo with hot sauce for a spicy dip. Homemade dips can be fun and fresh!
This guide covered all the steps to make great chicken tenders. You learned about ingredients, marinating, and cooking methods. We explored tips for crispiness and serving ideas. Variations showed how to customize flavors and meet dietary needs. Lastly, you discovered how to store and reheat leftovers.
Enjoy making delicious chicken tenders that friends and family will love. With this knowledge, you can create a tasty dish every time. Start cooking and enjoy your mea

Crispy Air Fryer Chicken Tenders
Ingredients
- 1 pound chicken tenderloins
- 1 cup buttermilk
- 1 teaspoon garlic powder
- 1 teaspoon onion powder
- 1 teaspoon smoked paprika
- 1 teaspoon kosher salt
- 0.5 teaspoon freshly cracked black pepper
- 1 cup all-purpose flour
- 1 cup panko breadcrumbs
- None spray cooking spray or olive oil spray
Instructions
- Prepare the Marinade: In a large mixing bowl, whisk together the buttermilk, garlic powder, onion powder, smoked paprika, kosher salt, and black pepper until fully blended.
- Marinate the Chicken: Submerge the chicken tenderloins in the buttermilk mixture, ensuring they are completely coated. Cover the bowl with plastic wrap and refrigerate for at least 1 hour; for the best flavor, marinate overnight.
- Set Up the Breading Station: In two shallow dishes, pour the flour in one and the panko breadcrumbs in the other. This will create a simple assembly line for breading.
- Coat the Chicken: Remove the chicken tenderloins from the buttermilk marinade, allowing any excess liquid to drip off.
- Flour Dredging: Dip each chicken tender into the flour, pressing gently to ensure a good coating, then shake off any excess flour.
- Second Dip: Return the floured tenders to the buttermilk mixture briefly, then roll them in the panko breadcrumbs, pressing the crumbs firmly to adhere.
- Preheat the Air Fryer: Set your air fryer to preheat at 400°F (200°C) for about 5 minutes.
- Arrange in Air Fryer: Lightly spray the air fryer basket with cooking spray. Place the chicken tenders in a single layer in the basket, ensuring they are not overlapping.
- Final Spray: Give the tops of the chicken tenders a light mist with cooking spray or olive oil for a crispier finish.
- Air Fry to Perfection: Cook the chicken tenders in the air fryer for 10-12 minutes. Flip them halfway through cooking to ensure even browning. The tenders should be golden brown and have an internal temperature of 165°F (75°C).
- Rest and Serve: Carefully remove the chicken tenders from the air fryer and let them rest for a few minutes to lock in moisture before serving.
![- 2 ripe avocados - 4 slices of whole grain bread - 4 large eggs - 1 tablespoon fresh lemon juice - Salt and pepper to taste - Optional: red pepper flakes for heat - Fresh herbs for garnish To make avocado toast with poached egg, gather these fresh ingredients. Start with ripe avocados. They should feel slightly soft but not mushy. Whole grain bread gives a nice texture and is healthy, too. Eggs are key to this dish; use large eggs for a satisfying poach. Lemon juice adds brightness to the avocado spread. Salt and pepper enhance the flavors, while red pepper flakes can add a bit of heat if you like. Finally, fresh herbs make your dish look and taste wonderful. You can choose cilantro, chives, or parsley, depending on your preference. Check out the Full Recipe to see how these simple ingredients transform into a tasty meal! Start by toasting the whole grain bread. You can use a toaster for quick results. Alternatively, heat a dry skillet over medium heat and add the bread slices. Toast until they turn golden brown and crispy. This gives your toast the perfect base. While the bread toasts, grab your ripe avocados. Cut them in half and scoop the flesh into a bowl. Use a fork to mash the avocado; it should be creamy but still a bit chunky. Stir in fresh lemon juice and a pinch of salt and pepper. This adds flavor and keeps the avocado bright. Fill a medium saucepan with about 3 inches of water. Bring it to a gentle simmer. Crack each egg into a small bowl first. This helps keep them intact. Gently slide each egg into the water, one by one. Poach them for about 3-4 minutes. If you want firmer yolks, cook them a bit longer. Once the bread is toasted, take a slice and spread a generous layer of the avocado mix on top. Place a poached egg carefully on each slice. Make sure the yolk stays intact for that delightful runny experience. This layering creates both flavor and visual appeal. For a little extra heat, sprinkle some red pepper flakes over the poached eggs. This is optional, but it adds a nice kick. Finish by adding fresh herbs like chopped cilantro or chives. They provide a pop of color and freshness. Serve your toast right away to enjoy the great mix of textures and flavors. For the full recipe, check out the instructions above. To poach eggs well, start with fresh eggs. Fresh eggs hold their shape better. A common mistake is using water that boils too hard. This can break the eggs. Instead, let the water simmer gently. Add a splash of vinegar to help the egg whites stay together. If you want tools, consider using a poaching pod or a small mesh strainer. These tools make it easier to transfer eggs into the water. When picking avocados, look for ones that yield slightly to gentle pressure. This means they are ripe and ready. Avoid avocados with dark spots or large dents. The best varieties for flavor are Hass and Bacon. Hass avocados have a creamy texture and rich taste, while Bacon avocados are milder and lighter. Both make your toast tasty and delightful. You can toast bread in many ways. Use a toaster, skillet, or even an oven. For a crunchy texture, try broiling the bread for a short time. Keep an eye on it to avoid burning. To enhance your toast, add toppings like cheese, herbs, or spices. A sprinkle of garlic powder or a slice of mozzarella can elevate the flavor. Try different combinations to find your favorite! {{image_4}} You can add fun toppings for more flavor. Try sliced tomatoes or radishes for crunch. Smoked salmon gives a nice salty taste. Cheese options are also great. Feta or goat cheese can add creaminess and tang. The bread you choose changes the taste and feel. Whole grain gives a nutty flavor. Sourdough adds a bit of tang. For gluten-free eaters, use gluten-free bread. Each type adds its own special touch. Spices can make your toast even better. Cumin adds warmth, while paprika gives a slight kick. Fresh herbs like basil or dill can brighten the dish. Experimenting with these can enhance your avocado toast experience. Want to learn more? Check the Full Recipe for more ideas! To keep your leftover avocado fresh, use these tips. First, cover the avocado tightly with plastic wrap. Press the wrap directly onto the flesh to limit air exposure. You can also store it in an airtight container. Adding lemon juice can help slow down browning. If you have half an avocado, use it within one day for the best taste. For longer storage, consider freezing avocado. Cut it into chunks and toss it with lemon juice. Place the pieces in a freezer bag. They will last up to six months. Just remember, frozen avocado is best used in smoothies or spreads. Once you've cooked your poached eggs, store them in the fridge. They can last for about two days. Place them in a container with a lid to keep them fresh. When you are ready to eat them, gently reheat them in warm water to avoid overcooking. You can also use the eggs in salads or sandwiches. For the avocado spread, store it in the fridge as well. It can last about three days. If you notice browning, simply stir it before use. You can also use it as a dip for chips or veggies. This way, you can enjoy your delicious leftovers in various ways! To keep your poached eggs intact, follow these tips: - Use fresh eggs. Fresh eggs hold their shape better. - Crack each egg into a small bowl first. This helps you control the drop. - Create a gentle whirlpool in the water. Stir the water with a spoon before adding the egg. - Poach in simmering, not boiling, water. This helps prevent the eggs from breaking. These steps lead to beautiful poached eggs every time. Yes, you can prep some parts ahead of time! Here’s how: - Toast the bread just before serving for crispness. - Mash the avocado but add lemon juice to slow browning. - Store the avocado mix in an airtight container. Press plastic wrap on the surface to keep it fresh. - Poach the eggs right before serving for the best texture. Prepping ahead saves time, but fresh is always best! If you love avocado toast, try these dishes: - Hummus toast with sliced veggies. - Nut butter toast with banana slices. - Smoked salmon on cream cheese toast. - Ricotta with honey and figs on bread. These options are tasty and easy to make! Yes, avocado toast is a healthy choice! Here’s why: - Avocados are rich in healthy fats. They help your heart and keep you full. - Eggs provide protein, which is great for muscle health. - Whole grain bread offers fiber, good for digestion. - Adding fresh herbs boosts vitamins and flavor. This meal is a great way to start your day! For the full recipe, check out [Full Recipe]. This blog post explored the steps to make delicious avocado toast. We covered the key ingredients, from ripe avocados to perfectly poached eggs. You learned how to toast bread, prepare avocado spread, and assemble your dish. Keep these tips in mind. Experiment with toppings and seasoning. Try different breads for new flavors. With a little practice, you’ll create a tasty, healthy meal. Enjoy your avocado toast creations and share them with others!](https://joymealplan.com/wp-content/uploads/2025/07/56055f10-0617-41ac-9d2a-da1e092d61f6-768x768.webp)
![- 1 cup fresh spinach, finely chopped - 1 cup canned artichoke hearts, well-drained and chopped - 1/2 cup cream cheese, softened to room temperature - 1/2 cup sour cream - 1/2 cup mozzarella cheese, freshly shredded - 1/4 cup Parmesan cheese, finely grated - 2 cloves garlic, minced - 1 teaspoon fresh lemon juice - Salt and freshly ground black pepper to taste - 1/4 teaspoon red pepper flakes (optional) - Tortilla chips or freshly sliced baguette for serving The ingredients for creamy spinach artichoke dip come together easily. You can choose fresh or canned artichokes. I prefer fresh spinach for flavor, but both work well. Cream cheese gives the dip its base, making every bite rich and smooth. The sour cream adds tanginess. For that cheesy pull, I use mozzarella. Parmesan adds a salty bite that brightens the whole dish. I always add fresh garlic for depth. A splash of lemon juice lifts the flavors, making them pop. Salt and pepper balance the dish. If you like heat, use red pepper flakes. They add a nice kick without overwhelming the flavors. Serve with tortilla chips or a sliced baguette for dipping. Each bite of this dip is a creamy, cheesy delight. For the full recipe, check the section above. Preheating your oven to 350°F (175°C) is key for this dip. This step makes sure your dip cooks evenly. You want it to bubble and get a nice golden color. Skipping this step can lead to an uneven bake. In a large bowl, mix together the cream cheese, sour cream, mozzarella, and Parmesan. Use a spatula or a hand mixer to blend until smooth. This creates a rich and creamy base. The cream cheese must be soft for easy mixing. Make sure there are no lumps. A smooth texture makes the dip great for dipping. Next, gently fold in the chopped spinach and artichoke hearts. Add in the minced garlic, lemon juice, salt, pepper, and red pepper flakes if you like some heat. Stir carefully to mix everything well. This is where the magic happens. The flavors of spinach and artichokes blend to create a delicious combination. Now, spoon the mixture into a baking dish. Spread it evenly to create a uniform layer. Place the baking dish in the preheated oven and bake for 25 to 30 minutes. You want to see bubbling around the edges and a light golden top. This means your dip is ready. Once baked, let it cool for a few minutes before serving. This short wait allows the flavors to meld beautifully, making it taste even better. For the Full Recipe, visit the provided link. To get that smooth and creamy dip, mix your cheeses well. Start with softened cream cheese and sour cream. This helps avoid lumps. Use a spatula or hand mixer to blend everything until it's nice and smooth. When you add spinach and artichokes, fold them in gently. This keeps the dip fluffy and creamy. Want to kick up the flavor? Add more garlic! You can use three or four cloves if you love garlic. Fresh herbs like basil or parsley also boost taste. A sprinkle of cayenne pepper adds a fun kick. Experiment with Italian seasoning for a unique twist. Each addition brings new flavor layers to your dip. Serve your dip warm for the best experience. When it comes out of the oven, let it cool for a few minutes. This allows the flavors to blend well. Serve it hot with tortilla chips or sliced baguette. The warmth makes it extra inviting and tasty. For a lovely touch, sprinkle some extra Parmesan on top before serving. {{image_4}} You can make this dip lighter by swapping some ingredients. Use low-fat cream cheese and sour cream for a healthier twist. Greek yogurt is another great choice. It adds creaminess without the extra fat. You won't miss the full-fat versions. Plus, you still get that rich taste you love. Want to change up the flavor? Try adding different cheeses. Cheddar or gouda can give it a fun kick. You can also mix in spices like cumin or paprika. These simple tweaks can make your dip unique. Don’t be afraid to experiment. Each time, you can create a new favorite. For a vegan version, replace dairy products with plant-based alternatives. Use cashew cream or tofu for the cream cheese. You can also use coconut yogurt instead of sour cream. Nutritional yeast gives it a cheesy flavor. These swaps keep the dish creamy while being vegan-friendly. Enjoy delicious flavors without the dairy! For the full recipe, check out [Full Recipe]. Store leftover dip in an airtight container. This keeps the dip fresh and tasty. Place it in the fridge within two hours of serving. For longer storage, you can freeze it. Use a freezer-safe container and label it with the date. Make sure to leave some space for expansion when freezing. To reheat your dip, use an oven or a microwave. In the oven, preheat to 350°F (175°C). Place the dip in a baking dish and cover it with foil. Heat for about 15-20 minutes, or until warm. In the microwave, heat in short bursts of 30 seconds, stirring in between. This way, you keep the dip creamy and avoid a rubbery texture. The dip lasts about 3-4 days in the fridge. Make sure it is sealed well. If frozen, it can last up to 2 months. To enjoy the best flavor, eat it within this time. Always check for any off smell or change in texture before eating. Yes, you can make this dip ahead of time! Prepare the dip and store it in the fridge. Use an airtight container to keep it fresh. You can make it a day before your event. Just remember to bake it right before serving. If you want to reheat it, warm it in the oven until it's hot and bubbly. This dip pairs well with many snacks. Try serving it with: - Tortilla chips - Fresh vegetable sticks like carrots and celery - Sliced baguette - Pita chips These options add crunch and freshness. They also bring out the creamy flavor of the dip. You can bake this dip in a slow cooker! First, mix all the ingredients as usual. Then, place the mixture in the slow cooker. Cook it on low for about 2 to 3 hours. Stir it occasionally to keep it smooth. This method makes the dip perfect for parties, as it stays warm and ready to enjoy. For the full recipe, check out the complete guide above. This creamy spinach artichoke dip is easy to make and fun to share. We covered the key ingredients and detailed step-by-step instructions to guide you. Remember to adjust flavors and textures to your liking, and don’t hesitate to explore variations. Whether making it healthier or trying vegan options, there’s a version for everyone. Store any leftovers properly, and reheat to enjoy it warm again. With this recipe, you are set for tasty gatherings and comfy nights in. Enjoy your delicious creation!](https://joymealplan.com/wp-content/uploads/2025/07/4577691d-75b4-487d-8cf6-776305dcf758-768x768.webp)