Pesto Mozzarella Christmas Wreath Festive Delight


Welcome to my festive kitchen! Your holiday gatherings just got tastier with the Pesto Mozzarella Christmas Wreath. This dish is a show-stopper, easy to make, and bursting with flavor. From preparing homemade pesto to baking perfectly flaky pastry, I’ll guide you step-by-step. Whether you’re hosting a party or bringing a dish to share, this wreath brings joy to the table. Let’s dive into the delicious details and make your holiday unforgettable!
Why I Love This Recipe
- Fresh Flavors: The vibrant taste of basil combined with the rich creaminess of mozzarella creates a delightful flavor explosion in every bite.
- Festive Presentation: This wreath-shaped dish is not only delicious but also visually stunning, making it a perfect centerpiece for holiday gatherings.
- Easy to Make: With simple ingredients and straightforward steps, this recipe is accessible even for beginner cooks, ensuring everyone can impress their guests.
- Versatile Serving: Serve it warm or at room temperature, and pair it with extra pesto for dipping; it’s the perfect appetizer for any occasion.
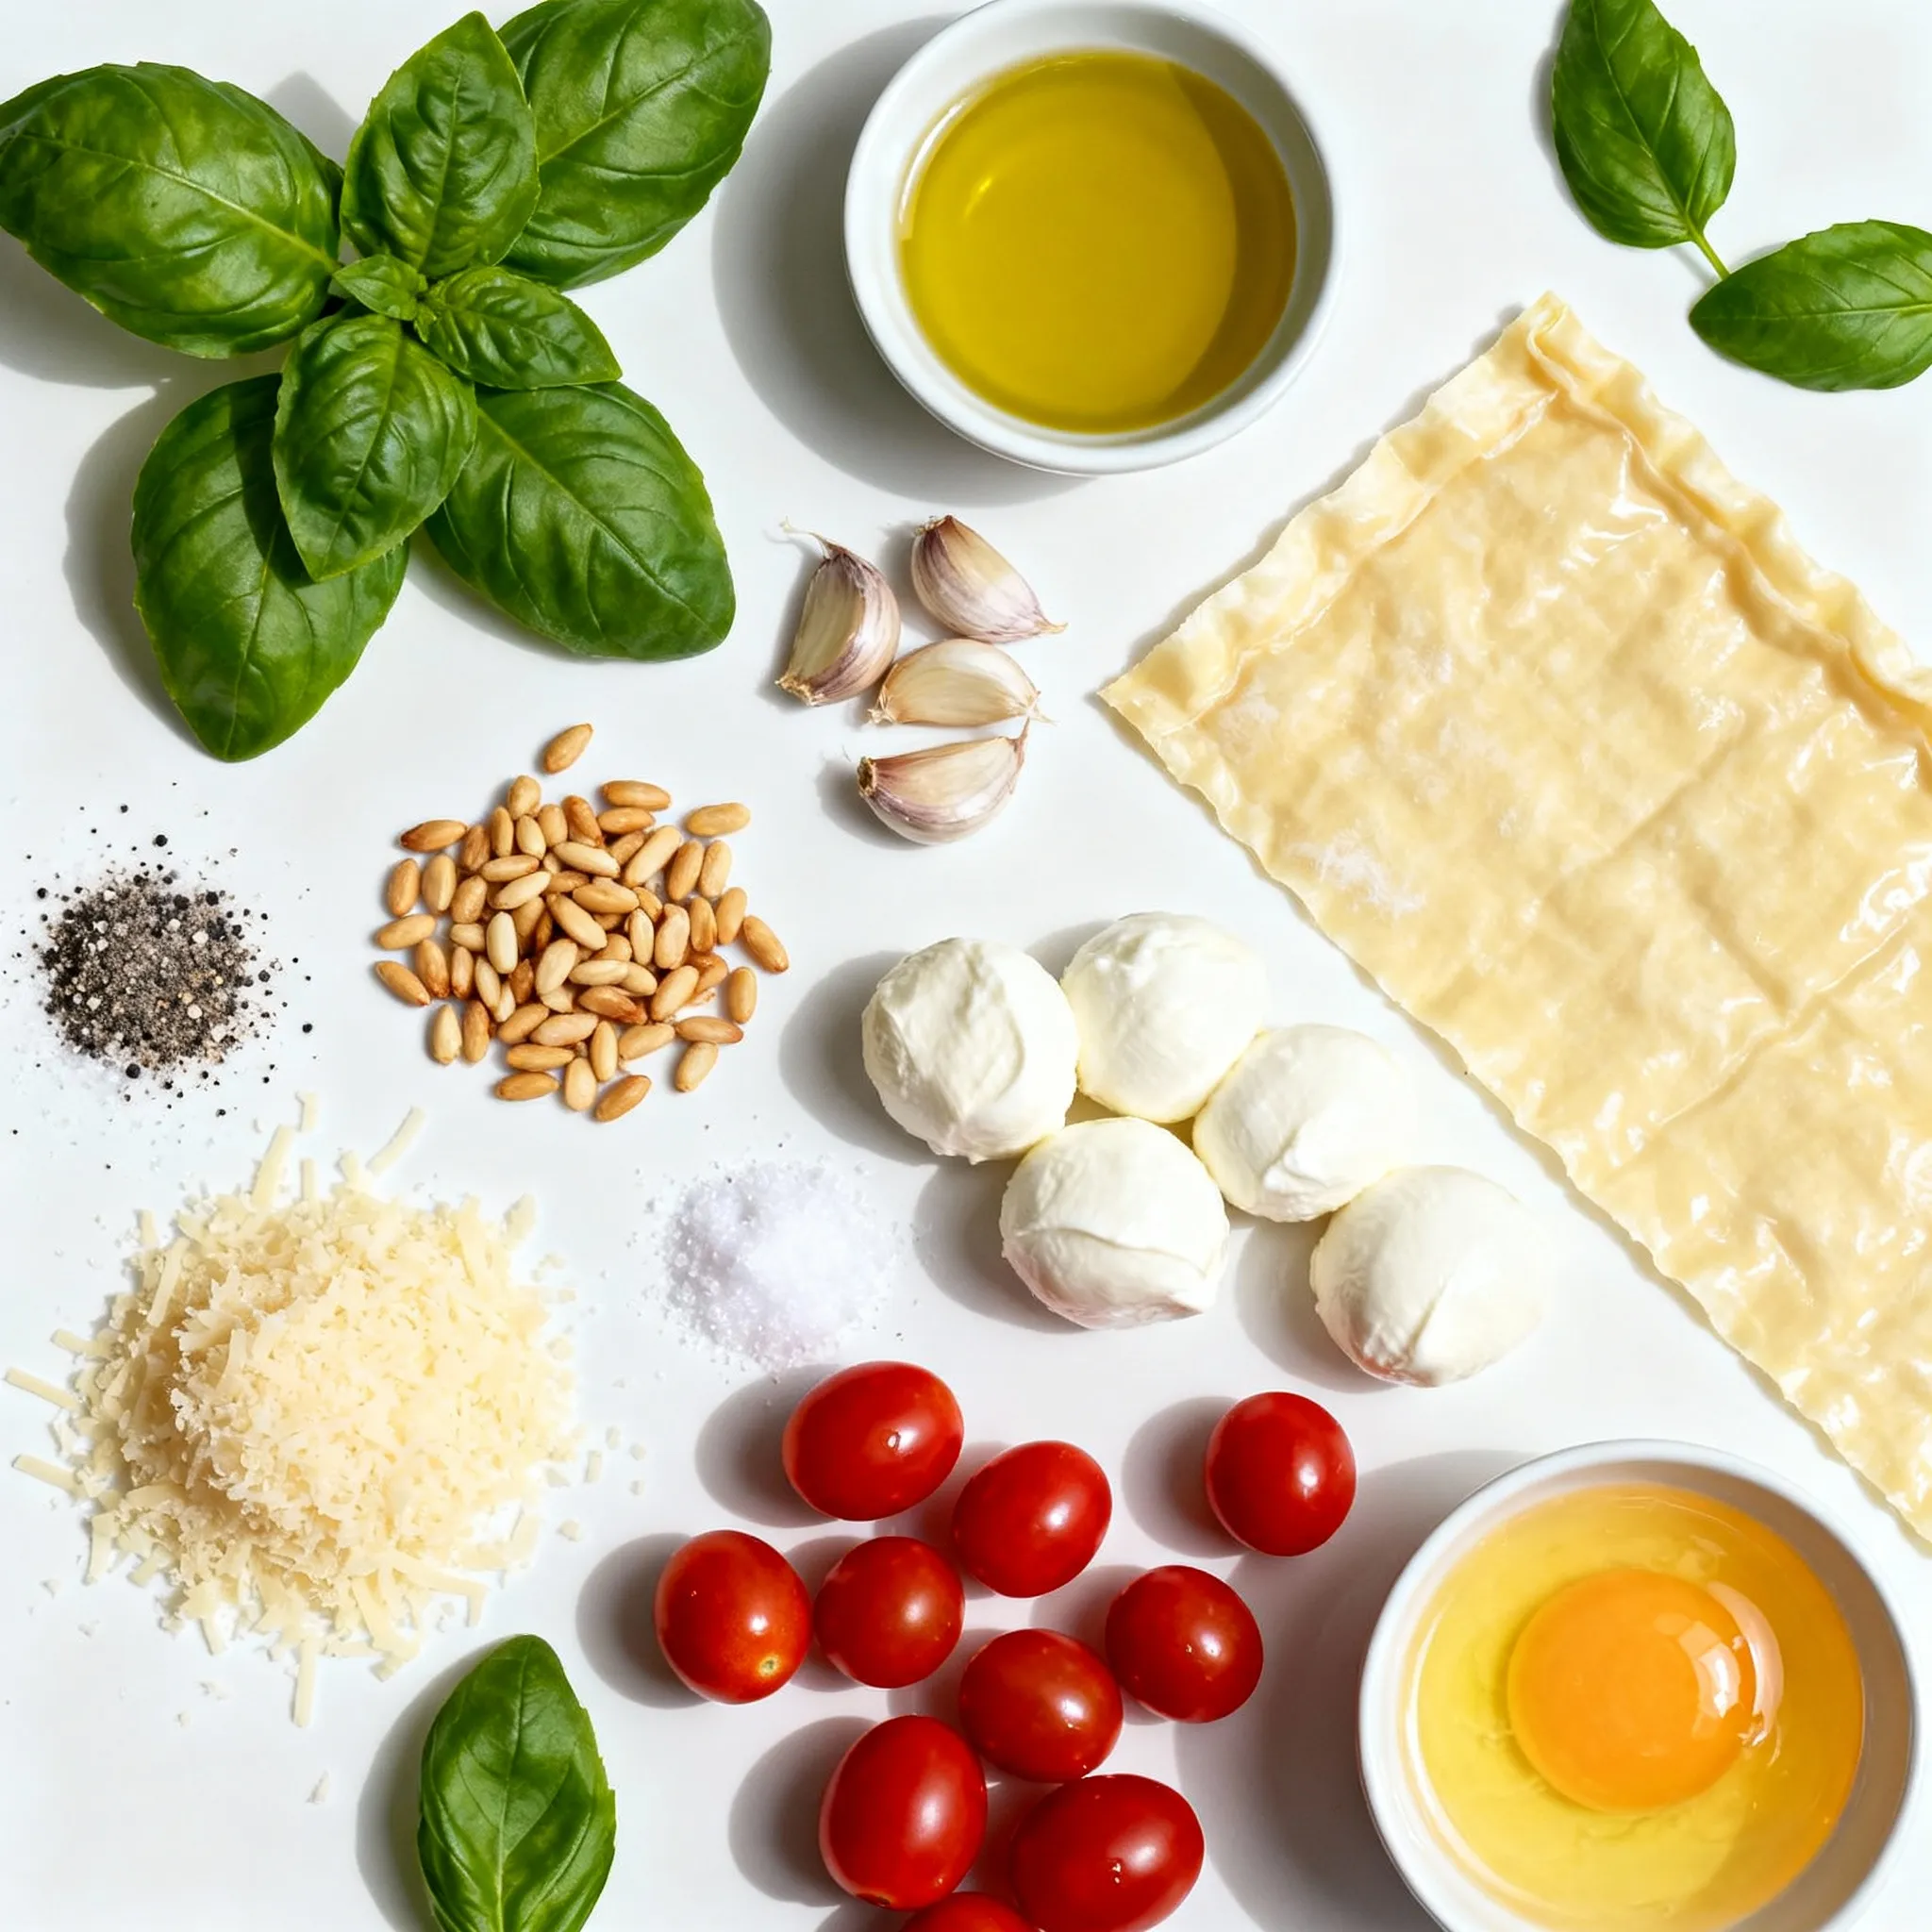
Ingredients
Essential Ingredients for Pesto Mozzarella Christmas Wreath
To create a delicious Pesto Mozzarella Christmas Wreath, you need key ingredients. Here’s what you will need:
– 1 cup fresh basil leaves
– ½ cup extra-virgin olive oil
– 2 cloves garlic, finely minced
– ⅓ cup pine nuts, lightly toasted
– ½ cup grated Parmesan cheese
– Salt and pepper, to taste
– 1 sheet puff pastry, thawed
– 8 oz fresh mozzarella balls (bocconcini)
– Cherry tomatoes, halved (for garnish)
– 1 egg, beaten (for egg wash)
– Extra fresh basil leaves (for garnish)
Detailed Measurements of Each Ingredient
– Fresh basil leaves: Use 1 cup. This adds a fragrant flavor.
– Extra-virgin olive oil: Use ½ cup. It helps blend the pesto.
– Garlic: Use 2 cloves. Mince them finely for a strong taste.
– Pine nuts: Use ⅓ cup, lightly toasted. They add a nutty crunch.
– Parmesan cheese: Use ½ cup, grated. This gives a salty kick.
– Salt and pepper: Add to taste. These enhance the overall flavor.
– Puff pastry: Use 1 sheet, thawed. It forms the base of the wreath.
– Fresh mozzarella balls: Use 8 oz. They melt beautifully in the oven.
– Cherry tomatoes: Halve them for garnish. They add color and freshness.
– Beaten egg: Use 1 for the egg wash. It helps achieve a golden crust.
– Extra basil leaves: Use for garnish. They add a festive touch.
Optional Additional Ingredients for Variations
To make the wreath unique, consider adding:
– Spinach or arugula: Mix in for extra greens.
– Sun-dried tomatoes: Add for a sweet, tangy flavor.
– Olives: Chopped olives can add a briny taste.
– Different cheeses: Try goat cheese or feta for a twist.
These variations can make your wreath special and cater to different tastes.
Step-by-Step Instructions
How to Prepare the Homemade Pesto
To make the pesto, grab your food processor. Add one cup of fresh basil leaves. Then, pour in half a cup of extra-virgin olive oil. Next, add two cloves of minced garlic. Toss in a third cup of lightly toasted pine nuts. Finally, include half a cup of grated Parmesan cheese.
Pulse the mixture until it becomes smooth. It should blend well without chunks. After blending, taste the pesto. Adjust with salt and pepper as needed. Set the pesto aside. Letting it rest helps the flavors come together.
Preparing and Cutting the Puff Pastry
First, preheat your oven to 400°F (200°C). This ensures even baking. Next, take your thawed puff pastry sheet. Place it on a lightly floured surface. Roll it out gently to remove creases. A smooth sheet makes for a better wreath.
Now, it’s time to cut the pastry. Use a pizza cutter or sharp knife. Slice the pastry into strips that are 1-2 inches wide. This size works well for pinwheels.
Assembling and Baking the Wreath
Let’s assemble the pinwheels! Take a strip of puff pastry. Spread a thin layer of pesto over it. Place a mozzarella ball at one end. Roll the strip tightly to form a pinwheel. Repeat this for all the strips.
Now, it’s time to form the wreath. On a baking sheet lined with parchment paper, arrange the pinwheels. Overlap them slightly to create a circular shape.
Next, brush the wreath with beaten egg. This gives it a nice golden color.
Finally, bake the wreath in the oven for 20-25 minutes. It should puff up and turn golden brown. Once it’s done, let it cool slightly on a wire rack. Garnish with halved cherry tomatoes and fresh basil leaves. Serve with any leftover pesto for dipping. Enjoy your festive creation!
Tips & Tricks
Perfecting the Pesto Flavor
To make great pesto, fresh basil is key. Use one cup of fresh basil leaves for the best taste. Mixing in the right amount of extra-virgin olive oil helps create a smooth texture. I use a half cup, but you can adjust it to your liking. The garlic adds a nice kick. Two cloves, minced finely, will do the trick. Don’t forget the pine nuts! Lightly toasting a third cup adds richness. Finally, stir in half a cup of grated Parmesan cheese for that salty depth. Season with salt and pepper to taste.
Achieving the Best Puff Pastry Texture
For puff pastry, start with a thawed sheet. Roll it out on a floured surface to make it even. This step helps it bake better. Cut the pastry into strips about 1-2 inches wide. A pizza cutter works well here! When you bake, the pastry needs space to puff up. Arrange your pinwheels in a circular shape but don’t squish them together. Finally, brush with a beaten egg. This gives a lovely golden color.
Presentation & Serving Suggestions
To serve, place the wreath on a big, decorative platter. I love to add a small bowl of leftover pesto in the center for dipping. It looks festive and inviting! Scatter a few whole basil leaves on the platter for a pop of color. Halved cherry tomatoes also add a nice touch. This wreath is perfect for parties or family gatherings. It’s a fun, tasty way to impress your guests!
Pro Tips
- Use Fresh Ingredients: Always opt for fresh basil and high-quality olive oil for the pesto to ensure vibrant flavors.
- Toast the Pine Nuts: Lightly toasting the pine nuts enhances their flavor and adds a lovely nuttiness to the pesto.
- Preheat the Oven: Make sure your oven is fully preheated before baking to achieve a perfectly puffed and golden wreath.
- Experiment with Add-Ins: Feel free to add other ingredients like sun-dried tomatoes or olives to the pinwheels for extra flavor variations.

Variations
Dietary Adjustments (Vegan, Gluten-Free)
You can easily adjust this recipe for different diets. To make it vegan, swap the mozzarella and Parmesan with vegan cheese. Use nutritional yeast for a cheesy flavor. For a gluten-free option, choose a gluten-free puff pastry. Many stores sell good alternatives. Always check the label to ensure it fits your diet.
Alternative Fillings and Garnishes
Feel free to mix up the fillings. Instead of pesto, try sun-dried tomato spread or olive tapenade. You can also use goat cheese or ricotta for a creamy twist. For garnishes, consider using sliced olives or roasted red peppers. Fresh herbs like thyme or parsley also add a nice touch.
Seasonal and Festive Add-Ins
Make this dish even more festive! Add seasonal ingredients like cranberries or walnuts for crunch. You can also sprinkle in some spices, like nutmeg or cinnamon, for warmth. For a holiday twist, use red and green bell peppers for color. The wreath becomes a centerpiece for your holiday table.
Storage Info
Storing Leftovers Safely
After enjoying your Pesto Mozzarella Christmas Wreath, store leftovers right away. Place them in an airtight container. If you do not have one, wrap them tightly with plastic wrap. Keep them in the fridge for up to three days. This helps keep the flavors fresh and the pastry crisp.
Reheating Instructions for Optimal Enjoyment
To reheat your wreath, preheat your oven to 350°F (175°C). Place the wreath on a baking sheet. Cover it loosely with aluminum foil to avoid burning. Heat for about 10-15 minutes or until warm. This method keeps the pastry flaky and delicious. You may also use a microwave, but it can make the puff pastry soft.
Freezing Options for Future Enjoyment
If you want to save some for later, freezing is a great option. Wrap the cooled wreath tightly in plastic wrap. Then, place it in a freezer-safe bag. This will keep it fresh for up to two months. When ready to eat, thaw it in the fridge overnight. Reheat it in the oven for the best taste.
FAQs
What is the best way to serve the Pesto Mozzarella Christmas Wreath?
I love serving the Pesto Mozzarella Christmas Wreath on a big, festive platter. It looks great and adds joy to any table. Place the wreath in the center. Serve extra pesto in a small bowl nearby for dipping. You can add fresh basil leaves around the wreath for a pop of color. This makes it more festive and appealing.
Can I make the pesto ahead of time?
Yes, you can make the pesto ahead of time! I suggest making it a day or two before. Just store it in an airtight container in the fridge. This allows the flavors to blend nicely. If you see some darkening on top, just stir it before you use it. You can also freeze the pesto for up to three months. Just thaw it in the fridge when you’re ready.
How do I prevent the puff pastry from getting soggy?
To keep the puff pastry crisp, avoid overfilling the pinwheels. Use just enough pesto to flavor without soaking the pastry. When baking, make sure your oven is preheated to 400°F (200°C). Bake until the wreath is golden and puffed. If you want extra crispiness, place the wreath on a baking stone if you have one. Enjoy that yummy crunch!
This blog post covered all you need for a Pesto Mozzarella Christmas Wreath. We explored essential ingredients, detailed measurements, and fun variations. I shared step-by-step instructions for making the wreath, plus helpful tips to elevate your dish.
Remember, you can adjust the recipe for different diets and enjoy various flavors. Store leftovers safely, and don’t hesitate to freeze them for later. Now, you’re ready to impress at your next gathering with this festive trea

Pesto Mozzarella Christmas Wreath
Ingredients
- 1 cup fresh basil leaves
- ½ cup extra-virgin olive oil
- 2 cloves garlic, finely minced
- ⅓ cup pine nuts, lightly toasted
- ½ cup grated Parmesan cheese
- to taste Salt and pepper
- 1 sheet puff pastry, thawed
- 8 oz fresh mozzarella balls (bocconcini)
- to garnish Cherry tomatoes, halved
- 1 egg beaten (for egg wash)
- to garnish Extra fresh basil leaves
Instructions
- Prepare the Pesto: In a food processor, combine the fresh basil leaves, extra-virgin olive oil, minced garlic, lightly toasted pine nuts, and grated Parmesan cheese. Pulse until the mixture is smooth and well blended. Taste and season with salt and pepper as desired. Set the pesto aside to allow the flavors to meld.
- Prepare the Puff Pastry: Preheat your oven to 400°F (200°C). On a lightly floured surface, roll out the thawed puff pastry sheet to flatten it and remove any creases for a smoother appearance.
- Cut the Puff Pastry: Using a pizza cutter or sharp knife, slice the puff pastry into long strips approximately 1-2 inches wide.
- Assemble the Pinwheels: Take one strip of puff pastry and spread a thin layer of the prepared pesto over it. Place a mozzarella ball at one end and roll the strip tightly to form a pinwheel. Repeat this process with the remaining strips of puff pastry.
- Create the Wreath Shape: On a baking sheet lined with parchment paper, arrange the pinwheels in a circular wreath pattern, overlapping them slightly to form a complete wreath shape.
- Brush with Egg Wash: Using a pastry brush, gently apply the beaten egg on top of the wreath to give it a golden, appetizing color while baking.
- Bake the Wreath: Transfer the wreath to the preheated oven and bake for 20-25 minutes, or until it becomes puffed up and golden brown, with a crispy crust.
- Finish and Garnish: Once baked, allow the wreath to cool slightly on a wire rack. Garnish with halved cherry tomatoes and fresh basil leaves for a festive touch. Serve any remaining pesto on the side for delightful dipping.


. {{image_4}} Vegetarian Mini Quiche Cups For a tasty vegetarian option, use only veggies. You can add spinach, mushrooms, and bell peppers. Mix in some cheese for creaminess. This keeps the dish light yet filling. You can also use fresh herbs like basil or oregano for extra flavor. Try to use seasonal veggies for the best taste. Meat Lovers' Option If you love meat, this option is for you. Use diced ham, crispy bacon, or cooked sausage. Combine these with your favorite cheese and veggies. This mix gives a hearty bite to each quiche cup. You will enjoy the rich, savory flavors in every bite. Gluten-Free Crust Alternatives If you need a gluten-free crust, use almond flour or cornmeal. You can also find ready-made gluten-free pie crusts at the store. Another idea is to make a crustless quiche. Just pour the filling into greased muffin tins. This way, you skip the crust but keep all the flavor. Dairy-Free Ingredient Swaps For a dairy-free version, use plant-based milk like almond or soy. Swap regular cheese for dairy-free cheese options. Nutritional yeast can add a cheesy flavor without dairy. Try these swaps to enjoy mini quiche cups without dairy. It keeps the recipe tasty and friendly for all diets. For the full recipe, check out the details in the previous section. To keep your mini quiche cups fresh, proper storage is key. - Refrigerating Leftovers: Place any leftover mini quiche cups in an airtight container. They will stay fresh for up to 3 days in the fridge. Just make sure they cool down before sealing. You can also wrap them tightly in plastic wrap for extra protection. - Freezing for Long-Term Storage: If you want to save them longer, freezing works well. First, let the quiche cups cool completely. Then, place them on a baking sheet and freeze until solid. After that, transfer them to a freezer-safe bag or container. They can last up to 2 months in the freezer. Remember to label the container with the date you made them. When you're ready to enjoy your mini quiche cups again, follow these tips for the best results. - Best Methods for Serving Again: The oven is the best way to reheat quiche cups. Preheat your oven to 350°F (175°C). Place the cups on a baking sheet and heat for about 10-15 minutes. This method keeps the crust crisp and the filling warm. - Retaining Flavor and Texture: Avoid using a microwave if you can. Microwaving can make the crust soggy and the filling rubbery. If you must use a microwave, heat them in short bursts of 30 seconds. Check often to ensure they don’t overcook. Following these tips will help you enjoy your mini quiche cups just like fresh! For the full recipe, check the [Full Recipe]. Bake Mini Quiche Cups for 18 to 20 minutes at 375°F (190°C). The tops should turn golden brown. You want the centers set but still moist. Keep an eye on them in the last few minutes. Each oven heats a bit differently. Yes, you can make Mini Quiche Cups ahead of time. Prepare them and store in the fridge for up to two days. You can also freeze them for up to a month. Just be sure to cool them completely before storing. To reheat, place them in the oven at 350°F (175°C) until warm. Great ingredients include: - 6 large eggs - 1 cup milk (whole or 2%) - 1 cup shredded cheese (like cheddar or mozzarella) - 1 cup diced vegetables (bell peppers, spinach, or mushrooms) - 1/2 cup cooked ham or crispy bacon (optional) - Garlic powder and onion powder for flavor These create a tasty base for your quiche cups. You can mix and match fillings easily. Try different cheeses or veggies. For a spicy kick, add jalapeños. If you love herbs, include fresh basil or thyme. Think about seasonal produce too. This makes your quiche cups unique and fun. Mini quiche cups are fun and easy to make. You can mix eggs, dairy, cheese, meats, and veggies to create tasty treats. Remember to preheat your oven and choose the right crust. I shared tips on filling them just right and baking them perfectly. Explore variations like vegetarian or gluten-free options, and learn how to store leftovers. With these steps and ideas, you have all you need for quiche success. Enjoy making your own mini quiche cups! They’ll be a hit with everyone.](https://joymealplan.com/wp-content/uploads/2025/06/d5cf7460-7b4e-43b3-accb-372b25b26cc9-768x768.webp)