Avocado Egg Salad Lettuce Wraps Light and Fresh Meal
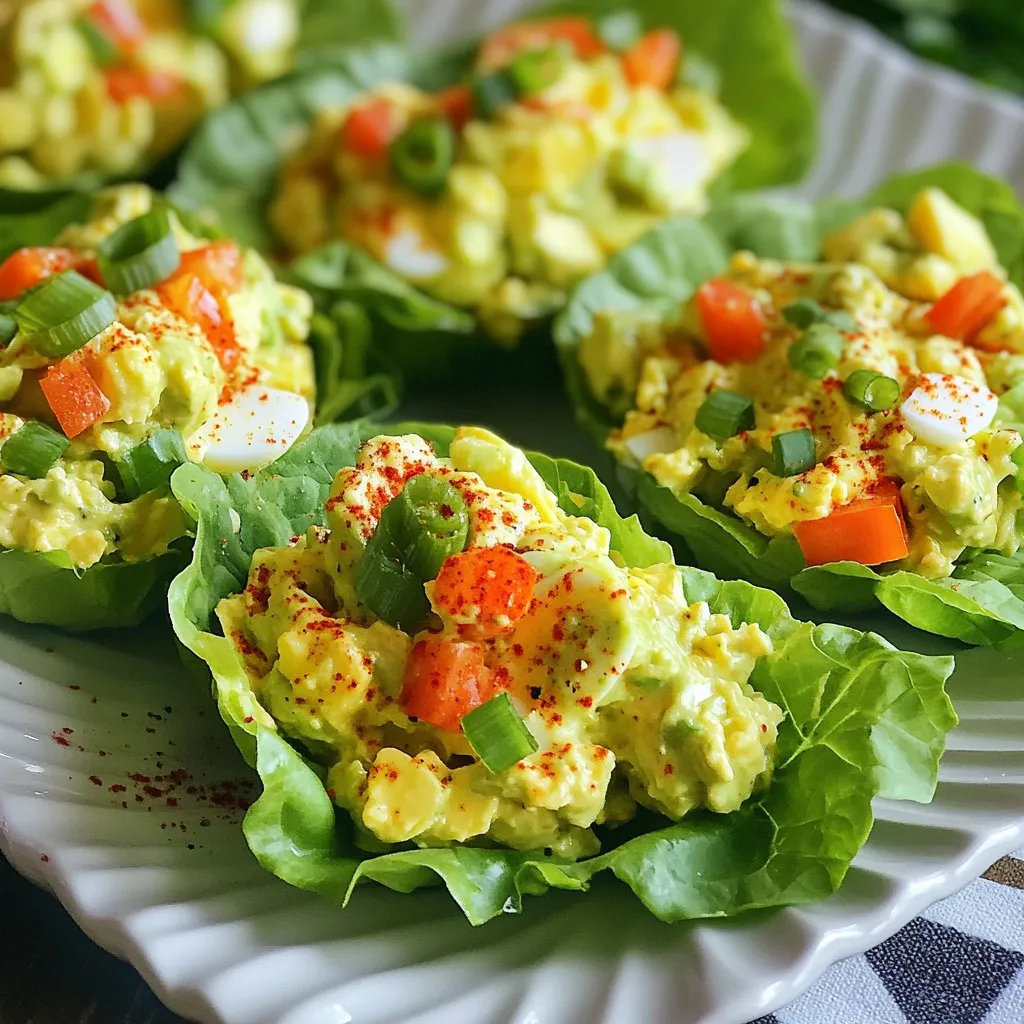

Looking for a light and fresh meal that’s packed with flavor? Try my Avocado Egg Salad Lettuce Wraps! This simple dish combines creamy avocados and protein-rich eggs, all wrapped in crisp lettuce. Whether you need a quick lunch or a healthy snack, this recipe hits the spot. Join me as I guide you through each step for a delicious, guilt-free meal you’ll love. Let’s get started!
Why I Love This Recipe
- Healthy and Nutritious: This avocado egg salad is packed with protein from the eggs and healthy fats from the avocado, making it a perfect nutritious option for any meal.
- Quick and Easy: With just a 15-minute prep time, you can whip up this delicious dish in no time, making it ideal for busy days or last-minute gatherings.
- Versatile and Customizable: You can easily modify the ingredients to suit your taste, adding other veggies or herbs to make it your own.
- Perfect for Meal Prep: This salad keeps well in the refrigerator, making it a great option for meal prep for the week ahead.
Ingredients
To make Avocado Egg Salad Lettuce Wraps, you will need the following ingredients:
– 4 large eggs
– 1 ripe avocado, peeled and pitted
– 2 tablespoons plain Greek yogurt
– 1 teaspoon Dijon mustard
– 1 tablespoon fresh lemon juice
– 1/4 teaspoon garlic powder
– Salt and freshly ground pepper, to taste
– 1/4 cup red bell pepper, finely chopped
– 1/4 cup green onions, sliced
– 1 cup crisp lettuce leaves (such as romaine or butter lettuce)
These simple ingredients make a fresh and tasty dish. The creamy avocado pairs well with the eggs. Using Greek yogurt gives it a nice tang, while the Dijon mustard adds a slight kick. Don’t forget the fresh lemon juice; it brightens everything up.
You can choose any kind of crisp lettuce for the wraps. Romaine or butter lettuce works best. They hold the filling well and add a nice crunch. The red bell pepper and green onions add color and flavor.
Gather all these ingredients before you start cooking, so you can enjoy the process.
Step-by-Step Instructions
Boiling the Eggs
Start with a medium pot. Place the four eggs in the pot. Cover the eggs with water, about an inch above them. Heat the pot on medium-high until the water boils. Once boiling, lower the heat to simmer. Cook the eggs for 9 to 12 minutes, depending on how firm you want the yolks. When done, move the eggs to a bowl of ice water. Let them cool completely. This helps stop the cooking and makes peeling easier.
Preparing the Avocado Mixture
While the eggs cool, take your ripe avocado. Cut it in half, remove the pit, and scoop the flesh into a mixing bowl. Use a fork to mash the avocado. Aim for a creamy texture with no big lumps. This will make your salad smooth and tasty.
Combining Ingredients
Now, it’s time to bring it all together. Peel the cooled eggs and chop them into small pieces. Add the chopped eggs to the mashed avocado. Next, include two tablespoons of Greek yogurt, one teaspoon of Dijon mustard, one tablespoon of lemon juice, and a quarter teaspoon of garlic powder. Mix everything until it is creamy and well combined. Season it with salt and freshly ground pepper to taste.
Adding Vegetables
To add a fresh crunch, fold in a quarter cup of finely chopped red bell pepper and a quarter cup of sliced green onions. Stir gently to keep the pieces intact. Taste again and adjust the seasoning if needed. The veggies add color and flavor to your salad.
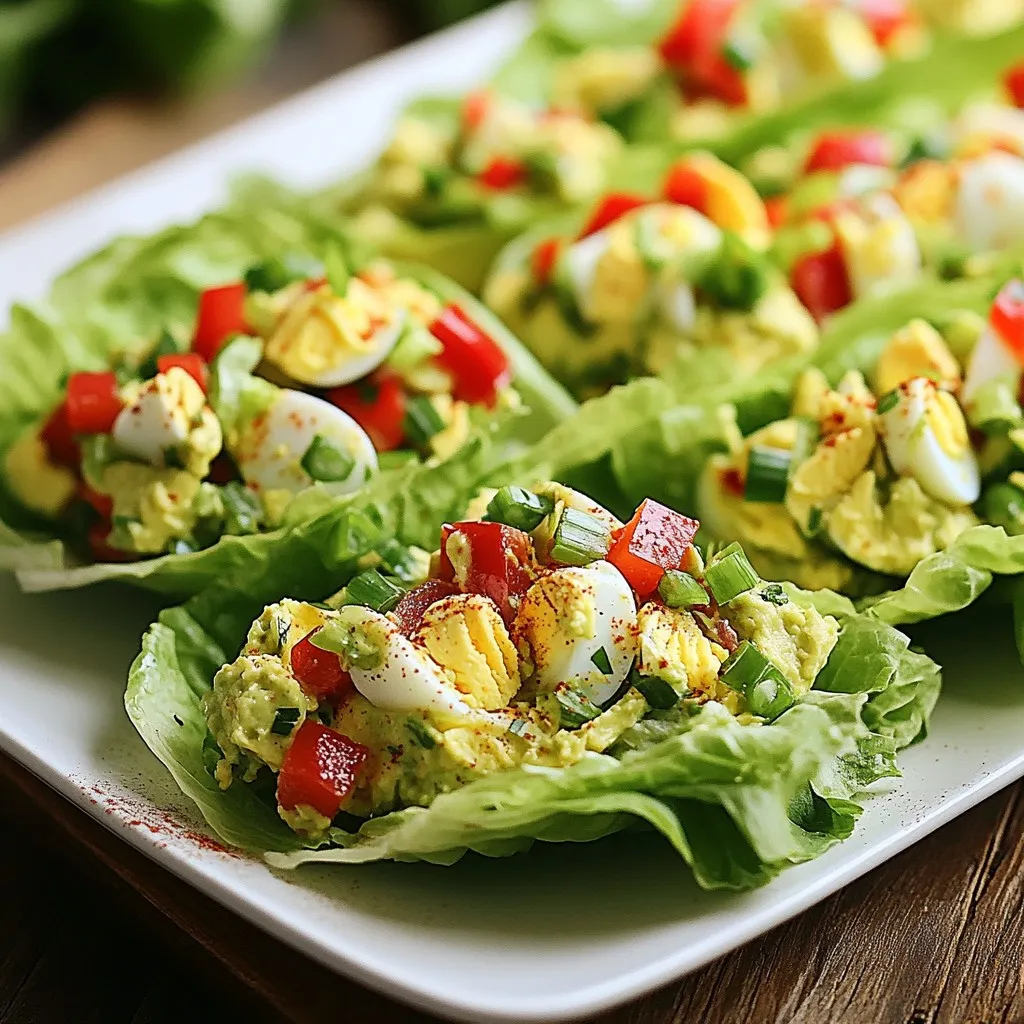
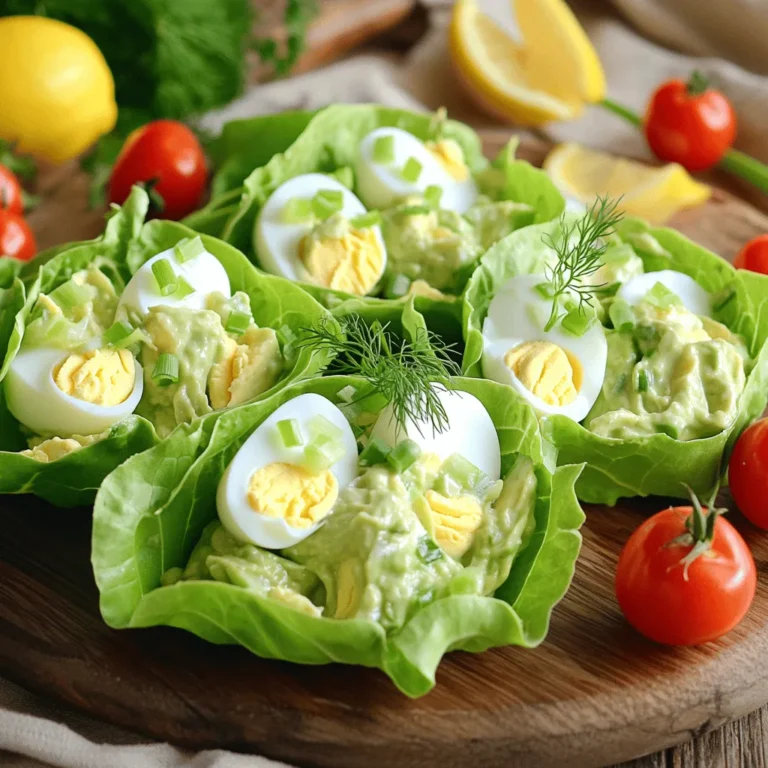
Assembling the Wraps
Finally, it’s time to wrap everything up. Take a crisp lettuce leaf, like romaine or butter lettuce. Place a scoop of the avocado egg salad in the center of the leaf. Fold the leaf around the filling like a taco. Enjoy your fresh and light meal right away!
Tips & Tricks
Perfecting the Egg Salad Texture
To get a creamy avocado egg salad, start with a ripe avocado. A ripe avocado should yield slightly when you press it. Mash it well with a fork in a bowl, removing any lumps. This helps blend it smoothly with the eggs. After boiling and cooling the eggs, chop them into small pieces. This way, they mix well with the avocado. The goal is a smooth, creamy texture that holds together.
Flavor Enhancements
Adding spices and herbs lifts the flavor. I like to use a pinch of smoked paprika for a touch of warmth. You can also try fresh dill or cilantro for a fresh twist. A squeeze of lime juice can brighten up the dish too. Just remember, taste as you go to find the balance you enjoy.
Serving Ideas
Presentation matters with this dish. I suggest serving the lettuce wraps on a bright platter. This makes the colors pop. You can add slices of red bell pepper next to the wraps for a fun touch. Serve with a side of fresh fruit or crunchy veggies. This adds a nice contrast and makes your meal feel complete.
Pro Tips
- Perfectly Boiled Eggs: To achieve the ideal hard-boiled eggs, consider using an instant pot or steaming method for consistent results; this can also make peeling easier.
- Avocado Freshness: To keep your avocado salad from browning, add a little extra lemon juice or cover it tightly with plastic wrap, pressing it directly against the surface of the salad.
- Customize Your Fillings: Feel free to experiment with additional ingredients like diced cucumbers, pickles, or even a sprinkle of feta cheese for added flavor and texture.
- Best Lettuce Choices: Choose sturdy lettuce like romaine or butter lettuce for your wraps, as they provide the best support for the filling and prevent tearing.
Variations
Different Protein Options
You can switch eggs for other proteins. Chickpeas work great. They add a nice texture and flavor. Tofu is another option. It brings a creamy feel and is plant-based. You could also try shredded chicken. It adds a hearty bite. Each protein gives a unique twist to your salad.
Using Different Vegetables
Mixing in other veggies can change the taste. Try diced cucumbers for crunch. They add freshness. You can also use diced celery for a nice crunch. Spinach or kale can add a healthy green touch. For a bit of heat, add jalapeños. The more veggies, the merrier your salad.
Alternative Wraps
Lettuce is not the only option. Cabbage leaves are sturdy and fun to use. They hold the filling well. Tortillas can be a great choice too. They are soft and easy to roll. You can even use whole grain or gluten-free tortillas. Each wrap style offers a new way to enjoy this dish.
Storage Info
Short-term Storage
To keep leftovers fresh, store your avocado egg salad in an airtight container. Place it in the fridge right after making it. This helps keep the flavors bright and the texture just right. It will stay good for about three days. If you notice browning, a splash of lemon juice can help keep it green.
Freezing Guidelines
I do not recommend freezing this dish. The avocado will change texture and become mushy when thawed. The egg salad can lose its creaminess and taste. Instead, enjoy it fresh and make just what you need.
Best Practices for Reheating
This dish is best served cold or at room temperature. If you must reheat, do so gently. Place it in a pan over low heat for a few minutes. Stir often to heat evenly. Avoid the microwave, as it can make the salad watery and change the flavor.
FAQs
Can I make Avocado Egg Salad ahead of time?
Yes, you can make this salad ahead of time. Prepare it in the morning and store it in the fridge. I recommend eating it within one day for the best flavor and texture. The avocado can brown, so keep it covered well.
What are the best types of lettuce for wraps?
For wraps, I like using romaine or butter lettuce. They offer a nice crunch and hold the filling well. Other good options are green leaf or iceberg lettuce. Each type adds a unique texture to your wrap.
How many calories are in Avocado Egg Salad Lettuce Wraps?
Each serving has about 200 calories. This number can vary based on how much filling you add. It’s a light meal that gives you good protein and healthy fats.
Can I substitute Greek yogurt in this recipe?
Yes, you can substitute Greek yogurt with a few options. Sour cream or plain yogurt works well. If you need a dairy-free option, try using mashed tofu or avocado. Each will change the taste a bit but will keep it creamy.
In this blog post, we explored a tasty and healthy Avocado Egg Salad recipe. We covered all the key ingredients, from eggs to fresh veggies. I shared step-by-step instructions and tips for making the perfect wrap. You can switch up the protein, add different veggies, or choose other wraps. Plus, we discussed storage methods and answered common questions. This dish is easy to make and great for meal prep. Enjoy it as a snack or a quick lunch. You’ll love how simple and delicious it i

Avocado Egg Salad Lettuce Wraps
Ingredients
- 4 large eggs
- 1 ripe avocado, peeled and pitted
- 2 tablespoons plain Greek yogurt
- 1 teaspoon Dijon mustard
- 1 tablespoon fresh lemon juice
- 0.25 teaspoon garlic powder
- to taste salt and freshly ground pepper
- 0.25 cup red bell pepper, finely chopped
- 0.25 cup green onions, sliced
- 1 cup crisp lettuce leaves (such as romaine or butter lettuce)
Instructions
- In a medium-sized pot, arrange the eggs and cover them with enough water to submerge them by about an inch. Bring the water to a rolling boil over medium-high heat. Once boiling, reduce the heat to low and let them simmer gently for 9 to 12 minutes, depending on your desired doneness. After cooking, immediately transfer the eggs to a bowl of ice water and let them cool completely.
- While the eggs cool, use a fork to mash the peeled avocado in a mixing bowl until it reaches a creamy consistency without any large lumps.
- Once the eggs are cool, peel them carefully and chop them into small, bite-sized pieces. Add the chopped eggs to the bowl filled with mashed avocado.
- To the avocado and egg mixture, add the Greek yogurt, Dijon mustard, fresh lemon juice, and garlic powder. Stir everything together until the mixture is thoroughly combined and creamy.
- Gently fold in the finely chopped red bell pepper and sliced green onions to the salad mix. Season generously with salt and freshly ground pepper to suit your taste.
- Take a crisp lettuce leaf and place a generous scoop of the avocado egg salad in the center. Fold the leaves around the filling to create a delightful wrap, similar to a taco.
![- 1 ripe mango, diced into small cubes - 2 ripe avocados, diced into small cubes - 1 small red onion, finely chopped - 1 jalapeño, minced - 1/4 cup fresh cilantro, finely chopped - Juice of 2 limes - Salt and pepper to taste - Optional: 1/2 teaspoon ground cumin To create a vibrant mango avocado salsa, you need fresh, tasty ingredients. First, pick a ripe mango. A ripe mango should feel slightly soft when you press it. Next, choose ripe avocados. They should also yield slightly to gentle pressure. The red onion adds a nice crunch and color. Finely chop it for the best texture. The jalapeño brings the heat. If you want less spice, remove the seeds. Fresh cilantro adds a bright flavor. Always choose fresh herbs for the best taste. Lime juice helps balance the sweetness of the fruits. It also keeps the avocados from browning. Salt and pepper enhance all the flavors. If you like a warm taste, add ground cumin. You can switch things up based on your taste. Try different types of onions, like white or green. They each bring a unique flavor. You can also add black beans or corn for extra texture and nutrition. If you love spice, add more jalapeño or try other peppers. Each choice lets you make this salsa your own. Explore and enjoy the creative process. Check out the Full Recipe for more details! - Start with a ripe mango. Cut it into small cubes. Place the mango in a large mixing bowl. - Next, take two ripe avocados. Dice them into small cubes, too. Add them gently to the bowl. - Now, grab a small red onion. Finely chop it and mix it into the bowl. - For some heat, use a jalapeño. Deseed it and mince it based on your spice level. - Chop 1/4 cup of fresh cilantro. This herb adds a bright flavor to the salsa. - Finally, squeeze the juice of two limes into the bowl. This keeps the avocados fresh. - Combine all the fresh ingredients carefully. Use a gentle folding motion. - This method keeps the avocados and mango intact. You want a nice texture in your salsa. - Pour in the lime juice and season with salt and pepper. If you like, add 1/2 teaspoon of ground cumin. - Mix everything together until well blended. Make sure not to break the avocado pieces. - Before serving, taste your salsa. Adjust the flavors if needed. - Add a pinch of salt or more lime juice for brightness. - Check the texture. It should be fresh and chunky, not mushy. You can find the Full Recipe for more details. Enjoy this fresh and vibrant salsa! Choosing the best mango and avocado is key. Look for a mango that feels slightly soft when you squeeze it. The skin should be mostly yellow with some red. For avocados, choose ones that yield to gentle pressure. They should feel soft but not mushy. Knowing when fruits are perfectly ripe matters. A ripe mango has a sweet smell at the stem end. The avocado should be dark green or nearly black. Check both fruits daily if you buy them unripe. To store salsa and preserve freshness, cover it tightly with plastic wrap. Press the wrap down to touch the salsa. This limits air exposure, keeping it bright. You can also store it in an airtight container. Best practices for flavor development overnight include letting the salsa sit in the fridge for at least an hour. This allows the flavors to marry. The lime juice helps keep the avocados from browning. Serve the salsa in a vibrant bowl for eye-catching appeal. A colorful dish makes the salsa pop on your table. Garnish with a sprig of cilantro on top for extra flair. Ideal accompaniments include crispy tortilla chips for dipping. You can also serve it with grilled meats like chicken or fish. Mango avocado salsa adds a fresh kick to any meal. Don’t forget to check the [Full Recipe] for more details! {{image_4}} You can change the fruits in this salsa. Try adding diced pineapple or peach for a sweet twist. These fruits bring a bright flavor and can make your salsa unique. If you want a vegan option, you can use black beans or corn. They add protein and make the salsa heartier. Many cultures have their own takes on salsa. You can add ingredients like mango or cilantro to reflect those flavors. For a spicy kick, adjust the jalapeño or add other peppers. For example, try using serrano peppers for more heat. Each region adds a special touch that can excite your taste buds. This salsa shines as a dip or topping. Serve it with crispy tortilla chips for a fun snack. You can also use it on grilled chicken or fish for a fresh meal. It adds color and flavor to your plate. Get creative with how you serve it, and enjoy the burst of flavors. For the full recipe, check out the complete guide above! To keep your Mango Avocado Salsa fresh, store it in the fridge. Place it in an airtight container. This helps prevent exposure to air, which can cause browning. Your salsa will last about 2 to 3 days in the fridge. Look for signs of spoilage, like an off smell or brown color in the avocados. If you see these signs, it's best to toss it out. Can you freeze Mango Avocado Salsa? Yes, but it's not the best option. Freezing can change the texture of avocados. If you choose to freeze it, do so right after making it. Use a freezer-safe container, leaving some space at the top for expansion. When you thaw it, the salsa might be watery. To fix this, drain any excess liquid before serving. Choose the best storage container for your salsa. Glass or BPA-free plastic containers work well. Airtight options are ideal because they keep air out. This helps maintain flavor and freshness. Using the right container can make a big difference in how long your salsa lasts. Mango Avocado Salsa stays fresh in the fridge for about 2 to 3 days. After that, the avocados may turn brown. You can freeze it, but it’s best to eat it fresh. If you freeze it, use it within a month for the best taste. Yes, you can swap ingredients based on your needs. If you're allergic to avocados, try using diced cucumbers instead. If you don’t like cilantro, fresh parsley works too. For a milder taste, skip the jalapeño or use sweet bell peppers. This salsa pairs well with many dishes. Serve it with tortilla chips for a crunchy snack. It’s also great on grilled chicken or fish. Try it on tacos or as a topping for burrito bowls for added flavor. The spice level depends on how much jalapeño you use. If you remove the seeds and ribs, it will be milder. If you like heat, add more jalapeño or try a spicier pepper. Adjusting the amount gives you control over the spice. Yes, you can prep it ahead! If you want to make it a day before, do so. Just add lime juice to keep the avocados bright. Store it in an airtight container in the fridge. This will help the flavors blend nicely. For the best taste, mix in the avocado right before serving. For the full recipe, check out the [Full Recipe]. Mango Avocado Salsa combines fresh ingredients for a tasty dish. We covered how to pick ripe fruits and mix flavors. You learned about variations, storage tips, and serving ideas. This salsa is perfect for gatherings or a light snack. It’s simple to make and adjust to your taste. Enjoy making it and share the joy of fresh flavors with others!](https://joymealplan.com/wp-content/uploads/2025/07/8dfe7157-a149-4f91-a822-36a2fad97dae-768x768.webp)

![- 1 block (14 oz) firm tofu, pressed and drained - 1/2 cup cornstarch - 3 tablespoons vegetable oil - 1/4 cup honey - 2 tablespoons soy sauce - 4 cloves garlic, minced - 1 teaspoon fresh ginger, grated - 1 tablespoon sesame seeds, toasted - 2 green onions, sliced - Salt and pepper to taste To make crispy honey garlic tofu, you need simple ingredients that pack big flavor. Start with firm tofu. It holds its shape well and crisps up nicely. Press and drain it to get rid of excess water. This step is key for crispy tofu. Next, grab some cornstarch. It’s your secret weapon for that crunchy coating. It sticks to the tofu and gets crispy in the hot oil. Vegetable oil helps fry the tofu evenly. Use a good amount, but don’t drown the tofu. For the sauce, honey adds sweetness. Soy sauce brings saltiness, and garlic and ginger give it a warm kick. These flavors blend perfectly. You can adjust the honey and soy sauce to fit your taste. Finally, sesame seeds and sliced green onions are for garnishing. They add a nice crunch and color to your dish. This crispy honey garlic tofu is not just tasty; it's visually appealing too. For the full recipe, check out the detailed steps. - Cut the tofu into 1-inch cubes. - Toss tofu cubes in cornstarch with salt and pepper. Start by cutting your block of firm tofu into 1-inch cubes. Make sure the pieces are even for cooking. Next, take a shallow dish and add cornstarch. Sprinkle in some salt and pepper. Toss those tofu cubes in the cornstarch mixture, coating each piece well. Shake off any extra cornstarch to keep them light and crispy. - Heat vegetable oil in a skillet over medium-high. - Sauté tofu until golden brown and crispy. Now, heat 3 tablespoons of vegetable oil in a skillet over medium-high heat. Wait until the oil is hot. Carefully place the tofu cubes in the skillet in a single layer. Sauté them for about 5 to 7 minutes. Turn the pieces so they cook evenly. You want them to turn golden brown and get nice and crispy. Once done, transfer the tofu to a paper towel-lined plate to absorb excess oil. - Sauté garlic and ginger in the skillet. - Combine honey and soy sauce, allowing to thicken. In the same skillet, lower the heat to medium. Add 4 minced garlic cloves and 1 teaspoon of grated ginger. Sauté these for about 1 minute. You'll know they're ready when they smell great and turn golden. Now, pour in 1/4 cup of honey and 2 tablespoons of soy sauce. Stir well and let it cook for 2 to 3 minutes until it thickens a bit. - Coat crispy tofu in the honey garlic sauce. - Serve with garnishes. Gently place the crispy tofu back into the skillet. Toss it in the honey garlic sauce until every piece is coated. Remove from heat and sprinkle 1 tablespoon of toasted sesame seeds and 2 sliced green onions over the dish. This adds flavor and makes it look nice. For the full recipe, check the details above! - Use firm tofu for best results: Firm tofu holds its shape and crisps up nicely. - Ensure the tofu is properly pressed and drained: Pressing removes excess water. This helps the tofu absorb flavors and get crispy. - Adjust honey and soy sauce ratios to taste: You can make it sweeter or saltier by changing these amounts. - Experiment with adding red pepper flakes for heat: A little spice can really elevate the dish. Add to your liking. - Consider using an air fryer for an even crispier finish: Air frying gives a great crunch without extra oil. - Double-fry method for ultimate crunch: Fry the tofu once, let it rest, and fry again. This makes it super crispy. For more details, check the Full Recipe. {{image_4}} You can switch tofu for other proteins. Tempeh is a great choice. It has a nutty flavor and a firmer texture. Just cut it into cubes like tofu. Cook it the same way for a tasty dish. Seitan is another option. It mimics meat well and offers a chewy texture. It absorbs flavors easily. Use seitan if you're looking for a heartier bite. Want a kick? Add sriracha to the sauce. This gives a spicy twist to the sweet honey. You can also try orange juice or maple syrup. These swaps change the flavor profile. Orange adds a fresh zest, while maple syrup gives a rich taste. Both can make your dish stand out. Crispy honey garlic tofu shines when paired with sides. Steamed vegetables bring color and nutrition. A fresh salad can add crunch. You can also use this tofu in wraps or tacos. Just fill them with your favorite veggies and tofu. It makes for a fun and easy meal. For the full recipe, follow the steps and enjoy your cooking journey! You can keep crispy honey garlic tofu in the fridge. Place it in an airtight container. It will stay fresh for up to 3 days. This way, you can enjoy it later without losing flavor. To reheat your tofu, use the oven or a skillet. This keeps it crispy and tasty. Avoid using the microwave. It makes the tofu soggy, which we want to prevent. You can also freeze cooked tofu. It will last for up to 2 months in the freezer. When you want to eat it, simply thaw it out. After thawing, re-crisp it in a skillet or oven before serving. This method helps regain its crunchy texture. Typically, crispy honey garlic tofu lasts up to 3 days when stored properly. To keep it fresh, place it in an airtight container. Ensure the tofu is cool before sealing. This helps maintain its flavor and texture. Yes, you can make this recipe vegan. Simply replace honey with agave or maple syrup. Both options add sweetness without using animal products. This change keeps the dish plant-based and equally delicious! Crispy honey garlic tofu pairs well with rice, noodles, or a fresh vegetable stir-fry. You can serve it over steamed jasmine rice for a classic combo. Noodles coated in a light sauce also work great. Adding a side of colorful stir-fried veggies brings extra nutrition and flavor. Firm or extra-firm tofu works best for a crispy texture. These types hold their shape and don’t crumble. For the best results, make sure you press and drain the tofu well before cooking. This removes excess moisture, allowing for a delightful crunch. For the full recipe, check out the [Full Recipe]. In this post, we covered how to make crispy honey garlic tofu. You learned about the key ingredients, from firm tofu to the sweet and savory sauce. I shared step-by-step cooking tips and tricks for the perfect texture and flavor. Remember, you can customize the recipe with different proteins or sauces. Store leftovers correctly to enjoy this dish later. Overall, this recipe is fun, flexible, and delicious. Give it a try, and you’ll impress your friends or family!](https://joymealplan.com/wp-content/uploads/2025/07/a62a8118-0118-41a9-8dcd-10793e5e2e73-768x768.webp)