Copycat Olive Garden Zuppa Toscana Flavorful Comfort Soup

If you love Olive Garden’s Zuppa Toscana, you’ll want to try my copycat recipe! This flavorful soup combines savory Italian sausage, crispy bacon, and tender potatoes in a rich broth. With easy steps and simple ingredients, you can recreate this comforting dish at home. Whether it’s a rainy day or a cozy night in, this soup will warm your soul. Ready to dive into the recipe? Let’s get cooking!
Why I Love This Recipe
- Comforting Flavor: This creamy soup captures the essence of cozy comfort food with its rich flavors and satisfying texture.
- Quick and Easy: This recipe comes together in just 45 minutes, making it perfect for a weeknight dinner.
- Customizable Ingredients: Feel free to adjust the heat level or swap out ingredients to suit your taste and dietary needs.
- Perfect for Sharing: Whether it’s a family gathering or a cozy dinner with friends, this soup is ideal for sharing and creating memories.
Ingredients
Main Ingredients
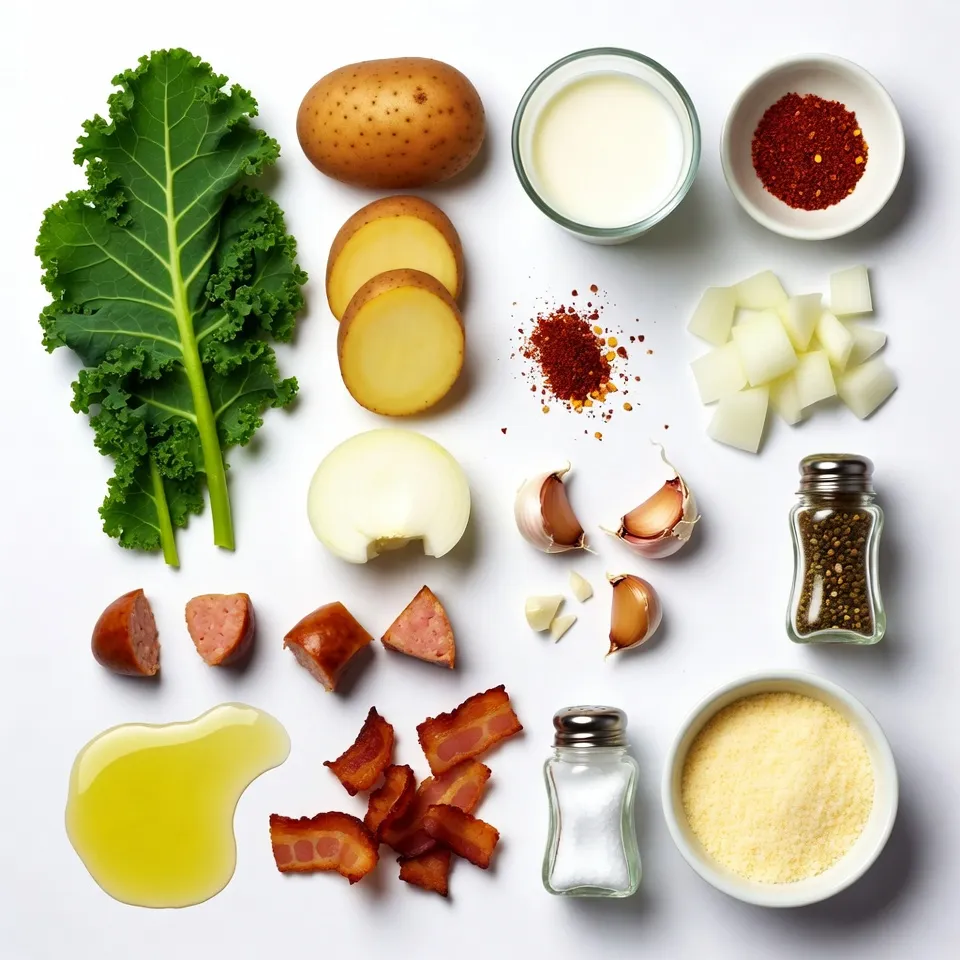
– 1 pound Italian sausage
– 4 slices of bacon
– 1 large onion
– 3 cloves garlic
Broth and Vegetables
– 6 cups chicken broth
– 3 large russet potatoes
– 2 cups kale
Seasonings and Final Touches
– 1 cup heavy cream
– 1 teaspoon red pepper flakes
– Salt and pepper to taste
– Olive oil
– Grated Parmesan cheese
To create the perfect copycat Olive Garden Zuppa Toscana, you need fresh and tasty ingredients. Start with one pound of Italian sausage, either mild or spicy, depending on how much heat you like. Next, add four slices of bacon, finely chopped, to give the soup a rich flavor.
For the base, you will need one large onion, diced, and three cloves of garlic, minced. These two ingredients add depth to the soup.
Next, grab six cups of chicken broth to create a flavorful liquid base. Then, three large russet potatoes should be washed and thinly sliced. Their creaminess enhances the texture of the soup. Finally, add two cups of kale, which adds a nice color and nutrition.
For the finishing touch, use one cup of heavy cream for a rich, velvety texture. A teaspoon of red pepper flakes will give the soup a little kick. Don’t forget to season with salt and pepper to taste, and drizzle in some olive oil for cooking. Grated Parmesan cheese will top off the dish, adding extra flavor.
With these ingredients, you are set to make a delicious bowl of comfort soup that rivals the restaurant version!
Step-by-Step Instructions
Preparation Steps
– Cook bacon until crispy.
– Brown the Italian sausage.
To start, heat a drizzle of olive oil in a large pot over medium heat. Add the finely chopped bacon. Cook it until crispy and golden brown, about 5-7 minutes. Use a slotted spoon to transfer the crispy bacon to a paper towel-lined plate. Keep the tasty drippings in the pot.
Next, add the Italian sausage in the same pot. Break it into smaller pieces as it cooks. Cook for about 5-7 minutes until browned and fully cooked. Set the sausage aside with the bacon.
Cooking the Vegetables
– Sauté onions and garlic.
– Add chicken broth and potatoes.
Now, add the diced onion to the pot. Sauté it for about 3-4 minutes until it turns translucent. Stir in the minced garlic and cook for an additional minute. This will make the garlic fragrant.
Carefully pour in the chicken broth. Use a wooden spoon to scrape up any browned bits at the bottom of the pot. This adds great flavor to your soup. Next, add the thinly sliced potatoes to the broth. Bring it to a rolling boil. Once boiling, reduce the heat to medium-low and let it simmer for about 15-20 minutes. The potatoes should be tender when pierced with a fork.
Final Assembly
– Incorporate sausage and bacon.
– Add kale and heavy cream.
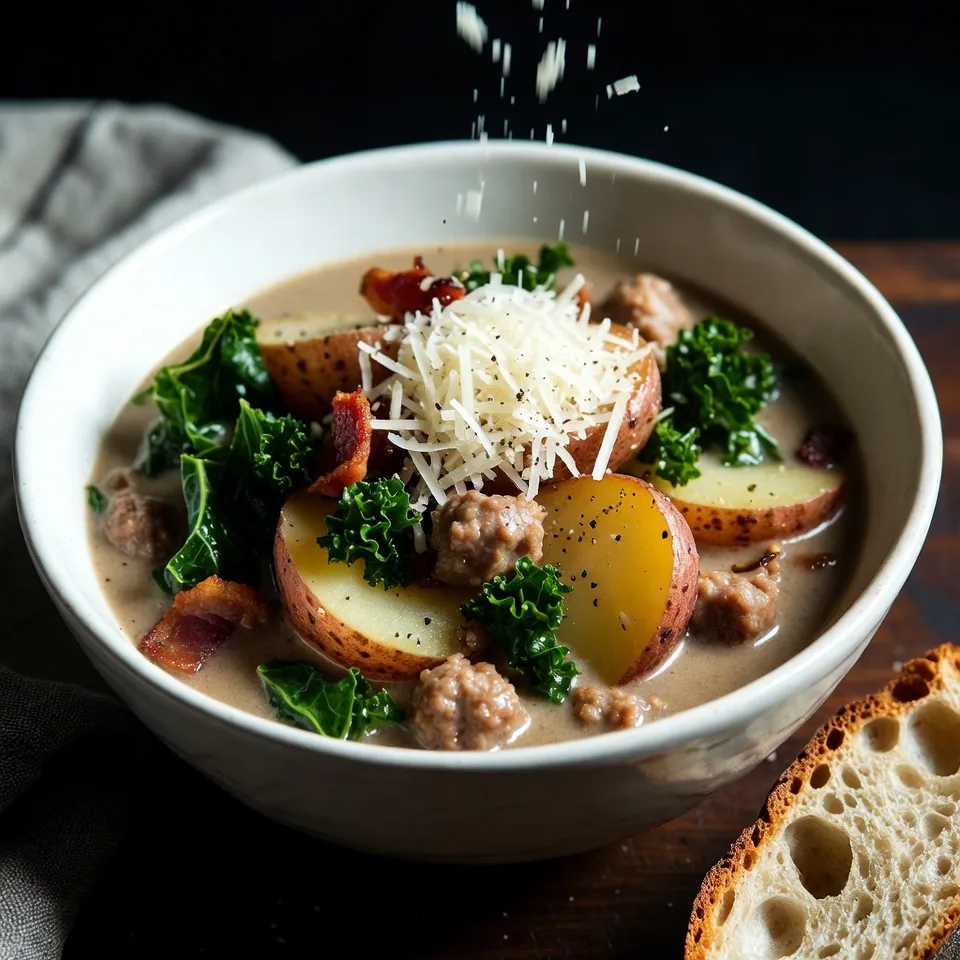
Now, stir in the cooked sausage, crispy bacon, and red pepper flakes. Let the soup simmer for another 5 minutes. This helps meld all the flavors together.
Next, add the chopped kale and heavy cream to the pot. Stir well and allow the soup to heat through for another 5 minutes. Taste the soup and add salt and pepper if needed. Once it’s heated, turn off the heat. Let the soup rest for a few minutes for the flavors to blend even more.
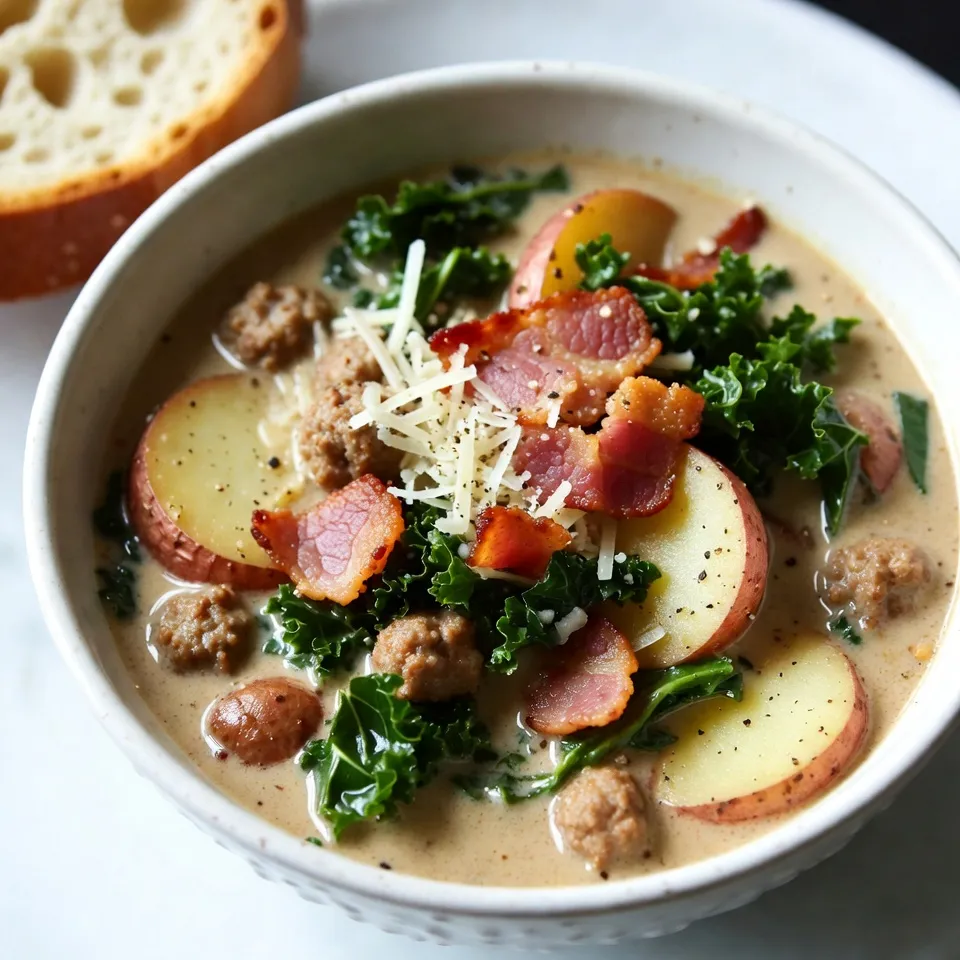
Your comforting Zuppa Toscana is now ready to enjoy!
Tips & Tricks
Achieving the Perfect Flavor
To get the best flavor in your Zuppa Toscana, start by adjusting the seasoning. You can add more salt or red pepper flakes if you like heat. Taste often as you cook. This helps you find your ideal balance. Sautéing ingredients adds depth to our soup. The bacon and sausage create a rich base. Cook these until they are golden and crispy. This step makes every spoonful delicious.
Texture and Consistency
Cooking the potatoes just right is key. Slice them thin and let them simmer until tender. They should break apart easily but not turn mushy. For a creamy finish, add the heavy cream at the end. This gives your soup that smooth, velvety texture we all love. Stir gently to mix everything well, but don’t overdo it.
Serving Suggestions
When serving, use warm bowls to keep the soup hot. Top each bowl with grated Parmesan cheese. A sprinkle of black pepper also adds a nice touch. Pair your soup with crusty bread for dipping. This makes for a comforting and filling meal. You can also add a fresh salad on the side for a complete dinner.
Pro Tips
- Choose the Right Sausage: Use mild Italian sausage for a subtle flavor or spicy for an extra kick. You can also mix both for a balanced taste.
- Perfect Potato Texture: Make sure to slice the potatoes evenly to ensure they cook uniformly. Thinner slices will cook faster and create a creamier texture.
- Enhance Flavor with Fresh Herbs: Consider adding a sprinkle of fresh thyme or rosemary towards the end of cooking for an aromatic boost.
- Let it Rest: Allow the soup to sit for a few minutes after cooking before serving. This helps the flavors meld together beautifully.
Variations
Substitute Ingredients
You can switch out the Italian sausage for turkey sausage. This change offers a lighter flavor. If you want a twist, try chicken sausage. For greens, kale is classic, but you can use spinach or Swiss chard. Both will add a fresh taste.
Dietary Adjustments
To make this soup gluten-free, choose gluten-free broth and check the sausage label. Many brands offer gluten-free options. For a vegan version, skip the meat and use plant-based sausage. Substitute coconut cream for the heavy cream. This adds richness without dairy.
Flavor Additions
Feel free to play with spices. Add thyme or oregano for extra depth. A squeeze of lemon can brighten the soup. You can also toss in veggies like carrots or celery. These will bring more color and nutrients. Experimenting makes this soup your own.
Storage Info
Refrigeration Guidelines
To store leftovers of your Zuppa Toscana, let it cool first. Use an airtight container. Place it in the fridge. It will stay fresh for about three to four days. When you’re ready to eat, just scoop out what you need.
Freezing Instructions
For freezing, pour the cooled soup into freezer-safe bags or containers. Leave some space at the top for expansion. You can freeze it for up to three months. To reheat, thaw it overnight in the fridge. Heat it slowly on the stove. This keeps the flavors intact.
Shelf Life
In the fridge, your soup lasts about four days. Look for signs of spoilage, like an off smell or mold. If you see either, it’s best to toss it out. Always trust your senses when it comes to food safety.
FAQs
How can I make Zuppa Toscana spicier?
To add more heat, you can adjust the red pepper flakes. Start with one teaspoon and add more to taste. If you want more spice, try using hot Italian sausage instead of mild. This change brings a rich flavor and a kick to the soup.
Can I use different types of potatoes?
Yes, you can use other potatoes. Yukon Gold or red potatoes work well. Just remember, these types may cook differently. Cut them into thin slices for even cooking. This keeps the texture soft but not mushy.
What is the best way to reheat leftovers?
You can reheat leftovers in two ways. For the microwave, use a microwave-safe bowl. Heat in short bursts, stirring often. If using the stove, warm on low heat. Stir frequently to keep the soup creamy. This prevents sticking and burning.
This blog post covered how to make a delicious Zuppa Toscana. We discussed key ingredients, including Italian sausage, bacon, and cream. The step-by-step instructions made it easy to follow along. I shared tips to boost flavor and perfect texture. You can adjust ingredients to fit your needs, whether gluten-free or vegan. Finally, I detailed storage tips for leftovers and answers to common questions. Enjoy your cooking, and don’t hesitate to experiment with this hearty dis

Creamy Copycat Zuppa Toscana
Ingredients
- 1 pound Italian sausage
- 4 slices bacon, finely chopped
- 1 large onion, diced
- 3 cloves garlic, minced
- 6 cups chicken broth
- 3 large russet potatoes, washed and thinly sliced
- 1 cup heavy cream
- 2 cups kale, stems removed and chopped
- 1 teaspoon red pepper flakes
- to taste salt and pepper
- for cooking drizzle olive oil
- for serving grated Parmesan cheese
Instructions
- In a large pot, heat a drizzle of olive oil over medium heat. Add the finely chopped bacon and cook, stirring occasionally, until the bacon is crispy and golden brown, about 5-7 minutes. Once done, use a slotted spoon to transfer the bacon to a paper towel-lined plate, leaving the delicious drippings in the pot.
- In the same pot, add the Italian sausage. Use a spatula to break it into smaller pieces as it cooks. Cook for about 5-7 minutes, or until browned and fully cooked. Remove the sausage from the pot and set it aside with the crispy bacon.
- Add the diced onion to the pot and sauté for about 3-4 minutes, or until the onion becomes translucent. Stir in the minced garlic and cook for an additional 1 minute, allowing the garlic to become fragrant without burning.
- Carefully pour in the chicken broth, using a wooden spoon to scrape the bottom of the pot to lift any browned bits, enhancing the flavor of the soup.
- Add the thinly sliced potatoes to the broth and bring the mixture to a rolling boil. Once boiling, reduce the heat to medium-low and simmer for about 15-20 minutes, or until the potatoes are tender when pierced with a fork.
- Stir in the cooked sausage, crispy bacon, and red pepper flakes. Let the soup simmer for an additional 5 minutes to meld the flavors together.
- Incorporate the chopped kale and heavy cream into the pot. Stir well, allowing the soup to heat through for another 5 minutes. Taste the soup and season with salt and pepper as desired.
- Once heated, turn off the heat and let the soup rest for a few minutes, allowing the flavors to become even more harmonious before serving.

![To make the Homemade Crunchwrap Supreme, gather these items: - 1 lb ground turkey or beef - 1 packet of taco seasoning - 1 cup black beans, drained and rinsed - 1 cup corn kernels (fresh or frozen) - 1 cup shredded cheddar cheese - 1 cup lettuce, finely shredded - 1 large tomato, diced - ½ cup sour cream - 4 large flour tortillas - 4 small tostada shells - 1 tablespoon olive oil - Salsa for serving Each Crunchwrap has around 500 calories. It includes protein from the meat and beans. The cheese adds calcium but also fat. Fresh veggies bring fiber and vitamins. If you want to cut calories, use less cheese or sour cream. This recipe feeds four, perfect for a family meal or a fun gathering. You can swap ground turkey for chicken or even tofu for a veggie option. Use black beans or pinto beans based on your taste. For cheese, try pepper jack for some heat. If you need a gluten-free option, use corn tortillas instead of flour. You can also replace sour cream with Greek yogurt for a healthier twist. Enjoy making it your own! Making a Homemade Crunchwrap Supreme is fun and easy. You start by cooking the meat. Then, you mix it with beans, corn, and cheese. Next, you assemble the wrap with layers of toppings. Finally, you cook the wrap until it’s crispy and golden. 1. Brown the Meat: Heat 1 tablespoon of olive oil in a skillet. Add 1 lb of ground turkey or beef. Cook it for 5-7 minutes until it’s browned. 2. Season the Meat: Drain any extra grease. Add 1 packet of taco seasoning. If needed, splash in some water. Cook for another 2-3 minutes. 3. Combine Ingredients: In a bowl, mix the seasoned meat with 1 cup of black beans, 1 cup of corn, and half of 1 cup of shredded cheese. Stir well. 4. Prepare the Tortilla: Lay out 1 large flour tortilla on a flat surface. 5. Assemble the Crunchwrap: Spoon the meat and bean mix into the center. Leave about 2 inches of space from the edges. 6. Add Tostada and Toppings: Place 1 small tostada shell on top of the mixture. Spread ½ cup of sour cream over the tostada. Add 1 cup of shredded lettuce, 1 diced tomato, and the rest of the cheese. 7. Fold the Crunchwrap: Fold the edges of the tortilla over the filling. Make pleats around the edge until it’s all enclosed. 8. Cook the Crunchwrap: Heat a non-stick skillet on medium heat. Place the crunchwrap seam-side down. Cook for 2-3 minutes until golden, then flip it and cook for another 2-3 minutes. 9. Serve: Cut each crunchwrap in half. Serve warm with salsa on the side. While I can't show pictures, I recommend you take photos of each step. It can help you track your progress. You can also find great visual aids in the [Full Recipe]. They can guide you through the cooking process with ease! To get that perfect crunchwrap texture, you want a good balance. Start with a large flour tortilla. This gives you room to fold. Use a small tostada shell inside. This will add a nice crunch. When you cook it, make sure your skillet is hot. A hot skillet helps create a nice, crispy outside. Flip it gently to avoid spills. Let it brown evenly on both sides for the best result. Flavorful meat is key to a great crunchwrap. I like to use ground turkey or beef. Sauté it in olive oil until browned. After that, add taco seasoning. This is where the magic happens. Follow the packet instructions for best results. If the meat seems dry, add a splash of water. This helps the seasonings stick and blend. Mix in black beans and corn for added taste and texture. Making ahead can save you time. You can prepare the meat mixture a day before. Just store it in an airtight container. When you are ready, assemble your crunchwraps. This way, you can enjoy a fresh meal with less work. You can also freeze the assembled crunchwraps. Just make sure to wrap them well. When you are ready to eat, heat them up in the skillet. This keeps them nice and crispy. For more details, check the Full Recipe. {{image_4}} You can easily make a tasty veggie crunchwrap. Just replace the meat with veggies. Use a mix of black beans, corn, and diced peppers. You can add mushrooms for a nice texture. To keep it creamy, use extra sour cream or a plant-based option. This way, you get all the flavor without meat! Want to spice things up? Add some jalapeños to the filling. You can use fresh slices or pickled ones. If you like heat, toss in some hot sauce or pepper flakes. A dash of chipotle seasoning in the meat gives a smoky kick. This adds a new level of flavor! Don’t stick to just one topping. Try different sauces like guacamole or zesty salsa. You can also add sliced olives or diced onions for crunch. Consider using different cheeses, like pepper jack, for extra flavor. Mix and match to create your perfect crunchwrap. For the full recipe, check out the Ultimate Crunchwrap Supreme. To keep your leftover Crunchwrap Supreme fresh, wrap it tightly in plastic wrap or foil. Place it in an airtight container. This way, it stays safe from air and moisture. Store it in the fridge for up to three days. To enjoy it later, make sure you don’t leave it out too long. Reheating your Crunchwrap is easy. Start by taking it out of the fridge. Place it in a skillet over medium heat. Cover it with a lid. Heat for about 3-4 minutes on each side. This method keeps it crispy. You can also use the microwave if you're in a hurry. Just place it on a microwave-safe plate. Heat it for about 1-2 minutes until warm. If you want to save your Crunchwrap for later, freezing is a great option. Wrap each Crunchwrap in plastic wrap, then in foil. This helps protect it from freezer burn. You can freeze them for up to three months. When you’re ready to eat, let it thaw in the fridge overnight. Then, reheat it as described above. Enjoy your homemade Crunchwrap Supreme whenever you crave it! For the full recipe, check out the Ultimate Crunchwrap Supreme . To make your Crunchwrap Supreme gluten-free, use gluten-free tortillas. You can find them at most grocery stores. Make sure the taco seasoning is also gluten-free. Check the label to be sure. All other ingredients in this recipe are naturally gluten-free. The best way to reheat a crunchwrap is to use a skillet. Heat it over medium heat for about 2-3 minutes on each side. This keeps the crunchwrap crispy. You can also use an oven at 350°F. Bake it for about 10 minutes. This method warms it through without making it soggy. Yes, you can customize your crunchwrap for any diet. For a vegetarian option, skip the meat and add more beans or veggies. You can also switch the cheese for a dairy-free kind. If you like spice, add jalapeños or hot sauce. This recipe is flexible and allows for many tasty changes. Try different flavors to find what you love most. For the full recipe, refer to the Ultimate Crunchwrap Supreme. In this post, I covered how to make a Crunchwrap Supreme from start to finish. We discussed key ingredients, cooking steps, and storage tips. I shared tricks for the perfect texture and flavorful meat. You have options for vegetarian and spicy versions, plus ways to adjust for your taste. With these insights, you can now make this fun and tasty meal. Enjoy your Crunchwrap adventure!](https://joymealplan.com/wp-content/uploads/2025/06/9254d856-97cc-48f7-bdd4-96eee0233a6c-768x768.webp)
![- 4 boneless, skinless chicken thighs - 1 lb baby potatoes, halved - 1 lemon, zested and juiced - 3 tablespoons extra virgin olive oil - 4 garlic cloves, minced - 1 tablespoon fresh rosemary, finely chopped - 1 tablespoon fresh thyme, finely chopped - 1 teaspoon paprika - Salt and freshly ground pepper to taste - 1 cup broccoli florets (for added color and nutrition) When I make this dish, I get excited about using fresh ingredients. The chicken thighs are juicy and flavorful. They pair perfectly with the baby potatoes, which crisp up beautifully. The lemon adds a bright and zesty touch. It brings life to the dish. I always zest the lemon first. This step releases the essential oils, which pack a punch of flavor. Then, I squeeze the lemon juice right into the marinade. Using fresh herbs like rosemary and thyme makes a big difference. They add a lovely aroma as they cook. I love to chop them finely so their flavor spreads evenly. Garlic, of course, gives that extra depth. If you want more color and nutrition, consider adding broccoli florets. They roast nicely and add a pop of green. For the full recipe, check out the detailed instructions. Each ingredient plays a key role in making this meal a hit. Enjoy cooking! First, preheat your oven to 425°F (220°C). This temperature helps the chicken and potatoes cook evenly. Next, line a sheet pan with parchment paper. This makes cleanup easy and helps prevent sticking. In a large bowl, mix your marinade. Combine 3 tablespoons of olive oil, the juice and zest of one lemon, minced garlic, chopped rosemary, chopped thyme, paprika, and a pinch of salt and pepper. Whisk it all together. This mixture adds great flavor. Now, add your chicken thighs to the marinade. Make sure each piece gets coated well. For the best flavor, let the chicken marinate for at least 15 minutes at room temperature. If you have more time, refrigerate it for up to 1 hour. This helps the flavors soak in. While the chicken marinates, prepare the baby potatoes. Place the halved potatoes on your lined sheet pan. Drizzle them with olive oil and season with salt and pepper. Toss them well so they are coated evenly. Spread them out in a single layer. This helps them crisp up nicely. If you want to add broccoli florets, toss them on the pan as well. They add color and nutrition to the dish. Once your chicken has marinated, take it out of the bowl. Place the chicken thighs on the sheet pan with the potatoes. Arrange them so they cook evenly. Now, put the sheet pan in the oven. Roast for 30-35 minutes. Check the chicken’s internal temperature; it should reach 165°F (75°C) to be safe to eat. The potatoes should be golden and crisp. If you want a golden finish, broil the dish for an extra 2-3 minutes at the end. Keep a close eye on it to avoid burning. After cooking, carefully take the pan out of the oven. Let the dish rest for about 5 minutes. This allows the flavors to settle. Now, you can enjoy your savory Sheet Pan Lemon Herb Chicken and Potatoes! For the complete cooking guide, refer to the Full Recipe. To get juicy chicken, marinate it well. I suggest marinating for at least 15 minutes. For deeper flavor, let it sit in the fridge for up to 1 hour. This helps the flavors sink in. Use a meat thermometer to check doneness. The chicken should reach 165°F (75°C) inside. Insert the thermometer into the thickest part of the thigh. This ensures your chicken is safe to eat. Arranging the potatoes is key to crispiness. Place them cut-side down on the sheet pan. This helps them brown evenly. Roasting in a single layer is important. If you crowd the pan, your potatoes may steam instead of roast. This can lead to soggy potatoes. More space means better air flow and crisp edges. Serve the chicken and potatoes right from the sheet pan. This gives a nice, rustic feel. If you want to impress, transfer it to a big platter. Add garnishes for a pop of color. Fresh lemon slices and more herbs look great. They make your dish more appealing and delicious. {{image_4}} You can switch up the herbs in this dish. Try using basil or oregano instead of rosemary and thyme. Fresh herbs give great flavor, but dried herbs work too. If you prefer dried herbs, use about one-third the amount. Dried herbs are easy to store and use anytime. Feel free to add more veggies to your sheet pan. Carrots, bell peppers, or green beans pair well with chicken and potatoes. You can also use seasonal veggies. In spring, try asparagus or peas. In fall, sweet potatoes or brussels sprouts work nicely. These additions bring color and nutrition. For a flavor kick, think about adding spices. Paprika adds a nice warmth, but you can also try cumin or chili powder for extra heat. Zest from other citrus fruits like lime or orange can brighten the dish. Each change will give your meal a unique twist, making it fun to explore. To keep your leftovers fresh, place them in an airtight container. This helps prevent moisture loss and keeps flavors intact. Store the container in the fridge. Your lemon herb chicken and potatoes will last up to three days. If you want to keep them longer, consider freezing them. In the freezer, they can last for up to three months. For reheating, the oven works best. Preheat your oven to 350°F (175°C). Place the chicken and potatoes on a baking sheet. Cover them with foil to keep them moist. Heat for about 15-20 minutes or until warm. You can also use a microwave if you’re in a hurry. Just be careful; it may make the potatoes a bit soft. To keep the texture nice, try reheating in the oven whenever possible. For a quick snack, you can also enjoy the chicken cold. It's still tasty and full of flavor! You can serve many side dishes with this meal. Here are some tasty options: - Steamed green beans: They add crunch and color. - Simple salad: A fresh salad with mixed greens is perfect. - Rice or quinoa: These grains soak up the juice well. - Roasted carrots: They bring sweetness that pairs nicely. - Garlic bread: This adds a nice touch for bread lovers. Yes, you can! Try these cuts for a fun twist: - Chicken breasts: They cook fast and stay juicy. - Drumsticks: They add a nice crispy skin. - Wings: Great for a fun, finger-licking option. Absolutely! To prep this dish in advance: - Marinate the chicken: You can do this a day before. - Chop the potatoes: Keep them in water to stay fresh. - Store in the fridge: Use airtight containers for best results. You can make it lighter with a few simple swaps: - Use skinless chicken: This cuts down on fat. - Swap olive oil for broth: It reduces calories while keeping taste. - Add more veggies: Include spinach or bell peppers for nutrition. You can find the Full Recipe [here]. It has all the details you need to make this dish perfectly. This recipe gives you a tasty and easy sheet pan lemon herb chicken dish. We've covered ingredients, step-by-step cooking methods, and tips for perfect results. Don't forget the option to add your favorite veggies for more flavor. You can also change this dish with different herbs and spices. Follow the storage tips to keep leftovers fresh. Enjoy making this simple, healthy meal that brings great taste to your table!](https://joymealplan.com/wp-content/uploads/2025/07/eaffd7d4-0358-4ae2-a047-6502860c21d0-768x768.webp)
![- 2 boneless, skinless chicken breasts - 8 oz penne pasta - 1 tablespoon Cajun seasoning - 2 tablespoons olive oil - 1 medium onion - 3 cloves garlic - 1 red bell pepper - 1 cup heavy cream - 1 cup chicken broth - 1 cup grated Parmesan cheese - Salt and pepper - Fresh parsley The ingredients for this dish come together to create a rich and tasty meal. You’ll notice how each part plays a role in the final flavor. The chicken gives protein and heartiness, while the pasta acts as a lovely base. The Cajun seasoning adds a spicy kick that makes this dish stand out. If you want to change things up, I have options for you. - For dairy alternatives, you can use coconut milk or almond milk instead of heavy cream. This keeps the dish creamy without dairy. - If you need a chicken substitute, consider using tofu or chickpeas. They both provide protein and soak up the sauce well. - For gluten-free pasta, options like rice or quinoa pasta work great. They cook differently, so keep an eye on them while cooking. With these substitutions, you can still enjoy a delicious creamy Cajun chicken pasta that fits your needs. Enjoy making this dish your own! If you want to see the full recipe, check out the [Full Recipe]. To cook the penne pasta, start by bringing a large pot of water to a rolling boil. Add a generous pinch of salt. This helps enhance the pasta's flavor. Once the water is boiling, add the penne pasta. Follow the package instructions for cooking time, usually around 11-12 minutes. You want it to be al dente, which means it should be firm to the bite. To check, taste a piece a minute or two before the time is up. When ready, drain the pasta in a colander and set it aside. In a large skillet, heat the olive oil over medium-high heat. Add the diced chicken pieces to the skillet. Season them generously with Cajun seasoning, salt, and pepper. Cook the chicken for about 5-7 minutes. You want it to be fully cooked through and golden brown. Use a meat thermometer to check if it reaches 165°F. Once cooked, remove the chicken from the skillet and place it on a plate. Set it aside while you prepare the other ingredients. In the same skillet, reduce the heat slightly. Add the finely chopped onion and minced garlic. Sauté them for about 2-3 minutes until the onion turns translucent and fragrant. Next, add the sliced red bell pepper. Cook for another 3-4 minutes until the pepper softens a bit. Then, pour in the heavy cream and chicken broth. Increase the heat until the mixture starts to simmer gently. Once simmering, lower the heat to keep it warm. Now, gradually mix in the grated Parmesan cheese. Stir continuously to melt the cheese completely. This will give your sauce a rich, creamy texture. Finally, return the sautéed chicken and drained penne pasta to the skillet. Toss everything together well, ensuring every piece of pasta is coated in the creamy sauce. Taste and adjust the seasoning if needed. To make your creamy Cajun chicken pasta even better, consider adding more spices. You can try smoked paprika or cayenne for extra heat. Fresh herbs like thyme or basil can also brighten the dish. To balance the creaminess, add a splash of lemon juice or a dash of vinegar. This adds a nice zing and cuts through the richness. Avoid overcooking your chicken by using medium heat. Cook it until golden brown, about 5-7 minutes. For pasta, watch the clock! Boil it until al dente, which means it should still have a slight bite. Drain it right away to stop the cooking. For a smooth sauce, stir continuously as you add cheese. This helps it melt evenly without clumping. If the sauce gets too thick, add a bit of chicken broth until it reaches your desired consistency. Plating makes a big difference! Serve your pasta in shallow bowls for a nice look. Drizzle some extra cream sauce on top to make it inviting. A sprinkle of extra Parmesan cheese adds a lovely touch. For garnish, fresh parsley works wonders. It adds color and a fresh taste. You might even add a slice of lemon on the side. This lets your guests squeeze a bit of juice over their pasta for a burst of flavor. For the full recipe, check out the detailed instructions above. {{image_4}} You can make a great vegetarian version of this dish. Replace the chicken with veggies. Use mushrooms, zucchini, or spinach for a fresh taste. For protein, add chickpeas or tofu. 1. Cook the Veggies: Sauté the vegetables until they soften. 2. Season Well: Use Cajun seasoning on the veggies to keep that flavor. 3. Follow the Sauce Steps: Keep the sauce the same, and mix in your veggies. This way, you keep the creamy goodness and add healthy veggies! Want more heat? You can boost the spice in a few ways. - Add Hot Sauce: Mix in your favorite hot sauce while cooking the chicken. - Use Spicy Peppers: Dice jalapeños or cayenne peppers and sauté with the onions. - Extra Cajun Seasoning: Add a bit more Cajun seasoning to the chicken for a kick. These small tweaks will give your pasta a fiery twist! If you love seafood, swap the chicken for shrimp or scallops. 1. Cook Seafood: Sauté shrimp or scallops until they turn pink and opaque. 2. Follow the Same Steps: Use the same sauce and pasta methods. 3. Adjust Cooking Time: Seafood cooks fast, so watch it closely. This change creates a rich, ocean-inspired version of the dish. Don't forget to check out the Full Recipe for more details! To keep your creamy Cajun chicken pasta fresh, store it in the fridge. Place the pasta in airtight containers. This helps prevent it from drying out and keeps the flavors strong. Make sure to cool the pasta to room temperature before sealing it. If you're storing it for more than a few days, consider freezing it. Just remember that freezing may change the texture a bit. When you’re ready to enjoy your leftovers, use gentle reheating methods. The best options are the stovetop or microwave. If you use the stovetop, add a splash of chicken broth or a little cream. This helps keep the sauce creamy. Stir often to avoid sticking. If using a microwave, cover the dish with a damp paper towel. This helps trap moisture. Heat in short bursts, stirring in between, until warm. Enjoy your creamy Cajun chicken pasta just like the first time! Yes, you can make this dish ahead of time. Here are some tips: - Cook the pasta: You can cook the penne pasta earlier on. Drain it well and toss it with a little oil to prevent sticking. - Prepare the chicken: Sauté the chicken and store it in the fridge. Reheat it before mixing with pasta. - Make the sauce: You can prepare the creamy sauce in advance. Store it in an airtight container in the fridge. - Combine before serving: Mix everything together just before serving. This keeps the pasta fresh and hot. Pair this pasta with these delicious sides: - Garlic bread: A warm, crusty garlic bread complements the dish perfectly. - Caesar salad: A fresh Caesar salad adds a nice crunch and balances the creamy pasta. - Steamed vegetables: Broccoli or green beans offer a healthy touch and color to your meal. - Corn on the cob: Sweet corn is a fun side that goes well with Cajun flavors. Adjusting the serving size is simple. Here’s how: - Double ingredients: If you want to serve eight, just double each ingredient in the recipe. - Halve ingredients: For two servings, cut the amounts in half. - Scale easily: Keep the ratios the same, so the flavors remain balanced. - Use measuring tools: A scale or measuring cups can help ensure precision when scaling down or up. You can find the [Full Recipe] online for more details! This blog post covered a delicious creamy Cajun chicken pasta recipe. You learned about the key ingredients, including chicken, pasta, and spices. We explored cooking methods and tips to enhance flavors. Variations allowed you to personalize your dish. Don't forget proper storage and reheating tips to enjoy leftovers. Embrace your culinary skills and try this recipe. It’s quick, satisfying, and perfect for any meal. Enjoy your cooking adventure!](https://joymealplan.com/wp-content/uploads/2025/06/ca6cae42-757f-40a7-bcb0-99b7cd192fd8-768x768.webp)
![- 1 lb chicken breast, sliced into strips - 2 tablespoons extra-virgin olive oil - 2 teaspoons dried oregano - 1 teaspoon garlic powder - 1 teaspoon smoked paprika - Salt and freshly ground black pepper to taste - 4 large pita breads - 1 cup shredded romaine lettuce - 1 large ripe tomato, diced - 1/2 medium red onion, thinly sliced - 1 cup cucumber, diced - 1/2 cup tzatziki sauce (store-bought or homemade) - Fresh parsley, finely chopped (for garnish) These ingredients create a tasty and fresh wrap. The chicken is the star, tender and juicy after marinating. The olive oil adds healthy fat, while oregano brings that classic Greek flavor. Garlic and smoked paprika give depth and warmth to each bite. You can mix in extras for fun twists. Consider adding: - Feta cheese for a salty touch - Bell peppers for a crunchy bite - Olives for a briny flavor - Avocado for creaminess These add-ins can make your gyro unique. You can customize it to fit your taste. Each ingredient brings health benefits. Chicken is high in protein, perfect for muscle repair. Olive oil is rich in good fats that support heart health. Fresh veggies like lettuce and cucumber offer fiber and hydration. Tomatoes add vitamins and antioxidants that fight disease. With these ingredients, you enjoy a meal that is not only delicious but good for you too. For the complete recipe, check out the Full Recipe. To start, I mix the chicken strips with olive oil, oregano, garlic powder, smoked paprika, salt, and pepper. This blend adds great flavor to the chicken. I make sure to coat the chicken well. After mixing, I cover the bowl with plastic wrap. I let it sit in the fridge for at least 30 minutes. For the best taste, I recommend marinating for up to 2 hours. Next, I heat my grill or skillet over medium-high heat. Once it's hot, I add the marinated chicken strips. I avoid overcrowding the pan to ensure even cooking. I let them cook for about 6-8 minutes. I flip them occasionally until they turn golden brown. I check that the internal temperature reaches 165°F. After cooking, I take the chicken off the heat and let it rest for a few minutes to keep it juicy. While the chicken rests, I prepare the pita bread. I warm it on the grill or in the microwave. If I use the microwave, I heat it for about 15-20 seconds. This helps the pita become soft and easy to wrap. Next, I chop the veggies. I dice the tomato and cucumber, and slice the red onion thinly. I also shred the romaine lettuce. These fresh toppings will add crunch and flavor to my wraps. Once everything is ready, I can start assembling the wraps. For the full recipe, check the details above! To get the best flavor in your chicken, use fresh ingredients. Start with quality chicken breast. Marinate it with olive oil, oregano, garlic powder, and smoked paprika. Each of these adds a unique taste. Let the chicken marinate for at least 30 minutes. For deeper flavor, marinate it for up to 2 hours. This gives the spices time to soak in. When cooking, use a hot grill or skillet. This helps to seal in the juices. Tzatziki sauce is key for your wraps. If you make it at home, use plain yogurt as the base. Add diced cucumber, minced garlic, lemon juice, and salt. Mix well for a refreshing taste. Chill the sauce for a bit to let the flavors blend. You can also buy tzatziki sauce if you're short on time. Make sure to taste it before you serve. Adjust the seasoning as needed to suit your taste. Wrapping your gyro properly is crucial. Start with a warm pita. This makes it pliable and easy to fold. Place a generous amount of tzatziki sauce in the center. Layer your veggies and chicken on top. When wrapping, tuck in the edges. This keeps all the tasty filling secure. Hold the wrap tightly as you eat. This way, you won't lose any delicious bites. Try this method for a neat and enjoyable meal. For more details, check out the Full Recipe. {{image_4}} If you want a meat-free meal, try using grilled vegetables or falafel. You can use zucchini, bell peppers, or eggplant. These veggies add a nice char and flavor. Place them in the marinade, just like you would with chicken. Cook them until they are soft and golden. This choice keeps the wrap tasty and satisfying. While tzatziki is classic, you can explore other sauces. Try hummus for a creamy texture. A spicy feta dip can add a kick. You might also enjoy adding a yogurt-based dressing or tahini sauce. Each sauce gives a new twist to your gyro wrap. Play around to find your favorite combination. Feel free to change up the veggies in your gyro wrap. Add roasted red peppers or olives for more flavor. Try shredded carrots or sliced radishes for some crunch. You can also use fresh herbs like dill or mint. Each addition gives your wrap a unique taste and makes it fun to create. After your meal, store any leftover gyro wraps in the fridge. Place them in an airtight container. This keeps them fresh for about 2-3 days. If you want to keep them longer, separate the chicken and veggies from the pita. This prevents sogginess. When reheating, use a skillet for the chicken. Heat it over medium heat for about 5 minutes, stirring gently. This helps keep the chicken juicy. For the pita, warm it in a microwave for 15-20 seconds. You can also use a skillet, heating it for about 1 minute per side. If you want to prepare ahead, you can freeze the chicken. Place cooked chicken strips in a freezer bag. Remove as much air as possible. They can last up to 3 months in the freezer. When ready to eat, thaw them in the fridge overnight before reheating. Avoid freezing the pita and fresh veggies; they taste best fresh. For more details, check the Full Recipe. Yes, you can use pre-cooked chicken. It saves time and effort. Just heat it before adding it to the wraps. You can also add your favorite spices to boost the flavor. This option is great for busy days or quick meals. Serve Greek Chicken Gyro Wraps warm. They taste best right after you make them. You can add extra tzatziki sauce on the side for dipping. Pair with a fresh salad or roasted veggies for a complete meal. It’s all about enjoying the flavors together. You can find ready-made Greek Chicken Gyro Wraps at many grocery stores. Look in the deli or prepared food section. Some restaurants also sell them for takeout. Check local Mediterranean or Greek eateries too. If you want a quick fix, this is a great option. For the full experience, try making them fresh at home using the [Full Recipe]. Greek chicken gyro wraps are full of flavor and easy to make. We covered key ingredients, from chicken to tzatziki. I shared marinating and cooking steps to help you nail it. You also learned tips for great wraps and tasty variations. Plus, I included storage info to keep your meal fresh. These wraps can fit any taste, and they are great for meal prep. Enjoy making your own gyro wraps, and feel free to get creative!](https://joymealplan.com/wp-content/uploads/2025/07/794e22a0-9e47-4100-a61d-0611f2557fa8-768x768.webp)