
Creamy Garlic Mushroom Pasta Easy and Flavorful Dish
![- 300g fettuccine or tagliatelle - 300g mushrooms (button or cremini), thinly sliced - 1 cup heavy cream - 1 cup vegetable broth - 4 cloves garlic, finely minced - 2 tablespoons extra virgin olive oil - 1 tablespoon unsalted butter - 1 teaspoon dried thyme - Salt and black pepper to taste - Grated Parmesan cheese (optional, for serving) - Fresh parsley, finely chopped (for garnish) When I make creamy garlic mushroom pasta, I always start with fresh ingredients. The fettuccine or tagliatelle gives a nice bite. I like using button or cremini mushrooms for their rich flavor. Heavy cream adds that luscious texture, while vegetable broth keeps it light and tasty. For seasonings, I finely mince garlic. I use just the right amount of extra virgin olive oil and unsalted butter for a rich base. Dried thyme adds a nice herbal note, and salt and black pepper bring the dish to life. If you want to elevate your meal, consider garnishing with grated Parmesan cheese. Fresh parsley not only adds a pop of color but also freshness. This combination makes the dish not only easy but also full of flavor. For the full recipe, check out Creamy Garlic Mushroom Pasta Delight. To start, bring a large pot of salted water to a rolling boil. Salt adds flavor, so don't skip it! Add 300g of fettuccine or tagliatelle. Cook according to package instructions until al dente. This usually takes about 8-10 minutes. You want the pasta firm but not hard. Once it's ready, drain the pasta. Make sure to reserve 1 cup of the cooking water. This water is full of starch, which helps thicken your sauce later. Next, we move to the mushrooms. In a large skillet, heat 2 tablespoons of extra virgin olive oil and 1 tablespoon of unsalted butter over medium heat. Wait until the oil shimmers and the butter melts. Then, add 300g of thinly sliced mushrooms. You can use button or cremini mushrooms for this dish. Sauté them for about 5-7 minutes. Stir occasionally, so they cook evenly. You want them to be golden brown and tender. Now comes the magic! Add 4 finely minced garlic cloves and 1 teaspoon of dried thyme to the skillet. Sprinkle in some salt and black pepper for taste. Sauté for another 1-2 minutes, but be careful not to burn the garlic. Next, pour in 1 cup of vegetable broth. Bring this mixture to a gentle simmer. Slowly stir in 1 cup of heavy cream. Mix well until all the ingredients blend together. Let this simmer for about 5 minutes. The sauce will thicken slightly, creating a rich flavor. Finally, add the drained pasta into the skillet. Use tongs or a spatula to toss the pasta in the creamy mushroom sauce. If you find the sauce is too thick, gradually add some of the reserved pasta water. This will help you reach the perfect consistency. Taste your dish and adjust with more salt and black pepper if needed. Now, your creamy garlic mushroom pasta is ready to serve! For the full recipe, check out the complete instructions. To keep your sauce from curdling, avoid boiling it. Use low heat when adding cream. Stir frequently to combine all the flavors without any lumps. For a smooth texture, whisk the cream before adding it to the pan. This will help it blend well with the broth. When choosing mushrooms, button and cremini are great options. They add depth and umami to the dish. Feel free to mix them for more flavor. For seasoning, add salt and pepper as you sauté. You can also try adding a pinch of nutmeg for warmth and richness. Serve the pasta in wide bowls. This makes the dish look fancy and inviting. Top with fresh parsley for color. Add a sprinkle of grated Parmesan for extra flavor. A drizzle of olive oil can enhance the look and taste, making your meal feel special. This will impress anyone who sees your dish! For the full recipe, check the [Full Recipe]. {{image_4}} You can easily enhance your creamy garlic mushroom pasta by adding proteins. If you like chicken, cook diced pieces in the skillet. They will add a nice flavor and texture. Just make sure to cook the chicken fully before adding the mushrooms. If you prefer seafood, shrimp works great too. Cook them until they turn pink, then mix them into the sauce. Both options give a hearty twist to the dish. If you want a vegetarian option, consider legumes like chickpeas or lentils. They add protein and fiber. Tofu is another great choice. Just sauté it until crispy, then toss it in with the pasta. While fettuccine or tagliatelle is classic, you can try other pasta shapes. Penne or fusilli offers fun textures. The sauce clings to the nooks and crannies, making every bite flavorful. For those who need gluten-free options, many brands offer great gluten-free pasta now. Corn or rice-based pasta works well. They may change the taste slightly, but the dish still shines. To elevate the flavor, think about adding white wine. Just pour a splash into the skillet after sautéing the mushrooms. Let it simmer down to enhance the sauce. Lemon juice also brightens the dish. A squeeze at the end adds a fresh zing. You can experiment with different herbs too. Basil or oregano can give a new twist. Don’t be afraid to play around with spices for a unique taste. For the full recipe, check out the Creamy Garlic Mushroom Pasta Delight . To keep your creamy garlic mushroom pasta fresh, store leftovers in the fridge. Use an airtight container to prevent drying out. For long-term storage, you can freeze it in a freezer-safe container. Make sure to label it with the date. This helps you track how long it has been stored. When reheating, avoid the microwave as it can make the pasta soggy. Instead, use a skillet over low heat. Add a splash of vegetable broth or water to help rehydrate the sauce. Stir gently to warm it up. This method keeps the creamy texture intact. Be careful not to overcook; heat just until warm. In the fridge, your creamy garlic mushroom pasta lasts about 3 to 5 days. If frozen, it can stay good for up to 2 months. Always check for signs of spoilage. If you see mold or an off smell, it’s best to throw it away. Safe storage ensures you enjoy this dish at its best. Yes, you can make creamy garlic mushroom pasta vegan. For the cream, use coconut milk or cashew cream. These options give a rich texture. Instead of butter, try vegan margarine or olive oil. Both work well and keep the flavor. I love using button and cremini mushrooms. Button mushrooms are mild and soft. Cremini mushrooms have a deeper, earthier flavor. You can also try shiitake or portobello mushrooms for a bolder taste. Each type adds a different twist. To add heat, use red pepper flakes or crushed chili peppers. You can also add a dash of hot sauce. Mixing in some black pepper gives a nice kick too. Adjust the spice based on your taste. Creamy garlic mushroom pasta is simple yet delicious. You learned about the key ingredients, cooking steps, and useful tips. I shared variations and storage advice, so your meal lasts longer. Remember, you can customize this dish to fit your tastes and needs. Whether you want it vegan or spicier, the options are endless. Enjoy your cooking journey and serve a dish everyone will love!](https://joymealplan.com/wp-content/uploads/2025/06/13e3dff8-112f-438a-8538-46fdbb61cecc.webp)
Craving a delicious dinner that’s simple to make? Look no further! This creamy garlic mushroom pasta is packed with flavor and comes together in no time. With just a few fresh ingredients, you can whip up an easy meal that impresses everyone. Whether you’re cooking for yourself or entertaining guests, this dish will wow your taste buds. Let’s dive into this foolproof recipe that’ll soon be a family favorite!
Ingredients
Main Ingredients for Creamy Garlic Mushroom Pasta
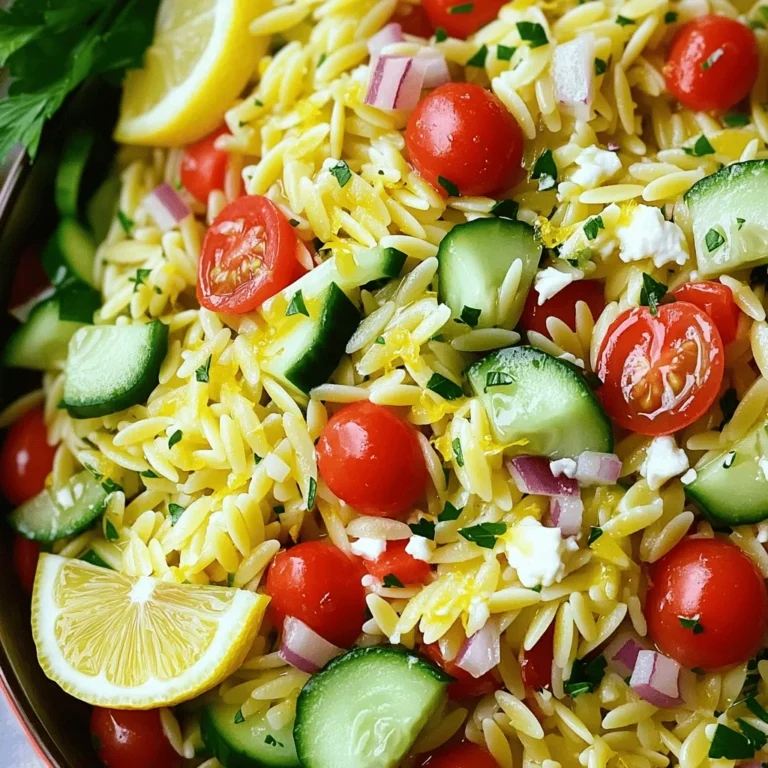
– 300g fettuccine or tagliatelle
– 300g mushrooms (button or cremini), thinly sliced
– 1 cup heavy cream
– 1 cup vegetable broth
Seasonings and Oils
– 4 cloves garlic, finely minced
– 2 tablespoons extra virgin olive oil
– 1 tablespoon unsalted butter
– 1 teaspoon dried thyme
– Salt and black pepper to taste
Optional Garnishes
– Grated Parmesan cheese (optional, for serving)
– Fresh parsley, finely chopped (for garnish)
When I make creamy garlic mushroom pasta, I always start with fresh ingredients. The fettuccine or tagliatelle gives a nice bite. I like using button or cremini mushrooms for their rich flavor. Heavy cream adds that luscious texture, while vegetable broth keeps it light and tasty.
For seasonings, I finely mince garlic. I use just the right amount of extra virgin olive oil and unsalted butter for a rich base. Dried thyme adds a nice herbal note, and salt and black pepper bring the dish to life.
If you want to elevate your meal, consider garnishing with grated Parmesan cheese. Fresh parsley not only adds a pop of color but also freshness. This combination makes the dish not only easy but also full of flavor.
Step-by-Step Instructions
Cooking the Pasta
To start, bring a large pot of salted water to a rolling boil. Salt adds flavor, so don’t skip it! Add 300g of fettuccine or tagliatelle. Cook according to package instructions until al dente. This usually takes about 8-10 minutes. You want the pasta firm but not hard.
Once it’s ready, drain the pasta. Make sure to reserve 1 cup of the cooking water. This water is full of starch, which helps thicken your sauce later.
Sautéing the Mushrooms
Next, we move to the mushrooms. In a large skillet, heat 2 tablespoons of extra virgin olive oil and 1 tablespoon of unsalted butter over medium heat. Wait until the oil shimmers and the butter melts.
Then, add 300g of thinly sliced mushrooms. You can use button or cremini mushrooms for this dish. Sauté them for about 5-7 minutes. Stir occasionally, so they cook evenly. You want them to be golden brown and tender.
Creating the Garlic Cream Sauce
Now comes the magic! Add 4 finely minced garlic cloves and 1 teaspoon of dried thyme to the skillet. Sprinkle in some salt and black pepper for taste. Sauté for another 1-2 minutes, but be careful not to burn the garlic.
Next, pour in 1 cup of vegetable broth. Bring this mixture to a gentle simmer. Slowly stir in 1 cup of heavy cream. Mix well until all the ingredients blend together. Let this simmer for about 5 minutes. The sauce will thicken slightly, creating a rich flavor.
Combining Pasta and Sauce
Finally, add the drained pasta into the skillet. Use tongs or a spatula to toss the pasta in the creamy mushroom sauce. If you find the sauce is too thick, gradually add some of the reserved pasta water. This will help you reach the perfect consistency.
Taste your dish and adjust with more salt and black pepper if needed. Now, your creamy garlic mushroom pasta is ready to serve!
Tips & Tricks
Perfecting the Creamy Sauce
To keep your sauce from curdling, avoid boiling it. Use low heat when adding cream. Stir frequently to combine all the flavors without any lumps. For a smooth texture, whisk the cream before adding it to the pan. This will help it blend well with the broth.
Enhancing Flavor with Mushrooms
When choosing mushrooms, button and cremini are great options. They add depth and umami to the dish. Feel free to mix them for more flavor. For seasoning, add salt and pepper as you sauté. You can also try adding a pinch of nutmeg for warmth and richness.
Presentation Ideas
Serve the pasta in wide bowls. This makes the dish look fancy and inviting. Top with fresh parsley for color. Add a sprinkle of grated Parmesan for extra flavor. A drizzle of olive oil can enhance the look and taste, making your meal feel special. This will impress anyone who sees your dish!

Variations
Adding Proteins
You can easily enhance your creamy garlic mushroom pasta by adding proteins. If you like chicken, cook diced pieces in the skillet. They will add a nice flavor and texture. Just make sure to cook the chicken fully before adding the mushrooms.
If you prefer seafood, shrimp works great too. Cook them until they turn pink, then mix them into the sauce. Both options give a hearty twist to the dish.
If you want a vegetarian option, consider legumes like chickpeas or lentils. They add protein and fiber. Tofu is another great choice. Just sauté it until crispy, then toss it in with the pasta.
Different Pasta Types
While fettuccine or tagliatelle is classic, you can try other pasta shapes. Penne or fusilli offers fun textures. The sauce clings to the nooks and crannies, making every bite flavorful.
For those who need gluten-free options, many brands offer great gluten-free pasta now. Corn or rice-based pasta works well. They may change the taste slightly, but the dish still shines.
Flavor Infusions
To elevate the flavor, think about adding white wine. Just pour a splash into the skillet after sautéing the mushrooms. Let it simmer down to enhance the sauce.
Lemon juice also brightens the dish. A squeeze at the end adds a fresh zing. You can experiment with different herbs too. Basil or oregano can give a new twist. Don’t be afraid to play around with spices for a unique taste.
Storage Info
How to Store Leftovers
To keep your creamy garlic mushroom pasta fresh, store leftovers in the fridge. Use an airtight container to prevent drying out. For long-term storage, you can freeze it in a freezer-safe container. Make sure to label it with the date. This helps you track how long it has been stored.
Reheating Guidelines
When reheating, avoid the microwave as it can make the pasta soggy. Instead, use a skillet over low heat. Add a splash of vegetable broth or water to help rehydrate the sauce. Stir gently to warm it up. This method keeps the creamy texture intact. Be careful not to overcook; heat just until warm.
Shelf Life
In the fridge, your creamy garlic mushroom pasta lasts about 3 to 5 days. If frozen, it can stay good for up to 2 months. Always check for signs of spoilage. If you see mold or an off smell, it’s best to throw it away. Safe storage ensures you enjoy this dish at its best.
FAQs
Can I make this dish vegan-friendly?
Yes, you can make creamy garlic mushroom pasta vegan. For the cream, use coconut milk or cashew cream. These options give a rich texture. Instead of butter, try vegan margarine or olive oil. Both work well and keep the flavor.
What type of mushrooms work best for this recipe?
I love using button and cremini mushrooms. Button mushrooms are mild and soft. Cremini mushrooms have a deeper, earthier flavor. You can also try shiitake or portobello mushrooms for a bolder taste. Each type adds a different twist.
How can I make the dish spicier?
To add heat, use red pepper flakes or crushed chili peppers. You can also add a dash of hot sauce. Mixing in some black pepper gives a nice kick too. Adjust the spice based on your taste.
Creamy garlic mushroom pasta is simple yet delicious. You learned about the key ingredients, cooking steps, and useful tips. I shared variations and storage advice, so your meal lasts longer. Remember, you can customize this dish to fit your tastes and needs. Whether you want it vegan or spicier, the options are endless. Enjoy your cooking journey and serve a dish everyone will love!
![- 300g fettuccine or tagliatelle - 300g mushrooms (button or cremini), thinly sliced - 1 cup heavy cream - 1 cup vegetable broth - 4 cloves garlic, finely minced - 2 tablespoons extra virgin olive oil - 1 tablespoon unsalted butter - 1 teaspoon dried thyme - Salt and black pepper to taste - Grated Parmesan cheese (optional, for serving) - Fresh parsley, finely chopped (for garnish) When I make creamy garlic mushroom pasta, I always start with fresh ingredients. The fettuccine or tagliatelle gives a nice bite. I like using button or cremini mushrooms for their rich flavor. Heavy cream adds that luscious texture, while vegetable broth keeps it light and tasty. For seasonings, I finely mince garlic. I use just the right amount of extra virgin olive oil and unsalted butter for a rich base. Dried thyme adds a nice herbal note, and salt and black pepper bring the dish to life. If you want to elevate your meal, consider garnishing with grated Parmesan cheese. Fresh parsley not only adds a pop of color but also freshness. This combination makes the dish not only easy but also full of flavor. For the full recipe, check out Creamy Garlic Mushroom Pasta Delight. To start, bring a large pot of salted water to a rolling boil. Salt adds flavor, so don't skip it! Add 300g of fettuccine or tagliatelle. Cook according to package instructions until al dente. This usually takes about 8-10 minutes. You want the pasta firm but not hard. Once it's ready, drain the pasta. Make sure to reserve 1 cup of the cooking water. This water is full of starch, which helps thicken your sauce later. Next, we move to the mushrooms. In a large skillet, heat 2 tablespoons of extra virgin olive oil and 1 tablespoon of unsalted butter over medium heat. Wait until the oil shimmers and the butter melts. Then, add 300g of thinly sliced mushrooms. You can use button or cremini mushrooms for this dish. Sauté them for about 5-7 minutes. Stir occasionally, so they cook evenly. You want them to be golden brown and tender. Now comes the magic! Add 4 finely minced garlic cloves and 1 teaspoon of dried thyme to the skillet. Sprinkle in some salt and black pepper for taste. Sauté for another 1-2 minutes, but be careful not to burn the garlic. Next, pour in 1 cup of vegetable broth. Bring this mixture to a gentle simmer. Slowly stir in 1 cup of heavy cream. Mix well until all the ingredients blend together. Let this simmer for about 5 minutes. The sauce will thicken slightly, creating a rich flavor. Finally, add the drained pasta into the skillet. Use tongs or a spatula to toss the pasta in the creamy mushroom sauce. If you find the sauce is too thick, gradually add some of the reserved pasta water. This will help you reach the perfect consistency. Taste your dish and adjust with more salt and black pepper if needed. Now, your creamy garlic mushroom pasta is ready to serve! For the full recipe, check out the complete instructions. To keep your sauce from curdling, avoid boiling it. Use low heat when adding cream. Stir frequently to combine all the flavors without any lumps. For a smooth texture, whisk the cream before adding it to the pan. This will help it blend well with the broth. When choosing mushrooms, button and cremini are great options. They add depth and umami to the dish. Feel free to mix them for more flavor. For seasoning, add salt and pepper as you sauté. You can also try adding a pinch of nutmeg for warmth and richness. Serve the pasta in wide bowls. This makes the dish look fancy and inviting. Top with fresh parsley for color. Add a sprinkle of grated Parmesan for extra flavor. A drizzle of olive oil can enhance the look and taste, making your meal feel special. This will impress anyone who sees your dish! For the full recipe, check the [Full Recipe]. {{image_4}} You can easily enhance your creamy garlic mushroom pasta by adding proteins. If you like chicken, cook diced pieces in the skillet. They will add a nice flavor and texture. Just make sure to cook the chicken fully before adding the mushrooms. If you prefer seafood, shrimp works great too. Cook them until they turn pink, then mix them into the sauce. Both options give a hearty twist to the dish. If you want a vegetarian option, consider legumes like chickpeas or lentils. They add protein and fiber. Tofu is another great choice. Just sauté it until crispy, then toss it in with the pasta. While fettuccine or tagliatelle is classic, you can try other pasta shapes. Penne or fusilli offers fun textures. The sauce clings to the nooks and crannies, making every bite flavorful. For those who need gluten-free options, many brands offer great gluten-free pasta now. Corn or rice-based pasta works well. They may change the taste slightly, but the dish still shines. To elevate the flavor, think about adding white wine. Just pour a splash into the skillet after sautéing the mushrooms. Let it simmer down to enhance the sauce. Lemon juice also brightens the dish. A squeeze at the end adds a fresh zing. You can experiment with different herbs too. Basil or oregano can give a new twist. Don’t be afraid to play around with spices for a unique taste. For the full recipe, check out the Creamy Garlic Mushroom Pasta Delight . To keep your creamy garlic mushroom pasta fresh, store leftovers in the fridge. Use an airtight container to prevent drying out. For long-term storage, you can freeze it in a freezer-safe container. Make sure to label it with the date. This helps you track how long it has been stored. When reheating, avoid the microwave as it can make the pasta soggy. Instead, use a skillet over low heat. Add a splash of vegetable broth or water to help rehydrate the sauce. Stir gently to warm it up. This method keeps the creamy texture intact. Be careful not to overcook; heat just until warm. In the fridge, your creamy garlic mushroom pasta lasts about 3 to 5 days. If frozen, it can stay good for up to 2 months. Always check for signs of spoilage. If you see mold or an off smell, it’s best to throw it away. Safe storage ensures you enjoy this dish at its best. Yes, you can make creamy garlic mushroom pasta vegan. For the cream, use coconut milk or cashew cream. These options give a rich texture. Instead of butter, try vegan margarine or olive oil. Both work well and keep the flavor. I love using button and cremini mushrooms. Button mushrooms are mild and soft. Cremini mushrooms have a deeper, earthier flavor. You can also try shiitake or portobello mushrooms for a bolder taste. Each type adds a different twist. To add heat, use red pepper flakes or crushed chili peppers. You can also add a dash of hot sauce. Mixing in some black pepper gives a nice kick too. Adjust the spice based on your taste. Creamy garlic mushroom pasta is simple yet delicious. You learned about the key ingredients, cooking steps, and useful tips. I shared variations and storage advice, so your meal lasts longer. Remember, you can customize this dish to fit your tastes and needs. Whether you want it vegan or spicier, the options are endless. Enjoy your cooking journey and serve a dish everyone will love!](https://joymealplan.com/wp-content/uploads/2025/06/13e3dff8-112f-438a-8538-46fdbb61cecc-300x300.webp)
![To create a delicious Lemon Herb Grilled Salmon, you need fresh and simple ingredients. Here’s what you will gather: - 4 salmon fillets (approximately 6 ounces each) - 1/4 cup extra virgin olive oil - Zest from 1 large lemon - Juice of 2 fresh lemons - 3 cloves garlic, finely minced - 2 tablespoons fresh parsley, finely chopped - 2 tablespoons fresh dill, finely chopped - 1 tablespoon fresh thyme, finely chopped - Salt and freshly ground black pepper to taste - Lemon wedges, for garnishing These ingredients work together to bring out the bright and zesty flavor of the salmon. The fresh herbs add depth, while the lemon provides a refreshing kick. When you combine these elements, you create a dish that looks and tastes amazing. If you want to explore the complete process, check out the Full Recipe. To start, grab a medium bowl. Mix together: - 1/4 cup extra virgin olive oil - Zest from 1 large lemon - Juice from 2 fresh lemons - 3 cloves garlic, finely minced - 2 tablespoons fresh parsley, chopped - 2 tablespoons fresh dill, chopped - 1 tablespoon fresh thyme, chopped - Salt and pepper to taste Whisk all these ingredients together until they blend well. This mix will be your flavorful marinade. Now, take your salmon fillets. Place them in a resealable bag or shallow dish. Pour the marinade over the salmon. Make sure each piece is well coated. Seal the bag or cover the dish. Let it chill in the fridge for 30 minutes up to 2 hours. The longer it sits, the stronger the flavor will be. Preheat your grill to medium-high heat. If using a grill pan, set it to medium heat. Lightly coat the surface with olive oil to stop the fish from sticking. After marinating, remove the salmon from the bag. Let any extra marinade drip off. Discard the leftover marinade. Place the salmon skin-side down on the hot grill. Cook for about 5-6 minutes without touching it. Then, flip the salmon gently with a spatula. Grill for another 4-5 minutes. The fish should be opaque and flake easily with a fork. Once it’s done, let the salmon rest for a few minutes. This helps improve the flavor and texture. Serve the grilled salmon with fresh lemon wedges. Add a pop of citrus to enhance your dish. Enjoy your meal! For the complete recipe, check the [Full Recipe]. To grill salmon just right, aim for medium-high heat. This usually means around 375°F to 400°F. The salmon needs about 5-6 minutes on the first side. Flip it gently and grill for another 4-5 minutes. To check for doneness, use a fork. The fish should easily flake apart and look opaque. If it’s still shiny, it needs more time. For more flavors, try adding a pinch of smoked paprika or a dash of cayenne pepper. These spices can add a nice kick. Pair the salmon with sides like roasted veggies, quinoa, or a fresh salad. These dishes complement the salmon well and balance its rich taste. When plating the salmon, add a bright touch with fresh herbs. A sprinkle of parsley or dill makes it pop. Serve with lemon wedges for an extra zing. For drinks, a crisp white wine, like Sauvignon Blanc, pairs well. It enhances the meal and makes it feel special. For a non-alcoholic option, try sparkling water with lemon. It refreshes the palate and adds a lovely touch to your dinner. For the full recipe, check out the detailed steps above. {{image_4}} You can switch up the marinade to keep things fresh. Try using lime or orange juice instead of lemon. These fruits add a different twist to your salmon. You can also add spices like cayenne pepper for some heat. A touch of heat makes the dish more exciting. Grilling is great, but you have other choices too. Baking or broiling the salmon works well and keeps it moist. If it’s raining or too cold outside, use a stovetop grill pan. Just make sure it’s hot before adding the salmon for even cooking. You can make this dish fit your diet needs. For a gluten-free version, check that your spices are gluten-free. You can also skip dairy by using olive oil instead of butter. If you want to lower calories, use less oil in the marinade. These small changes keep the meal healthy while still tasting great. Try these variations to make lemon herb grilled salmon fit your taste and lifestyle. For the full recipe, check out the earlier sections! To keep your grilled salmon fresh, store it in the fridge. Place the salmon in an airtight container. This helps keep it from drying out. It should last for up to three days in the fridge. If you want to save it longer, freezing is a good option. Wrap the salmon tightly in plastic wrap, then put it in a freezer bag. You can freeze it for up to three months. Label the bag with the date so you know when to use it. When you reheat grilled salmon, you want to keep it moist. The best way is to use the oven. Preheat the oven to 275°F (135°C). Place the salmon on a baking sheet, cover it with foil, and heat for about 15 minutes. This method helps avoid drying out the fish. You can also use a microwave, but be careful. Heat it in short bursts of 30 seconds on low power. Check often to keep the flavor and texture. A splash of lemon juice can help refresh the taste. Grilling time depends on the thickness of the salmon. For fillets about 1 inch thick, grill for 5-6 minutes on one side. Flip and grill for another 4-5 minutes. Thicker fillets may need more time, so check for doneness. When the salmon is opaque and flakes easily, it's ready to eat. Yes, you can use frozen salmon. To cook it, thaw the salmon first. Place it in the fridge overnight or submerge it in cold water for about an hour. Once thawed, pat it dry and marinate as in the Full Recipe. This will help keep it moist while grilling. Lemon herb grilled salmon pairs well with fresh salads and veggies. Try serving it with: - Mixed green salad with a light vinaigrette - Steamed asparagus or green beans - Roasted potatoes seasoned with herbs - Quinoa or rice pilaf for a hearty side These dishes complement the fresh flavors of the salmon and make a complete meal. Grilling lemon herb salmon is simple and rewarding. You start with fresh salmon and a tasty marinade of olive oil, lemon, garlic, and herbs. Marinate for a short time to boost flavor. Grill it right and serve with sides for a complete meal. Experiment with different flavors and cooking methods to find your favorite. Always store leftovers properly to enjoy them later. With these tips, you’ll impress everyone at the table. Now, get ready to grill and enjoy this delicious dish!](https://joymealplan.com/wp-content/uploads/2025/06/94675a3f-7fd4-4f6d-bbd0-da6b916d26a4-768x768.webp)
![- 1 lb boneless, skinless chicken thighs, cut into bite-sized pieces - 2 tablespoons sesame oil - 2 tablespoons fresh ginger, finely grated - 3 cloves garlic, minced - 3 tablespoons low-sodium soy sauce - 2 tablespoons honey - 1 teaspoon rice vinegar - 1 teaspoon cornstarch mixed with 2 tablespoons water (for thickening) - 1 cup cooked brown rice - 1 cup broccoli florets - 1 cup shredded carrots - 1 red bell pepper, sliced into thin strips The chicken thighs give this dish a rich flavor. I love using chicken thighs because they stay juicy and tender. Sesame oil adds a nice nutty taste. Fresh ginger and garlic bring warmth and a hint of spice. Soy sauce gives that classic umami kick. Honey brings sweetness to balance the flavors. Rice vinegar adds a touch of brightness. Cornstarch helps the sauce thicken perfectly. Brown rice serves as a hearty base. The broccoli, carrots, and bell pepper add color and crunch. - Green onions, finely chopped - 2 teaspoons sesame seeds - Lime wedges - Other vegetable options like snap peas or bok choy Garnishes make the dish pop! Green onions and sesame seeds add a lovely texture. Lime wedges are great for a fresh squeeze of citrus. You can swap in other vegetables based on your taste. This way, you can make the dish your own. You can find the full recipe in the article above. 1. Heat 2 tablespoons of sesame oil in a large skillet over medium-high heat. 2. When the oil is hot, add 2 tablespoons of freshly grated ginger and 3 cloves of minced garlic. Sauté for 30 seconds until they smell great. 3. Now, add 1 pound of bite-sized chicken thighs to the skillet. Cook for 6-7 minutes, stirring often. Make sure the chicken is no longer pink inside and is golden-brown. 1. While the chicken cooks, take a small bowl. Whisk together 3 tablespoons of low-sodium soy sauce, 2 tablespoons of honey, and 1 teaspoon of rice vinegar. 2. Pour this delicious sauce over the cooked chicken. Stir well to coat each piece. 1. Reduce the heat to medium. Let the chicken simmer in the sauce for 2-3 minutes. This helps the flavors blend together. 2. Mix 1 teaspoon of cornstarch with 2 tablespoons of water. Stir this into the skillet until it’s well combined. Cook for another minute until the sauce thickens and shines. 3. While the chicken simmers, steam 1 cup of broccoli florets for 3-4 minutes. They should be bright green and tender-crisp. 4. To put your bowls together, start with 1/2 cup of cooked brown rice in each bowl. Top with a scoop of ginger sesame chicken, steamed broccoli, shredded carrots, and sliced red bell pepper. 5. Finally, garnish each bowl with chopped green onions and sesame seeds. This adds flavor and looks nice. For the full recipe, check out the [Full Recipe]. Fresh ingredients make a big difference. Use high-quality chicken and vibrant veggies. This will enhance the taste of your dish. Adjust the sweetness and saltiness to your liking. Add more honey for sweetness or soy sauce for salt. Taste as you go; this helps you find the perfect balance. Cook chicken thighs for about 6-7 minutes. Stir often to ensure even cooking. To check if the chicken is done, cut a piece open. The inside should be white, with no pink. If you see any pink, cook it a bit longer. Make your bowl visually pleasing. Arrange the vegetables in colorful layers. Start with the rice at the bottom, then add the chicken, and top with veggies. For garnish, add green onions and sesame seeds. You can also serve with a lime wedge. A squeeze of lime adds freshness and brightness to each bite. {{image_4}} You can easily swap chicken for other proteins. If you want a vegetarian option, use tofu. Tofu absorbs flavor well and adds a nice texture. Just cube it and sauté it like chicken. For seafood lovers, shrimp works great too. Cook it until pink and tender. You can also use beef. Thinly slice it and cook it until it’s just right. Each protein offers a unique taste and texture. Feel free to change up the veggies in your bowl. Seasonal vegetables can add freshness. Think of zucchini in summer or sweet potatoes in fall. Quick-cooking vegetables are also great. Snap peas and baby corn cook fast and add crunch. Just steam or sauté them briefly. This way, you keep the nutrients and color bright. If you need gluten-free options, try tamari instead of soy sauce. It has a similar taste and works well in this dish. For those watching carbs, use cauliflower rice instead of brown rice. It’s light and absorbs flavors well. You can still enjoy the same taste without the extra carbs. Just sauté it briefly, and you’re good to go. After a tasty meal, you may want to save some for later. Store your Sesame Ginger Chicken Bowls in airtight containers. This keeps the flavors fresh and tasty. Make sure to let the dish cool before sealing it up. You can keep leftovers in the fridge for about 3 to 4 days. If you want to save it longer, freezing is a great option. Place the chicken and veggies in freezer-safe bags or containers. Remove as much air as possible to prevent freezer burn. You can freeze the bowls for up to 3 months. When you're ready to eat, thaw them overnight in the fridge. To reheat, warm them on the stove or in the microwave until hot. Meal prepping helps save time during busy weeks. You can chop and store all your veggies in advance. Cook the chicken and make the sauce separately. This way, you can mix and match throughout the week. Prepare multiple servings at once to enjoy these bowls several times. Each time, just reheat the rice and combine everything for a quick meal. You can add chili flakes or hot sauce to the dish. Start with a small amount and taste it. You can always add more to reach your preferred spice level. This kick can enhance the flavor and make it even more exciting. Yes, you can skip the cornstarch if you prefer. You can use arrowroot powder or flour as a thickening alternative. These options work well in sauces, but you may need to adjust the amount. Just be careful not to add too much, or it may change the taste. I recommend serving your bowls with steamed vegetables or a light salad. A refreshing cucumber salad pairs well. You can also enjoy the bowls with a cold drink, like iced green tea, for a balanced meal. These Sesame Ginger Chicken Bowls are easy to make and packed with flavor. You now have a full guide, covering ingredients, step-by-step cooking, tips, variations, and storage. Fresh ingredients give the best taste, while swapping proteins and veggies keeps it fun. Don't forget to use garnishes for that special touch. Enjoy these bowls any day of the week, and feel free to get creative with your own twists! They make for great leftovers, too. Cook well, and enjoy your tasty meal!](https://joymealplan.com/wp-content/uploads/2025/07/ee8b11ee-19fa-4955-830a-ea8ab42ba55e-768x768.webp)