
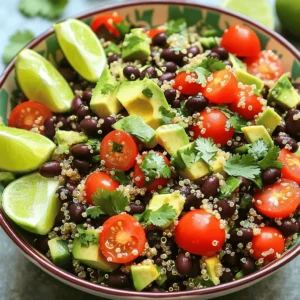
Spicy Quinoa Black Bean Salad Fresh and Flavorful Mix

Looking for a fresh and tasty salad? My Spicy Quinoa Black Bean Salad is just what you need! This dish is easy to make and packed with vibrant flavors. It features protein-rich quinoa and black beans, along with colorful veggies that make each bite exciting. Whether you want a quick lunch or a side for dinner, this salad fits the bill. Ready to dive in? Let’s get cooking!
Ingredients
Main Ingredients
– 1 cup quinoa, thoroughly rinsed
– 2 cups vegetable broth (or water)
– 1 can (15 oz) black beans, drained and rinsed
Fresh Produce
– 1 red bell pepper, finely diced
– 1 cup cherry tomatoes, halved
– 1 small red onion, finely chopped
– 1 jalapeño pepper, deseeded and minced
– 1 ripe avocado, diced
– 1/4 cup fresh cilantro, roughly chopped
Dressing Ingredients
– Juice of 2 fresh limes
– 2 tablespoons extra virgin olive oil
– 1 teaspoon ground cumin
– 1 teaspoon chili powder
– Salt and black pepper to taste
Creating a vibrant and tasty Spicy Quinoa Black Bean Salad starts with some simple yet fresh ingredients. First, quinoa is the star of this dish. The tiny seeds are full of protein and add a nice texture. Rinse it well to remove any bitter taste.
Next, we have black beans. They are rich in fiber and protein, making the salad filling and nutritious. Don’t forget to drain and rinse them!
For the fresh produce, I love using colorful veggies. The red bell pepper adds crunch and sweetness. Cherry tomatoes bring juiciness, while the red onion adds a sharp bite. The jalapeño gives the salad its spicy kick. You can adjust the heat by adding more or less. Lastly, the avocado is creamy and balances the spice.
Cilantro brings a fresh herb flavor that brightens the dish.
Now, let’s talk about the dressing. Fresh lime juice adds tanginess, while olive oil gives richness. Ground cumin and chili powder enhance the salad’s flavor. Season with salt and pepper to taste.
Step-by-Step Instructions
Cooking the Quinoa
To start, combine 1 cup of rinsed quinoa with 2 cups of vegetable broth or water in a medium saucepan. Place the saucepan on medium heat and bring it to a rolling boil. Once boiling, lower the heat to a gentle simmer. Cover the saucepan and let it cook for about 15 minutes, or until all the liquid is absorbed. After cooking, remove it from heat and let it sit covered for 5 more minutes. Finally, fluff the quinoa with a fork to separate the grains.
Preparing the Salad Base
In a large bowl, mix together the salad base. Add 1 can of drained and rinsed black beans, 1 finely diced red bell pepper, 1 cup of halved cherry tomatoes, 1 small chopped red onion, 1 minced jalapeño, and 1 diced avocado. Gently stir to combine the ingredients. This mix creates a colorful and hearty base for our salad.
Making the Dressing
Now it’s time to make the dressing. In a small bowl, whisk together the juice of 2 fresh limes, 2 tablespoons of extra virgin olive oil, 1 teaspoon of ground cumin, and 1 teaspoon of chili powder. Add a pinch of salt and black pepper to taste. Whisk until the mixture is well blended. This dressing adds zesty flavor to our salad.
Combining Ingredients
Add the fluffed quinoa to the large bowl with the salad base. Pour the dressing over the top and gently toss everything together using a spatula. Make sure all the ingredients are evenly coated with the dressing. Lastly, fold in 1/4 cup of freshly chopped cilantro. Taste the salad and adjust the seasoning with more salt and pepper if needed.Enjoy your fresh and flavorful Spicy Quinoa Black Bean Salad!
Tips & Tricks
Ingredient Substitutions
If you want to mix things up, try using different beans. Kidney beans or pinto beans work well in this salad. They add their own unique flavor and texture. You can also swap the avocado for diced mango. This change gives a sweet twist and a fruity taste to your salad.
Enhancing Flavor
To really boost the taste, marinate the salad for about 30 minutes before you serve it. This time allows the flavors to blend perfectly. If you love tanginess, add more lime juice. This will give your salad an extra zing that brightens every bite.
Serving Suggestions
This salad pairs nicely with grilled chicken or fish. The added protein makes for a satisfying meal. For a fun twist, try serving the salad in lettuce wraps. This is a great low-carb option that makes for a fresh and crunchy bite.

Variations
Spicy Versions
To make this salad even spicier, you can add more jalapeño. A dash of hot sauce also works well. If you like a smoky taste, incorporate diced chipotle peppers. They add depth and heat to your dish.
Ingredient Additions
You can include corn for a hint of sweetness and delightful crunch. Diced cucumber is another great addition. It brings extra freshness, balancing the heat from the jalapeño.
Different Dressings
For a tangy twist, try a vinaigrette made with apple cider vinegar. This will brighten the flavors in your salad. You can also use a tahini-based dressing. It adds a creamy texture that complements the other ingredients well.
Explore all these variations to find your perfect mix!
Storage Info
Refrigeration
To keep your spicy quinoa black bean salad fresh, store it in an airtight container in the fridge. This salad is best eaten within 2-3 days. After that, the flavors may start to fade, and the texture can change.
Freezing Guidelines
Can you freeze quinoa and beans? Yes, but it’s best to freeze them separately. This keeps their quality high. When frozen together, they can become mushy when thawed.
Reheating Tips
If you want to enjoy warm quinoa, you can reheat it. However, this salad is best served cold. After reheating, add fresh ingredients like avocado and cilantro. This keeps the crunch and adds texture to your dish.
FAQs
How to Make Spicy Quinoa Black Bean Salad Vegan?
All ingredients listed are naturally vegan. This salad is perfect for everyone!
Can I use Different Grains?
Yes, substitute quinoa with brown rice, farro, or bulgur. Each grain adds a unique taste.
What Are the Health Benefits of This Salad?
This salad is high in protein and fiber. It is packed with vitamins from fresh vegetables. Eating it can boost your health.
How Can I Make It Gluten-Free?
Ensure that all ingredients are certified gluten-free, particularly the broth. This makes the salad safe for those with gluten issues.
Can This Be Made Ahead of Time?
Yes, the salad can be prepared ahead. It is best when flavors meld for a few hours before serving. Enjoy it cold for a refreshing meal!
This quinoa black bean salad is easy to make and delicious. We combined quinoa, black beans, and fresh vegetables with a tasty dressing. You can customize it with bold flavors or different ingredients as you like. Store leftovers in the fridge for a quick meal. This dish is not just filling; it’s also good for you. Enjoy making this salad at home, and wow your friends and family with your skills!
![To make a tasty savory breakfast hash, gather these key items: - 2 medium potatoes, diced into small cubes - 1 cup bell peppers, a mix of red and green, diced - 1 small onion, finely diced - 1 cup cooked breakfast sausage, crumbled (or a plant-based option) - 4 large eggs - 2 tablespoons olive oil - 1 teaspoon smoked paprika - ½ teaspoon garlic powder - ½ teaspoon freshly ground black pepper - Salt, to taste - Fresh parsley, chopped, for garnish These ingredients work well together. The potatoes give a hearty base, while the bell peppers and onions add sweetness and color. The sausage provides a savory touch. You can make your breakfast hash unique by adding: - Spinach or kale for greens - Cherry tomatoes for a burst of flavor - Cheese for creaminess - Hot sauce for some heat - Avocado slices for extra richness Feel free to mix and match these options based on what you like. This lets you create a dish that fits your taste. To whip up this savory breakfast hash, have the following tools ready: - A large skillet for cooking - A spatula for stirring and serving - A sharp knife for chopping - A cutting board for easy prep With these ingredients and tools, you can create a breakfast hash that is quick and full of flavor. Don't forget to check the Full Recipe for detailed steps! Start by heating 1 tablespoon of olive oil in a large skillet over medium heat. When the oil shimmers, add the diced potatoes. Season them with salt and black pepper. Cook for about 10 to 12 minutes, stirring now and then. You want the potatoes to be tender and golden. Next, add the diced onion and bell peppers to the skillet. Stir well and cook for another 5 to 7 minutes. The veggies should be soft and smell great. Now, mix in the crumbled breakfast sausage. Add the smoked paprika and garlic powder, stirring everything together. Let it cook for another 3 to 4 minutes to blend the flavors. Choose medium-sized potatoes for even cooking. Russet or Yukon Gold work great. Cut them into small cubes for quicker cooking. Soak the diced potatoes in water for 10 minutes before cooking. This helps remove excess starch and makes them crispier. Don’t overcrowd the skillet; use a large enough pan to allow space. Stir regularly to avoid burning and ensure even browning. Creating small wells in the hash is key. Crack one egg into each well gently. Cover the skillet to trap steam and cook the eggs evenly. For runny yolks, check them at around 5 minutes. For firmer yolks, let them cook for about 7 minutes. If you prefer scrambled eggs, whisk them in a bowl first. Pour them into the hash after adding the sausage and spices. Cook until they’re just set for a light and fluffy texture. For the full recipe, refer to the above section and enjoy this delicious dish! To boost flavor, use fresh herbs. Parsley adds brightness. You can also try cilantro or chives. Adding a splash of hot sauce can give your hash a kick. Use smoked paprika for a deep, rich taste. If you want a bit more heat, add cayenne pepper. For a savory touch, consider a dash of Worcestershire sauce. One common mistake is undercooking potatoes. Make sure they are tender and golden. Avoid overcrowding the skillet. This can lead to steaming instead of browning. Another mistake is not seasoning well. Taste your hash as you cook. Adjust salt and pepper as needed. Lastly, don’t rush the eggs. Let them cook gently to your liking for the best texture. To change serving sizes, simply scale the ingredients. For two servings, use one potato and two eggs. If you want to make more, double the recipe. This hash is easy to adapt. Just keep the ingredient ratios similar. You can also add more vegetables or proteins if you want extra portions. Experiment and enjoy your perfect breakfast hash! {{image_4}} You can make a tasty vegetarian hash without meat. Use a mix of veggies like zucchini, mushrooms, or spinach. Replace sausage with black beans or chickpeas. These add protein and flavor. You can also use tofu for a protein boost. Season with herbs like thyme and basil for more taste. This dish stays colorful and healthy. If you like heat, add jalapeños or red pepper flakes. This will give your hash a kick. You can also try spicy sausage or chorizo. These meat choices add a rich flavor. For extra zest, mix in a splash of hot sauce. Remember, balance the spice with creamy avocado or sour cream. This will help cool it down. Making a gluten-free breakfast hash is simple. The main ingredients, like potatoes and veggies, are naturally gluten-free. Just check your sausage label to ensure it’s gluten-free. You can also use quinoa as a base. This adds a nutty flavor and is packed with protein. Serve with a side of gluten-free toast for a complete meal. Feel free to explore these variations to make the hash your own! For the full recipe, check out the Savory Breakfast Hash. To keep your savory breakfast hash fresh, allow it to cool down. Use an airtight container to store the leftovers. Make sure to seal it tightly. You can keep it in the fridge for up to three days. This way, you can enjoy it again soon! When you are ready to eat your leftovers, you can reheat them in a skillet or the microwave. If using a skillet, add a splash of olive oil. Heat over medium until warm. Stir it often to heat evenly. If using a microwave, cover it with a microwave-safe lid. Heat for one to two minutes, stirring halfway through. This keeps the eggs from overcooking. If you want to store your breakfast hash for longer, freezing is a great option. Divide the hash into portions and place them in freezer-safe bags. Press out any extra air before sealing. You can store it in the freezer for up to three months. When you are ready to enjoy it, thaw it overnight in the fridge. Then reheat it as described above. This will help maintain the taste and texture. For the full recipe, check out the [Full Recipe]. The best potato for breakfast hash is the Yukon Gold. It has a creamy texture and holds its shape well. Russet potatoes are also a good choice. They give a crispy outer layer when cooked. Try to avoid waxy potatoes like red potatoes. They can become mushy during cooking. Yes, you can make Savory Breakfast Hash ahead of time. Cook the hash without eggs and store it in the fridge. When ready to eat, reheat the hash in a skillet. Then, add the eggs and cook them fresh. This keeps the eggs from becoming rubbery. You can also store the hash for up to three days. Good side dishes to serve with breakfast hash include fresh fruit, toast, or yogurt. A simple green salad can add freshness. If you want more protein, serve it with bacon or ham. For a fun twist, pair it with avocado slices or guacamole. These add creaminess and flavor to the dish. Savory breakfast hash offers a tasty way to start your day. We covered essential and optional ingredients, cooking steps, and great tips. You can customize it to fit your tastes, whether vegetarian or spicy. Remember the right cooking tools for best results. Store your leftovers properly to enjoy later. A well-made hash is not just a meal; it’s a chance to explore flavors. Experiment and find your favorite version for a delightful breakfast treat.](https://joymealplan.com/wp-content/uploads/2025/06/6aa0d9ce-cbc8-4487-b08c-a378fe8215a9-768x768.webp)


![- 1 pound boneless chicken thighs, cut into bite-sized pieces - 1 cup all-purpose flour - 2 large eggs, beaten - 1 cup panko breadcrumbs - 1 cup freshly squeezed orange juice - Zest of 1 medium orange - 1/4 cup honey - 2 tablespoons soy sauce - Salt and freshly ground pepper to taste - Oil for frying - 1 tablespoon cornstarch I love using chicken thighs for this dish. They stay juicy and tender. The all-purpose flour creates a great base for the breading. Beating the eggs helps the breadcrumbs stick. Panko breadcrumbs give that extra crunch. For the orange sauce, fresh juice is the best choice. It gives a bright flavor. The zest adds even more orange goodness. Honey brings a nice sweetness. Low-sodium soy sauce keeps the salt level balanced. Don’t forget the salt and pepper! They enhance the chicken's taste. Oil is key for frying; it makes everything crispy. Cornstarch helps thicken the sauce so it coats the chicken well. If you want the full recipe, you can find it above. Enjoy making this dish! First, season the chicken pieces with salt and pepper. This adds flavor and enhances the dish. Next, create a breading station. Set up three bowls: one with all-purpose flour, another with beaten eggs, and the last with panko breadcrumbs mixed with cornstarch. The cornstarch adds extra crispiness to the coating. Now it's time for the fun part. Take a piece of chicken and dredge it in the flour. Make sure to shake off any extra flour. After that, dip it into the beaten eggs, ensuring it is fully coated. Then roll the chicken in the panko breadcrumbs. Press gently to help the crumbs stick. Place the breaded chicken on a wire rack to rest for at least ten minutes. This resting time is crucial. It helps the coating stay on during frying. In a medium saucepan, pour in the fresh orange juice. Then add the orange zest, honey, soy sauce, rice vinegar, minced ginger, and minced garlic. Stir everything together. Heat the pan over medium heat until it simmers. This allows the flavors to blend nicely. To thicken the sauce, stir in the cornstarch mixed with cold water. Keep stirring for two to three minutes. You'll notice the sauce thickens and gets shiny. Once it's just right, remove the saucepan from heat. Set the orange sauce aside for later. For the complete recipe, check out the [Full Recipe]. To get that perfect crispy texture, start by picking the right frying oil. Use oils with high smoke points like canola or peanut oil. These oils can handle high heat without burning. Double frying is also key. After the first fry, let the chicken rest. Then, fry it again for a few minutes. This makes the chicken extra crunchy. When it comes to orange juice, always choose fresh over bottled. Fresh juice has a bright taste that really shines. Adding orange zest gives your dish an extra zing. Zest is the outer peel of the orange. It holds a lot of flavor, so don’t skip it! For garnishes, sesame seeds and chopped green onions are great choices. They add color and a nice crunch. Pair your crispy orange chicken with steamed rice or stir-fried veggies. These sides balance the dish and make it even more satisfying. For the full recipe, check out the details above! {{image_4}} You can bake the chicken instead of frying it. Baking reduces oil and calories. To bake, coat the chicken as usual, then place it on a lined baking sheet. Bake at 400°F for about 20-25 minutes. This method gives a crispy texture without frying. Adjust the sauce for a low-sodium option. Use low-sodium soy sauce to cut the salt. This change keeps the flavor but makes it healthier. You can use tofu or shrimp instead of chicken. For tofu, press it to remove moisture, then cut it into cubes. Coat and cook it the same way as chicken. Shrimp cooks quickly, so reduce the frying time to 2-3 minutes until they turn pink. For vegetarians, replace chicken with veggies. Bell peppers, broccoli, or snap peas work well. Coat these in the same way and fry until crispy. Want some heat? Add chili flakes or hot sauce to the orange sauce. Start with a teaspoon and adjust to your taste. You can also use different peppers. Try jalapeños or serranos for a fresh kick. These peppers add flavor and heat to the dish. To keep your crispy orange chicken fresh, refrigerate it promptly. Place the chicken in an airtight container. This method helps prevent moisture loss and keeps the chicken tasty. Make sure to cool the chicken to room temperature before sealing. This step avoids condensation that can make the chicken soggy. When it’s time to enjoy leftovers, you have two main options: oven or microwave. The oven is best for keeping the chicken crispy. Preheat it to 350°F (175°C). Spread the chicken on a baking sheet and heat for about 10-15 minutes. For a quicker method, use the microwave but be cautious. Heat in short bursts to prevent sogginess. If you choose this method, you can add a paper towel on top to absorb moisture. Freezing is a great option for long-term storage. To freeze, first allow the chicken to cool completely. Then place it in a freezer-safe bag or container. Remove as much air as possible to avoid freezer burn. The chicken stays good for about 2-3 months. When you're ready to eat it, thaw in the fridge overnight. Reheat as mentioned above for the best results. Yes, you can use chicken breast. However, thighs have more fat. This fat gives extra flavor. Chicken thighs stay juicy, while breasts can dry out. If you use breasts, be careful not to overcook them. They cook faster than thighs. To thicken the sauce, add more cornstarch. Mix one tablespoon of cornstarch with two tablespoons of cold water. Stir this mixture into the sauce while it simmers. Cook for a few minutes until thick. For a thinner sauce, add more orange juice or water. Just remember to adjust the flavor as needed. You can use maple syrup or agave nectar instead of honey. Brown sugar is another option. If you want a sugar-free choice, try stevia or monk fruit sweetener. These alternatives change the taste slightly, but they work. Yes, you can make it ahead. Cook the chicken and sauce separately. Store them in the fridge in airtight containers. When you’re ready to eat, reheat the chicken in the oven. This keeps it crispy. Then, heat the sauce on the stove. Toss them together just before serving. Crispy Orange Chicken is a popular dish in Chinese-American cuisine. It combines sweet and savory flavors. The dish likely came from Hunan cuisine, which uses oranges in cooking. It gained fame in the U.S. in the 1980s. Many enjoy its crunchy texture and bright taste. This blog post covered the key steps to making Crispy Orange Chicken. We discussed the main ingredients, such as chicken, flour, and a tasty orange sauce. I shared tips to achieve a crispy texture and offered serving ideas. You learned about healthier options and variations like spicy orange chicken. Proper storage and reheating tips were also included for your convenience. In summary, this dish is fun to make and enjoy. Don't hesitate to get creative with flavors and substitutions. Happy cooking!](https://joymealplan.com/wp-content/uploads/2025/06/e5d29336-8dbd-4ed1-97b7-adaf34762187-768x768.webp)