Mango Sticky Rice Delightful Dessert Recipe Guide
![- 1 cup glutinous (sticky) rice - 1 ½ cups coconut milk - 1 ripe mango, peeled and thinly sliced - ¼ cup granulated sugar - ¼ teaspoon salt Glutinous rice gives Mango Sticky Rice its unique texture. It sticks together and becomes chewy when cooked. The coconut milk adds a rich and creamy flavor to the dish. Using ripe mango is key; its sweetness and juiciness balance the rice. - 1 tablespoon sesame seeds (toasted, optional) - Fresh mint leaves for garnish (optional) Toasted sesame seeds provide a nice crunch. Fresh mint leaves add a pop of color and a refreshing taste. Both are great if you want to elevate your dish. - Calories per Serving: Approximately 300 calories - Key Nutrients: Carbohydrates, fats, fiber, vitamin C, and iron Mango Sticky Rice is a delightful dessert. While it is not low-calorie, it offers some nutrients. The rice provides energy, and mango adds vitamins. Enjoy it as an occasional treat! For the complete recipe, check out the Full Recipe. Rinsing and Soaking the Rice Start by rinsing the sticky rice under cold water. Keep rinsing until the water runs clear. This step removes excess starch. It's key for the right texture. After rinsing, soak the rice in water for 4 hours. If you can, soak it overnight. This helps the rice absorb water and cook better. Steaming Process After soaking, drain the rice. Place it in a steamer lined with cheesecloth or a steaming basket. Steam the rice over simmering water for 25 to 30 minutes. You want it to become translucent and tender. This process makes the rice fluffy and sticky, perfect for the dish. Combining Ingredients While the rice steams, prepare the coconut milk mixture. In a medium saucepan, mix coconut milk, sugar, and salt. Stir the mixture over low to medium heat. Keep stirring until the sugar dissolves. Be careful not to boil it; you want a smooth texture. Cooking Technique Once the sugar is dissolved, take the saucepan off the heat. This step ensures the coconut milk stays creamy. Set it aside until the rice is ready. This coconut milk will add a rich flavor to the sticky rice. Mixing Rice and Coconut Milk When the sticky rice is cooked, transfer it to a large bowl. Gradually pour in about 1 cup of the warm coconut milk mixture. Use a gentle folding motion to mix it in. Make sure every grain of rice is coated. Let it sit for 15 to 20 minutes. This allows the rice to absorb the coconut flavor. Plating Suggestions To serve, scoop a generous amount of sticky rice onto a plate. Arrange thin slices of ripe mango on top. Drizzle some extra coconut milk over it. For added crunch, sprinkle toasted sesame seeds on top. You can also garnish with fresh mint leaves for a pop of color. This makes the dish look as good as it tastes! For the complete method, check the Full Recipe. Appearance and Aroma Indicators When choosing mangoes, look for smooth skin. The color should be bright and rich. A ripe mango feels slightly soft when gently squeezed. It should also have a sweet aroma near the stem. This smell tells you it's ready to eat. Ideal Varieties for the Dish For this dessert, I recommend using the Ataulfo or Haden mango. Ataulfo mangoes have a creamy texture and sweet taste. Haden mangoes are juicy and fragrant, adding great flavor to your dish. Both work well with the sticky rice. Toasting Sticky Rice Option Toasting the sticky rice can bring out a nutty taste. Before soaking, heat it in a pan over low heat. Stir it for a few minutes until it turns golden. This step adds depth to the flavor of your dessert. Alternative Sweeteners While granulated sugar is common, you can try other sweeteners. Honey or agave syrup can add unique flavors. Coconut sugar offers a caramel-like taste. Each option can change the dish’s final taste, so feel free to experiment. Serving Style Variations For a fun twist, try serving the sticky rice in small bowls. You can layer the mango slices on top. This makes each serving look special. You can also use a ring mold to shape the rice for a more elegant look. Creative Garnishing Tips Garnishing can elevate your dessert. Sprinkle toasted sesame seeds for crunch. Add fresh mint leaves for color and flavor. You can also drizzle a bit of coconut milk on top for a beautiful finish. These small touches make your dish more appealing. For the complete recipe, check out the [Full Recipe]. {{image_4}} Mango sticky rice shines in Thai cuisine. Each region has its own twist. In northern Thailand, you might find a version with black sticky rice. This adds a nutty flavor and a stunning dark color. Southern styles often emphasize sweetness with extra coconut milk. Other cuisines influence this dish too. In Vietnam, they serve a similar treat called "xôi xoài." It features a sweeter coconut sauce and often includes mung beans. Exploring these variations lets you enjoy mango sticky rice in new ways. If you want vegan options, just use coconut milk. This recipe is already dairy-free. You can also make it gluten-free, since glutinous rice has no gluten. For low-sugar options, try using a sugar substitute. Many people enjoy using stevia or monk fruit. These keep the sweetness without the added calories. Want to make your mango sticky rice unique? You can add food coloring to the rice. This gives it a fun pop of color. Just a few drops will do! Incorporating fruits and nuts is another way to change up the flavor. Add some chopped mango or berries for extra fruitiness. You could also sprinkle in some toasted coconut or nuts for crunch. This adds texture and makes your dish even more delightful. For the full recipe, check out the Mango Paradise Sticky Rice section. When you have leftover mango sticky rice, you want to keep it fresh. Here are some tips: - Refrigeration Tips: Store the sticky rice in an airtight container. It will stay good in the fridge for about 3 to 4 days. Always let the rice cool to room temperature before sealing it to avoid condensation. - Freezing Sticky Rice: If you want to keep it longer, consider freezing. Wrap the sticky rice tightly in plastic wrap. Then place it in a freezer bag. This way, it can last up to 3 months. You can enjoy your mango sticky rice again with these methods: - Microwave vs. Stovetop: The microwave is quick and easy. Place the rice in a bowl, add a splash of water, and cover it. Heat in short bursts until warm. The stovetop can be better for texture. Add a little coconut milk to a pot, then heat the rice gently over low heat. - Maintaining Texture and Flavor: When reheating, stir the rice often. This helps it warm evenly. Adding coconut milk will also keep it creamy and flavorful. You should know how long your mango sticky rice lasts: - How Long Can You Store It? In the fridge, it lasts 3 to 4 days. In the freezer, it can be good for up to 3 months. - Signs of Spoilage: Check for off smells or a change in color. If you see mold or a strange texture, it’s best to throw it away. Always trust your senses! Mango sticky rice is a sweet dessert from Thailand. It features glutinous rice cooked in creamy coconut milk. This dish is very popular in Thai cuisine, often enjoyed as a treat during festivals or special occasions. The soft, sweet rice pairs perfectly with ripe mango slices. The dish represents a delightful mix of flavors and textures. You should not use regular rice. Regular rice will not give the same sticky texture. Glutinous rice is key to achieving that chewy bite. If you cannot find glutinous rice, look for sushi rice as an alternative. It has a similar texture but may not be as sticky. You can easily change the sweetness of your mango sticky rice. To do this, modify the amount of sugar you use. Start with less sugar and add more to taste. If you want alternatives to granulated sugar, try using honey or maple syrup. These can add unique flavors while still sweetening your dish. Mango sticky rice is a simple, yet delicious dessert. It requires just three main ingredients: sticky rice, coconut milk, and fresh mango. You can add garnishes like sesame seeds or mint for that extra touch. Follow the easy steps for preparation and assembly to create this flavorful dish. Remember to choose ripe mangoes for the best taste. With tips on storage and variations, you can enjoy this treat anytime. Experiment with flavors and enjoy the process. Your mango sticky rice will shine with every bite!](https://joymealplan.com/wp-content/uploads/2025/06/5d335504-2931-49f8-8062-6f7285d5d66d.webp)
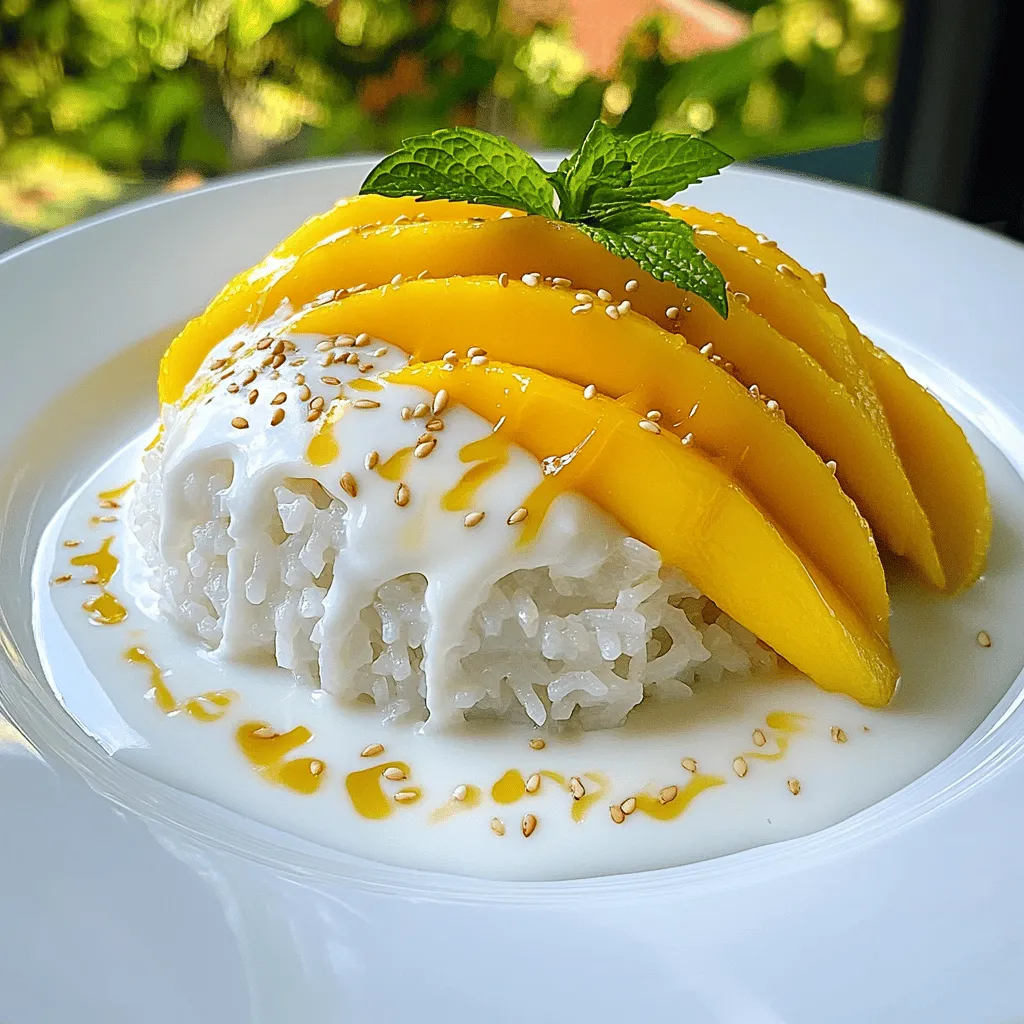
If you’ve ever tasted Mango Sticky Rice, you know it’s pure bliss. This delightful dessert combines sweet mango, creamy coconut milk, and sticky rice for a treat that’s hard to resist. In this guide, I’ll share simple, step-by-step instructions, essential tips, and fun variations to personalize your dessert. Whether you’re a novice or an expert, you’ll find everything you need to whip up this popular Thai dish right at home!
Ingredients
Main Ingredients for Mango Sticky Rice
– 1 cup glutinous (sticky) rice
– 1 ½ cups coconut milk
– 1 ripe mango, peeled and thinly sliced
– ¼ cup granulated sugar
– ¼ teaspoon salt
Glutinous rice gives Mango Sticky Rice its unique texture. It sticks together and becomes chewy when cooked. The coconut milk adds a rich and creamy flavor to the dish. Using ripe mango is key; its sweetness and juiciness balance the rice.
Optional Ingredients for Garnishing
– 1 tablespoon sesame seeds (toasted, optional)
– Fresh mint leaves for garnish (optional)
Toasted sesame seeds provide a nice crunch. Fresh mint leaves add a pop of color and a refreshing taste. Both are great if you want to elevate your dish.
Nutritional Information
– Calories per Serving: Approximately 300 calories
– Key Nutrients: Carbohydrates, fats, fiber, vitamin C, and iron
Mango Sticky Rice is a delightful dessert. While it is not low-calorie, it offers some nutrients. The rice provides energy, and mango adds vitamins. Enjoy it as an occasional treat!
Step-by-Step Instructions
Preparation of Sticky Rice
Rinsing and Soaking the Rice
Start by rinsing the sticky rice under cold water. Keep rinsing until the water runs clear. This step removes excess starch. It’s key for the right texture. After rinsing, soak the rice in water for 4 hours. If you can, soak it overnight. This helps the rice absorb water and cook better.
Steaming Process
After soaking, drain the rice. Place it in a steamer lined with cheesecloth or a steaming basket. Steam the rice over simmering water for 25 to 30 minutes. You want it to become translucent and tender. This process makes the rice fluffy and sticky, perfect for the dish.
Coconut Milk Preparation
Combining Ingredients
While the rice steams, prepare the coconut milk mixture. In a medium saucepan, mix coconut milk, sugar, and salt. Stir the mixture over low to medium heat. Keep stirring until the sugar dissolves. Be careful not to boil it; you want a smooth texture.
Cooking Technique
Once the sugar is dissolved, take the saucepan off the heat. This step ensures the coconut milk stays creamy. Set it aside until the rice is ready. This coconut milk will add a rich flavor to the sticky rice.
Assembling the Dish
Mixing Rice and Coconut Milk
When the sticky rice is cooked, transfer it to a large bowl. Gradually pour in about 1 cup of the warm coconut milk mixture. Use a gentle folding motion to mix it in. Make sure every grain of rice is coated. Let it sit for 15 to 20 minutes. This allows the rice to absorb the coconut flavor.
Plating Suggestions
To serve, scoop a generous amount of sticky rice onto a plate. Arrange thin slices of ripe mango on top. Drizzle some extra coconut milk over it. For added crunch, sprinkle toasted sesame seeds on top. You can also garnish with fresh mint leaves for a pop of color. This makes the dish look as good as it tastes!
Tips & Tricks
Selecting Ripe Mangoes
Appearance and Aroma Indicators
When choosing mangoes, look for smooth skin. The color should be bright and rich. A ripe mango feels slightly soft when gently squeezed. It should also have a sweet aroma near the stem. This smell tells you it’s ready to eat.
Ideal Varieties for the Dish
For this dessert, I recommend using the Ataulfo or Haden mango. Ataulfo mangoes have a creamy texture and sweet taste. Haden mangoes are juicy and fragrant, adding great flavor to your dish. Both work well with the sticky rice.
Enhancing Flavors
Toasting Sticky Rice Option
Toasting the sticky rice can bring out a nutty taste. Before soaking, heat it in a pan over low heat. Stir it for a few minutes until it turns golden. This step adds depth to the flavor of your dessert.
Alternative Sweeteners
While granulated sugar is common, you can try other sweeteners. Honey or agave syrup can add unique flavors. Coconut sugar offers a caramel-like taste. Each option can change the dish’s final taste, so feel free to experiment.
Presentation Ideas
Serving Style Variations
For a fun twist, try serving the sticky rice in small bowls. You can layer the mango slices on top. This makes each serving look special. You can also use a ring mold to shape the rice for a more elegant look.
Creative Garnishing Tips
Garnishing can elevate your dessert. Sprinkle toasted sesame seeds for crunch. Add fresh mint leaves for color and flavor. You can also drizzle a bit of coconut milk on top for a beautiful finish. These small touches make your dish more appealing.
Variations
Regional Adaptations
Mango sticky rice shines in Thai cuisine. Each region has its own twist. In northern Thailand, you might find a version with black sticky rice. This adds a nutty flavor and a stunning dark color. Southern styles often emphasize sweetness with extra coconut milk.
Other cuisines influence this dish too. In Vietnam, they serve a similar treat called “xôi xoài.” It features a sweeter coconut sauce and often includes mung beans. Exploring these variations lets you enjoy mango sticky rice in new ways.
Dietary Adaptations
If you want vegan options, just use coconut milk. This recipe is already dairy-free. You can also make it gluten-free, since glutinous rice has no gluten. For low-sugar options, try using a sugar substitute. Many people enjoy using stevia or monk fruit. These keep the sweetness without the added calories.
Flavor Infusions
Want to make your mango sticky rice unique? You can add food coloring to the rice. This gives it a fun pop of color. Just a few drops will do!
Incorporating fruits and nuts is another way to change up the flavor. Add some chopped mango or berries for extra fruitiness. You could also sprinkle in some toasted coconut or nuts for crunch. This adds texture and makes your dish even more delightful.
Storage Info
Best Practices for Storing Leftovers
When you have leftover mango sticky rice, you want to keep it fresh. Here are some tips:
– Refrigeration Tips: Store the sticky rice in an airtight container. It will stay good in the fridge for about 3 to 4 days. Always let the rice cool to room temperature before sealing it to avoid condensation.
– Freezing Sticky Rice: If you want to keep it longer, consider freezing. Wrap the sticky rice tightly in plastic wrap. Then place it in a freezer bag. This way, it can last up to 3 months.
Reheating Methods
You can enjoy your mango sticky rice again with these methods:
– Microwave vs. Stovetop: The microwave is quick and easy. Place the rice in a bowl, add a splash of water, and cover it. Heat in short bursts until warm. The stovetop can be better for texture. Add a little coconut milk to a pot, then heat the rice gently over low heat.
– Maintaining Texture and Flavor: When reheating, stir the rice often. This helps it warm evenly. Adding coconut milk will also keep it creamy and flavorful.
Shelf Life
You should know how long your mango sticky rice lasts:
– How Long Can You Store It? In the fridge, it lasts 3 to 4 days. In the freezer, it can be good for up to 3 months.
– Signs of Spoilage: Check for off smells or a change in color. If you see mold or a strange texture, it’s best to throw it away. Always trust your senses!
FAQs
What is Mango Sticky Rice?
Mango sticky rice is a sweet dessert from Thailand. It features glutinous rice cooked in creamy coconut milk. This dish is very popular in Thai cuisine, often enjoyed as a treat during festivals or special occasions. The soft, sweet rice pairs perfectly with ripe mango slices. The dish represents a delightful mix of flavors and textures.
Can I use regular rice instead of glutinous rice?
You should not use regular rice. Regular rice will not give the same sticky texture. Glutinous rice is key to achieving that chewy bite. If you cannot find glutinous rice, look for sushi rice as an alternative. It has a similar texture but may not be as sticky.
How can I adjust the sweetness level?
You can easily change the sweetness of your mango sticky rice. To do this, modify the amount of sugar you use. Start with less sugar and add more to taste. If you want alternatives to granulated sugar, try using honey or maple syrup. These can add unique flavors while still sweetening your dish.
Mango sticky rice is a simple, yet delicious dessert. It requires just three main ingredients: sticky rice, coconut milk, and fresh mango. You can add garnishes like sesame seeds or mint for that extra touch. Follow the easy steps for preparation and assembly to create this flavorful dish. Remember to choose ripe mangoes for the best taste. With tips on storage and variations, you can enjoy this treat anytime. Experiment with flavors and enjoy the process. Your mango sticky rice will shine with every bite!
![- 1 cup glutinous (sticky) rice - 1 ½ cups coconut milk - 1 ripe mango, peeled and thinly sliced - ¼ cup granulated sugar - ¼ teaspoon salt Glutinous rice gives Mango Sticky Rice its unique texture. It sticks together and becomes chewy when cooked. The coconut milk adds a rich and creamy flavor to the dish. Using ripe mango is key; its sweetness and juiciness balance the rice. - 1 tablespoon sesame seeds (toasted, optional) - Fresh mint leaves for garnish (optional) Toasted sesame seeds provide a nice crunch. Fresh mint leaves add a pop of color and a refreshing taste. Both are great if you want to elevate your dish. - Calories per Serving: Approximately 300 calories - Key Nutrients: Carbohydrates, fats, fiber, vitamin C, and iron Mango Sticky Rice is a delightful dessert. While it is not low-calorie, it offers some nutrients. The rice provides energy, and mango adds vitamins. Enjoy it as an occasional treat! For the complete recipe, check out the Full Recipe. Rinsing and Soaking the Rice Start by rinsing the sticky rice under cold water. Keep rinsing until the water runs clear. This step removes excess starch. It's key for the right texture. After rinsing, soak the rice in water for 4 hours. If you can, soak it overnight. This helps the rice absorb water and cook better. Steaming Process After soaking, drain the rice. Place it in a steamer lined with cheesecloth or a steaming basket. Steam the rice over simmering water for 25 to 30 minutes. You want it to become translucent and tender. This process makes the rice fluffy and sticky, perfect for the dish. Combining Ingredients While the rice steams, prepare the coconut milk mixture. In a medium saucepan, mix coconut milk, sugar, and salt. Stir the mixture over low to medium heat. Keep stirring until the sugar dissolves. Be careful not to boil it; you want a smooth texture. Cooking Technique Once the sugar is dissolved, take the saucepan off the heat. This step ensures the coconut milk stays creamy. Set it aside until the rice is ready. This coconut milk will add a rich flavor to the sticky rice. Mixing Rice and Coconut Milk When the sticky rice is cooked, transfer it to a large bowl. Gradually pour in about 1 cup of the warm coconut milk mixture. Use a gentle folding motion to mix it in. Make sure every grain of rice is coated. Let it sit for 15 to 20 minutes. This allows the rice to absorb the coconut flavor. Plating Suggestions To serve, scoop a generous amount of sticky rice onto a plate. Arrange thin slices of ripe mango on top. Drizzle some extra coconut milk over it. For added crunch, sprinkle toasted sesame seeds on top. You can also garnish with fresh mint leaves for a pop of color. This makes the dish look as good as it tastes! For the complete method, check the Full Recipe. Appearance and Aroma Indicators When choosing mangoes, look for smooth skin. The color should be bright and rich. A ripe mango feels slightly soft when gently squeezed. It should also have a sweet aroma near the stem. This smell tells you it's ready to eat. Ideal Varieties for the Dish For this dessert, I recommend using the Ataulfo or Haden mango. Ataulfo mangoes have a creamy texture and sweet taste. Haden mangoes are juicy and fragrant, adding great flavor to your dish. Both work well with the sticky rice. Toasting Sticky Rice Option Toasting the sticky rice can bring out a nutty taste. Before soaking, heat it in a pan over low heat. Stir it for a few minutes until it turns golden. This step adds depth to the flavor of your dessert. Alternative Sweeteners While granulated sugar is common, you can try other sweeteners. Honey or agave syrup can add unique flavors. Coconut sugar offers a caramel-like taste. Each option can change the dish’s final taste, so feel free to experiment. Serving Style Variations For a fun twist, try serving the sticky rice in small bowls. You can layer the mango slices on top. This makes each serving look special. You can also use a ring mold to shape the rice for a more elegant look. Creative Garnishing Tips Garnishing can elevate your dessert. Sprinkle toasted sesame seeds for crunch. Add fresh mint leaves for color and flavor. You can also drizzle a bit of coconut milk on top for a beautiful finish. These small touches make your dish more appealing. For the complete recipe, check out the [Full Recipe]. {{image_4}} Mango sticky rice shines in Thai cuisine. Each region has its own twist. In northern Thailand, you might find a version with black sticky rice. This adds a nutty flavor and a stunning dark color. Southern styles often emphasize sweetness with extra coconut milk. Other cuisines influence this dish too. In Vietnam, they serve a similar treat called "xôi xoài." It features a sweeter coconut sauce and often includes mung beans. Exploring these variations lets you enjoy mango sticky rice in new ways. If you want vegan options, just use coconut milk. This recipe is already dairy-free. You can also make it gluten-free, since glutinous rice has no gluten. For low-sugar options, try using a sugar substitute. Many people enjoy using stevia or monk fruit. These keep the sweetness without the added calories. Want to make your mango sticky rice unique? You can add food coloring to the rice. This gives it a fun pop of color. Just a few drops will do! Incorporating fruits and nuts is another way to change up the flavor. Add some chopped mango or berries for extra fruitiness. You could also sprinkle in some toasted coconut or nuts for crunch. This adds texture and makes your dish even more delightful. For the full recipe, check out the Mango Paradise Sticky Rice section. When you have leftover mango sticky rice, you want to keep it fresh. Here are some tips: - Refrigeration Tips: Store the sticky rice in an airtight container. It will stay good in the fridge for about 3 to 4 days. Always let the rice cool to room temperature before sealing it to avoid condensation. - Freezing Sticky Rice: If you want to keep it longer, consider freezing. Wrap the sticky rice tightly in plastic wrap. Then place it in a freezer bag. This way, it can last up to 3 months. You can enjoy your mango sticky rice again with these methods: - Microwave vs. Stovetop: The microwave is quick and easy. Place the rice in a bowl, add a splash of water, and cover it. Heat in short bursts until warm. The stovetop can be better for texture. Add a little coconut milk to a pot, then heat the rice gently over low heat. - Maintaining Texture and Flavor: When reheating, stir the rice often. This helps it warm evenly. Adding coconut milk will also keep it creamy and flavorful. You should know how long your mango sticky rice lasts: - How Long Can You Store It? In the fridge, it lasts 3 to 4 days. In the freezer, it can be good for up to 3 months. - Signs of Spoilage: Check for off smells or a change in color. If you see mold or a strange texture, it’s best to throw it away. Always trust your senses! Mango sticky rice is a sweet dessert from Thailand. It features glutinous rice cooked in creamy coconut milk. This dish is very popular in Thai cuisine, often enjoyed as a treat during festivals or special occasions. The soft, sweet rice pairs perfectly with ripe mango slices. The dish represents a delightful mix of flavors and textures. You should not use regular rice. Regular rice will not give the same sticky texture. Glutinous rice is key to achieving that chewy bite. If you cannot find glutinous rice, look for sushi rice as an alternative. It has a similar texture but may not be as sticky. You can easily change the sweetness of your mango sticky rice. To do this, modify the amount of sugar you use. Start with less sugar and add more to taste. If you want alternatives to granulated sugar, try using honey or maple syrup. These can add unique flavors while still sweetening your dish. Mango sticky rice is a simple, yet delicious dessert. It requires just three main ingredients: sticky rice, coconut milk, and fresh mango. You can add garnishes like sesame seeds or mint for that extra touch. Follow the easy steps for preparation and assembly to create this flavorful dish. Remember to choose ripe mangoes for the best taste. With tips on storage and variations, you can enjoy this treat anytime. Experiment with flavors and enjoy the process. Your mango sticky rice will shine with every bite!](https://joymealplan.com/wp-content/uploads/2025/06/5d335504-2931-49f8-8062-6f7285d5d66d-300x300.webp)


. To get that perfect chewy texture in your cookies, use more brown sugar than white sugar. Brown sugar has moisture, which helps keep cookies soft. Also, don’t overmix the dough. Mix until just combined. This helps keep the cookies tender. One common mistake is using cold ingredients. Always use room temperature butter and eggs. Cold ingredients can make the batter too firm. Another mistake is baking too long. Take the cookies out when the edges are golden but the centers look soft. They firm up as they cool. Use parchment paper on your baking sheet. This prevents sticking and makes cleanup easy. Always space the cookies at least 2 inches apart. This gives them room to spread while baking. Lastly, let the cookies cool on the baking sheet for a few minutes before moving them. This helps them set nicely. For a full recipe, check the section above. {{image_4}} You can make Chewy Oatmeal Raisin Cookies healthier. Try using whole wheat flour instead of all-purpose flour. You can also replace half the sugar with applesauce. This swap keeps the cookies moist and reduces the sugar content. Another option is to use honey or maple syrup for a natural sweetener. These changes keep the cookies tasty while cutting down on empty calories. To spice up your cookies, add different flavors. A pinch of nutmeg or ginger can add a nice kick. You can also mix in some chocolate chips for sweetness. If you want a fun twist, try adding a tablespoon of peanut butter. It will give the cookies a rich, nutty flavor. A splash of almond extract instead of vanilla can also elevate the taste. If you need vegan cookies, swap the egg for a flax egg. Mix one tablespoon of ground flaxseed with three tablespoons of water, then let it sit until it thickens. For a gluten-free version, use a gluten-free flour blend in place of all-purpose flour. Just make sure the oats are certified gluten-free. These swaps will make your cookies friendly for all diets while still being delicious. For the complete recipe, check out the Full Recipe section! To keep your chewy oatmeal raisin cookies fresh, store them in an airtight container. This helps prevent them from drying out. You can place a slice of bread in the container. The bread will absorb any moisture and keep the cookies soft. Store the cookies at room temperature for up to a week. If you want to keep them longer, consider freezing them. Freezing cookies is a great way to enjoy them later. To freeze your chewy oatmeal raisin cookies, let them cool completely first. Then, place them in a single layer on a baking sheet. Freeze for about an hour. Once frozen, transfer the cookies to a freezer-safe bag or container. They can last for up to three months in the freezer. When you’re ready to eat them, just thaw at room temperature or reheat in the oven. Reheating cookies brings back their fresh-baked taste. To do this, preheat your oven to 350°F (175°C). Place the cookies on a baking sheet and heat them for about 5 to 7 minutes. This warms them up and makes them soft again. You can also use a microwave. Heat each cookie for about 10-15 seconds. Enjoy them warm for the best flavor! For more tips and the full recipe, check out the [Full Recipe]. Yes, you can use quick oats. They are smaller and cook faster. This change may make your cookies softer. Rolled oats give a chewier texture. If you want chewy cookies, stick with rolled oats. Chewy oatmeal raisin cookies last about one week at room temperature. Store them in an airtight container. For longer freshness, keep them in the fridge. You can also freeze them for up to three months. If you don't like raisins, try using chocolate chips or dried cranberries. Chopped dates or apricots also work well. These options add a nice twist to the cookies. Feel free to mix and match your favorites! Yes, you can double the recipe easily. Just double each ingredient amount. Make sure to have enough space on your baking sheets. Baking in batches works well too. Enjoy sharing these cookies with friends! Check the edges of the cookies. They should be lightly golden. The centers will look soft but not wet. If they look set, they are done. Remember, they will firm up as they cool! Chewy oatmeal raisin cookies are simple and fun to make. We covered the key ingredients, step-by-step baking, and useful tips. Explore tasty variations and safe storage methods to keep them fresh. Remember to avoid common mistakes for the perfect cookie. With these insights, you can enjoy delightful treats any time. Baking is about experimenting, so feel free to try new flavors or adjustments. Happy baking!](https://joymealplan.com/wp-content/uploads/2025/06/785fb639-1a06-41d5-89d3-a942a31939ee-768x768.webp)