
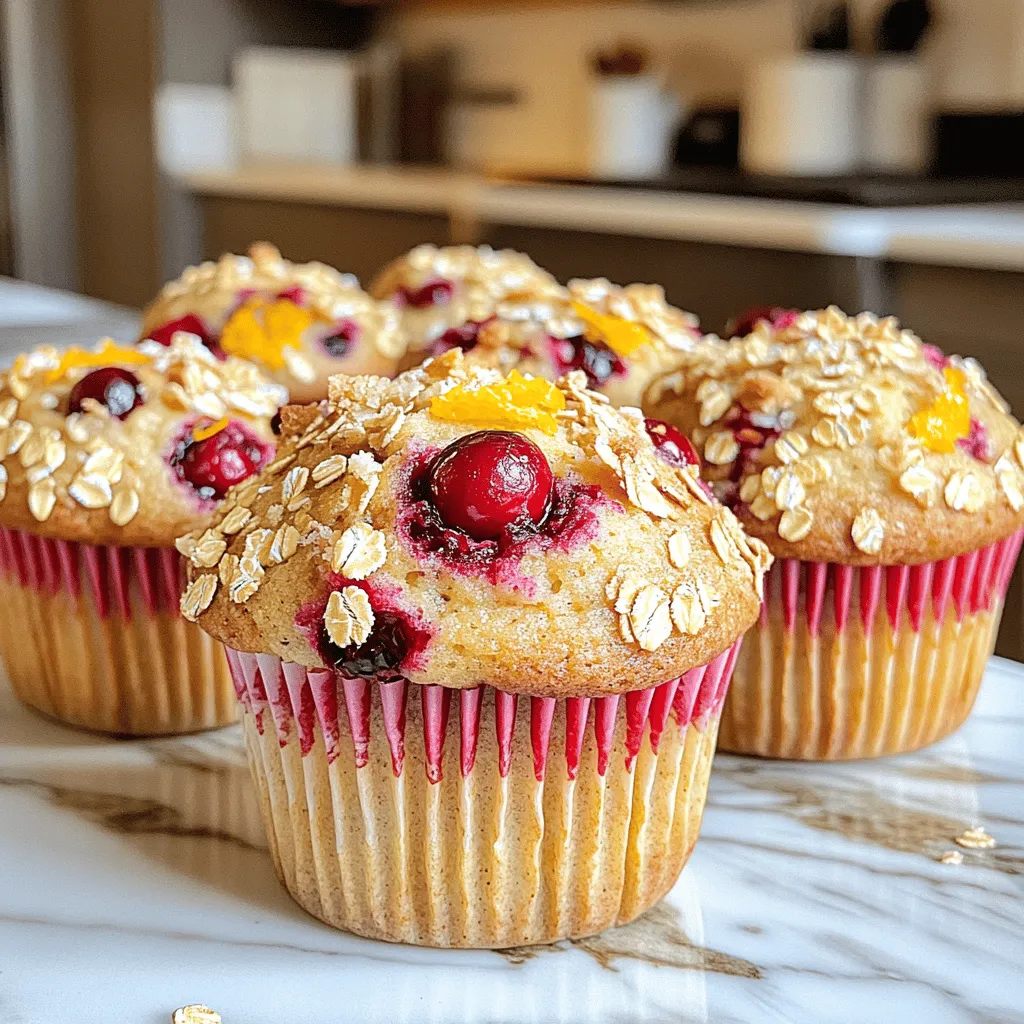
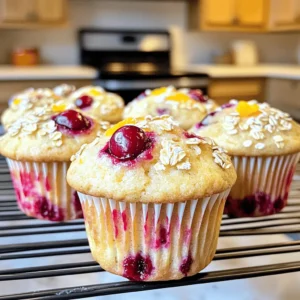
Cranberry Orange Muffins Fresh and Flavorful Treat

Get ready to delight your taste buds with fresh and flavorful cranberry orange muffins! This easy recipe blends tart cranberries with zesty orange for a delicious treat. Whether you enjoy them for breakfast, snack time, or dessert, these muffins will impress everyone. Follow my simple steps and tips for the best results. Your kitchen will smell amazing, and your family will be asking for more! Let’s dive into the fun of baking!
Ingredients
To make delicious cranberry orange muffins, gather these fresh ingredients:
– 2 cups all-purpose flour
– 1 cup fresh cranberries, halved
– 1 large orange, zested and juiced
– 3/4 cup granulated sugar
– 1/2 cup unsalted butter, melted and cooled slightly
– 1/2 cup buttermilk, at room temperature
– 2 large eggs, at room temperature
– 2 teaspoons baking powder
– 1 teaspoon baking soda
– 1/2 teaspoon salt
– 1 teaspoon vanilla extract
– 1/4 cup rolled oats (for topping)
Each ingredient plays an important role. The all-purpose flour gives structure, while fresh cranberries add tartness. The orange zest and juice provide bright flavor and aroma. Butter keeps the muffins rich and moist. Buttermilk adds a nice tang and helps the muffins rise well.
Baking powder and baking soda are your leavening agents, making the muffins rise. Salt enhances all the flavors. The vanilla extract adds warmth, and rolled oats on top give a nice crunch.You’ll create a treat that’s perfect for breakfast or a snack!
Step-by-Step Instructions
Prepping the Oven and Muffin Tin
– Preheat the oven to 375°F (190°C).
– Prepare the muffin tin with liners or cooking spray.
Start by preheating your oven. This step is key to getting perfect muffins. While your oven heats up, grab your muffin tin. You can use paper liners or a light coat of cooking spray. Either choice makes it easy to remove the muffins later.
Mixing Dry Ingredients
– Combine flour, baking powder, baking soda, and salt.
In a large mixing bowl, add the all-purpose flour. Then, sprinkle in the baking powder, baking soda, and salt. Whisk these dry ingredients together until they blend well. This helps your muffins rise evenly.
Mixing Wet Ingredients
– Cream together butter and sugar, then add eggs, buttermilk, orange juice, and vanilla.
In another bowl, melt your butter and mix it with the sugar. Use a whisk or an electric mixer to combine them until creamy. Now, crack in the eggs and pour in the buttermilk, orange juice, and vanilla extract. Mix them well until the mixture is smooth.
Combining Mixtures
– Fold cranberries and zest into the wet mixture and incorporate dry ingredients.
Take your halved cranberries and orange zest. Gently fold them into the wet mixture. This step adds bursts of flavor. Next, add the dry ingredients to the wet mix. Stir gently until just combined. Do not overmix; a few lumps are okay.
Filling Muffin Tins and Topping
– Fill muffin cups and sprinkle with rolled oats.
Using a spoon or an ice cream scoop, fill each muffin cup about 3/4 full with batter. This gives your muffins room to rise. Once filled, sprinkle rolled oats on top of each muffin. This adds a nice crunch.
Baking
– Bake for 18-20 minutes and check for doneness.
Place your muffin tin in the preheated oven. Bake for 18 to 20 minutes. To check if they are done, insert a toothpick into the center of a muffin. If it comes out clean, they are ready. Let them cool in the pan for a few minutes before transferring them to a wire rack.
Tips & Tricks
Perfecting Texture
To get light and fluffy muffins, avoid overmixing the batter. When you mix too much, the muffins can become dense and tough. Instead, stir until just combined, leaving some lumps in the batter.
The temperature of your ingredients matters. Use room temperature eggs and buttermilk. This helps create a smooth batter and ensures even baking. If you forget to take them out before cooking, just place them in warm water for a few minutes.
Additional Flavor Enhancements
To take your muffins to the next level, consider adding spices. A pinch of cinnamon or nutmeg can create a warm and cozy flavor. These spices blend well with cranberries and orange.
You can also switch up the sweetener. Instead of regular sugar, try honey or maple syrup. These options add a different taste and can make your muffins even more special.
Variations
Ingredient Substitutions
You can easily swap fresh cranberries for frozen ones. Frozen cranberries work just fine. They may add a little more moisture. If you use them, do not thaw them first. Just toss them in the batter while still frozen.
Buttermilk is a key ingredient, but you can replace it with yogurt. Greek yogurt works well for this recipe. You can also use dairy-free options like almond milk mixed with a bit of vinegar. This gives a similar tangy flavor.
Muffin Size and Shape
You can make mini muffins instead of standard-sized ones. Mini muffins bake faster, usually around 10 to 12 minutes. This is perfect for a bite-sized treat. If you want a different shape, consider making a Cranberry Orange loaf. Just pour the batter into a loaf pan and bake for about 50 to 60 minutes.
Flavor Add-ins
Want to mix things up? Adding chocolate chips is a great option. They add a sweet surprise to each bite. You can also throw in some nuts like walnuts or pecans for crunch. This adds texture and flavor to your muffins.
Storage Info
Storing Muffins
To keep your cranberry orange muffins fresh, store them in an airtight container. Place the container at room temperature for up to three days. If you need extra time, put them in the fridge. Just remember, the cold can change the texture a bit. For long-term storage, freeze the muffins. Wrap each muffin in plastic wrap, then put them in a freezer bag. This keeps them tasty for about three months.
Reheating Tips
When you want to enjoy a warm muffin, you have a few choices. You can use the microwave for quick heating. Just warm them for about 15-20 seconds. This works well, but the muffin might become a bit soft. For a crispier texture, use the oven. Preheat it to 350°F (175°C) and heat the muffins for about 5-10 minutes. This method keeps the outside nice and crunchy while warming the inside.
FAQs
How can I make these muffins healthier?
You can make these muffins healthier by reducing the sugar. Try using half the amount or substituting with honey or maple syrup. Another option is to use whole grain flour instead of all-purpose flour. Whole grain flour adds fiber and nutrients, making the muffins more filling.
Can I use dried cranberries instead of fresh?
Yes, you can use dried cranberries. They will add sweetness, but they may change the muffin’s flavor and moisture. Fresh cranberries give a tart burst, while dried ones are sweeter and chewier. If using dried cranberries, consider reducing the sugar in the recipe.
How long will the muffins last?
These muffins will last about 3 to 5 days at room temperature. Keep them in an airtight container. Signs of spoilage include a dry texture or mold. If they smell off or look strange, throw them away.
Can I freeze these muffins?
Absolutely! To freeze, let the muffins cool completely. Wrap each muffin tightly in plastic wrap and place them in a freezer bag. They will last for up to three months. To thaw, take them out and leave them at room temperature or warm them in the microwave.
What can I serve with Cranberry Orange Muffins?
These muffins pair well with tea or coffee. You can also serve them with a light spread of butter or cream cheese. For a fun twist, try them with a dollop of orange marmalade. Enjoy the fresh, bright flavors!
These cranberry orange muffins are easy to make and delicious. We’ve covered all the ingredients you need and simple steps for baking. You can customize them with spices or different fruits, too. Remember to check their doneness and store them well. With these tips, you’ll always have fresh muffins ready. Enjoy the process and let your creativity shine in the kitchen!
![- Ripe avocados: Choose avocados that feel soft but not mushy. Ripe avocados add creaminess. They bring healthy fats and nutrients to the mousse. When selecting avocados, look for dark green skin. A little give when pressed is a good sign. Avoid avocados with large dark spots or cracks. - Cocoa powder: The type of cocoa powder you use matters. Choose high-quality, unsweetened cocoa for the best flavor. Dutch-processed cocoa has a smooth taste. Regular cocoa has a rich chocolate flavor. Both are great choices. - Sweeteners: Maple syrup and agave syrup are both tasty options. Maple syrup gives a unique flavor. It adds a slight caramel note. Agave syrup is milder and sweeter. It blends well without changing the taste much. You can adjust the sweetness based on your preference. - Non-dairy milk options: You can use almond, coconut, or oat milk. Almond milk is light and nutty. Coconut milk adds creaminess and a hint of tropical flavor. Oat milk is thick and wholesome. Any of these choices work well to create a smooth texture. - Flavor enhancers: Vanilla extract adds warmth and depth. A little cinnamon gives an extra layer of flavor. Both options are simple and enhance the chocolate taste. You can try adding a pinch to see what you like best. - Garnish suggestions: Dark chocolate shavings are a rich topping. They add elegance and extra chocolate flavor. Fresh berries like raspberries or strawberries bring brightness. Their color and tartness balance the rich mousse perfectly. These garnishes make the dish even more appealing. You can find the full recipe at the beginning of this article. First, you need to prepare your avocados. To peel and pit them easily, slice the avocado in half. Twist the halves apart. Use a spoon to scoop out the pit. Then, scoop the green flesh into a bowl. Next, measure your ingredients. For this mousse, you will need: - 2 ripe avocados, peeled and pitted - 1/2 cup unsweetened cocoa powder - 1/3 cup maple syrup (or agave syrup) - 1/4 cup almond milk (or any non-dairy milk of your choice) - 1 teaspoon vanilla extract - 1/4 teaspoon sea salt - A pinch of cinnamon (optional) Combine all these ingredients in a food processor. Now, let’s blend for that creamy texture. Start blending on high speed. Stop occasionally to scrape down the sides. This ensures everything mixes well. Blend until it’s smooth. Taste your mousse after blending. If you desire more sweetness, add extra maple syrup. Blend again to mix in the syrup. Adjust to your liking for the best flavor. Chilling the mousse is very important. It allows the flavors to develop and the mousse to thicken. Cover the individual dishes with plastic wrap. Chill them in the fridge for at least 30 minutes. For serving, get creative! Garnish your mousse with dark chocolate shavings or fresh berries. This adds a pop of color and texture. You can serve it in small bowls or glasses for a fun touch. Enjoy your rich and creamy vegan chocolate avocado mousse! - Over-blending the mousse: Blending too long makes it thin. Blend just until smooth. You want a creamy texture, not soup. - Using unripe avocados: Unripe avocados are hard and bitter. Always pick ripe ones. They should feel slightly soft. - Balancing sweetness: Taste your mousse before serving. If it's too bitter, add more maple syrup. Start with a little more. Keep tasting until it’s just right. - Experimenting with additional flavorings: You can try adding a pinch of espresso or a drop of peppermint extract. These flavors can make the mousse even more exciting. - Best food processors for smooth blending: Look for a powerful food processor. A 600-watt model works well. It blends the ingredients evenly and quickly. - Storage containers for chilling the mousse: Use small bowls with lids. This keeps the mousse fresh. Glass containers are a great choice. They help keep the mousse cool and tasty. For the full recipe, check out the [Full Recipe]. {{image_4}} You can make your Vegan Chocolate Avocado Mousse even more fun by adding nut butters. Try almond or peanut butter for a rich and creamy taste. These nut butters enhance the texture and add healthy fats. You can also infuse flavors like coffee or mint. A splash of coffee brings a deep, bold taste. Mint adds a refreshing twist that brightens up the dessert. Both options create a unique mousse that surprises and delights. For those with dietary needs, gluten-free variations are easy to make. All the ingredients in this mousse are naturally gluten-free. This makes it a great choice for anyone avoiding gluten. You can also opt for sugar-free alternatives. Using stevia or monk fruit keeps the mousse sweet without added sugar. These substitutes do not change the creamy texture. You can enjoy a guilt-free treat that still tastes amazing. Transform your mousse into parfaits for a stunning dessert. Layer the mousse with fresh fruits or granola in clear cups. This adds color and texture, making your dessert look beautiful. You can use the mousse as a filling for cakes or other desserts. It works well between layers of cake or as a filling for tart shells. This gives you a chance to be creative with your presentation. For the complete recipe, check out the Full Recipe section. To keep your Vegan Chocolate Avocado Mousse fresh, follow these steps: - Chill the mousse: After making it, cover your mousse with plastic wrap or a lid. This helps prevent air from getting in. - Use airtight containers: Store the mousse in airtight containers. This keeps it from absorbing other flavors in the fridge. - Refrigerate promptly: Place it in the fridge as soon as it's ready. This helps maintain its creamy texture. The mousse stays fresh for about 3 to 5 days in the fridge. Always check for any changes in smell or texture before serving. Can you freeze Vegan Chocolate Avocado Mousse? Yes, you can! Freezing is a great option if you want to store it longer. - Portion it out: Divide the mousse into small portions before freezing. This makes it easy to thaw only what you need. - Use freezer-safe containers: Make sure to use containers that are safe for freezing. This prevents freezer burn. When you're ready to enjoy it again, follow these steps to thaw: - Thaw in the fridge: Place the frozen mousse in the fridge overnight. This keeps it at a safe temperature while it thaws. - Stir before serving: After thawing, give the mousse a quick stir. This helps regain its smooth texture. By following these storage and freezing tips, you can enjoy your Vegan Chocolate Avocado Mousse at its best. For the complete recipe, check out the Full Recipe section. Yes, you can use different sweeteners. Honey or agave syrup works well too. Each sweetener changes the taste slightly. Honey adds a floral note, while agave is milder. You can experiment to find your favorite. Just keep the amount similar to maple syrup for the best results. This mousse stays fresh for about three days in the fridge. Store it in an airtight container to keep it from drying out. The mousse may thicken as it sits, so stirring it gently can help restore its creamy texture. Enjoy it within this timeframe for the best flavor and quality. Yes, this dessert is quite healthy! Avocados are full of good fats and nutrients. They can boost heart health and provide fiber. Cocoa powder is also rich in antioxidants, adding to the health benefits. This mousse is a guilt-free treat that satisfies your sweet tooth while nourishing your body. Absolutely! To make it nut-free, choose oat milk or soy milk instead of almond milk. Both options work well and keep the mousse creamy. Ensure your cocoa powder is also nut-free. With these swaps, you can enjoy this tasty dessert without any nut allergy concerns. Vegan Chocolate Avocado Mousse is simple and fun to make. You learned about key ingredients like ripe avocados, cocoa powder, and sweeteners. I shared tips on preparation, blending, and storing your mousse. Mixing in flavors or making parfaits adds creativity. Remember, use ripe avocados for the best taste. This mousse is healthy and easily customizable for different diets. Enjoy your tasty treat, and don't hesitate to share your own variations!](https://joymealplan.com/wp-content/uploads/2025/06/f08f53b2-ba89-49fb-bc73-48bd2b3a08b2-768x768.webp)
![For my Lemon Poppy Seed Zucchini Muffins, I use these ingredients: - 1 cup grated zucchini (squeeze out excess moisture) - 1 cup all-purpose flour - 1/2 cup whole wheat flour - 1/4 cup poppy seeds - 1 teaspoon baking powder - 1/2 teaspoon baking soda - 1/2 teaspoon salt - 1/2 teaspoon ground cinnamon - 1/2 cup granulated sugar - 1/4 cup brown sugar, packed - 2 large eggs - 1/2 cup vegetable oil - 1/4 cup plain Greek yogurt - Zest of 1 lemon (about 1 tablespoon) - 2 tablespoons fresh lemon juice Using fresh zucchini is key. It keeps your muffins moist. Fresh lemon juice and zest add bright flavors. These ingredients work together to create a light and fluffy treat. If you have dietary needs, you can substitute some ingredients: - For gluten-free muffins, replace all-purpose flour with a gluten-free blend. - Use almond milk or coconut milk in place of Greek yogurt for a dairy-free option. - You can swap the granulated sugar with coconut sugar for a lower glycemic option. To enhance flavor, consider adding: - 1/2 cup chopped nuts, like walnuts or pecans. - 1/2 cup chocolate chips for a sweet twist. - A pinch of nutmeg or ginger for a warm spice note. Feel free to experiment! These small changes can lead to new and exciting flavors in your muffins. For the complete recipe, check out the [Full Recipe]. 1. Preheat your oven to 350°F (175°C). This step is key for even baking. 2. Prepare a muffin tin by lining it with paper liners or lightly greasing it with cooking spray. I like to use liners for easy removal and cleanup. 3. Mix the dry ingredients in a medium bowl. Combine all-purpose flour, whole wheat flour, poppy seeds, baking powder, baking soda, salt, and ground cinnamon. Whisk until well blended. This helps mix the leavening agents evenly. 4. In a large bowl, blend the granulated sugar and brown sugar. Add the lemon zest and whisk until mixed. This adds a bright flavor to your muffins. 5. Add the eggs one at a time, whisking well after each. This helps create a smooth, fluffy batter. Then, pour in the vegetable oil, Greek yogurt, and lemon juice. Mix until smooth. 1. Carefully fold the dry ingredients into the wet mixture. Stir gently until just combined. Avoid overmixing to keep your muffins tender. 2. Fold in the grated zucchini. Make sure it is evenly distributed without overworking the batter. The zucchini adds moisture and flavor. 1. Divide the batter evenly among the muffin cups. Fill each cup about two-thirds full. This allows space for the muffins to rise. 2. Bake in the preheated oven for 18-22 minutes. Check for doneness by inserting a toothpick into the center. If it comes out clean, your muffins are ready. 3. Let the muffins cool in the tin for about 5 minutes. Then, transfer them to a wire rack to cool completely. This helps them maintain their shape and texture. For the complete recipe, check the [Full Recipe]. Enjoy the delightful taste of lemon poppy seed zucchini muffins! To make moist lemon poppy seed zucchini muffins, focus on a few key techniques: - Squeeze the Zucchini: Grate your zucchini, then squeeze out the excess moisture. This step prevents the batter from becoming too wet. - Measure Accurately: Use measuring cups for both dry and wet ingredients. This helps your muffins rise and stay light. When you measure, remember that even small variations can change the texture. Accurate measurements make a big difference in your results. Avoid these common missteps to keep your muffins light and fluffy: - Overmixing: When you combine the dry and wet ingredients, mix gently. Overmixing can lead to tough muffins. - Filling Too Full: Fill the muffin cups about two-thirds full. If you fill them too high, they might sink in the middle. By following these tips, you can make sure your lemon poppy seed zucchini muffins turn out perfectly every time. For the complete recipe, check out the [Full Recipe]. {{image_4}} You can make lemon poppy seed zucchini muffins even more exciting by adding spices. Try mixing in 1/2 teaspoon of nutmeg or 1/2 teaspoon of ginger for a warm twist. These spices add depth and enhance the citrus flavor. Fruits can also change the taste of your muffins. You might consider adding 1/2 cup of blueberries or 1/2 cup of cranberries. These fruits will bring a burst of sweetness and tartness. Just fold them into the batter gently to keep the muffins fluffy. If you want to make vegan lemon poppy seed zucchini muffins, it's easy. Substitute the eggs with 1/2 cup of unsweetened applesauce or 1/4 cup of ground flaxseed mixed with 1/2 cup of water. Both options work well for binding the ingredients. For those wanting lower sugar options, you can use 1/4 cup of honey or 1/4 cup of maple syrup instead of granulated sugar. If you need a sugar-free version, try a sugar substitute that measures like sugar. These variations help you enjoy the muffins while fitting your dietary needs. You can still delight in the great taste of lemon poppy seed zucchini muffins. For the full recipe, check out the details provided earlier. To keep your lemon poppy seed zucchini muffins fresh, store them in an airtight container at room temperature. If you add a paper towel inside, it helps absorb moisture. This method keeps the muffins soft and tasty. When stored this way, they can last for about 2 to 3 days. After that, they may start to dry out or lose their flavor. If you want to save muffins for later, freezing is a great option. Allow the muffins to cool completely, then wrap each muffin tightly in plastic wrap. Place them in a freezer-safe bag or container. They can stay fresh in the freezer for up to 3 months. When you’re ready to eat a muffin, take it out of the freezer. Let it thaw in the fridge overnight or at room temperature for a few hours. For the best taste, reheat them in the oven at 350°F for about 10 minutes. You can also use the microwave for about 20-30 seconds. This warms them up and brings back their soft texture. Enjoy your muffins just like the day you baked them! To make lemon poppy seed zucchini muffins, start by prepping your oven and muffin tin. 1. Preheat your oven to 350°F (175°C). 2. Grate 1 cup of zucchini and squeeze out extra moisture. 3. In one bowl, mix 1 cup all-purpose flour, 1/2 cup whole wheat flour, 1/4 cup poppy seeds, 1 teaspoon baking powder, 1/2 teaspoon baking soda, 1/2 teaspoon salt, and 1/2 teaspoon ground cinnamon. 4. In another bowl, combine 1/2 cup granulated sugar, 1/4 cup brown sugar, and the zest of 1 lemon. 5. Add 2 large eggs, followed by 1/2 cup vegetable oil, 1/4 cup Greek yogurt, and 2 tablespoons of lemon juice. 6. Mix until smooth. Fold in the dry ingredients, then add the zucchini. 7. Fill muffin cups two-thirds full. Bake for 18-22 minutes. This quick overview gives you all the steps needed to create delicious muffins. Check the Full Recipe for more details. Yes, you can freeze these muffins. Here’s how: - Let the muffins cool completely after baking. - Place them in an airtight container or a freezer bag. - Label the bag with the date and type of muffin. - Store in the freezer for up to 3 months. When ready to eat, thaw them in the fridge overnight or on the counter for a few hours. You can warm them in the oven for a fresh-baked taste. Dense muffins can happen for a few reasons: - Overmixing the batter can create too much gluten. - Not using enough leavening agents like baking powder or baking soda can also lead to density. - Using too much zucchini without squeezing out moisture may add extra weight. To prevent dense muffins, mix the batter gently and ensure you measure ingredients correctly. Following these tips will help you achieve light and fluffy muffins. In summary, we covered how to make Lemon Poppy Seed Zucchini Muffins. You learned about the key ingredients and possible substitutions for dietary needs. I shared step-by-step instructions, tips to perfect your muffins, and various flavor options. Remember, measuring accurately and not overmixing are key for success. These muffins can be stored well, either short-term or long-term, for your convenience. With a bit of practice, you can enjoy delicious muffins tailored to your taste preferences. Happy baking!](https://joymealplan.com/wp-content/uploads/2025/07/b4c3b954-0106-4660-8231-7250b8c7a63e-768x768.webp)