
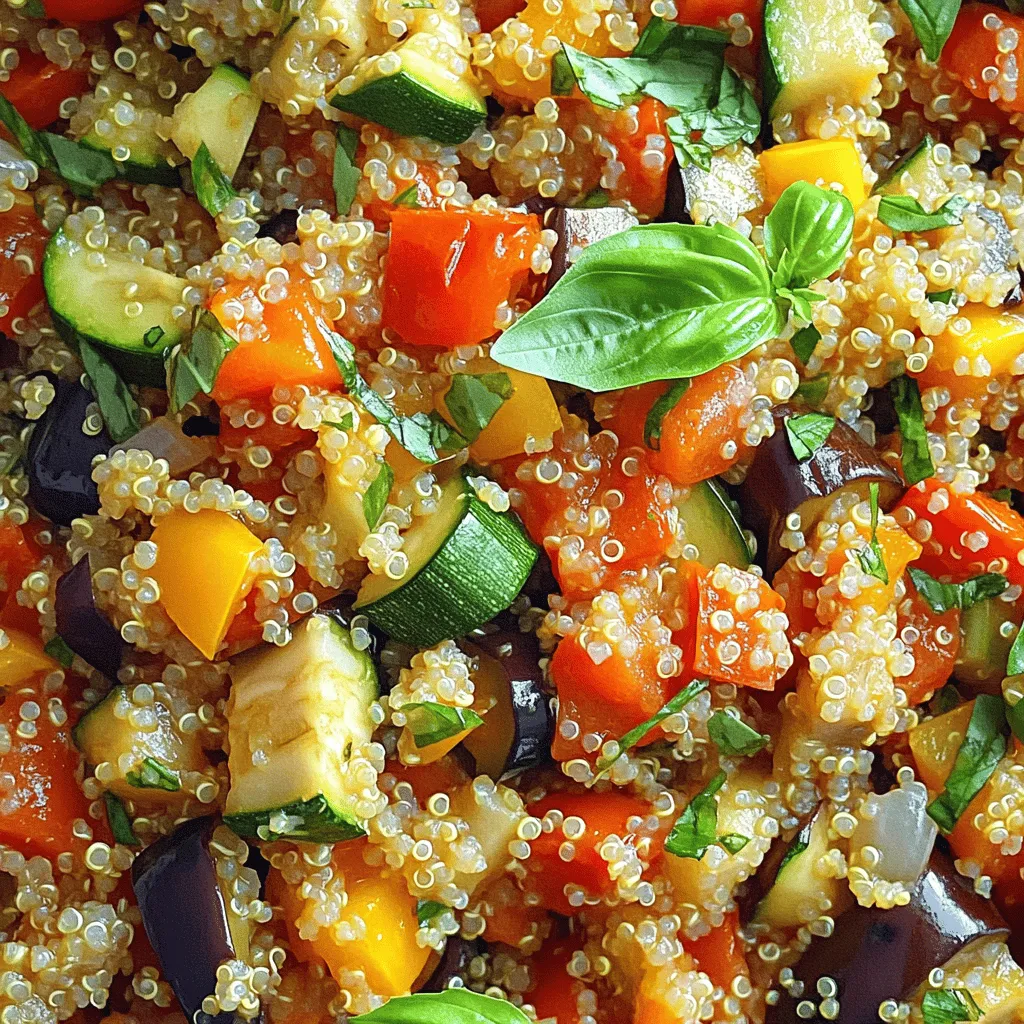
Ratatouille with Quinoa Flavorful and Nutritious Meal
. To get the best flavor in your ratatouille with quinoa, start with fresh veggies. Fresh vegetables bring out the natural taste. Use ripe tomatoes for a juicy base. Add herbs like thyme and basil early in the cook. This helps release their oils and flavors. Sautéing the onions and garlic first adds depth to your dish. A common mistake is overcooking the vegetables. You want them soft but not mushy. Another mistake is not seasoning enough. Taste as you cook and adjust. Don't skip the olive oil; it adds richness. Lastly, avoid using pre-cooked quinoa. Cooking it fresh makes a big difference in texture. Serve your quinoa ratatouille warm in shallow bowls. Drizzle with extra virgin olive oil for a touch of luxury. Fresh basil leaves make a great garnish. They add color and flavor. You can also sprinkle some crushed red pepper for heat. Pair it with crusty bread or a simple salad for a full meal. For more details, check the Full Recipe. {{image_4}} Ratatouille with quinoa is naturally vegan and gluten-free. You can enjoy this dish without any animal products. Quinoa itself is a great choice. It is a whole grain that is safe for those avoiding gluten. You can feel good about serving this meal to friends and family with dietary needs. If you want to boost the protein in your dish, consider adding beans or tofu. Black beans or chickpeas mix well with ratatouille. They add texture and protein. Tofu is another option. Just cube it and sauté it with the veggies. It soaks up all the flavors of the dish. Ratatouille is flexible when it comes to vegetables. You can switch out the veggies based on what you have. Try adding carrots, mushrooms, or even spinach. Each vegetable brings its own taste and texture. You can make the dish more colorful and exciting. Experiment with what you love. Each combination can lead to a new favorite dish! To store leftovers, let the quinoa ratatouille cool down. Place it in an airtight container. This keeps the dish fresh and tasty. You can keep it in the fridge for up to three days. Make sure to label the container with the date. When you are ready to eat, you can reheat the dish. You can use the microwave or a stovetop. To microwave, place it in a bowl and cover it. Heat on high for about 2-3 minutes. Stir halfway through to heat evenly. If you prefer the stovetop, warm it in a skillet over medium heat. Stir and cook for about 5 minutes until hot. If you want to freeze the dish, use a freezer-safe container. Portion out servings to make it easy to reheat later. Freeze for up to three months. To thaw, move it to the fridge overnight. Reheat as mentioned above before serving. Enjoy your tasty meal even when you are busy! Yes, you can make Ratatouille with Quinoa ahead of time. I often prepare it a day before. This allows the flavors to mix well. Just store it in an airtight container in the fridge. When you are ready to eat, just reheat it on the stove or in the microwave. Ratatouille with Quinoa is a complete meal. You can serve it with crusty bread for dipping. A simple green salad also pairs well. If you want to add protein, try grilled chicken or fish. This makes a balanced meal that everyone will enjoy. Adjusting the spice level is easy. If you like it mild, stick to the recipe. For more heat, add red pepper flakes. You can also use spicy bell peppers or a dash of hot sauce. Always taste as you go to find the right balance for you. This blog post covered the key steps to make Ratatouille with Quinoa. We reviewed the ingredients and their benefits, plus substitutions for dietary needs. The step-by-step instructions simplify preparation and cooking. Tips and tricks help you avoid common mistakes and enhance flavor. We also explored variations to suit different diets and preferences. Ratatouille with Quinoa is versatile and easy to store. You can enjoy it fresh or as leftovers. Embrace your creativity with this dish, and feel confident in your cooking skills. Enjoy making this healthy meal!](https://joymealplan.com/wp-content/uploads/2025/06/988dfaac-430c-4a57-a4f4-203d0c398d72.webp)
Looking for a tasty and healthy meal? Ratatouille with quinoa is a perfect choice! This dish combines fresh veggies with nutritious quinoa for a burst of flavor. It’s easy to make, filling, and suitable for various diets. Whether you want a quick weeknight dinner or meal prep, this recipe has you covered. Join me as we explore the ingredients, steps, and tips to create a nutritious delight that everyone will love!
Ingredients
Complete list of ingredients
To make this delicious ratatouille with quinoa, gather the following ingredients:
– 1 cup quinoa, thoroughly rinsed
– 2 cups vegetable broth
– 1 medium eggplant, diced into bite-sized pieces
– 1 medium zucchini, diced
– 1 bell pepper (choose red or yellow for sweetness), diced
– 1 medium onion, finely chopped
– 2 cloves of garlic, minced
– 2 ripe medium tomatoes, diced
– 1 teaspoon dried thyme
– 1 teaspoon dried basil
– Salt and black pepper to taste
– 2 tablespoons extra virgin olive oil
– Fresh basil leaves, torn, for garnish
Nutritional benefits of the ingredients
Each ingredient in this dish adds health benefits. Quinoa is a great source of protein and fiber. It helps with digestion and keeps you full. Eggplant contains antioxidants and is low in calories. Zucchini is hydrating and rich in vitamins A and C. Bell peppers add sweetness and vitamin C. Onions offer anti-inflammatory properties and promote heart health. Garlic is known for its immune-boosting effects. Tomatoes are high in vitamins and help maintain skin health. Olive oil provides healthy fats that support heart health.
Ingredient substitutions for dietary restrictions
You can make easy swaps in this recipe. For a gluten-free option, use quinoa, which is naturally gluten-free. If you cannot eat nightshades like eggplant or tomatoes, try using carrots or green beans instead. You can replace vegetable broth with water for a lighter dish. If you prefer a vegan option, ensure your vegetable broth is vegan. For added protein, consider adding chickpeas or lentils. The recipe is flexible, so feel free to adjust it to your needs.
Step-by-Step Instructions
Preparation of quinoa
Start by rinsing 1 cup of quinoa under cool water. This step helps remove any bitter taste. In a medium saucepan, combine the rinsed quinoa with 2 cups of vegetable broth. Bring the mixture to a boil over high heat. Once it boils, reduce the heat to low. Cover the pot and let it simmer for about 15 minutes. The quinoa will absorb the broth and become fluffy. After 15 minutes, take it off heat and fluff it with a fork. Set it aside to cool for a bit.
Cooking the vegetables
Next, grab a large skillet and warm 2 tablespoons of extra virgin olive oil over medium heat. Add 1 finely chopped onion and sauté for about 5 minutes. Stir occasionally until the onion turns soft and translucent. Then, add 2 minced garlic cloves and cook for 1 more minute. You want to release that lovely garlic aroma. Now, toss in the diced eggplant, zucchini, and bell pepper. Cook the vegetables for about 7 to 8 minutes. Stir them often until they begin to soften.
After that, add 2 diced tomatoes along with 1 teaspoon each of dried thyme and dried basil. Season with salt and black pepper to taste. Let this ratatouille mixture cook for another 10 minutes. Stir occasionally to blend the flavors.
Combining quinoa with ratatouille
Once your ratatouille is cooked, it’s time to mix in the quinoa. Gently fold the cooked quinoa into the ratatouille mixture. Make sure everything is combined well. Allow it to heat through for another 2 to 3 minutes. Taste the dish and adjust the seasoning if needed. When ready, serve the quinoa ratatouille warm. Garnish with torn fresh basil leaves for extra flavor and a pop of color. Enjoy this flavorful and nutritious meal!
Tips & Tricks
How to achieve the best flavor
To get the best flavor in your ratatouille with quinoa, start with fresh veggies. Fresh vegetables bring out the natural taste. Use ripe tomatoes for a juicy base. Add herbs like thyme and basil early in the cook. This helps release their oils and flavors. Sautéing the onions and garlic first adds depth to your dish.
Common mistakes to avoid
A common mistake is overcooking the vegetables. You want them soft but not mushy. Another mistake is not seasoning enough. Taste as you cook and adjust. Don’t skip the olive oil; it adds richness. Lastly, avoid using pre-cooked quinoa. Cooking it fresh makes a big difference in texture.
Serving recommendations and garnishes
Serve your quinoa ratatouille warm in shallow bowls. Drizzle with extra virgin olive oil for a touch of luxury. Fresh basil leaves make a great garnish. They add color and flavor. You can also sprinkle some crushed red pepper for heat. Pair it with crusty bread or a simple salad for a full meal.
Variations
Vegan and gluten-free options
Ratatouille with quinoa is naturally vegan and gluten-free. You can enjoy this dish without any animal products. Quinoa itself is a great choice. It is a whole grain that is safe for those avoiding gluten. You can feel good about serving this meal to friends and family with dietary needs.
Adding proteins (like beans or tofu)
If you want to boost the protein in your dish, consider adding beans or tofu. Black beans or chickpeas mix well with ratatouille. They add texture and protein. Tofu is another option. Just cube it and sauté it with the veggies. It soaks up all the flavors of the dish.
Different vegetable combinations
Ratatouille is flexible when it comes to vegetables. You can switch out the veggies based on what you have. Try adding carrots, mushrooms, or even spinach. Each vegetable brings its own taste and texture. You can make the dish more colorful and exciting. Experiment with what you love. Each combination can lead to a new favorite dish!
Storage Info
How to store leftovers
To store leftovers, let the quinoa ratatouille cool down. Place it in an airtight container. This keeps the dish fresh and tasty. You can keep it in the fridge for up to three days. Make sure to label the container with the date.
Reheating instructions
When you are ready to eat, you can reheat the dish. You can use the microwave or a stovetop. To microwave, place it in a bowl and cover it. Heat on high for about 2-3 minutes. Stir halfway through to heat evenly. If you prefer the stovetop, warm it in a skillet over medium heat. Stir and cook for about 5 minutes until hot.
Freezing tips for meal prep
If you want to freeze the dish, use a freezer-safe container. Portion out servings to make it easy to reheat later. Freeze for up to three months. To thaw, move it to the fridge overnight. Reheat as mentioned above before serving. Enjoy your tasty meal even when you are busy!
FAQs
Can I make this dish ahead of time?
Yes, you can make Ratatouille with Quinoa ahead of time. I often prepare it a day before. This allows the flavors to mix well. Just store it in an airtight container in the fridge. When you are ready to eat, just reheat it on the stove or in the microwave.
What can I serve with Ratatouille with Quinoa?
Ratatouille with Quinoa is a complete meal. You can serve it with crusty bread for dipping. A simple green salad also pairs well. If you want to add protein, try grilled chicken or fish. This makes a balanced meal that everyone will enjoy.
How do I adjust the spice level in the dish?
Adjusting the spice level is easy. If you like it mild, stick to the recipe. For more heat, add red pepper flakes. You can also use spicy bell peppers or a dash of hot sauce. Always taste as you go to find the right balance for you.
This blog post covered the key steps to make Ratatouille with Quinoa. We reviewed the ingredients and their benefits, plus substitutions for dietary needs. The step-by-step instructions simplify preparation and cooking. Tips and tricks help you avoid common mistakes and enhance flavor. We also explored variations to suit different diets and preferences.
Ratatouille with Quinoa is versatile and easy to store. You can enjoy it fresh or as leftovers. Embrace your creativity with this dish, and feel confident in your cooking skills. Enjoy making this healthy meal!
. To get the best flavor in your ratatouille with quinoa, start with fresh veggies. Fresh vegetables bring out the natural taste. Use ripe tomatoes for a juicy base. Add herbs like thyme and basil early in the cook. This helps release their oils and flavors. Sautéing the onions and garlic first adds depth to your dish. A common mistake is overcooking the vegetables. You want them soft but not mushy. Another mistake is not seasoning enough. Taste as you cook and adjust. Don't skip the olive oil; it adds richness. Lastly, avoid using pre-cooked quinoa. Cooking it fresh makes a big difference in texture. Serve your quinoa ratatouille warm in shallow bowls. Drizzle with extra virgin olive oil for a touch of luxury. Fresh basil leaves make a great garnish. They add color and flavor. You can also sprinkle some crushed red pepper for heat. Pair it with crusty bread or a simple salad for a full meal. For more details, check the Full Recipe. {{image_4}} Ratatouille with quinoa is naturally vegan and gluten-free. You can enjoy this dish without any animal products. Quinoa itself is a great choice. It is a whole grain that is safe for those avoiding gluten. You can feel good about serving this meal to friends and family with dietary needs. If you want to boost the protein in your dish, consider adding beans or tofu. Black beans or chickpeas mix well with ratatouille. They add texture and protein. Tofu is another option. Just cube it and sauté it with the veggies. It soaks up all the flavors of the dish. Ratatouille is flexible when it comes to vegetables. You can switch out the veggies based on what you have. Try adding carrots, mushrooms, or even spinach. Each vegetable brings its own taste and texture. You can make the dish more colorful and exciting. Experiment with what you love. Each combination can lead to a new favorite dish! To store leftovers, let the quinoa ratatouille cool down. Place it in an airtight container. This keeps the dish fresh and tasty. You can keep it in the fridge for up to three days. Make sure to label the container with the date. When you are ready to eat, you can reheat the dish. You can use the microwave or a stovetop. To microwave, place it in a bowl and cover it. Heat on high for about 2-3 minutes. Stir halfway through to heat evenly. If you prefer the stovetop, warm it in a skillet over medium heat. Stir and cook for about 5 minutes until hot. If you want to freeze the dish, use a freezer-safe container. Portion out servings to make it easy to reheat later. Freeze for up to three months. To thaw, move it to the fridge overnight. Reheat as mentioned above before serving. Enjoy your tasty meal even when you are busy! Yes, you can make Ratatouille with Quinoa ahead of time. I often prepare it a day before. This allows the flavors to mix well. Just store it in an airtight container in the fridge. When you are ready to eat, just reheat it on the stove or in the microwave. Ratatouille with Quinoa is a complete meal. You can serve it with crusty bread for dipping. A simple green salad also pairs well. If you want to add protein, try grilled chicken or fish. This makes a balanced meal that everyone will enjoy. Adjusting the spice level is easy. If you like it mild, stick to the recipe. For more heat, add red pepper flakes. You can also use spicy bell peppers or a dash of hot sauce. Always taste as you go to find the right balance for you. This blog post covered the key steps to make Ratatouille with Quinoa. We reviewed the ingredients and their benefits, plus substitutions for dietary needs. The step-by-step instructions simplify preparation and cooking. Tips and tricks help you avoid common mistakes and enhance flavor. We also explored variations to suit different diets and preferences. Ratatouille with Quinoa is versatile and easy to store. You can enjoy it fresh or as leftovers. Embrace your creativity with this dish, and feel confident in your cooking skills. Enjoy making this healthy meal!](https://joymealplan.com/wp-content/uploads/2025/06/988dfaac-430c-4a57-a4f4-203d0c398d72-300x300.webp)
![To make easy chicken noodle soup, gather these simple ingredients: - 1 tablespoon olive oil - 1 medium onion, finely chopped - 2 carrots, peeled and sliced into thin rounds - 2 celery stalks, diced into small pieces - 3 cloves of garlic, minced - 1 pound boneless, skinless chicken breasts - 6 cups chicken broth (homemade or low-sodium) - 1 teaspoon dried thyme - 1 bay leaf - 8 ounces egg noodles - 1 cup frozen peas - Salt and freshly ground black pepper to taste - Fresh parsley, chopped (for garnish) These ingredients work together to create a warm, hearty dish. The chicken adds protein, while the veggies give great flavor. The egg noodles soak up the broth, making each bite comforting. I always choose low-sodium broth for control over salt. Using fresh parsley at the end makes the dish pop with color. For the full recipe, you can check out the detailed steps to bring this soup to life. Sautéing Aromatics Start by heating 1 tablespoon of olive oil in a large stockpot over medium heat. Once the oil is hot, add the finely chopped onion, sliced carrots, and diced celery. Sauté these for about 5-7 minutes. You want them to become tender and smell great. Next, add 3 cloves of minced garlic and sauté for another 1-2 minutes. Stir it constantly to avoid burning the garlic. Cooking the Chicken Now, it’s time for the star of the show: the chicken. Carefully place 1 pound of boneless, skinless chicken breasts into the pot. Pour in 6 cups of chicken broth, then add 1 teaspoon of dried thyme and 1 bay leaf. Bring this mixture to a boil. Once it’s boiling, reduce the heat to low. Let it simmer for about 15-20 minutes. The chicken should reach an internal temperature of 165°F (75°C). Shredding the Chicken After cooking, carefully remove the chicken from the pot using tongs or a slotted spoon. Shred the chicken into bite-sized pieces using two forks. Once shredded, return the chicken to the pot to soak up all the flavors. Adding Noodles and Peas Next, stir in 8 ounces of egg noodles and 1 cup of frozen peas. Cook the soup for an additional 7-10 minutes. The noodles should be al dente and tender, ready to enjoy. Seasoning the Soup Taste your soup! Season it with salt and freshly ground black pepper, adjusting to your liking. Don’t forget to remove the bay leaf before serving. Tips for Serving Serve the soup hot in bowls. For a nice touch, sprinkle some freshly chopped parsley on top. This adds color and a burst of flavor. Enjoy this comforting bowl of easy chicken noodle soup! For complete details, check out the Full Recipe. Choosing the Right Broth Use homemade broth for the best flavor. If you don’t have time, low-sodium store-bought broth works too. It keeps the soup light and lets other flavors shine through. How to Properly Shred Chicken After cooking the chicken, let it cool slightly. Use two forks to pull the chicken apart. This keeps it moist and tender. You can also use your hands if you prefer. Ensuring Perfect Noodles Cook the noodles separately if you want them to stay firm. Overcooked noodles can turn mushy in the soup. If you add them straight to the pot, just keep an eye on the cooking time. Adding Fresh Herbs and Spices Fresh herbs like parsley or thyme brighten the soup. You can also add a squeeze of lemon juice for a touch of zest. Experiment with flavors to find your perfect mix. Substituting Ingredients Feel free to swap out chicken for turkey or use veggie broth for a vegetarian version. You can also add other veggies like spinach or corn for extra nutrition. Slow Cooker/Instant Pot Options For a slow cooker, add all the ingredients and cook on low for 6-8 hours. In an Instant Pot, cook on high pressure for 15 minutes, then shred the chicken. Both methods make great soup with less effort. For the complete recipe, check out the [Full Recipe]. {{image_4}} - Switching to Whole Wheat Noodles Whole wheat noodles add more fiber. They make the soup heartier. Plus, they keep you full longer. - Using Low-Sodium Ingredients Low-sodium chicken broth helps control salt intake. It is great for those watching their sodium levels. You still keep all the flavor without the extra salt. - Adding Spinach or Kale Spinach or kale boosts nutrition. They add vitamins and minerals. Toss them in just before serving for a fresh taste. - Mexican Chicken Noodle Soup Add cumin and lime juice for a twist. Include black beans and corn for extra texture. This gives your soup a bright, zesty flavor. - Creamy Chicken Noodle Soup Stir in some heavy cream or coconut milk. This makes the soup rich and smooth. It feels like a warm hug in a bowl. - Spicy Chicken Noodle Soup Use red pepper flakes or jalapeños to spice things up. This adds a kick that warms you from the inside. Perfect for chilly days or when you need a little heat. For detailed steps on how to make your soup, check the Full Recipe. Store your easy chicken noodle soup in an airtight container. This keeps it fresh and tasty. Let the soup cool down before sealing it. You can keep it in the fridge for up to four days. Just remember to reheat it well before serving. If you notice any off smell or change in color, it’s best to discard it. To freeze your soup, use freezer-safe containers. Leave some space at the top, as the soup will expand. It can last up to three months in the freezer. When you’re ready to eat it, let it thaw overnight in the fridge. Reheat the soup on the stove over low heat. Stir it often to keep it warm and to avoid burning. You can also use a microwave. Just heat it in short bursts and stir in between. This keeps the soup delicious and helps it warm evenly. For the best taste, add fresh herbs or a squeeze of lemon after reheating. For the full recipe, visit the link provided. Can I use rotisserie chicken? Yes, rotisserie chicken works great! It saves time and adds rich flavor. Just shred it and add it to your soup near the end of cooking. How do I make chicken noodle soup thicker? To thicken your soup, try adding more noodles or use a cornstarch slurry. Mix equal parts cornstarch and cold water, then stir it in while the soup simmers. Can I substitute egg noodles with another type? Absolutely! You can use any pasta you like. Just adjust the cooking time based on the type of pasta you choose. Is chicken noodle soup healthy? Yes, chicken noodle soup is healthy. It offers protein from the chicken and nutrients from the veggies. Plus, it can soothe a cold! What are the calories in easy chicken noodle soup? A serving has about 250-300 calories, depending on your ingredients. It’s a light meal that fills you up. What to serve with chicken noodle soup? I love pairing it with crusty bread or a fresh salad. Both add texture and flavor to your meal. How long does it take to make chicken noodle soup? It takes about 40 minutes from start to finish. This includes prep time and cooking time, so it’s quick and easy. Can I double the recipe? Yes, you can double the recipe! Just make sure your pot is big enough. Adjust cooking time if needed, but it should stay about the same. For the full recipe, check out the detailed instructions above! This blog post covered how to make a tasty chicken noodle soup. I shared the ingredients you need, step-by-step instructions, and useful tips. Plus, you learned about healthy and flavorful variations and storage options. Remember, chicken noodle soup can be easy and fun to make. With a few tweaks, you can personalize it to fit your taste. Enjoy making this comforting dish for yourself and others!](https://joymealplan.com/wp-content/uploads/2025/06/a8abc01f-2283-4b1e-aacb-1aa29c0460c5-768x768.webp)

![- 2 cups cooked chicken, shredded - 1 cup canned black beans, rinsed and drained - 1 cup fresh or frozen corn kernels The main ingredients create the heart of the chicken enchiladas. First, shredded chicken offers a tender and juicy base. I love using rotisserie chicken for ease. Black beans add protein and fiber, making the meal hearty. Corn brings sweetness and a pop of color. Each ingredient plays a role in making this dish satisfying. - 1 small red onion, finely chopped - 2 cloves garlic, minced - 1 teaspoon ground cumin - 1 teaspoon chili powder Aromatics and seasonings elevate the flavor. The red onion adds a sweet, savory taste. Garlic brings depth and aroma that fills your kitchen. Cumin provides a warm, earthy note. Chili powder adds a gentle kick. These elements create a rich base for the enchiladas. - 8 small corn tortillas - 2 cups shredded cheese (cheddar or Mexican blend) - ¼ cup fresh cilantro, chopped (for garnish) Tortillas hold everything together. I prefer corn tortillas for their authentic flavor. They warm up nicely, making them easy to roll. Cheese melts beautifully, creating a creamy topping. I recommend using a blend for extra flavor. Fresh cilantro adds brightness and a fresh touch. Together, these elements create a delightful finish to your enchiladas. For the full recipe, check out the Spicy Chicken Enchiladas. - Preheat your oven to 350°F (175°C). - Sauté red onion and garlic until fragrant. Start by heating a drizzle of oil in a large skillet over medium heat. Add the finely chopped red onion. Sauté for about 3-4 minutes until the onion turns soft and clear. Then, add the minced garlic and cook for another minute. This step makes your kitchen smell amazing and sets the stage for great flavor. - Combine chicken, black beans, corn, onion-garlic mixture, salsa, cumin, and chili powder. In a big mixing bowl, add the shredded chicken, rinsed black beans, and corn. Pour in the sautéed onion and garlic mixture, along with your choice of salsa. To spice it up, add cumin and chili powder. Mix everything well. This filling is packed with protein and flavor, making your enchiladas both tasty and hearty. - Warm tortillas and fill with chicken mixture. - Roll and arrange in baking dish. Now, warm the corn tortillas in a dry skillet or microwave. This makes them soft and easy to roll. Take about ¼ cup of the chicken mixture and place it in the center of each tortilla. Sprinkle a little cheese on top, then roll them up tightly. Place the rolled tortillas seam-side down in a greased 9x13 inch baking dish. This step is where the magic begins! - Cover with salsa and cheese, bake with foil, then uncovered. Pour any remaining salsa over the top of the enchiladas. Sprinkle the rest of the cheese evenly on top. Cover your baking dish with aluminum foil to keep the moisture in. Bake in the preheated oven for 20 minutes. After that, remove the foil and bake for another 10 minutes. You want the cheese to melt and bubble. Once done, let the enchiladas cool for a few minutes. Garnish with fresh cilantro before serving. This adds a fresh flavor and a lovely touch. Enjoy your homemade chicken enchiladas! For more detailed steps, check out the Full Recipe. - Ensure tortillas are pliable to prevent cracking. Warm them in a skillet or microwave. - Use a mix of cheeses for more flavor. Try combining cheddar and pepper jack. - Serve with sour cream and additional cilantro for extra zest. - Integrate sides like rice or refried beans to complete the meal. - Overfilling tortillas can make them hard to roll. Stick to ¼ cup of filling. - Not letting them cool before serving can lead to a messy plate. Give them a few minutes. {{image_4}} You can make your chicken enchiladas even better for you. - Swap out cheese for a low-fat version. This change cuts calories. - Use whole wheat tortillas for extra fiber. This option boosts nutrition. Want to spice things up? Add some fun flavors! - Add jalapeños for extra heat. This will make your dish lively! - Experiment with different salsas. Try mild, medium, or spicy. Each adds a unique taste. Need to adjust for dietary needs? No problem! - Make it vegetarian by using black beans only. This keeps it hearty and filling. - Use corn tortillas for gluten-free options. They work perfectly in this dish. Feel free to explore these variations and make the recipe your own! To keep your chicken enchiladas fresh, store them in an airtight container. This helps prevent moisture loss and keeps flavors intact. Place them in the fridge where they can stay good for about 3-4 days. Label the container with the date, so you remember when you made them. If you want to save some for later, freezing is a great option. Wrap each enchilada tightly in foil before placing them in a freezer bag. This protects them from freezer burn. They can last for up to 3 months in the freezer. When you're ready to eat, simply thaw them overnight in the fridge. For the best taste and texture, reheat your enchiladas in the oven. Preheat your oven to 350°F (175°C). Place the enchiladas in a baking dish, cover with foil, and heat for about 20-25 minutes. Remove the foil for the last 5 minutes to crisp up the cheese. Enjoy them warm! Chicken enchiladas last about 3-4 days when stored properly. Keep them in an airtight container to maintain freshness. Always check for any signs of spoilage before eating leftovers. Yes, you can assemble chicken enchiladas ahead of time. Just prepare them and place them in the fridge before baking. This is a great way to save time, especially on busy days. You can add many tasty toppings to your enchiladas. Some options include: - Avocado - Guacamole - Green onions - Olives Feel free to get creative with your toppings. They can add color and flavor. You can easily customize this recipe. Adjust the spices to fit your taste. Add your favorite vegetables to the filling, like bell peppers or spinach. This makes the dish more personal and fun. Yes, you can use a slow cooker for this dish. Cook the filling in the slow cooker first. Then, assemble the enchiladas and bake them as usual. This method adds rich flavors and makes cooking easier. For the full recipe, check [Full Recipe]. Chicken enchiladas are simple and fun to make. You need cooked chicken, black beans, corn, and cheese. Follow the steps to prepare, mix, and bake them to perfection. Use tips to avoid common mistakes and enjoy variations for your taste. Remember, leftovers are easy to store and reheat. You can customize this dish with your favorite toppings too. Enjoy this tasty meal with friends and family!](https://joymealplan.com/wp-content/uploads/2025/07/08f715d1-a8ab-4086-9fca-7ff252efa8d5-768x768.webp)