
Vegetarian Enchiladas Flavorful and Easy Recipe
![- 8 corn tortillas - 1 cup black beans, drained and rinsed - 1 cup corn kernels (fresh or frozen) - 1 red bell pepper, diced - 1 small zucchini, diced - 1 cup fresh spinach, chopped - 1 teaspoon ground cumin - 1 teaspoon chili powder - 1/2 teaspoon garlic powder - 1 1/2 cups enchilada sauce - 1 cup shredded cheese - 1 tablespoon olive oil - Salt and pepper to taste - Fresh cilantro for garnish You can swap black beans for pinto or kidney beans. You might also try non-dairy cheese if you want a vegan option. If you need gluten-free, use gluten-free tortillas. These swaps keep the recipe flexible and fun! Each serving has about 300 calories. You get protein from beans and fiber from veggies. Black beans boost heart health, while spinach adds iron. Corn gives you energy, making these enchiladas not just tasty but also good for you. - Preheat the oven to 375°F (190°C). - In a large skillet, heat 1 tablespoon of olive oil over medium heat. - Add 1 diced red bell pepper and 1 small diced zucchini. - Sauté for about 5 minutes until they soften. Stir often to avoid sticking. - Next, stir in 1 cup of drained black beans, 1 cup of corn, and 1 cup of chopped spinach. - Cook for 3-4 minutes until the spinach wilts. - Season the mix with 1 teaspoon of ground cumin, 1 teaspoon of chili powder, and 1/2 teaspoon of garlic powder. - Add salt and pepper to taste. Mix well and cook for another 2 minutes. - Pour 1/2 cup of enchilada sauce into a baking dish. Spread it evenly across the bottom. - Warm 8 corn tortillas in the microwave for 20 seconds, or heat them in a skillet. - Take one tortilla and spoon a portion of the filling into the center. - Sprinkle some shredded cheese on top, then roll it up tightly. Place the rolled tortilla seam-side down in the baking dish. - Repeat this for all the tortillas until the filling is used up. - Pour the remaining enchilada sauce over the assembled enchiladas. - Sprinkle the remaining shredded cheese on top of the sauce. - Place the dish in the oven and bake for 20-25 minutes. Look for melted and bubbly cheese. - Allow the enchiladas to cool for a few minutes before serving. Enjoy with fresh cilantro if you like! For the full recipe, check the details above. - Add smokiness with chipotle peppers: Chipotle peppers add a rich, smoky taste. You can use them in the filling or mix them into the sauce. Just chop a few and add them to your veggies while cooking. This will elevate the flavor profile. - Use fresh herbs for garnish: Fresh herbs brighten up your dish. I love adding cilantro or parsley on top before serving. It adds color and freshness, making the enchiladas look even more appealing. - Importance of softening tortillas: Softening the tortillas is key. If they are too hard, they will crack when you roll them. Heat them in the microwave for 20 seconds or warm them on a skillet. This makes them easy to roll and fill without breaking. - Tips for perfectly melted cheese: To get that perfect melt, use a cheese blend with good melting properties. Cheddar and Monterey Jack work great. Add a little extra cheese on top when baking for a delicious, bubbly finish. - Pair with side dishes: Serve your enchiladas with rice or beans on the side. These help balance the meal and add more protein. You can also serve them with a simple salad for extra crunch. - Ideas for toppings: Top your enchiladas with sour cream or guacamole. These creamy toppings add richness and flavor. You can also sprinkle some diced onions or jalapeños for extra spice. These tips will help you make your vegetarian enchiladas even more delicious. For the full recipe, check out the [Full Recipe]. {{image_4}} You can make your enchiladas even better by changing the filling. - Adding roasted vegetables: Roasting veggies like carrots, eggplant, or butternut squash adds depth. The sweet, caramelized flavor makes the filling more exciting. - Using different kinds of cheese: Try mixing cheeses like queso fresco or pepper jack. Each cheese brings its unique taste. This change can keep your enchiladas fresh and fun. The sauce can change the whole dish. - Homemade enchilada sauce recipe: Making your own sauce is simple and rewarding. Blend tomatoes, chili powder, and spices for a rich flavor. This way, you control the heat and taste. - Alternatives like verde sauce: If you like a fresh twist, try verde sauce made with tomatillos. It adds a nice tangy kick that contrasts well with the cheese and veggies. You can adjust the recipe to fit various diets. - Vegan version of enchiladas: Swap cheese for a nut-based cheese or leave it out. Use more beans and veggies to fill the tortillas. You still get a hearty meal without animal products. - Low-carb or keto adaptations: Use lettuce wraps instead of tortillas. This swap keeps the taste while reducing carbs. You can still enjoy the flavors of enchiladas without the extra carbs. For a complete guide on making these delicious meals, check out the Full Recipe. To store leftovers, first, let the enchiladas cool down. Place them in an airtight container. This keeps them fresh and tasty. Glass or plastic containers work well. I prefer glass for easy reheating. If you want to freeze enchiladas, wrap them tightly in plastic wrap. Then, place them in a freezer-safe bag or container. Label the bag with the date. To reheat frozen enchiladas, remove them from the freezer. Let them thaw in the fridge overnight. Bake in a preheated oven at 350°F (175°C) until hot. In the fridge, these enchiladas last about 3 to 5 days. Always check for signs of spoilage. Look for off smells, mold, or changes in color. If you see any of these, it’s best to throw them out. Enjoy your tasty vegetarian enchiladas with confidence! For the full recipe, check the earlier sections. To prevent soggy enchiladas, apply the sauce wisely. Use a thin layer on the bottom of your dish. Do not drown the rolled enchiladas in sauce. Pour the rest of the sauce on top after filling them. Bake them just right. Overcooking can cause sogginess. Bake at 375°F for 20-25 minutes. This keeps them firm and tasty. Yes, you can use flour tortillas. They are softer and easier to roll. However, corn tortillas add a nice flavor. They are also gluten-free. Flour tortillas can get too soft and break. Each type has its charm. Choose based on your taste and needs. Many sides pair well with vegetarian enchiladas. Try Mexican rice for a classic touch. Beans add protein and fiber. A fresh salad can balance the meal. Guacamole or sour cream makes a great dip. You can also serve with a refreshing drink. Consider agua fresca or a light beer. These sides enhance the flavor of your enchiladas. Enjoy exploring different pairings! This blog post covered all you need for delicious vegetarian enchiladas. We discussed key ingredients, from black beans to fresh spinach. I shared tips on prepping and cooking, plus variations for your taste. You learned how to store leftovers and reheat them. These enchiladas are tasty, healthy, and easy to make. Enjoy trying different flavors and ingredients. Whether for a quick dinner or a party, these enchiladas will impress everyone. Now, get in the kitchen and start cooking!](https://joymealplan.com/wp-content/uploads/2025/06/0bc30ee8-fb20-468c-811c-2f42a5691433.webp)
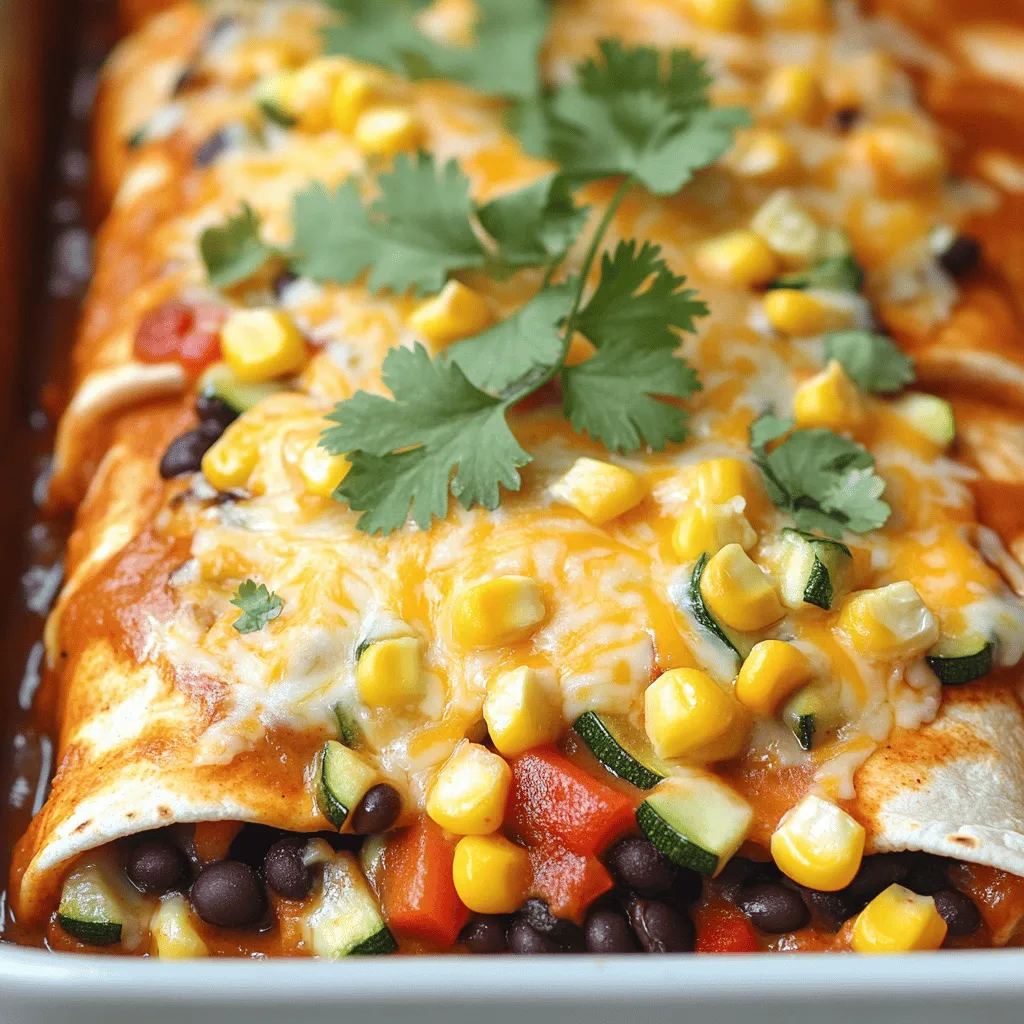
Looking for a simple, tasty dish that everyone will love? These Vegetarian Enchiladas are packed with flavor and nutrients, making them perfect for any meal. With just a few ingredients like black beans, bell peppers, and cheese, you’ll make a delicious meal in no time. Join me as I guide you through this easy recipe that will impress your family and friends. Let’s get cooking!
Ingredients
List of Ingredients
– 8 corn tortillas
– 1 cup black beans, drained and rinsed
– 1 cup corn kernels (fresh or frozen)
– 1 red bell pepper, diced
– 1 small zucchini, diced
– 1 cup fresh spinach, chopped
– 1 teaspoon ground cumin
– 1 teaspoon chili powder
– 1/2 teaspoon garlic powder
– 1 1/2 cups enchilada sauce
– 1 cup shredded cheese
– 1 tablespoon olive oil
– Salt and pepper to taste
– Fresh cilantro for garnish
Ingredient Substitutions
You can swap black beans for pinto or kidney beans. You might also try non-dairy cheese if you want a vegan option. If you need gluten-free, use gluten-free tortillas. These swaps keep the recipe flexible and fun!
Nutritional Information
Each serving has about 300 calories. You get protein from beans and fiber from veggies. Black beans boost heart health, while spinach adds iron. Corn gives you energy, making these enchiladas not just tasty but also good for you.
Step-by-Step Instructions
Prepping and Sautéing the Vegetables
– Preheat the oven to 375°F (190°C).
– In a large skillet, heat 1 tablespoon of olive oil over medium heat.
– Add 1 diced red bell pepper and 1 small diced zucchini.
– Sauté for about 5 minutes until they soften. Stir often to avoid sticking.
Preparing the Filling
– Next, stir in 1 cup of drained black beans, 1 cup of corn, and 1 cup of chopped spinach.
– Cook for 3-4 minutes until the spinach wilts.
– Season the mix with 1 teaspoon of ground cumin, 1 teaspoon of chili powder, and 1/2 teaspoon of garlic powder.
– Add salt and pepper to taste. Mix well and cook for another 2 minutes.
Assembling the Enchiladas
– Pour 1/2 cup of enchilada sauce into a baking dish. Spread it evenly across the bottom.
– Warm 8 corn tortillas in the microwave for 20 seconds, or heat them in a skillet.
– Take one tortilla and spoon a portion of the filling into the center.
– Sprinkle some shredded cheese on top, then roll it up tightly. Place the rolled tortilla seam-side down in the baking dish.
– Repeat this for all the tortillas until the filling is used up.
Baking Process
– Pour the remaining enchilada sauce over the assembled enchiladas.
– Sprinkle the remaining shredded cheese on top of the sauce.
– Place the dish in the oven and bake for 20-25 minutes. Look for melted and bubbly cheese.
– Allow the enchiladas to cool for a few minutes before serving. Enjoy with fresh cilantro if you like!
Tips & Tricks
Flavor Boosting Tips
– Add smokiness with chipotle peppers: Chipotle peppers add a rich, smoky taste. You can use them in the filling or mix them into the sauce. Just chop a few and add them to your veggies while cooking. This will elevate the flavor profile.
– Use fresh herbs for garnish: Fresh herbs brighten up your dish. I love adding cilantro or parsley on top before serving. It adds color and freshness, making the enchiladas look even more appealing.
Cooking Techniques
– Importance of softening tortillas: Softening the tortillas is key. If they are too hard, they will crack when you roll them. Heat them in the microwave for 20 seconds or warm them on a skillet. This makes them easy to roll and fill without breaking.
– Tips for perfectly melted cheese: To get that perfect melt, use a cheese blend with good melting properties. Cheddar and Monterey Jack work great. Add a little extra cheese on top when baking for a delicious, bubbly finish.
Serving Suggestions
– Pair with side dishes: Serve your enchiladas with rice or beans on the side. These help balance the meal and add more protein. You can also serve them with a simple salad for extra crunch.
– Ideas for toppings: Top your enchiladas with sour cream or guacamole. These creamy toppings add richness and flavor. You can also sprinkle some diced onions or jalapeños for extra spice.
These tips will help you make your vegetarian enchiladas even more delicious.
Variations
Alternative Fillings
You can make your enchiladas even better by changing the filling.
– Adding roasted vegetables: Roasting veggies like carrots, eggplant, or butternut squash adds depth. The sweet, caramelized flavor makes the filling more exciting.
– Using different kinds of cheese: Try mixing cheeses like queso fresco or pepper jack. Each cheese brings its unique taste. This change can keep your enchiladas fresh and fun.
Types of Sauces
The sauce can change the whole dish.
– Homemade enchilada sauce recipe: Making your own sauce is simple and rewarding. Blend tomatoes, chili powder, and spices for a rich flavor. This way, you control the heat and taste.
– Alternatives like verde sauce: If you like a fresh twist, try verde sauce made with tomatillos. It adds a nice tangy kick that contrasts well with the cheese and veggies.
Dietary Options
You can adjust the recipe to fit various diets.
– Vegan version of enchiladas: Swap cheese for a nut-based cheese or leave it out. Use more beans and veggies to fill the tortillas. You still get a hearty meal without animal products.
– Low-carb or keto adaptations: Use lettuce wraps instead of tortillas. This swap keeps the taste while reducing carbs. You can still enjoy the flavors of enchiladas without the extra carbs.
Storage Info
Refrigeration
To store leftovers, first, let the enchiladas cool down. Place them in an airtight container. This keeps them fresh and tasty. Glass or plastic containers work well. I prefer glass for easy reheating.
Freezing Instructions
If you want to freeze enchiladas, wrap them tightly in plastic wrap. Then, place them in a freezer-safe bag or container. Label the bag with the date. To reheat frozen enchiladas, remove them from the freezer. Let them thaw in the fridge overnight. Bake in a preheated oven at 350°F (175°C) until hot.
Shelf Life
In the fridge, these enchiladas last about 3 to 5 days. Always check for signs of spoilage. Look for off smells, mold, or changes in color. If you see any of these, it’s best to throw them out. Enjoy your tasty vegetarian enchiladas with confidence!
FAQs
How do I prevent soggy enchiladas?
To prevent soggy enchiladas, apply the sauce wisely. Use a thin layer on the bottom of your dish. Do not drown the rolled enchiladas in sauce. Pour the rest of the sauce on top after filling them. Bake them just right. Overcooking can cause sogginess. Bake at 375°F for 20-25 minutes. This keeps them firm and tasty.
Can I use flour tortillas instead of corn?
Yes, you can use flour tortillas. They are softer and easier to roll. However, corn tortillas add a nice flavor. They are also gluten-free. Flour tortillas can get too soft and break. Each type has its charm. Choose based on your taste and needs.
What sides go well with vegetarian enchiladas?
Many sides pair well with vegetarian enchiladas. Try Mexican rice for a classic touch. Beans add protein and fiber. A fresh salad can balance the meal. Guacamole or sour cream makes a great dip. You can also serve with a refreshing drink. Consider agua fresca or a light beer. These sides enhance the flavor of your enchiladas. Enjoy exploring different pairings!
This blog post covered all you need for delicious vegetarian enchiladas. We discussed key ingredients, from black beans to fresh spinach. I shared tips on prepping and cooking, plus variations for your taste. You learned how to store leftovers and reheat them.
These enchiladas are tasty, healthy, and easy to make. Enjoy trying different flavors and ingredients. Whether for a quick dinner or a party, these enchiladas will impress everyone. Now, get in the kitchen and start cooking!
![- 8 corn tortillas - 1 cup black beans, drained and rinsed - 1 cup corn kernels (fresh or frozen) - 1 red bell pepper, diced - 1 small zucchini, diced - 1 cup fresh spinach, chopped - 1 teaspoon ground cumin - 1 teaspoon chili powder - 1/2 teaspoon garlic powder - 1 1/2 cups enchilada sauce - 1 cup shredded cheese - 1 tablespoon olive oil - Salt and pepper to taste - Fresh cilantro for garnish You can swap black beans for pinto or kidney beans. You might also try non-dairy cheese if you want a vegan option. If you need gluten-free, use gluten-free tortillas. These swaps keep the recipe flexible and fun! Each serving has about 300 calories. You get protein from beans and fiber from veggies. Black beans boost heart health, while spinach adds iron. Corn gives you energy, making these enchiladas not just tasty but also good for you. - Preheat the oven to 375°F (190°C). - In a large skillet, heat 1 tablespoon of olive oil over medium heat. - Add 1 diced red bell pepper and 1 small diced zucchini. - Sauté for about 5 minutes until they soften. Stir often to avoid sticking. - Next, stir in 1 cup of drained black beans, 1 cup of corn, and 1 cup of chopped spinach. - Cook for 3-4 minutes until the spinach wilts. - Season the mix with 1 teaspoon of ground cumin, 1 teaspoon of chili powder, and 1/2 teaspoon of garlic powder. - Add salt and pepper to taste. Mix well and cook for another 2 minutes. - Pour 1/2 cup of enchilada sauce into a baking dish. Spread it evenly across the bottom. - Warm 8 corn tortillas in the microwave for 20 seconds, or heat them in a skillet. - Take one tortilla and spoon a portion of the filling into the center. - Sprinkle some shredded cheese on top, then roll it up tightly. Place the rolled tortilla seam-side down in the baking dish. - Repeat this for all the tortillas until the filling is used up. - Pour the remaining enchilada sauce over the assembled enchiladas. - Sprinkle the remaining shredded cheese on top of the sauce. - Place the dish in the oven and bake for 20-25 minutes. Look for melted and bubbly cheese. - Allow the enchiladas to cool for a few minutes before serving. Enjoy with fresh cilantro if you like! For the full recipe, check the details above. - Add smokiness with chipotle peppers: Chipotle peppers add a rich, smoky taste. You can use them in the filling or mix them into the sauce. Just chop a few and add them to your veggies while cooking. This will elevate the flavor profile. - Use fresh herbs for garnish: Fresh herbs brighten up your dish. I love adding cilantro or parsley on top before serving. It adds color and freshness, making the enchiladas look even more appealing. - Importance of softening tortillas: Softening the tortillas is key. If they are too hard, they will crack when you roll them. Heat them in the microwave for 20 seconds or warm them on a skillet. This makes them easy to roll and fill without breaking. - Tips for perfectly melted cheese: To get that perfect melt, use a cheese blend with good melting properties. Cheddar and Monterey Jack work great. Add a little extra cheese on top when baking for a delicious, bubbly finish. - Pair with side dishes: Serve your enchiladas with rice or beans on the side. These help balance the meal and add more protein. You can also serve them with a simple salad for extra crunch. - Ideas for toppings: Top your enchiladas with sour cream or guacamole. These creamy toppings add richness and flavor. You can also sprinkle some diced onions or jalapeños for extra spice. These tips will help you make your vegetarian enchiladas even more delicious. For the full recipe, check out the [Full Recipe]. {{image_4}} You can make your enchiladas even better by changing the filling. - Adding roasted vegetables: Roasting veggies like carrots, eggplant, or butternut squash adds depth. The sweet, caramelized flavor makes the filling more exciting. - Using different kinds of cheese: Try mixing cheeses like queso fresco or pepper jack. Each cheese brings its unique taste. This change can keep your enchiladas fresh and fun. The sauce can change the whole dish. - Homemade enchilada sauce recipe: Making your own sauce is simple and rewarding. Blend tomatoes, chili powder, and spices for a rich flavor. This way, you control the heat and taste. - Alternatives like verde sauce: If you like a fresh twist, try verde sauce made with tomatillos. It adds a nice tangy kick that contrasts well with the cheese and veggies. You can adjust the recipe to fit various diets. - Vegan version of enchiladas: Swap cheese for a nut-based cheese or leave it out. Use more beans and veggies to fill the tortillas. You still get a hearty meal without animal products. - Low-carb or keto adaptations: Use lettuce wraps instead of tortillas. This swap keeps the taste while reducing carbs. You can still enjoy the flavors of enchiladas without the extra carbs. For a complete guide on making these delicious meals, check out the Full Recipe. To store leftovers, first, let the enchiladas cool down. Place them in an airtight container. This keeps them fresh and tasty. Glass or plastic containers work well. I prefer glass for easy reheating. If you want to freeze enchiladas, wrap them tightly in plastic wrap. Then, place them in a freezer-safe bag or container. Label the bag with the date. To reheat frozen enchiladas, remove them from the freezer. Let them thaw in the fridge overnight. Bake in a preheated oven at 350°F (175°C) until hot. In the fridge, these enchiladas last about 3 to 5 days. Always check for signs of spoilage. Look for off smells, mold, or changes in color. If you see any of these, it’s best to throw them out. Enjoy your tasty vegetarian enchiladas with confidence! For the full recipe, check the earlier sections. To prevent soggy enchiladas, apply the sauce wisely. Use a thin layer on the bottom of your dish. Do not drown the rolled enchiladas in sauce. Pour the rest of the sauce on top after filling them. Bake them just right. Overcooking can cause sogginess. Bake at 375°F for 20-25 minutes. This keeps them firm and tasty. Yes, you can use flour tortillas. They are softer and easier to roll. However, corn tortillas add a nice flavor. They are also gluten-free. Flour tortillas can get too soft and break. Each type has its charm. Choose based on your taste and needs. Many sides pair well with vegetarian enchiladas. Try Mexican rice for a classic touch. Beans add protein and fiber. A fresh salad can balance the meal. Guacamole or sour cream makes a great dip. You can also serve with a refreshing drink. Consider agua fresca or a light beer. These sides enhance the flavor of your enchiladas. Enjoy exploring different pairings! This blog post covered all you need for delicious vegetarian enchiladas. We discussed key ingredients, from black beans to fresh spinach. I shared tips on prepping and cooking, plus variations for your taste. You learned how to store leftovers and reheat them. These enchiladas are tasty, healthy, and easy to make. Enjoy trying different flavors and ingredients. Whether for a quick dinner or a party, these enchiladas will impress everyone. Now, get in the kitchen and start cooking!](https://joymealplan.com/wp-content/uploads/2025/06/0bc30ee8-fb20-468c-811c-2f42a5691433-300x300.webp)

![- 1 lb boneless, skinless chicken thighs, cut into bite-sized chunks - 2 tablespoons olive oil - 1 cup broccoli florets, washed and trimmed - 1 red bell pepper, sliced into thin strips - 1 cup snap peas, ends trimmed - 1 small carrot, julienned - 3 green onions, finely chopped - 2 cloves garlic, minced - 1 tablespoon fresh ginger, grated - 1/4 cup low-sodium soy sauce - 2 tablespoons honey - 1 tablespoon rice vinegar - 1 teaspoon sesame oil - Salt and freshly ground black pepper to taste - Toasted sesame seeds for garnish The chicken is the star here. I use boneless, skinless thighs for juiciness. They cook quickly and stay tender. For veggies, I choose bright broccoli, sweet bell pepper, crisp snap peas, and a touch of carrot for color. Fresh garlic and ginger add a zing. The sauce blends soy sauce, honey, rice vinegar, and sesame oil for a sweet and savory mix. - Other protein options: shrimp, beef, or tofu - Additional veggies: zucchini, mushrooms, or bell peppers - Garnishes and toppings: cilantro, green onions, or chili flakes You can swap chicken for shrimp, beef, or even tofu for a vegetarian twist. Feel free to add other veggies like zucchini or mushrooms. They all taste great! Top with fresh cilantro or chili flakes for extra flavor. This dish is fun to customize based on what you have at home. For more details, you can check the Full Recipe. To start, gather your teriyaki sauce ingredients. You need low-sodium soy sauce, honey, rice vinegar, sesame oil, garlic, and ginger. In a small bowl, mix these ingredients well. A whisk works great here. This sauce adds a sweet and savory taste to your dish. Next, heat olive oil in a large skillet or wok. Use medium-high heat for the best results. When the oil shimmers, add the chicken chunks. Sprinkle a pinch of salt and black pepper over it. Cook for about 5-7 minutes. Turn the chicken often until it is brown and cooked through. Remove the chicken and set it aside on a plate. In the same skillet, add your vegetables: broccoli, bell pepper, snap peas, and carrot. Stir them for 3-4 minutes. You want the veggies to stay bright and start to soften. This keeps them crunchy and full of flavor. Now, return the cooked chicken to the skillet. Pour the teriyaki sauce over everything. Toss gently to coat the chicken and veggies evenly. Cook for another 2-3 minutes. This allows the flavors to meld nicely. Finally, remove the skillet from the heat. Stir in finely chopped green onions. This adds a fresh taste. To serve, spoon the stir fry onto plates. Sprinkle toasted sesame seeds on top for a nice finish. You can serve it over jasmine rice or alongside quinoa. This makes a complete meal. Enjoy the vibrant colors and flavors! - Overcooking the chicken: Overcooked chicken turns dry and tough. Cook it just until it's no longer pink inside. This usually takes about 5-7 minutes on medium-high heat. - Vegetable texture issues: If you overcook the veggies, they lose their crispness. Stir fry them for about 3-4 minutes. They should be bright and tender but still crunchy. - Flavor tweaks: Want more heat? Add chili flakes or sriracha to your teriyaki sauce. Prefer a sweeter taste? Mix in more honey or brown sugar. Adjust the sauce to match your taste. - Alternative vegetables: You can swap out the veggies based on what you have. Try bell peppers, zucchini, or even bok choy. Mix and match for fun flavors and colors. - Sweetness adjustments: If the sauce is too sweet, add a splash of soy sauce. If it’s not sweet enough, add more honey. Taste as you go to get it just right. - Thickness options: To thicken your sauce, simmer it longer in the pan. For a thinner sauce, add a bit of water or broth. This helps you control the sauce for your liking. By following these tips, you'll create a teriyaki chicken stir fry that's both delicious and fun to make. If you're ready to dive in, check out the Full Recipe for all the details! {{image_4}} You can easily make this dish fit your diet. - Low-Carb Options: Swap the chicken for shrimp or tofu. Use cauliflower rice instead of white rice. This keeps the flavor but cuts carbs. - Vegetarian or Vegan Swaps: For a plant-based dish, use tofu or tempeh. You can also add more veggies like bell peppers or mushrooms. You can give your stir fry a twist. - Different Sauce Options: Try a hoisin sauce or sweet chili sauce for a different taste. You can even add peanut butter for a creamy texture. - Cultural Twists on Stir Fry: Add spices like curry powder for an Indian flavor. Or use a teriyaki sauce recipe from Japan. Each culture adds its unique flair. Using seasonal produce can enhance your dish. - Best Vegetables to Use Per Season: In spring, use asparagus and snap peas. In summer, add zucchini and bell peppers. Fall is great for carrots and squash. Winter brings hearty greens like kale. - Sustainable Sourcing Tips: Shop local farmers' markets. This supports local farms and gets you fresh ingredients. You can also look for organic labels to ensure quality. Explore these options to make your teriyaki chicken stir fry even more special! To store your teriyaki chicken stir fry, first let it cool down. Place it in an airtight container. This helps keep the flavors fresh. You can refrigerate it for up to three days. If you want to keep it longer, freezing is a good option. Use a freezer-safe container or bag. It can last up to three months in the freezer. When you're ready to eat your leftovers, reheating is easy. For the microwave, place the stir fry in a bowl. Cover it with a microwave-safe lid. Heat it for one to two minutes, stirring halfway. This ensures even heating. If you prefer a skillet, heat a small amount of oil over medium heat. Add the stir fry and stir until warm, about three to five minutes. In the fridge, your teriyaki chicken stir fry lasts about three days. Be sure to check for signs of spoilage before eating. If you see any mold or if it smells off, it's best to throw it away. When frozen, the stir fry can sit for up to three months. After that, the taste may not be as good. Always trust your senses when it comes to food safety. You can serve teriyaki chicken stir fry with rice or noodles. Here are some great options: - Jasmine rice: This fluffy rice pairs well with teriyaki sauce. - Brown rice: A healthier option with more fiber. - Egg noodles: These add a nice chew to your meal. - Quinoa: A protein-rich choice that adds texture. - Side salad: A fresh salad can balance the flavors. Try pairing your stir fry with steamed or sautéed vegetables. Broccoli, bok choy, and carrots work well. You can also serve it with a light soup for a complete meal. Yes, you can make teriyaki chicken stir fry in advance. Here are some tips: - Cook and cool: Prepare the dish fully, then cool it quickly. - Store properly: Place it in an airtight container in the fridge. - Reheat gently: When ready to eat, heat it on the stove or in the microwave. Meal prep makes busy nights easier. You can also chop veggies ahead of time. This saves time and lets you enjoy a fresh meal. Teriyaki chicken stir fry is tasty and nutritious. Here are the key facts: - Caloric content: One serving has about 350 calories. - Protein: It has around 30 grams of protein from chicken. - Carbohydrates: Expect about 30 grams, mostly from veggies and sauce. - Fat: It contains about 10 grams, mostly healthy fats from olive oil. This dish is rich in vitamins and minerals, thanks to the colorful veggies. Broccoli offers vitamin C, while carrots are high in beta-carotene. Enjoy this dish for a balanced meal! For the complete instructions and ingredient list, check out the [Full Recipe]. Teriyaki chicken stir fry is a simple dish to make at home. You learned key ingredients, how to prepare the sauce, and tips for cooking. Avoid common mistakes like overcooking chicken. Customize your stir fry with different veggies or proteins to suit your taste. Remember, fresh ingredients make a big difference. Whether you serve it fresh or store leftovers, this dish is delicious. Enjoy creating your own unique stir fry!](https://joymealplan.com/wp-content/uploads/2025/06/4a36c5e3-194c-4011-88f6-f3f1f5f34a05-768x768.webp)


![- 2 boneless, skinless chicken breasts - 8 oz penne pasta - 1 tablespoon Cajun seasoning - 2 tablespoons olive oil - 1 medium onion - 3 cloves garlic - 1 red bell pepper - 1 cup heavy cream - 1 cup chicken broth - 1 cup grated Parmesan cheese - Salt and pepper - Fresh parsley The ingredients for this dish come together to create a rich and tasty meal. You’ll notice how each part plays a role in the final flavor. The chicken gives protein and heartiness, while the pasta acts as a lovely base. The Cajun seasoning adds a spicy kick that makes this dish stand out. If you want to change things up, I have options for you. - For dairy alternatives, you can use coconut milk or almond milk instead of heavy cream. This keeps the dish creamy without dairy. - If you need a chicken substitute, consider using tofu or chickpeas. They both provide protein and soak up the sauce well. - For gluten-free pasta, options like rice or quinoa pasta work great. They cook differently, so keep an eye on them while cooking. With these substitutions, you can still enjoy a delicious creamy Cajun chicken pasta that fits your needs. Enjoy making this dish your own! If you want to see the full recipe, check out the [Full Recipe]. To cook the penne pasta, start by bringing a large pot of water to a rolling boil. Add a generous pinch of salt. This helps enhance the pasta's flavor. Once the water is boiling, add the penne pasta. Follow the package instructions for cooking time, usually around 11-12 minutes. You want it to be al dente, which means it should be firm to the bite. To check, taste a piece a minute or two before the time is up. When ready, drain the pasta in a colander and set it aside. In a large skillet, heat the olive oil over medium-high heat. Add the diced chicken pieces to the skillet. Season them generously with Cajun seasoning, salt, and pepper. Cook the chicken for about 5-7 minutes. You want it to be fully cooked through and golden brown. Use a meat thermometer to check if it reaches 165°F. Once cooked, remove the chicken from the skillet and place it on a plate. Set it aside while you prepare the other ingredients. In the same skillet, reduce the heat slightly. Add the finely chopped onion and minced garlic. Sauté them for about 2-3 minutes until the onion turns translucent and fragrant. Next, add the sliced red bell pepper. Cook for another 3-4 minutes until the pepper softens a bit. Then, pour in the heavy cream and chicken broth. Increase the heat until the mixture starts to simmer gently. Once simmering, lower the heat to keep it warm. Now, gradually mix in the grated Parmesan cheese. Stir continuously to melt the cheese completely. This will give your sauce a rich, creamy texture. Finally, return the sautéed chicken and drained penne pasta to the skillet. Toss everything together well, ensuring every piece of pasta is coated in the creamy sauce. Taste and adjust the seasoning if needed. To make your creamy Cajun chicken pasta even better, consider adding more spices. You can try smoked paprika or cayenne for extra heat. Fresh herbs like thyme or basil can also brighten the dish. To balance the creaminess, add a splash of lemon juice or a dash of vinegar. This adds a nice zing and cuts through the richness. Avoid overcooking your chicken by using medium heat. Cook it until golden brown, about 5-7 minutes. For pasta, watch the clock! Boil it until al dente, which means it should still have a slight bite. Drain it right away to stop the cooking. For a smooth sauce, stir continuously as you add cheese. This helps it melt evenly without clumping. If the sauce gets too thick, add a bit of chicken broth until it reaches your desired consistency. Plating makes a big difference! Serve your pasta in shallow bowls for a nice look. Drizzle some extra cream sauce on top to make it inviting. A sprinkle of extra Parmesan cheese adds a lovely touch. For garnish, fresh parsley works wonders. It adds color and a fresh taste. You might even add a slice of lemon on the side. This lets your guests squeeze a bit of juice over their pasta for a burst of flavor. For the full recipe, check out the detailed instructions above. {{image_4}} You can make a great vegetarian version of this dish. Replace the chicken with veggies. Use mushrooms, zucchini, or spinach for a fresh taste. For protein, add chickpeas or tofu. 1. Cook the Veggies: Sauté the vegetables until they soften. 2. Season Well: Use Cajun seasoning on the veggies to keep that flavor. 3. Follow the Sauce Steps: Keep the sauce the same, and mix in your veggies. This way, you keep the creamy goodness and add healthy veggies! Want more heat? You can boost the spice in a few ways. - Add Hot Sauce: Mix in your favorite hot sauce while cooking the chicken. - Use Spicy Peppers: Dice jalapeños or cayenne peppers and sauté with the onions. - Extra Cajun Seasoning: Add a bit more Cajun seasoning to the chicken for a kick. These small tweaks will give your pasta a fiery twist! If you love seafood, swap the chicken for shrimp or scallops. 1. Cook Seafood: Sauté shrimp or scallops until they turn pink and opaque. 2. Follow the Same Steps: Use the same sauce and pasta methods. 3. Adjust Cooking Time: Seafood cooks fast, so watch it closely. This change creates a rich, ocean-inspired version of the dish. Don't forget to check out the Full Recipe for more details! To keep your creamy Cajun chicken pasta fresh, store it in the fridge. Place the pasta in airtight containers. This helps prevent it from drying out and keeps the flavors strong. Make sure to cool the pasta to room temperature before sealing it. If you're storing it for more than a few days, consider freezing it. Just remember that freezing may change the texture a bit. When you’re ready to enjoy your leftovers, use gentle reheating methods. The best options are the stovetop or microwave. If you use the stovetop, add a splash of chicken broth or a little cream. This helps keep the sauce creamy. Stir often to avoid sticking. If using a microwave, cover the dish with a damp paper towel. This helps trap moisture. Heat in short bursts, stirring in between, until warm. Enjoy your creamy Cajun chicken pasta just like the first time! Yes, you can make this dish ahead of time. Here are some tips: - Cook the pasta: You can cook the penne pasta earlier on. Drain it well and toss it with a little oil to prevent sticking. - Prepare the chicken: Sauté the chicken and store it in the fridge. Reheat it before mixing with pasta. - Make the sauce: You can prepare the creamy sauce in advance. Store it in an airtight container in the fridge. - Combine before serving: Mix everything together just before serving. This keeps the pasta fresh and hot. Pair this pasta with these delicious sides: - Garlic bread: A warm, crusty garlic bread complements the dish perfectly. - Caesar salad: A fresh Caesar salad adds a nice crunch and balances the creamy pasta. - Steamed vegetables: Broccoli or green beans offer a healthy touch and color to your meal. - Corn on the cob: Sweet corn is a fun side that goes well with Cajun flavors. Adjusting the serving size is simple. Here’s how: - Double ingredients: If you want to serve eight, just double each ingredient in the recipe. - Halve ingredients: For two servings, cut the amounts in half. - Scale easily: Keep the ratios the same, so the flavors remain balanced. - Use measuring tools: A scale or measuring cups can help ensure precision when scaling down or up. You can find the [Full Recipe] online for more details! This blog post covered a delicious creamy Cajun chicken pasta recipe. You learned about the key ingredients, including chicken, pasta, and spices. We explored cooking methods and tips to enhance flavors. Variations allowed you to personalize your dish. Don't forget proper storage and reheating tips to enjoy leftovers. Embrace your culinary skills and try this recipe. It’s quick, satisfying, and perfect for any meal. Enjoy your cooking adventure!](https://joymealplan.com/wp-content/uploads/2025/06/ca6cae42-757f-40a7-bcb0-99b7cd192fd8-768x768.webp)