Easy Shrimp Scampi Quick and Flavorful Delight
. To cook shrimp just right, start with fresh shrimp. Look for shrimp that smell like the ocean, not fishy. When you heat your skillet, make sure it’s hot before adding the shrimp. This helps create a nice sear. Cook the shrimp in a single layer. This way, they cook evenly. Flip them when they turn pink, and they will be ready in about 2-3 minutes per side. Overcooking shrimp makes them tough, so watch closely! To make your shrimp scampi burst with flavor, use quality ingredients. Fresh garlic creates a rich taste. You can also add lemon zest for a bright kick. Try adding capers or sun-dried tomatoes for a twist. Herbs like parsley and basil add freshness. If you like heat, adjust red pepper flakes to your taste. You can also finish with a squeeze of fresh lemon juice for a zesty touch. Timing is key for a great shrimp scampi dish. Start by boiling the pasta first. While it cooks, prepare your shrimp and sauce. This keeps everything fresh and hot. Drain the pasta once it’s al dente, and don’t forget to save some pasta water. This water helps the sauce stick to the pasta. Combine everything right away for the best flavor. Serve your dish immediately to enjoy the vibrant tastes. For more ideas, check the Full Recipe. {{image_4}} You can add fresh vegetables to your shrimp scampi. This adds flavor and color. Try using bell peppers, zucchini, or spinach. They cook quickly and blend well with shrimp. Simply sauté them with garlic before adding shrimp. This way, you get a healthy twist on the classic dish. If you want a gluten-free option, you have choices. Look for gluten-free pasta made from rice or quinoa. These options taste great and hold the sauce well. You can also use spiralized vegetables, like zucchini or carrots. They are fun to eat and low in carbs. Both options keep the dish light and flavorful. Do you like heat? You can easily spice up your shrimp scampi. Add more red pepper flakes for extra kick. You could also include diced jalapeños or a dash of hot sauce. Mix in some cayenne pepper for another layer of flavor. Just remember to adjust to your taste. Enjoy the heat while keeping the dish balanced. These variations let you customize your shrimp scampi. They make it fun and unique every time you cook. For the full recipe, check out the details above! Store any leftover shrimp scampi in an airtight container. Place it in the fridge. It stays fresh for 2-3 days. Make sure it cools down before sealing. This keeps the flavors intact. When you reheat shrimp scampi, use low heat. A skillet works best. Add a splash of broth or water to keep it moist. Stir often to heat evenly. You can also use the microwave. Heat in short bursts to avoid overcooking the shrimp. You can freeze shrimp scampi too! Just place it in a freezer-safe container. Use it within three months for best flavor. Thaw it overnight in the fridge before reheating. Avoid freezing it with pasta; they don't hold up well. Instead, cook fresh pasta when you're ready to eat. For the full recipe, check the earlier section. Making Easy Shrimp Scampi takes about 20 minutes. You need 10 minutes to prep and 10 minutes to cook. This fast dish fits well into any busy schedule. You can enjoy a tasty meal in no time. Yes, you can use frozen shrimp. Just remember to thaw them first. Place the shrimp in the fridge overnight or run them under cold water. Using frozen shrimp may add a few extra minutes to your cook time. Shrimp Scampi pairs well with many sides. Here are some great options: - Garlic bread for dipping in the sauce - A fresh green salad for a light touch - Steamed vegetables for extra color and flavor - A glass of white wine to enhance the meal Yes, you can safely reheat shrimp leftovers. Just make sure to heat them gently. Use low heat on the stove or in the microwave. This helps keep the shrimp tender and tasty. Be careful not to overcook them, as they can become tough. This blog post covered easy shrimp scampi from start to finish. We looked at key ingredients, substitutions, and tools. You learned step-by-step cooking instructions and helpful tips to elevate your dish. Variations give you room to tailor it to your taste, while storage tips ensure nothing goes to waste. As you make your shrimp scampi, remember these insights to create a delicious meal every time. Enjoy your cooking adventure!](https://joymealplan.com/wp-content/uploads/2025/06/da480725-ca76-4dc0-87ac-7692f8ecae54.webp)
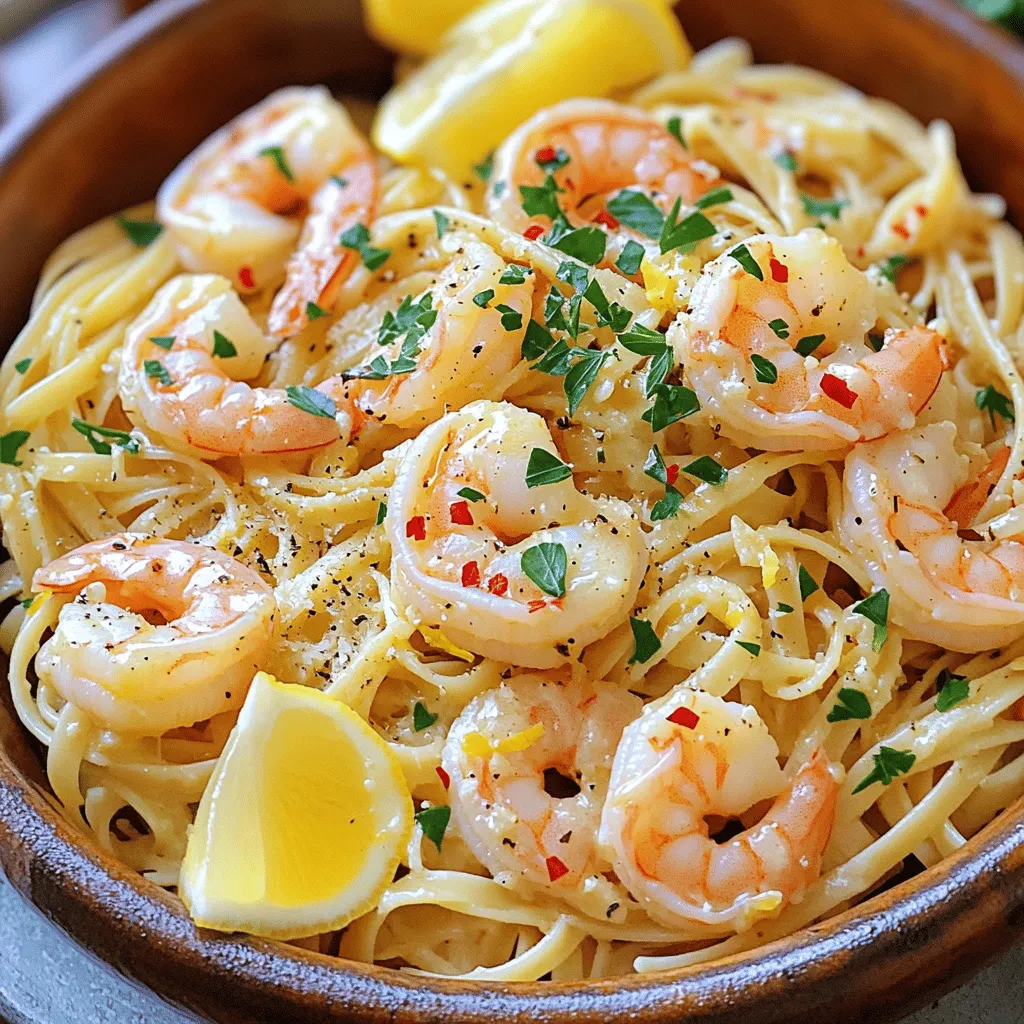
Are you ready to whip up a quick and tasty shrimp scampi? This dish is full of flavor but easy to make. In my guide, I will share simple steps, great tips, and helpful tricks. You’ll impress your friends and family without the fuss. Let’s dive into the ingredients and get cooking! Your perfect shrimp scampi awaits!
Ingredients
List of Ingredients for Easy Shrimp Scampi
To make Easy Shrimp Scampi, gather these simple ingredients:
– 1 pound large shrimp, peeled and deveined
– 6 tablespoons unsalted butter, divided
– 4 cloves garlic, finely minced
– 1 teaspoon red pepper flakes (adjust according to spice preference)
– 1 cup chicken broth (substitute with vegetable broth for a vegetarian option)
– 1 lemon, juiced and zested
– 8 ounces linguine or spaghetti
– 1/4 cup fresh parsley, finely chopped
– Salt and freshly ground black pepper, to taste
Substitutions for Key Ingredients
You can swap some ingredients based on your taste or what you have at home:
– Use olive oil instead of butter for a lighter dish.
– Swap shrimp for scallops or chicken if you prefer.
– For a gluten-free option, try zucchini noodles or gluten-free pasta.
– Lemon juice can be replaced with lime juice for a twist.
Suggested Tools and Equipment
Having the right tools makes cooking easier. Here’s what you need:
– A large pot for boiling pasta
– A large skillet for cooking shrimp
– A sharp knife for mincing garlic and chopping parsley
– A cutting board for prep
– Measuring cups and spoons for accuracy
These items will help you whip up this dish quickly and easily.
Step-by-Step Instructions
Prepping the Pasta
First, fill a large pot with water and add a good amount of salt. This helps flavor the pasta. Bring the water to a rolling boil. Once it’s boiling, add 8 ounces of linguine or spaghetti. Cook it according to the package directions, usually about 8-10 minutes. You want it to be al dente, which means it should be firm but not hard. When done, drain the pasta, but save 1/2 cup of the pasta water. This will help your sauce later.
Cooking the Garlic and Shrimp
In a large skillet, heat 4 tablespoons of unsalted butter over medium heat. Once the butter is melted, add 4 cloves of finely minced garlic and 1 teaspoon of red pepper flakes. Stir it often for about 1-2 minutes. You want the garlic to smell good but not brown, as that can change the taste.
Next, turn the heat to medium-high and add 1 pound of peeled and deveined shrimp. Cook the shrimp for about 2-3 minutes on each side. They should turn pink and be fully cooked. Don’t forget to season with salt and freshly ground black pepper to taste.
Creating the Scampi Sauce
Carefully pour in 1 cup of chicken broth and the juice of 1 lemon. Add the lemon zest as well. Stir all of this together and let it simmer for 2-3 minutes. This will reduce the sauce a bit and make it rich in flavor.
Combining and Finishing Touches
Now it’s time to combine everything. Add the drained pasta right into the skillet with the shrimp and sauce. Gently toss it all together, so the pasta gets coated in that delicious sauce. If the sauce feels too thick, slowly add some of the reserved pasta water until it’s just right.
Finally, remove the skillet from the heat and stir in the remaining 2 tablespoons of butter. This makes the sauce even creamier. For the final touch, sprinkle freshly chopped parsley on top. Serve the dish warm, either right from the skillet or in a big bowl. Enjoy this easy and flavorful delight!
Tips & Tricks
How to Perfectly Cook Shrimp
To cook shrimp just right, start with fresh shrimp. Look for shrimp that smell like the ocean, not fishy. When you heat your skillet, make sure it’s hot before adding the shrimp. This helps create a nice sear. Cook the shrimp in a single layer. This way, they cook evenly. Flip them when they turn pink, and they will be ready in about 2-3 minutes per side. Overcooking shrimp makes them tough, so watch closely!
Flavor Enhancements for Shrimp Scampi
To make your shrimp scampi burst with flavor, use quality ingredients. Fresh garlic creates a rich taste. You can also add lemon zest for a bright kick. Try adding capers or sun-dried tomatoes for a twist. Herbs like parsley and basil add freshness. If you like heat, adjust red pepper flakes to your taste. You can also finish with a squeeze of fresh lemon juice for a zesty touch.
Timing Your Meal for Optimal Freshness
Timing is key for a great shrimp scampi dish. Start by boiling the pasta first. While it cooks, prepare your shrimp and sauce. This keeps everything fresh and hot. Drain the pasta once it’s al dente, and don’t forget to save some pasta water. This water helps the sauce stick to the pasta. Combine everything right away for the best flavor. Serve your dish immediately to enjoy the vibrant tastes.
Variations
Shrimp Scampi with Vegetables
You can add fresh vegetables to your shrimp scampi. This adds flavor and color. Try using bell peppers, zucchini, or spinach. They cook quickly and blend well with shrimp. Simply sauté them with garlic before adding shrimp. This way, you get a healthy twist on the classic dish.
Gluten-Free Alternatives for Pasta
If you want a gluten-free option, you have choices. Look for gluten-free pasta made from rice or quinoa. These options taste great and hold the sauce well. You can also use spiralized vegetables, like zucchini or carrots. They are fun to eat and low in carbs. Both options keep the dish light and flavorful.
Spicy Shrimp Scampi Recipe Adjustments
Do you like heat? You can easily spice up your shrimp scampi. Add more red pepper flakes for extra kick. You could also include diced jalapeños or a dash of hot sauce. Mix in some cayenne pepper for another layer of flavor. Just remember to adjust to your taste. Enjoy the heat while keeping the dish balanced.
These variations let you customize your shrimp scampi. They make it fun and unique every time you cook.
Storage Info
How to Store Leftover Shrimp Scampi
Store any leftover shrimp scampi in an airtight container. Place it in the fridge. It stays fresh for 2-3 days. Make sure it cools down before sealing. This keeps the flavors intact.
Best Practices for Reheating
When you reheat shrimp scampi, use low heat. A skillet works best. Add a splash of broth or water to keep it moist. Stir often to heat evenly. You can also use the microwave. Heat in short bursts to avoid overcooking the shrimp.
Freezing Tips for Shrimp Scampi
You can freeze shrimp scampi too! Just place it in a freezer-safe container. Use it within three months for best flavor. Thaw it overnight in the fridge before reheating. Avoid freezing it with pasta; they don’t hold up well. Instead, cook fresh pasta when you’re ready to eat.
FAQs
How long does it take to make Easy Shrimp Scampi?
Making Easy Shrimp Scampi takes about 20 minutes. You need 10 minutes to prep and 10 minutes to cook. This fast dish fits well into any busy schedule. You can enjoy a tasty meal in no time.
Can I use frozen shrimp for this recipe?
Yes, you can use frozen shrimp. Just remember to thaw them first. Place the shrimp in the fridge overnight or run them under cold water. Using frozen shrimp may add a few extra minutes to your cook time.
What to serve with Shrimp Scampi?
Shrimp Scampi pairs well with many sides. Here are some great options:
– Garlic bread for dipping in the sauce
– A fresh green salad for a light touch
– Steamed vegetables for extra color and flavor
– A glass of white wine to enhance the meal
Is it safe to reheat shrimp leftovers?
Yes, you can safely reheat shrimp leftovers. Just make sure to heat them gently. Use low heat on the stove or in the microwave. This helps keep the shrimp tender and tasty. Be careful not to overcook them, as they can become tough.
This blog post covered easy shrimp scampi from start to finish. We looked at key ingredients, substitutions, and tools. You learned step-by-step cooking instructions and helpful tips to elevate your dish. Variations give you room to tailor it to your taste, while storage tips ensure nothing goes to waste.
As you make your shrimp scampi, remember these insights to create a delicious meal every time. Enjoy your cooking adventure!
. To cook shrimp just right, start with fresh shrimp. Look for shrimp that smell like the ocean, not fishy. When you heat your skillet, make sure it’s hot before adding the shrimp. This helps create a nice sear. Cook the shrimp in a single layer. This way, they cook evenly. Flip them when they turn pink, and they will be ready in about 2-3 minutes per side. Overcooking shrimp makes them tough, so watch closely! To make your shrimp scampi burst with flavor, use quality ingredients. Fresh garlic creates a rich taste. You can also add lemon zest for a bright kick. Try adding capers or sun-dried tomatoes for a twist. Herbs like parsley and basil add freshness. If you like heat, adjust red pepper flakes to your taste. You can also finish with a squeeze of fresh lemon juice for a zesty touch. Timing is key for a great shrimp scampi dish. Start by boiling the pasta first. While it cooks, prepare your shrimp and sauce. This keeps everything fresh and hot. Drain the pasta once it’s al dente, and don’t forget to save some pasta water. This water helps the sauce stick to the pasta. Combine everything right away for the best flavor. Serve your dish immediately to enjoy the vibrant tastes. For more ideas, check the Full Recipe. {{image_4}} You can add fresh vegetables to your shrimp scampi. This adds flavor and color. Try using bell peppers, zucchini, or spinach. They cook quickly and blend well with shrimp. Simply sauté them with garlic before adding shrimp. This way, you get a healthy twist on the classic dish. If you want a gluten-free option, you have choices. Look for gluten-free pasta made from rice or quinoa. These options taste great and hold the sauce well. You can also use spiralized vegetables, like zucchini or carrots. They are fun to eat and low in carbs. Both options keep the dish light and flavorful. Do you like heat? You can easily spice up your shrimp scampi. Add more red pepper flakes for extra kick. You could also include diced jalapeños or a dash of hot sauce. Mix in some cayenne pepper for another layer of flavor. Just remember to adjust to your taste. Enjoy the heat while keeping the dish balanced. These variations let you customize your shrimp scampi. They make it fun and unique every time you cook. For the full recipe, check out the details above! Store any leftover shrimp scampi in an airtight container. Place it in the fridge. It stays fresh for 2-3 days. Make sure it cools down before sealing. This keeps the flavors intact. When you reheat shrimp scampi, use low heat. A skillet works best. Add a splash of broth or water to keep it moist. Stir often to heat evenly. You can also use the microwave. Heat in short bursts to avoid overcooking the shrimp. You can freeze shrimp scampi too! Just place it in a freezer-safe container. Use it within three months for best flavor. Thaw it overnight in the fridge before reheating. Avoid freezing it with pasta; they don't hold up well. Instead, cook fresh pasta when you're ready to eat. For the full recipe, check the earlier section. Making Easy Shrimp Scampi takes about 20 minutes. You need 10 minutes to prep and 10 minutes to cook. This fast dish fits well into any busy schedule. You can enjoy a tasty meal in no time. Yes, you can use frozen shrimp. Just remember to thaw them first. Place the shrimp in the fridge overnight or run them under cold water. Using frozen shrimp may add a few extra minutes to your cook time. Shrimp Scampi pairs well with many sides. Here are some great options: - Garlic bread for dipping in the sauce - A fresh green salad for a light touch - Steamed vegetables for extra color and flavor - A glass of white wine to enhance the meal Yes, you can safely reheat shrimp leftovers. Just make sure to heat them gently. Use low heat on the stove or in the microwave. This helps keep the shrimp tender and tasty. Be careful not to overcook them, as they can become tough. This blog post covered easy shrimp scampi from start to finish. We looked at key ingredients, substitutions, and tools. You learned step-by-step cooking instructions and helpful tips to elevate your dish. Variations give you room to tailor it to your taste, while storage tips ensure nothing goes to waste. As you make your shrimp scampi, remember these insights to create a delicious meal every time. Enjoy your cooking adventure!](https://joymealplan.com/wp-content/uploads/2025/06/da480725-ca76-4dc0-87ac-7692f8ecae54-300x300.webp)

![To make Lemon Butter Shrimp Pasta, gather these items: - 8 oz linguine or spaghetti - 1 lb large shrimp, peeled and deveined - 4 tablespoons unsalted butter - 3 cloves garlic, minced - Zest and juice of 1 large lemon - 1/2 teaspoon crushed red pepper flakes (optional) - Salt and freshly ground black pepper, to taste - 1/4 cup fresh parsley, finely chopped - Grated Parmesan cheese for serving (optional) If you need substitutes, here are some ideas: - Use fettuccine instead of linguine or spaghetti. - Swap shrimp for scallops or chicken. - Use olive oil in place of butter for a lighter dish. - Fresh garlic can be replaced with garlic powder, but use less. To ensure great taste, focus on freshness: - Buy shrimp that smells clean, like the ocean. - Look for shrimp with a firm texture and a slight sheen. - Choose fresh parsley with vibrant green leaves. - Use fresh lemons for the best flavor, avoiding dried or bottled juice. These tips help create a dish that is as delightful as it is simple. For the complete recipe, refer to the [Full Recipe]. Start by boiling a large pot of salted water. Once it bubbles, add 8 oz of linguine or spaghetti. Cook until the pasta is al dente. This usually takes about 8 to 10 minutes. Before draining, save 1/2 cup of the pasta water. Drain the pasta and put it in a big bowl. In a large skillet, melt 2 tablespoons of unsalted butter over medium heat. When the butter bubbles, add 1 lb of peeled and deveined shrimp. Sprinkle salt, black pepper, and crushed red pepper flakes if you want some heat. Cook the shrimp for 3 to 4 minutes until they turn pink and opaque. Take the shrimp out and set them aside on a plate. In the same skillet, add 2 more tablespoons of unsalted butter. Then, add 3 cloves of minced garlic. Sauté for about a minute. You want the garlic fragrant but not browned. Next, stir in the zest and juice of 1 large lemon. Mix well until combined. Now, add the cooked pasta to the skillet with the lemon garlic sauce. Toss gently to coat the noodles. If it feels dry, add a little of the reserved pasta water. Keep tossing until the pasta reaches a creamy texture. Fold in the cooked shrimp and 1/4 cup of chopped parsley. Make sure everything is evenly mixed. Taste the dish. Adjust the flavor with extra salt or black pepper if needed. Serve the pasta hot in shallow bowls. For a nice touch, add extra parsley and a sprinkle of grated Parmesan cheese on top. To cook shrimp just right, time is key. You want shrimp to turn pink and opaque. This usually takes about 3 to 4 minutes on medium heat. If you overcook them, they become tough. Keep an eye on them while they sauté. If they curl tightly, they are likely overdone. Take them out as soon as they are done. Lemon is the star of this dish. Zest and juice both bring bright flavor. Start with just the juice of one lemon. Taste the pasta sauce before adding more. If it’s too sour, add a pinch of sugar. This helps balance the flavors. You can also add more butter to soften the lemon taste. Sometimes things don’t go as planned. If your sauce is too thick, add some of the reserved pasta water. This will help loosen it up. If the shrimp seems bland, sprinkle a little more salt. For a bit of heat, add extra crushed red pepper flakes. Just remember to adjust slowly and taste often. For the full recipe, check out the detailed instructions. {{image_4}} You can make this dish even better by adding veggies. Spinach, cherry tomatoes, and bell peppers work well. Just sauté them with the shrimp for a quick cook. For a fresh crunch, try adding arugula or zucchini at the end. This boosts flavor and nutrition. If you want to switch up the protein, consider using scallops or chicken. Scallops cook fast like shrimp. Just remember to adjust the cook time. Chicken needs a bit longer. Cut it into small pieces to ensure even cooking. You can also use tofu for a vegetarian option. If you need a gluten-free option, swap regular pasta for gluten-free pasta. Rice noodles or zucchini noodles are great choices. They absorb the sauce well and keep the dish light. Always check labels to ensure your ingredients are gluten-free. To keep your lemon butter shrimp pasta fresh, store it in an airtight container. Place it in the fridge within two hours of cooking. It will stay good for up to three days. When you’re ready to eat, check for any signs of spoilage, like a sour smell or unusual texture. You can freeze this dish for longer storage. Allow the pasta to cool completely before freezing. Use a freezer-safe container or bag, and try to remove as much air as possible. It can last in the freezer for about two months. When you are ready to enjoy it, thaw it in the fridge overnight. For reheating, use the stovetop for best results. Place the pasta in a skillet over medium heat. Add a splash of water or broth to help revive the sauce. Stir often until heated through. You can also use the microwave, but be sure to cover it to keep moisture in. Heat it in short bursts, stirring in between. This will help keep the pasta from drying out. For extra flavor, add a squeeze of fresh lemon juice before serving. For a full recipe, check out the details above! To make Lemon Butter Shrimp Pasta, start by cooking the pasta. Boil salted water, add linguine or spaghetti, and cook until al dente. Reserve some pasta water before draining. Next, melt butter in a skillet over medium heat. Add shrimp, season with salt and pepper, and sauté until pink. Remove shrimp and cook garlic in the same skillet. Add lemon zest and juice, then return the pasta and shrimp. Toss everything together, adding reserved pasta water as needed. Finish with parsley and serve hot. For the complete recipe, check the Full Recipe section. You can serve Lemon Butter Shrimp Pasta with a fresh green salad or garlic bread. A light, crisp white wine pairs well too. For added flavor, consider a side of roasted vegetables. These options enhance the meal and balance the rich flavors. Yes, you can use frozen shrimp. Just thaw them before cooking. Place the shrimp in cold water for about 15-20 minutes. After they are thawed, peel and devein if needed. This allows you to enjoy this dish even when shrimp is not fresh. To prevent pasta from sticking, use plenty of water when boiling. Stir the pasta during the first few minutes of cooking. Drain it well and toss it with a little olive oil after draining. This keeps the noodles separate and ready for the sauce. Linguine and spaghetti are the best choices for this dish. They hold the sauce well and complement the shrimp. You can also try fettuccine for a thicker noodle. Choose a pasta that you enjoy, as it can enhance your overall experience. In this blog post, I covered the key ingredients for Lemon Butter Shrimp Pasta and offered tips on making it shine. You learned how to cook shrimp perfectly and balance that bright lemon flavor. I shared variations to suit your taste and provided essential storage info for leftovers. With these steps, you can create a delicious meal. Try new ingredients or variations to keep things exciting. Enjoy making this dish and impressing your family and friends!](https://joymealplan.com/wp-content/uploads/2025/07/d5b21a26-0d28-4d5a-916e-1d45c765ab6a-768x768.webp)
![- 1 lb boneless, skinless chicken thighs, cut into bite-sized pieces - 2 tablespoons sesame oil - 2 tablespoons fresh ginger, finely grated - 3 cloves garlic, minced - 3 tablespoons low-sodium soy sauce - 2 tablespoons honey - 1 teaspoon rice vinegar - 1 teaspoon cornstarch mixed with 2 tablespoons water (for thickening) - 1 cup cooked brown rice - 1 cup broccoli florets - 1 cup shredded carrots - 1 red bell pepper, sliced into thin strips The chicken thighs give this dish a rich flavor. I love using chicken thighs because they stay juicy and tender. Sesame oil adds a nice nutty taste. Fresh ginger and garlic bring warmth and a hint of spice. Soy sauce gives that classic umami kick. Honey brings sweetness to balance the flavors. Rice vinegar adds a touch of brightness. Cornstarch helps the sauce thicken perfectly. Brown rice serves as a hearty base. The broccoli, carrots, and bell pepper add color and crunch. - Green onions, finely chopped - 2 teaspoons sesame seeds - Lime wedges - Other vegetable options like snap peas or bok choy Garnishes make the dish pop! Green onions and sesame seeds add a lovely texture. Lime wedges are great for a fresh squeeze of citrus. You can swap in other vegetables based on your taste. This way, you can make the dish your own. You can find the full recipe in the article above. 1. Heat 2 tablespoons of sesame oil in a large skillet over medium-high heat. 2. When the oil is hot, add 2 tablespoons of freshly grated ginger and 3 cloves of minced garlic. Sauté for 30 seconds until they smell great. 3. Now, add 1 pound of bite-sized chicken thighs to the skillet. Cook for 6-7 minutes, stirring often. Make sure the chicken is no longer pink inside and is golden-brown. 1. While the chicken cooks, take a small bowl. Whisk together 3 tablespoons of low-sodium soy sauce, 2 tablespoons of honey, and 1 teaspoon of rice vinegar. 2. Pour this delicious sauce over the cooked chicken. Stir well to coat each piece. 1. Reduce the heat to medium. Let the chicken simmer in the sauce for 2-3 minutes. This helps the flavors blend together. 2. Mix 1 teaspoon of cornstarch with 2 tablespoons of water. Stir this into the skillet until it’s well combined. Cook for another minute until the sauce thickens and shines. 3. While the chicken simmers, steam 1 cup of broccoli florets for 3-4 minutes. They should be bright green and tender-crisp. 4. To put your bowls together, start with 1/2 cup of cooked brown rice in each bowl. Top with a scoop of ginger sesame chicken, steamed broccoli, shredded carrots, and sliced red bell pepper. 5. Finally, garnish each bowl with chopped green onions and sesame seeds. This adds flavor and looks nice. For the full recipe, check out the [Full Recipe]. Fresh ingredients make a big difference. Use high-quality chicken and vibrant veggies. This will enhance the taste of your dish. Adjust the sweetness and saltiness to your liking. Add more honey for sweetness or soy sauce for salt. Taste as you go; this helps you find the perfect balance. Cook chicken thighs for about 6-7 minutes. Stir often to ensure even cooking. To check if the chicken is done, cut a piece open. The inside should be white, with no pink. If you see any pink, cook it a bit longer. Make your bowl visually pleasing. Arrange the vegetables in colorful layers. Start with the rice at the bottom, then add the chicken, and top with veggies. For garnish, add green onions and sesame seeds. You can also serve with a lime wedge. A squeeze of lime adds freshness and brightness to each bite. {{image_4}} You can easily swap chicken for other proteins. If you want a vegetarian option, use tofu. Tofu absorbs flavor well and adds a nice texture. Just cube it and sauté it like chicken. For seafood lovers, shrimp works great too. Cook it until pink and tender. You can also use beef. Thinly slice it and cook it until it’s just right. Each protein offers a unique taste and texture. Feel free to change up the veggies in your bowl. Seasonal vegetables can add freshness. Think of zucchini in summer or sweet potatoes in fall. Quick-cooking vegetables are also great. Snap peas and baby corn cook fast and add crunch. Just steam or sauté them briefly. This way, you keep the nutrients and color bright. If you need gluten-free options, try tamari instead of soy sauce. It has a similar taste and works well in this dish. For those watching carbs, use cauliflower rice instead of brown rice. It’s light and absorbs flavors well. You can still enjoy the same taste without the extra carbs. Just sauté it briefly, and you’re good to go. After a tasty meal, you may want to save some for later. Store your Sesame Ginger Chicken Bowls in airtight containers. This keeps the flavors fresh and tasty. Make sure to let the dish cool before sealing it up. You can keep leftovers in the fridge for about 3 to 4 days. If you want to save it longer, freezing is a great option. Place the chicken and veggies in freezer-safe bags or containers. Remove as much air as possible to prevent freezer burn. You can freeze the bowls for up to 3 months. When you're ready to eat, thaw them overnight in the fridge. To reheat, warm them on the stove or in the microwave until hot. Meal prepping helps save time during busy weeks. You can chop and store all your veggies in advance. Cook the chicken and make the sauce separately. This way, you can mix and match throughout the week. Prepare multiple servings at once to enjoy these bowls several times. Each time, just reheat the rice and combine everything for a quick meal. You can add chili flakes or hot sauce to the dish. Start with a small amount and taste it. You can always add more to reach your preferred spice level. This kick can enhance the flavor and make it even more exciting. Yes, you can skip the cornstarch if you prefer. You can use arrowroot powder or flour as a thickening alternative. These options work well in sauces, but you may need to adjust the amount. Just be careful not to add too much, or it may change the taste. I recommend serving your bowls with steamed vegetables or a light salad. A refreshing cucumber salad pairs well. You can also enjoy the bowls with a cold drink, like iced green tea, for a balanced meal. These Sesame Ginger Chicken Bowls are easy to make and packed with flavor. You now have a full guide, covering ingredients, step-by-step cooking, tips, variations, and storage. Fresh ingredients give the best taste, while swapping proteins and veggies keeps it fun. Don't forget to use garnishes for that special touch. Enjoy these bowls any day of the week, and feel free to get creative with your own twists! They make for great leftovers, too. Cook well, and enjoy your tasty meal!](https://joymealplan.com/wp-content/uploads/2025/07/ee8b11ee-19fa-4955-830a-ea8ab42ba55e-768x768.webp)