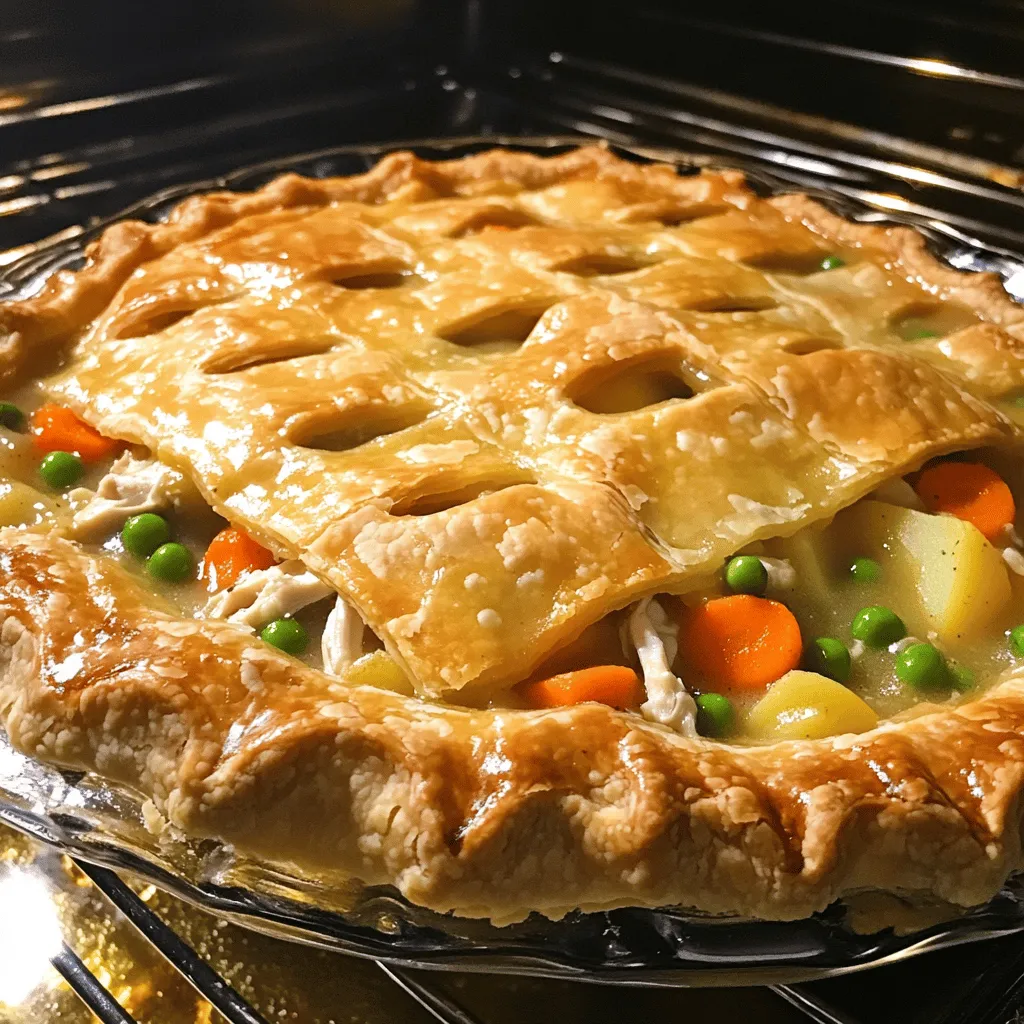
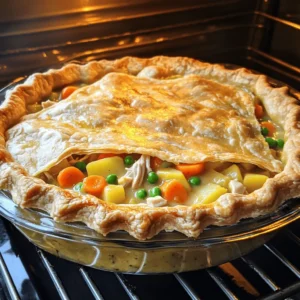
Classic Chicken Pot Pie Comforting Family Dish

There’s nothing quite like a Classic Chicken Pot Pie for a warm, family meal. You’ll love this dish for its flaky crust and creamy filling. It’s packed with chicken and veggies, making it both yummy and satisfying. In this guide, I’ll walk you through the steps to create this comforting dish. Let’s get started on making a pot pie that will delight your loved ones!
Ingredients
Essential Ingredients for Classic Chicken Pot Pie
To create a classic chicken pot pie, you need the right ingredients. Here’s what you’ll need:
– 2 cups cooked chicken, shredded
– 1 cup carrots, diced
– 1 cup peas (fresh or frozen)
– 1 cup potatoes, diced into small cubes
– 1/2 cup celery, diced
– 1/2 cup onion, finely chopped
– 3 tablespoons unsalted butter
– 3 tablespoons all-purpose flour
– 1 3/4 cups low-sodium chicken broth
– 1/2 cup whole milk
– 1 teaspoon dried thyme
– Salt and freshly ground black pepper to taste
– 1 pre-made pie crust (store-bought or homemade)
– 1 egg, beaten (for egg wash)
These ingredients combine to create a rich and savory filling.
Herbs and Seasonings
Herbs and seasonings bring life to your chicken pot pie. I always use dried thyme for its warm, earthy flavor. Salt and fresh black pepper add a nice touch. Feel free to add herbs like rosemary or parsley if you want more flavor. Fresh herbs can brighten the dish.
Optional Add-ins
You can customize your pot pie with optional add-ins. Try adding:
– Corn for sweetness
– Green beans for crunch
– Mushrooms for an earthy taste
These add-ins can make your pot pie unique. Experiment and find your favorite mix!
Step-by-Step Instructions
Prepping the Chicken and Vegetables
Start by cooking your chicken. You can use leftover chicken or boil it fresh. Once cooked, shred the chicken into bite-sized pieces. Next, chop your vegetables. Dice the carrots, celery, and potatoes. Make sure the pieces are small for even cooking.
In a large pot, melt the butter over medium heat. Add the diced onion, celery, carrots, and potatoes. Cook these veggies for about 5-7 minutes, stirring often. You want them tender but not mushy.
Making the Creamy Filling
After the vegetables soften, sprinkle the flour over them. Stir this mix for about a minute. This forms a roux, which thickens the filling. Slowly add the chicken broth while whisking. This helps avoid lumps. Once combined, stir in the milk and bring everything to a gentle simmer.
Now it’s time for flavor. Add the shredded chicken, peas, thyme, salt, and pepper. Keep stirring for about 5-10 minutes until the filling thickens nicely. Take the pot off the heat and let it cool for a bit.
Assembling and Baking the Pot Pie
If you made your pie crust, roll it out on a floured surface. Place it into a pie dish, covering the bottom and sides. Spoon the creamy chicken mixture into the crust evenly. If you have another crust, place it over the filling. Pinch the edges to seal them.
Cut some slits in the top crust. This lets steam escape while baking. Brush the top with the beaten egg for a golden finish.
Cooking Time and Temperature
Now, preheat your oven to 425°F (220°C). Place the pot pie in the oven on the middle rack. Bake it for 30-35 minutes. You want the crust golden brown and the filling bubbling.
Once baked, take the pot pie out and let it cool for about 10 minutes. This makes it easier to slice and serve. Enjoy this classic dish with family or friends!
Tips & Tricks
How to Achieve a Flaky Pie Crust
To get a flaky pie crust, keep your ingredients cold. Use cold butter and ice water. When mixing, work the dough quickly. Overworking makes it tough. Roll the dough gently and avoid using too much flour. Chill the crust for at least 30 minutes before baking. This helps create layers and makes it rise nicely.
Perfecting the Filling Consistency
The filling should be creamy but not watery. Start by cooking the vegetables until they are just tender. When adding flour, stir it in well to avoid lumps. Gradually add the broth and milk while whisking. Let the filling simmer until it thickens. If it gets too thick, add a splash of broth or milk to adjust.
Enhancements for Flavor
To boost flavor, use fresh herbs like thyme or parsley. A splash of lemon juice adds brightness. You can also try adding a dash of hot sauce for a kick. For a richer taste, substitute some broth with white wine. Each of these tips enhances the dish and makes it even more comforting.
Variations
Vegetarian Version of Chicken Pot Pie
You can easily make a vegetarian chicken pot pie. Start by swapping chicken for plant-based proteins. Consider using chickpeas or lentils as a hearty option. For a richer flavor, add mushrooms and a mix of your favorite vegetables. Carrots, peas, and green beans work well. Use vegetable broth instead of chicken broth. This will keep that comforting taste without the meat.
Incorporating Different Proteins
You can also switch up the protein in your pot pie. Try turkey for a festive twist. You can even use beef or pork for a heartier dish. Just make sure to cook the meat thoroughly before adding it to the filling. Adjust the cooking time if needed. This gives you a chance to explore new flavors while still enjoying the classic pot pie style.
Unique Flavor Profiles
Adding different herbs and spices can change the flavor of your pot pie. For a spicy kick, toss in some cayenne pepper or smoked paprika. If you want a fresh taste, try adding lemon zest or dill. You can also experiment with cheeses, like cheddar or gouda, for a creamy finish. These tweaks can make your pot pie feel new and exciting each time you bake it.
Storage Info
How to Store Leftover Pot Pie
Store your leftover pot pie in the fridge. Place it in an airtight container. Make sure to cover it well if you don’t have one. It stays fresh for about 3 to 4 days. If you have a slice or two, you can wrap them in plastic wrap. This protects the filling and crust.
Freezing Tips for Meal Prep
You can freeze chicken pot pie, too! To freeze, let it cool first. Wrap it tightly in plastic wrap and then in aluminum foil. This keeps out air and prevents freezer burn. You can freeze it for up to 3 months. Just remember to label it with the date.
Reheating Your Pot Pie
Reheat your pot pie in the oven for the best results. Preheat the oven to 350°F (175°C). Place the pie on a baking sheet. Heat it for about 25 to 30 minutes. If it’s frozen, it may take longer. Check for warmth in the center. You can also microwave it for a quick fix, but the crust won’t be as crispy.
FAQs
Can I use rotisserie chicken for this recipe?
Yes, you can use rotisserie chicken. It saves time and adds great flavor. Just shred the chicken and add it to your filling. This shortcut makes the process quick and easy, perfect for busy nights.
What can I substitute for the pie crust?
If you need a crust swap, try phyllo dough or biscuit dough. You can also use mashed potatoes for a fun twist. Just layer it on top of the filling. Each option gives a unique taste and texture to your dish.
How long can I keep leftovers?
You can keep leftovers in the fridge for about three days. Store them in an airtight container to keep them fresh. If you want to save them longer, consider freezing. Just make sure to wrap it well before freezing.
Can I make this dish ahead of time?
Absolutely! You can prepare the filling a day ahead. Just assemble the pie before baking. This way, you save time on busy days.
We explored the essentials of making a classic chicken pot pie. You learned about key ingredients, herbs, and optional add-ins. The step-by-step guide helped you prepare and bake your dish. I shared tips for a flaky crust and perfect filling. We also discussed tasty variations and storage options.
Making chicken pot pie is fun and rewarding. Enjoy creating your own with the ideas shared here. Your kitchen will smell amazing, and your taste buds will thank you!
![- 8 lasagna noodles - 2 cups cooked chicken, shredded - 1 cup ricotta cheese - 2 cups mozzarella cheese, shredded (divided) - 1 cup grated Parmesan cheese - 2 cups Alfredo sauce (store-bought or homemade) - 1 teaspoon garlic powder - 1 teaspoon Italian seasoning - Salt and pepper to taste - Fresh parsley, chopped (for garnish) Gathering these ingredients is the first step. Start with lasagna noodles. They are the base for your roll-ups. Make sure to have cooked chicken ready. Shredded chicken works best. You can use leftover chicken or cook some fresh. Ricotta cheese adds creaminess. Mozzarella cheese gives a nice stretch when melted. Parmesan cheese adds a sharp flavor. Alfredo sauce is key for richness. You can buy it or make your own. Garlic powder and Italian seasoning bring extra taste. Don't forget salt and pepper to enhance all the flavors. Fresh parsley adds a pop of color. It also freshens the dish. With all your ingredients lined up, you’re set to create a delicious meal. For the full recipe, check the details above. - Preheat oven to 375°F (190°C). - Grease a 9x13 inch baking dish with cooking spray or butter. This helps prevent sticking. - Boil a large pot of water. Add salt for flavor. - Cook lasagna noodles until al dente, usually about 8-10 minutes. - Drain the noodles carefully in a colander. Lay them flat on a clean kitchen towel. This helps them dry slightly and prevents sticking. - In a mixing bowl, combine: - 2 cups cooked chicken, shredded - 1 cup ricotta cheese - 1 cup mozzarella cheese, shredded - 1 teaspoon garlic powder - 1 teaspoon Italian seasoning - Salt and pepper to taste - Stir the mixture well until everything is blended. Aim for a smooth filling with no lumps. - Spread a thin layer of Alfredo sauce on the bottom of the greased dish. - For each lasagna noodle, take 2-3 tablespoons of the filling. Spread it evenly along the noodle's length. - Roll the noodle up tightly from one end to the other, keeping the filling inside. Place the roll seam-side down in the dish. Repeat with all noodles. - Pour the remaining Alfredo sauce evenly over the roll-ups. - Sprinkle the remaining mozzarella and Parmesan cheese on top. - Cover the dish tightly with foil and bake for 25 minutes. - After 25 minutes, remove the foil and bake for another 15 minutes. This helps the cheese bubble and turn golden. - Let the dish cool for a few minutes before slicing. Garnish with fresh parsley before serving. For the complete recipe, check the full recipe section! If you want to switch things up, you can replace ricotta cheese with cottage cheese or cream cheese. Both options still give a creamy taste. For mozzarella, try using provolone or gouda. Both melt well and add great flavor. When it comes to Alfredo sauce, you can use store-bought for speed. If you prefer homemade, blend butter, cream, and parmesan for a rich taste. Homemade sauce can be thicker and creamier, which enhances your roll ups. To get the perfect noodle texture, boil them until just al dente. This keeps them sturdy enough to roll without tearing. After cooking, place the noodles on a clean kitchen towel to absorb excess water. For cheese melting and browning, use full-fat cheese. It melts beautifully and creates a golden crust. Keep the dish covered with foil for the first part of baking. Remove the foil later to allow the cheese to brown nicely. Pair your roll ups with a fresh salad or garlic bread. A light Caesar salad adds a crisp contrast to the creamy dish. Garlic bread complements the flavors and adds a warm touch. For garnishing, sprinkle fresh parsley on top just before serving. You can also drizzle extra Alfredo sauce over the roll ups for a tasty finish. This adds color and makes your dish look fancy. For the full recipe, check out [Full Recipe]. {{image_4}} You can boost your roll-ups by adding veggies. Spinach and mushrooms work well here. Just sauté them first to soften. Mix these veggies into your filling for extra flavor and nutrition. This makes the dish colorful and adds a nice crunch. While Alfredo is rich and creamy, you can switch it up. Try using marinara sauce for a tangy twist. Pesto can also bring a fresh, herby taste. Each sauce gives your roll-ups a new life. Feel free to experiment and find your favorite! For those with dietary needs, there are options. Use gluten-free lasagna noodles to keep it safe. For a dairy-free choice, look for dairy-free cheese. Many brands offer great flavors that melt well. These swaps let everyone enjoy this delicious meal! For the complete recipe, check out the Full Recipe section. After enjoying your Chicken Alfredo Lasagna Roll Ups, let them cool down. Place them in an airtight container. Make sure to cover them well. This keeps them fresh and tasty in the fridge. You can store leftovers for up to three days. When you are ready to eat again, reheat them in the oven. Set it to 350°F (175°C). Cover the dish with foil to avoid drying out. Heat for about 20 minutes. If you prefer the microwave, heat in short bursts. Check every minute until hot. To freeze your roll ups, follow these steps: 1. Cool Completely: Let them cool in the fridge first. 2. Wrap Well: Use plastic wrap to cover each roll up tightly. 3. Use a Freezer Bag: Place wrapped roll ups in a freezer bag. Remove as much air as you can. 4. Label and Date: Write the date on the bag for easy tracking. You can freeze these roll ups for up to three months. When you want to eat, move them to the fridge overnight to thaw. After thawing, reheat as mentioned above. In the fridge, your Chicken Alfredo Lasagna Roll Ups last three days. If you freeze them, they stay good for three months. Always check for any signs of spoilage before enjoying them again. Storing them properly helps keep their flavors intact and delicious. For the full recipe, check out the details provided earlier. Yes, you can make Chicken Alfredo Lasagna Roll Ups ahead of time. Prepare them up to the baking step. Cover the dish and store it in the fridge for up to 24 hours. When ready to bake, add a few extra minutes to the cooking time. This makes meal prep easy. To make this recipe vegetarian, swap the chicken for sautéed vegetables. Good choices include mushrooms, spinach, or zucchini. Use the same filling method with ricotta and mozzarella. This keeps the creamy texture and flavor you love. Serve Chicken Alfredo Lasagna Roll Ups with a fresh salad. A Caesar or mixed greens salad pairs nicely. Garlic bread or crusty rolls also complement this dish. You can add a light soup for a complete meal. If your Alfredo sauce is runny, try adding more cheese. Grated Parmesan or mozzarella works well. You can also simmer the sauce on low heat. This helps it thicken. Use cornstarch mixed with water as a last resort to thicken it. Absolutely! You can use cooked turkey or ham instead of chicken. Shredded beef or pork also works well. Just ensure the meat is tender and flavorful, as this adds depth to your roll-ups. You can create a delicious Chicken Alfredo Lasagna Roll Ups meal. This recipe included key ingredients, clear steps, and useful tips. It’s easy to customize, whether for dietary needs or personal taste. You can serve them with sides to make it a feast. Don’t forget about storing leftovers properly for quick meals. Enjoy making these tasty roll ups. You’ll impress your guests and family with their creamy flavor and cheesy goodness. These roll ups make cooking fun and simple.](https://joymealplan.com/wp-content/uploads/2025/06/3bb75aa4-aa5d-45cb-bb96-cf9b565c5d71-768x768.webp)