
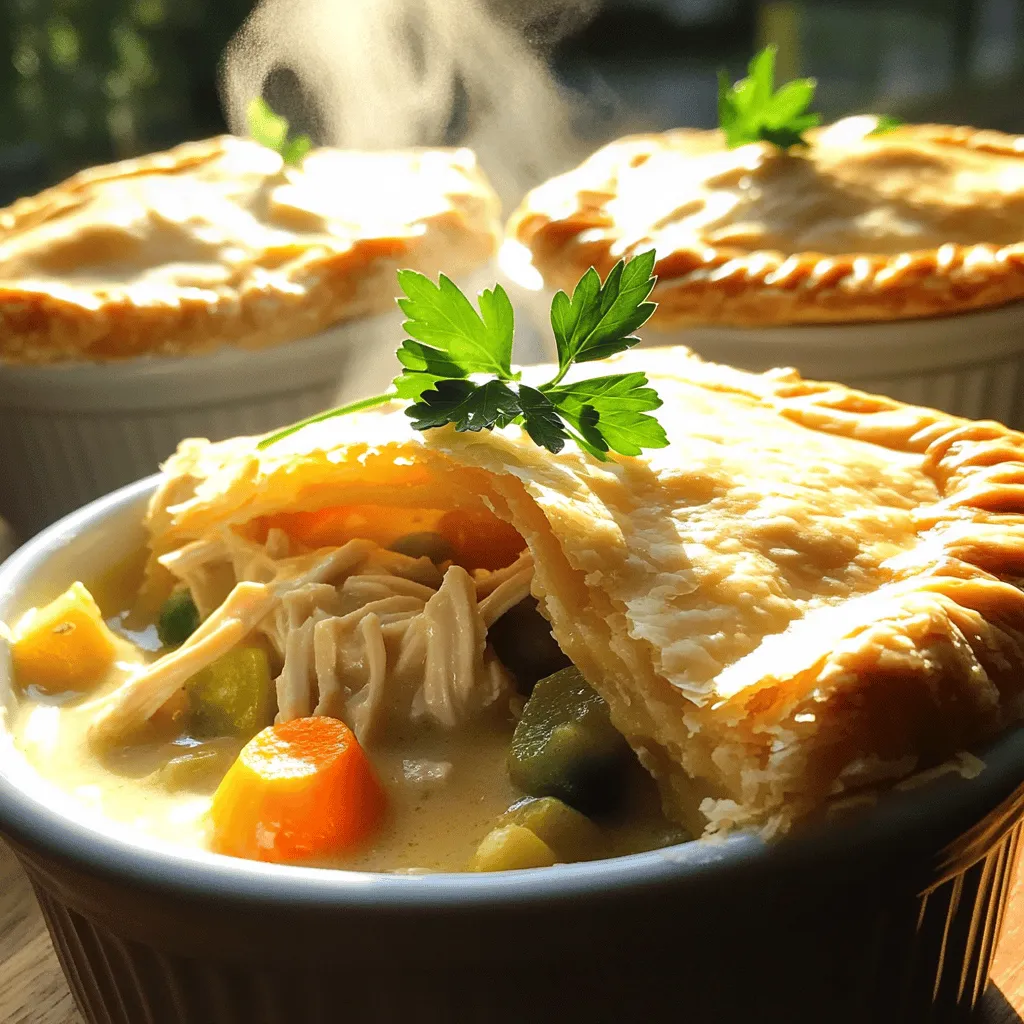
Easy Chicken Pot Pie Comforting Family Meal Recipe

Craving a dish that wraps you in warmth and nostalgia? Look no further than my Easy Chicken Pot Pie! This recipe is perfect for busy families, delivering comfort and joy in every bite. With simple ingredients and a few easy steps, you’ll create a hearty meal that brings everyone to the table. Get ready to impress and satisfy your loved ones with this classic comfort food!
Ingredients
Main Ingredients
– 2 cups cooked chicken, shredded
– 1 cup frozen mixed vegetables (carrots, peas, and corn)
– 1/2 cup onions, finely chopped
– 1/2 cup celery, diced
– 1/2 cup potatoes, diced into small cubes
Cooking Essentials
– 1/3 cup all-purpose flour
– 1 cup chicken broth
– 1 cup whole milk
– 1 teaspoon dried thyme
– 1 teaspoon garlic powder
– Salt and pepper to taste
Pie Crust Options
– 2 pre-made pie crusts (or homemade, if you prefer)
– 1 tablespoon olive oil
When I create my Easy Chicken Pot Pie, I focus on fresh, quality ingredients. The base of the pie is tender chicken and vibrant mixed veggies. I love using frozen vegetables because they save time and still taste great.
The chicken should be cooked ahead of time. You can use leftover roast chicken or even rotisserie chicken. The flavor is already there, making it easy. I also chop up fresh onions, celery, and potatoes. These add a nice crunch and heartiness to the filling.
For the sauce, I rely on chicken broth and whole milk. This combo makes the filling creamy and rich. The flour helps thicken the sauce, giving it the right texture. Dried thyme and garlic powder bring out natural flavors. I always season with salt and pepper to enhance the taste.
When it comes to the crust, I use pre-made pie crusts. They save a lot of time! However, if you love baking, homemade crust is a great option. It can add an extra touch of love to the dish. I also use olive oil to sauté the veggies. This step adds richness and depth to the filling.Enjoy the process and feel good about serving a dish full of flavor and comfort!
Step-by-Step Instructions
Preheat and Prepare
– Preheat the oven to 425°F (220°C).
– In a skillet, heat 1 tablespoon of olive oil over medium heat. Add 1/2 cup finely chopped onions and 1/2 cup diced celery. Sauté them for 4-5 minutes. The onions and celery should get soft and clear.
Create the Filling
– Add 1/2 cup diced potatoes to the skillet. Cook for another 5 minutes until the potatoes soften.
– Sprinkle 1/3 cup all-purpose flour over the veggies. Stir well and cook for 1-2 minutes. This helps remove the raw flour taste.
Combine Ingredients
– Gradually pour in 1 cup of chicken broth and 1 cup of whole milk while stirring. Keep stirring until the sauce thickens, about 3-4 minutes.
– Next, add 2 cups of cooked, shredded chicken and 1 cup of frozen mixed vegetables. Season with 1 teaspoon dried thyme, 1 teaspoon garlic powder, salt, and pepper. Mix well until all ingredients blend.
Assemble the Pie
– Turn off the heat and let the filling cool for a bit. Roll out one pie crust and place it in a 9-inch pie pan. Make sure it covers the bottom and sides well.
– Pour the chicken filling into the crust. Spread it evenly. Roll out the second crust and place it over the filling. Seal the edges by crimping with a fork or pinching with your fingers. Cut slits in the top crust to let steam escape.
Baking Instructions
– Place the pie in the preheated oven. Bake for 30-35 minutes until the crust is golden brown and flaky.
Serving Suggestions
– Let the pie cool for about 10 minutes before slicing.
– For a nice touch, serve individual portions in ramekins. Garnish with fresh parsley to add color and charm.
Tips & Tricks
Perfecting the Filling
Using leftover rotisserie chicken makes this dish easy and quick. It saves time and adds great flavor. You can also adjust the seasoning to fit your taste. Try adding herbs like thyme or spices like paprika. Each change can bring new life to your pot pie.
Crust Tips
If you want a crispier bottom crust, blind bake it first. To blind bake, simply pre-bake the crust for about 10 minutes before adding the filling. You can also switch things up by using puff pastry instead of a regular crust. This gives a light and flaky texture that many love.
Enhancing Flavor
For a flavor boost, add a splash of white wine or sherry to the sauce. It adds depth and richness. Fresh herbs like parsley or rosemary can really elevate the taste too. Just chop them finely and mix them in for an extra fresh kick.
Variations
Flavor Twists
You can easily change the flavor of your chicken pot pie. Swap out chicken for turkey or beef if you want a new taste. Both options work well with the creamy sauce. You can also use different vegetables. Try adding broccoli, green beans, or bell peppers. This lets you use what you have on hand or what you like best.
Healthier Alternatives
If you want a lighter dish, substitute low-fat milk for whole milk. This keeps the creaminess while cutting some calories. You can also use a whole wheat crust. It adds fiber and nutrients. For a low-carb option, try a cauliflower crust. This makes the pie gluten-free and adds a unique flavor.
Vegetarian Version
For a meat-free version, replace chicken with mushrooms or chickpeas. Both options add great texture and flavor. Use vegetable broth instead of chicken broth to keep it vegetarian. This way, you still get a rich taste without any meat. You can still enjoy a comforting meal that everyone will love.
Storage Info
Refrigeration
Store any leftovers in an airtight container in the fridge. This keeps them fresh and safe to eat. The pie tastes best if you enjoy it within 3-4 days.
Freezing Tips
You can freeze unbaked pies wrapped tightly in plastic wrap. This way, you can save it for later. If you have a cooked pie, it can be frozen for up to 3 months. Just make sure it is fully cooled before wrapping.
Reheating Instructions
For the best texture, reheat your pie in the oven. Set the oven to 350°F (180°C) and bake until warm. If you need a quicker option, use the microwave. Just heat in short intervals, stirring in between, to avoid hot spots.
FAQs
How long does it take to make Easy Chicken Pot Pie?
Total preparation and cooking time is about 50 minutes. This includes chopping, cooking, and baking. You can enjoy a warm, homemade meal in less than an hour!
Can I use frozen chicken for this recipe?
Yes, just ensure it is fully cooked before adding to the filling. You can use leftover rotisserie chicken for quick prep. It saves time and adds great flavor.
What can I serve with chicken pot pie?
Great accompaniments include a fresh salad or steamed vegetables. A crisp green salad brightens the meal. Steamed carrots or broccoli add color and nutrients.
How can I make my chicken pot pie gluten-free?
Use gluten-free flour and crust for the recipe. Many stores offer gluten-free pie crusts. Just check the label to ensure it fits your needs.
This recipe for Easy Chicken Pot Pie is simple and satisfying. You learned about the key ingredients, cooking steps, and smart tips to enhance flavor. Remember, you can swap proteins and use different vegetables for variety. Store any leftovers properly to enjoy later. Enjoy creating this warm meal that brings comfort and happiness to your table. This dish is sure to impress friends and family alike. Happy cooking!

![- 1 pound baby carrots (or 4 medium-sized regular carrots, sliced into uniform sticks or rounds) - 2 tablespoons unsalted butter - 3 tablespoons pure maple syrup - 1 tablespoon packed brown sugar - 1 teaspoon ground cinnamon - Salt and freshly cracked black pepper to taste - Fresh parsley, finely chopped, for garnish Each serving of maple glazed carrots has about 120 calories. You get roughly 30 grams of carbohydrates, with 15 grams of sugar. The dish has 4 grams of fat and 3 grams of fiber. These sweet carrots pack lots of flavor without too many calories, making them a great side. You might want to switch up ingredients for different diets. For a vegan option, use plant-based butter. If you want to lower sugar, try agave syrup or honey. Each choice can change the taste, but they all work well. To start, wash your carrots well. If you have baby carrots, just rinse them under cold water. For regular carrots, peel them first. Slice them into uniform sticks or rounds. This helps them cook evenly. Aim for pieces about the same size. This step is key for a great dish. Now, let’s cook! Heat a large skillet over medium heat. Add the unsalted butter and let it melt completely. Swirl the pan gently to coat the bottom. Once the butter is bubbly, add your prepared carrots. Sauté them for about 5 minutes. Stir occasionally to get even cooking. You want the carrots to start softening but not fully cooked yet. Next, sprinkle brown sugar and ground cinnamon over the carrots. Mix everything well so each carrot gets coated. This adds a sweet and warm flavor. Now, drizzle the pure maple syrup over the carrots. Cook for another 5-7 minutes, stirring often. This allows the glaze to thicken and the carrots to become tender. When your carrots are tender, season them with salt and black pepper to taste. Give everything one last gentle toss to combine. Carefully remove the skillet from the heat. Transfer the glazed carrots to a serving dish. Make sure to drizzle any leftover syrup from the skillet over the top. To add a finishing touch, garnish with finely chopped fresh parsley. This not only adds color but also a fresh taste. Serve your sweet maple glazed carrots warm. They look great on the plate and taste even better. You can find the complete recipe in the [Full Recipe]. To enhance the sweetness and aroma of your maple glazed carrots, always use pure maple syrup. This syrup has a rich taste that makes your dish shine. Combine it with a bit of brown sugar and cinnamon. This mix adds depth and warmth to the carrots. You can also try adding a pinch of nutmeg for extra flavor. This small tweak can make a big difference. For best results, use a large, heavy skillet. A cast-iron or non-stick pan works well. These types of pans heat evenly and help the carrots cook perfectly. If you have a sauté pan with high sides, that’s great too. This design keeps the glaze in the pan and helps it thicken faster. Maple glazed carrots pair well with many meals. They are a perfect side for roasted chicken or pork. You can also serve them with grilled fish for a fresh taste. If you want a vegetarian option, try them with quinoa or lentils. They add a sweet touch that balances savory dishes. For a festive look, serve them alongside other colorful veggies. For the full recipe, check out the Sweet Maple Glazed Carrots recipe above! {{image_4}} You can make your maple glazed carrots even better by adding other veggies. Try using baby potatoes, parsnips, or sweet potatoes. Cut them into similar sizes as the carrots for even cooking. This mix adds more color and flavor to your dish. When you add more vegetables, adjust the cooking time to ensure everything cooks well. Want to change the flavor? You can add herbs or spices to make your dish unique. Try adding fresh thyme or rosemary for an earthy taste. A pinch of nutmeg can also give a warm hint. If you like heat, sprinkle in some red pepper flakes. Mix and match these additions to find what you enjoy most. If you want to try different sweeteners, you have options! Honey works well and gives a floral note. Brown sugar adds a deeper flavor. Agave syrup is also a great choice for a lighter sweetness. Each sweetener will change the taste, so feel free to experiment with what you have on hand. For the full recipe, check the earlier section. To keep your maple glazed carrots fresh, store them in an airtight container. This helps prevent moisture loss and keeps them tasty. Place the cooled carrots in the container and seal tightly. You can keep them in the fridge for up to four days. If you want to enjoy them later, consider the next steps. When you are ready to eat the leftovers, you want to reheat them gently. The best way is to use a skillet. Heat the skillet over low heat. Add a splash of water or broth to help steam the carrots. Stir them often until they are warmed through. This method helps keep the carrots soft and the glaze flavorful. Avoid using a microwave, as it can make them mushy. If you want to store your maple glazed carrots for a long time, freezing is a good option. First, let them cool completely. Then, place the carrots in a freezer-safe bag or container. Remove as much air as possible to prevent freezer burn. They can last up to three months in the freezer. To use them, thaw in the fridge overnight before reheating. To make maple glazed carrots vegan, swap the butter for a plant-based oil or vegan butter. You can use coconut oil for a hint of tropical flavor. This keeps the dish rich and tasty while staying true to vegan standards. Remember to check the maple syrup as well; most brands are naturally vegan. Yes, you can use frozen carrots. They are convenient and can save time. However, frozen carrots may have a different texture than fresh ones. Thaw them first and drain excess water. Sauté them for a bit longer to ensure they cook through. Fresh carrots bring more crunch and flavor, but frozen can still work well in a pinch. To ensure your glazed carrots are tender, cook them over medium heat. Start with 5 minutes of sautéing before adding the glaze. After adding the maple syrup, cook for another 5-7 minutes. Stir often to coat them evenly. The key is to keep an eye on them and test for tenderness with a fork. Aim for a soft texture without losing their shape. This post covered how to make delicious maple glazed carrots. We discussed the key ingredients and their nutritional value. You learned tips for cooking and how to enhance flavors. I also shared ideas for variations and how to store your leftovers properly. Making these carrots is easy and fun. With simple swaps, you can adjust for dietary needs. Enjoy this dish as a side or experiment with different flavors. Happy cooking!](https://joymealplan.com/wp-content/uploads/2025/06/e145556d-f1e0-4204-89d9-54022a16ffd1-768x768.webp)
![For a great veggie stir fry, you need fresh veggies. Here’s what I use: - 1 cup broccoli florets - 1 bell pepper (red or yellow), sliced into thin strips - 1 cup sugar snap peas, trimmed - 1 medium carrot, cut into julienne strips - 1 cup mushrooms (shiitake or button), sliced Spices and oils bring flavor to your dish. I recommend these: - 2 cloves garlic, finely minced - 1 tablespoon fresh ginger, grated - 3 tablespoons soy sauce (or tamari for gluten-free) - 1 tablespoon sesame oil - 1 tablespoon vegetable oil for high-heat cooking - Salt and pepper, to taste You can add more fun to your stir fry with these options: - Cooked tofu or tempeh for protein - Cooked rice or noodles for a fuller dish - Chili flakes for some heat - Fresh herbs like cilantro for a fresh touch For the full recipe, check out [Full Recipe]. These ingredients make a colorful and tasty meal that’s easy to prepare. To start, wash all your vegetables. This step is super important. Cut the broccoli into small florets. Slice the bell pepper into thin strips. Julienne the carrot for a nice crunch. Slice your mushrooms too. Having everything ready makes cooking fast and fun. Grab a large skillet or wok for this part. Heat the vegetable oil over medium-high heat. You want the oil to shimmer a little. Now, add the minced garlic and grated ginger. Sauté them for around 30 seconds. Watch closely so they don’t burn! Next, toss in the broccoli, bell pepper, and carrot. Stir-fry these for about 3 to 4 minutes. They should be a bit soft but still crunchy. Then, add the sugar snap peas and sliced mushrooms. Keep cooking for another 3 to 4 minutes. This makes sure all veggies are tender but still bright. Once your veggies are just how you like them, pour in the soy sauce. Drizzle the sesame oil over the top. Stir everything well to mix the flavors. Let them cook together for 1 to 2 more minutes. Season with salt and pepper to taste. Remove from heat and sprinkle with toasted sesame seeds. This adds a nice touch! Serve the stir fry in a big bowl. You can add rice or noodles for a full meal. Check the Full Recipe for more details. Enjoy your vibrant dish! To get the right texture, cut your veggies small and even. This way, they cook quickly and stay crisp. Start with the harder veggies first, like carrots and broccoli. Cook them for a few minutes before adding softer ones like bell peppers and mushrooms. Stir the mix often to avoid burning. Keep an eye on the color; vibrant hues mean freshness! Adding flavor is key. Use fresh garlic and ginger for a bold taste. A splash of soy sauce brings saltiness. You can also try adding a bit of chili paste for heat. For a nutty touch, drizzle sesame oil right at the end. Also, sprinkle toasted sesame seeds on top for crunch and flavor. These simple changes can elevate your dish. Avoid overcrowding the pan. If you add too many veggies at once, they steam instead of fry. This makes them soggy. Always have your ingredients prepped before you heat the pan. Another mistake is cooking on low heat. High heat keeps the veggies crisp and colorful. Lastly, don’t skip the seasoning; it makes all the difference! For more details, check the Full Recipe. {{image_4}} You can use many different vegetables in your stir fry. If you don't have broccoli, try cauliflower or zucchini. Green beans add a nice crunch too. For a sweeter taste, add some baby corn or bell peppers. Just keep in mind that cooking times may change based on what you pick. Always cut the veggies into similar sizes. This helps them cook evenly and look great. This veggie stir fry is easy to adapt for special diets. To make it vegan, just stick with the current ingredients. Use tamari instead of soy sauce for a gluten-free option. You can even add some coconut aminos for a sweeter flavor. This keeps it tasty without gluten. Always check labels to ensure all ingredients meet your dietary needs. To make your stir fry more filling, add protein. Tofu is a great choice. Press it first to remove extra moisture, then cube it. You can also add chickpeas or edamame for plant-based protein. If you eat meat, try chicken or shrimp. Cook the protein first, then add it back with the veggies. This way, everything blends well together. For the full recipe, check the section above. After enjoying your veggie stir fry, let it cool down. Use an airtight container to keep it fresh. Store it in the fridge for up to three days. This way, you can savor your delicious meal again! Reheating is simple. You can use a microwave or stovetop. If using a microwave, heat in short bursts. Stir in between to ensure even heating. On the stovetop, add a splash of water to keep it moist. Heat on medium until warm. If you want to save some for later, freezing works well too. Place the cooled stir fry in freezer-safe bags. Remove as much air as possible before sealing. It can last for up to three months in the freezer. When ready to eat, thaw in the fridge overnight before reheating. Enjoy your easy veggie stir fry again with fresh flavors! For the full recipe, check the details above. It takes about 10 to 15 minutes to cook veggie stir fry. The prep time is around 15 minutes, and the actual cooking time is quick. You want to heat your pan and cook the veggies at high heat. This helps keep them crisp and colorful. Yes, you can use frozen vegetables for stir fry. They are handy and save time. Just remember that frozen veggies may release more water. Cook them for a bit longer to get rid of the moisture. This way, your stir fry stays flavorful and not soggy. Besides soy sauce, you can try other sauces for different flavors. Here are some great options: - Teriyaki sauce for a sweet touch - Hoisin sauce for a thicker, rich flavor - Oyster sauce for umami - Coconut aminos for a soy-free option These sauces can add a unique twist to your dish. To make your stir fry taste better, use fresh ingredients. Fresh veggies bring bright flavors. Adding garlic and ginger enhances the taste, too. You can also experiment with spices like red pepper flakes for heat. Lastly, finish with toasted sesame oil for a nutty flavor. For more ideas, check out the Full Recipe. To sum up, this blog post gives you all you need for a great stir fry. You learned about fresh veggies, essential spices, and fun add-ins. I showed you how to prepare, cook, and season your dish. The tips shared help avoid common mistakes and enhance flavor. You can also explore different variations and learn how to store leftovers. Stir fry is versatile and fun to make. Enjoy your cooking journey and make it your own!](https://joymealplan.com/wp-content/uploads/2025/06/d6e89b1e-9902-47ff-ae43-a4ac0f8c3362-768x768.webp)
