Sheet Pan Lemon Herb Shrimp Flavorful and Easy Recipe
![- 1 pound large shrimp, peeled and deveined - 2 cups broccoli florets - 1 cup cherry tomatoes, halved - 1 medium yellow bell pepper, sliced into strips - 3 tablespoons extra virgin olive oil - 4 cloves garlic, finely minced - Zest and juice of 1 large lemon - 1 teaspoon dried oregano - 1 teaspoon dried thyme - Salt and freshly cracked black pepper to taste - Fresh parsley for garnish The main ingredients in this recipe create a bright, fresh dish. The shrimp are the star. Their sweet flavor pairs well with the crunchy broccoli and juicy tomatoes. The yellow bell pepper adds color and sweetness. For the drizzle, I love using olive oil. It adds richness and helps the garlic blend well with the other flavors. The lemon brings a zesty kick. Its zest adds a fragrant aroma, while the juice brightens the dish. Dried oregano and thyme lend an earthy note. They balance the freshness of the lemon and shrimp. Finally, salt and pepper bring out all the flavors. Fresh parsley adds a splash of color and a hint of freshness when you serve. You can find the full recipe here: [Full Recipe]. Enjoy cooking! 1. First, preheat your oven to 400°F (200°C). 2. Line a large baking sheet with parchment paper. This makes cleanup simple. 3. In a big bowl, mix 1 pound of shrimp, 2 cups of broccoli, 1 cup of halved cherry tomatoes, and 1 sliced yellow bell pepper. Toss them gently to combine. 1. In a small bowl, whisk together 3 tablespoons of olive oil, 4 minced garlic cloves, the zest of 1 lemon, and its juice. 2. Then, add 1 teaspoon each of dried oregano and thyme, plus salt and pepper. Mix it well. 1. Pour the lemon herb mix over the shrimp and veggies. Toss everything together to coat well. 2. Spread the mixture evenly on the baking sheet. 3. Place it in the oven and bake for about 12-15 minutes. The shrimp should turn pink, and the veggies should soften. 4. After baking, sprinkle chopped parsley on top for a fresh look and taste. This recipe is quick and makes a colorful dish that bursts with flavor. For the full recipe, check the details above. To know when shrimp are done, look for a bright pink color. They should also be opaque. If you see these signs, they are ready to eat. Cooking time may change with different ovens. Start checking for doneness at around 12 minutes. Your oven may cook faster or slower, so keep an eye on them. Adding more flavors can make this dish even better. You might try a pinch of red pepper flakes for some heat. A dash of smoked paprika adds a nice smoky taste. Fresh herbs are key in this dish. They give a bright and fresh flavor that dried herbs can't match. Always use fresh parsley for a vibrant finish. You can serve the shrimp right from the baking sheet. This gives a fun, casual feel. If you want to impress, transfer them to a nice platter. Drizzle with extra lemon juice for zing. Pair this dish with a light salad or some rice to soak up the juices. These sides complement the shrimp beautifully. For the full recipe, check out the details above. {{image_4}} You can use many vegetables in this dish. Instead of broccoli and bell peppers, try zucchini or asparagus. These options add color and flavor. You can also use seasonal veggies. In summer, fresh corn or green beans work well. In fall, add butternut squash or Brussels sprouts. Mix and match to suit your taste. If you want to change the protein, scallops or chicken are great swaps. Scallops cook fast like shrimp. They need about 8-10 minutes in the oven. Chicken takes longer, around 20-25 minutes. Cut it into small pieces for even cooking. Adjust your bake time based on the protein you choose. This recipe is easy to adapt for different diets. For a gluten-free option, make sure your seasonings are gluten-free. You can also make it dairy-free. Just skip any dairy-based sides. Want a vegan version? Use chickpeas or tofu instead of shrimp. Season them the same way for a delicious meal. Store leftover shrimp and veggies in an airtight container. Keep it in the fridge for up to two days. If you want to save some for later, freezing is a good option. Place shrimp and vegetables in a freezer-safe bag. Remove as much air as you can before sealing. They can last up to three months in the freezer. When reheating, use the oven or stovetop for best results. Preheat your oven to 350°F (175°C) and place the shrimp and veggies on a baking sheet. Heat for about 10 minutes. This keeps everything warm and tasty. You can also use a skillet on low heat. Stir gently to warm the dish without overcooking the shrimp. Avoid the microwave if possible, as it can make shrimp tough. For the full recipe of Sheet Pan Lemon Herb Shrimp, check the earlier section! Shrimp cook quickly. The best time is 12 to 15 minutes at 400°F. They turn pink and opaque when done. Overcooking makes them tough, so watch closely. Each oven is different, so check them a little early. Yes, you can prep this dish in advance. Mix the shrimp and veggies, then store them in the fridge. You can also make the marinade ahead. Just keep the shrimp and marinade separate until you are ready to bake. This keeps the shrimp fresh. This shrimp pairs well with many sides. Here are some great options: - Quinoa salad for a healthy touch - Garlic bread for a filling option - Steamed rice for a classic choice - A fresh garden salad for crunch These sides balance the flavors and make a complete meal. In this post, I shared how to make a delicious sheet pan lemon herb shrimp dish. We covered main ingredients, step-by-step instructions, and tips for perfecting the recipe. I also included variations based on your taste. Cooking should be fun and easy. With quick steps and fresh ingredients, you can create a meal everyone will love. Enjoy experimenting with flavors and make this recipe your own!](https://joymealplan.com/wp-content/uploads/2025/06/8195c318-04ef-4784-9bf9-d5c1a8395797.webp)
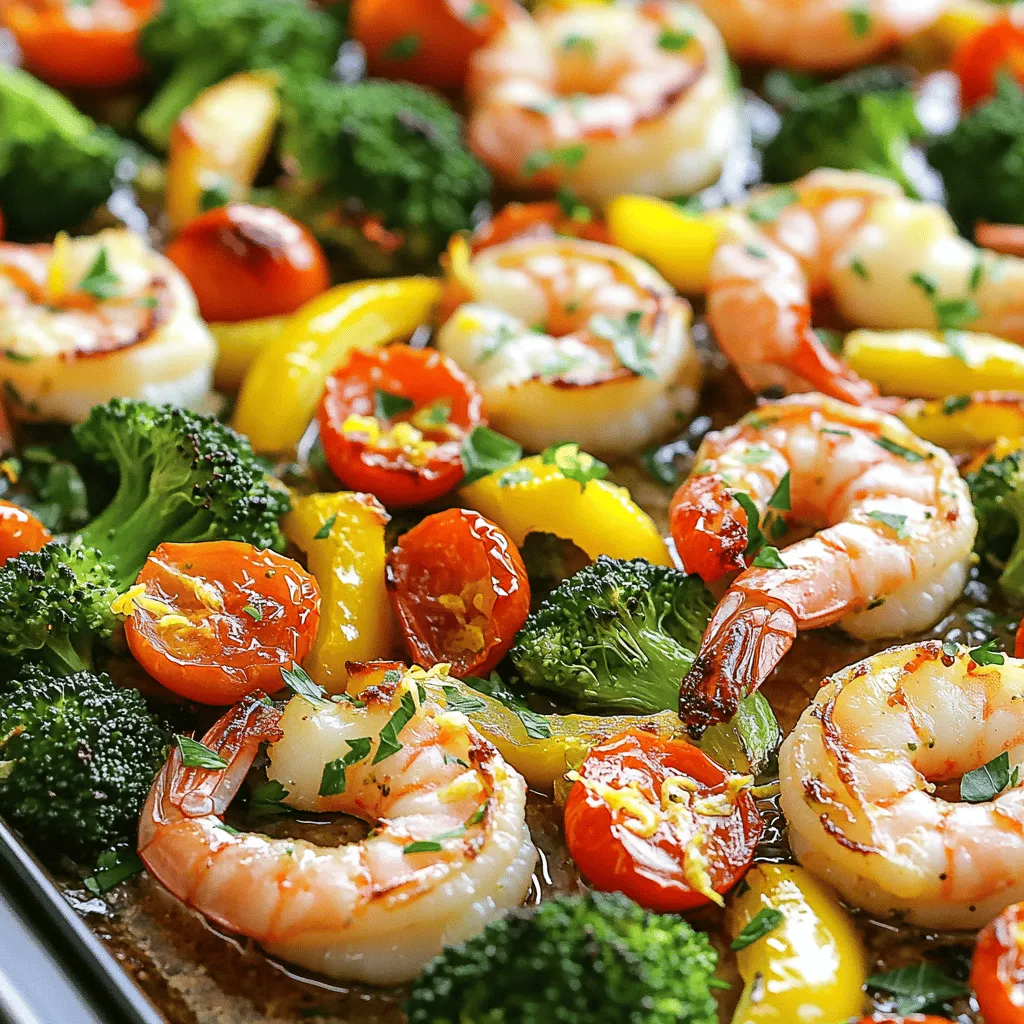
Looking for a quick and flavorful meal? This Sheet Pan Lemon Herb Shrimp recipe is your answer! With just a few fresh ingredients, you’ll create a dish that bursts with zest and herbiness. Not only is it easy to make, but it also allows you to enjoy a wholesome dinner without a mess. Let’s dive into the simple steps that will make your meal a hit!
Ingredients
Main Ingredients
– 1 pound large shrimp, peeled and deveined
– 2 cups broccoli florets
– 1 cup cherry tomatoes, halved
– 1 medium yellow bell pepper, sliced into strips
Seasoning and Drizzle
– 3 tablespoons extra virgin olive oil
– 4 cloves garlic, finely minced
– Zest and juice of 1 large lemon
– 1 teaspoon dried oregano
– 1 teaspoon dried thyme
– Salt and freshly cracked black pepper to taste
– Fresh parsley for garnish
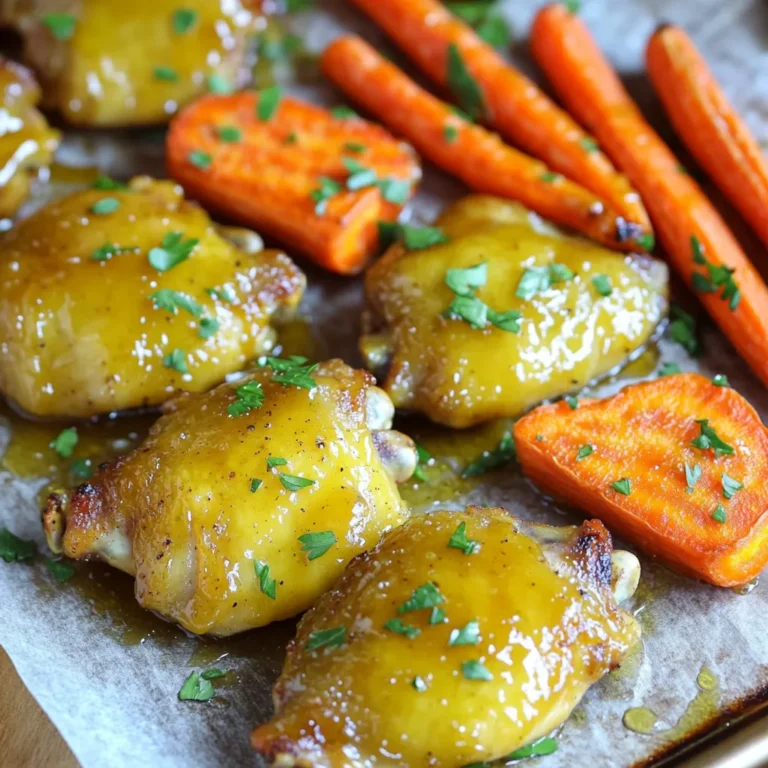
The main ingredients in this recipe create a bright, fresh dish. The shrimp are the star. Their sweet flavor pairs well with the crunchy broccoli and juicy tomatoes. The yellow bell pepper adds color and sweetness.
For the drizzle, I love using olive oil. It adds richness and helps the garlic blend well with the other flavors. The lemon brings a zesty kick. Its zest adds a fragrant aroma, while the juice brightens the dish.
Dried oregano and thyme lend an earthy note. They balance the freshness of the lemon and shrimp. Finally, salt and pepper bring out all the flavors. Fresh parsley adds a splash of color and a hint of freshness when you serve.Enjoy cooking!
Step-by-Step Instructions
Preparation Steps
1. First, preheat your oven to 400°F (200°C).
2. Line a large baking sheet with parchment paper. This makes cleanup simple.
3. In a big bowl, mix 1 pound of shrimp, 2 cups of broccoli, 1 cup of halved cherry tomatoes, and 1 sliced yellow bell pepper. Toss them gently to combine.
Make the Lemon Herb Marinade
1. In a small bowl, whisk together 3 tablespoons of olive oil, 4 minced garlic cloves, the zest of 1 lemon, and its juice.
2. Then, add 1 teaspoon each of dried oregano and thyme, plus salt and pepper. Mix it well.
Combine and Bake
1. Pour the lemon herb mix over the shrimp and veggies. Toss everything together to coat well.
2. Spread the mixture evenly on the baking sheet.
3. Place it in the oven and bake for about 12-15 minutes. The shrimp should turn pink, and the veggies should soften.
4. After baking, sprinkle chopped parsley on top for a fresh look and taste.
This recipe is quick and makes a colorful dish that bursts with flavor.
Tips & Tricks
Perfect Cooking Time
To know when shrimp are done, look for a bright pink color. They should also be opaque. If you see these signs, they are ready to eat. Cooking time may change with different ovens. Start checking for doneness at around 12 minutes. Your oven may cook faster or slower, so keep an eye on them.
Flavor Enhancements
Adding more flavors can make this dish even better. You might try a pinch of red pepper flakes for some heat. A dash of smoked paprika adds a nice smoky taste. Fresh herbs are key in this dish. They give a bright and fresh flavor that dried herbs can’t match. Always use fresh parsley for a vibrant finish.
Serving Suggestions
You can serve the shrimp right from the baking sheet. This gives a fun, casual feel. If you want to impress, transfer them to a nice platter. Drizzle with extra lemon juice for zing. Pair this dish with a light salad or some rice to soak up the juices. These sides complement the shrimp beautifully.
Variations
Different Vegetables
You can use many vegetables in this dish. Instead of broccoli and bell peppers, try zucchini or asparagus. These options add color and flavor. You can also use seasonal veggies. In summer, fresh corn or green beans work well. In fall, add butternut squash or Brussels sprouts. Mix and match to suit your taste.
Protein Swaps
If you want to change the protein, scallops or chicken are great swaps. Scallops cook fast like shrimp. They need about 8-10 minutes in the oven. Chicken takes longer, around 20-25 minutes. Cut it into small pieces for even cooking. Adjust your bake time based on the protein you choose.
Dietary Modifications
This recipe is easy to adapt for different diets. For a gluten-free option, make sure your seasonings are gluten-free. You can also make it dairy-free. Just skip any dairy-based sides. Want a vegan version? Use chickpeas or tofu instead of shrimp. Season them the same way for a delicious meal.
Storage Info
Leftover Storage
Store leftover shrimp and veggies in an airtight container. Keep it in the fridge for up to two days. If you want to save some for later, freezing is a good option. Place shrimp and vegetables in a freezer-safe bag. Remove as much air as you can before sealing. They can last up to three months in the freezer.
Reheating Instructions
When reheating, use the oven or stovetop for best results. Preheat your oven to 350°F (175°C) and place the shrimp and veggies on a baking sheet. Heat for about 10 minutes. This keeps everything warm and tasty. You can also use a skillet on low heat. Stir gently to warm the dish without overcooking the shrimp. Avoid the microwave if possible, as it can make shrimp tough.
FAQs
How long does it take to cook shrimp?
Shrimp cook quickly. The best time is 12 to 15 minutes at 400°F. They turn pink and opaque when done. Overcooking makes them tough, so watch closely. Each oven is different, so check them a little early.
Can I make this recipe ahead of time?
Yes, you can prep this dish in advance. Mix the shrimp and veggies, then store them in the fridge. You can also make the marinade ahead. Just keep the shrimp and marinade separate until you are ready to bake. This keeps the shrimp fresh.
What can I serve with Sheet Pan Lemon Herb Shrimp?
This shrimp pairs well with many sides. Here are some great options:
– Quinoa salad for a healthy touch
– Garlic bread for a filling option
– Steamed rice for a classic choice
– A fresh garden salad for crunch
These sides balance the flavors and make a complete meal.
In this post, I shared how to make a delicious sheet pan lemon herb shrimp dish. We covered main ingredients, step-by-step instructions, and tips for perfecting the recipe. I also included variations based on your taste.
Cooking should be fun and easy. With quick steps and fresh ingredients, you can create a meal everyone will love. Enjoy experimenting with flavors and make this recipe your own!
![- 1 pound large shrimp, peeled and deveined - 2 cups broccoli florets - 1 cup cherry tomatoes, halved - 1 medium yellow bell pepper, sliced into strips - 3 tablespoons extra virgin olive oil - 4 cloves garlic, finely minced - Zest and juice of 1 large lemon - 1 teaspoon dried oregano - 1 teaspoon dried thyme - Salt and freshly cracked black pepper to taste - Fresh parsley for garnish The main ingredients in this recipe create a bright, fresh dish. The shrimp are the star. Their sweet flavor pairs well with the crunchy broccoli and juicy tomatoes. The yellow bell pepper adds color and sweetness. For the drizzle, I love using olive oil. It adds richness and helps the garlic blend well with the other flavors. The lemon brings a zesty kick. Its zest adds a fragrant aroma, while the juice brightens the dish. Dried oregano and thyme lend an earthy note. They balance the freshness of the lemon and shrimp. Finally, salt and pepper bring out all the flavors. Fresh parsley adds a splash of color and a hint of freshness when you serve. You can find the full recipe here: [Full Recipe]. Enjoy cooking! 1. First, preheat your oven to 400°F (200°C). 2. Line a large baking sheet with parchment paper. This makes cleanup simple. 3. In a big bowl, mix 1 pound of shrimp, 2 cups of broccoli, 1 cup of halved cherry tomatoes, and 1 sliced yellow bell pepper. Toss them gently to combine. 1. In a small bowl, whisk together 3 tablespoons of olive oil, 4 minced garlic cloves, the zest of 1 lemon, and its juice. 2. Then, add 1 teaspoon each of dried oregano and thyme, plus salt and pepper. Mix it well. 1. Pour the lemon herb mix over the shrimp and veggies. Toss everything together to coat well. 2. Spread the mixture evenly on the baking sheet. 3. Place it in the oven and bake for about 12-15 minutes. The shrimp should turn pink, and the veggies should soften. 4. After baking, sprinkle chopped parsley on top for a fresh look and taste. This recipe is quick and makes a colorful dish that bursts with flavor. For the full recipe, check the details above. To know when shrimp are done, look for a bright pink color. They should also be opaque. If you see these signs, they are ready to eat. Cooking time may change with different ovens. Start checking for doneness at around 12 minutes. Your oven may cook faster or slower, so keep an eye on them. Adding more flavors can make this dish even better. You might try a pinch of red pepper flakes for some heat. A dash of smoked paprika adds a nice smoky taste. Fresh herbs are key in this dish. They give a bright and fresh flavor that dried herbs can't match. Always use fresh parsley for a vibrant finish. You can serve the shrimp right from the baking sheet. This gives a fun, casual feel. If you want to impress, transfer them to a nice platter. Drizzle with extra lemon juice for zing. Pair this dish with a light salad or some rice to soak up the juices. These sides complement the shrimp beautifully. For the full recipe, check out the details above. {{image_4}} You can use many vegetables in this dish. Instead of broccoli and bell peppers, try zucchini or asparagus. These options add color and flavor. You can also use seasonal veggies. In summer, fresh corn or green beans work well. In fall, add butternut squash or Brussels sprouts. Mix and match to suit your taste. If you want to change the protein, scallops or chicken are great swaps. Scallops cook fast like shrimp. They need about 8-10 minutes in the oven. Chicken takes longer, around 20-25 minutes. Cut it into small pieces for even cooking. Adjust your bake time based on the protein you choose. This recipe is easy to adapt for different diets. For a gluten-free option, make sure your seasonings are gluten-free. You can also make it dairy-free. Just skip any dairy-based sides. Want a vegan version? Use chickpeas or tofu instead of shrimp. Season them the same way for a delicious meal. Store leftover shrimp and veggies in an airtight container. Keep it in the fridge for up to two days. If you want to save some for later, freezing is a good option. Place shrimp and vegetables in a freezer-safe bag. Remove as much air as you can before sealing. They can last up to three months in the freezer. When reheating, use the oven or stovetop for best results. Preheat your oven to 350°F (175°C) and place the shrimp and veggies on a baking sheet. Heat for about 10 minutes. This keeps everything warm and tasty. You can also use a skillet on low heat. Stir gently to warm the dish without overcooking the shrimp. Avoid the microwave if possible, as it can make shrimp tough. For the full recipe of Sheet Pan Lemon Herb Shrimp, check the earlier section! Shrimp cook quickly. The best time is 12 to 15 minutes at 400°F. They turn pink and opaque when done. Overcooking makes them tough, so watch closely. Each oven is different, so check them a little early. Yes, you can prep this dish in advance. Mix the shrimp and veggies, then store them in the fridge. You can also make the marinade ahead. Just keep the shrimp and marinade separate until you are ready to bake. This keeps the shrimp fresh. This shrimp pairs well with many sides. Here are some great options: - Quinoa salad for a healthy touch - Garlic bread for a filling option - Steamed rice for a classic choice - A fresh garden salad for crunch These sides balance the flavors and make a complete meal. In this post, I shared how to make a delicious sheet pan lemon herb shrimp dish. We covered main ingredients, step-by-step instructions, and tips for perfecting the recipe. I also included variations based on your taste. Cooking should be fun and easy. With quick steps and fresh ingredients, you can create a meal everyone will love. Enjoy experimenting with flavors and make this recipe your own!](https://joymealplan.com/wp-content/uploads/2025/06/8195c318-04ef-4784-9bf9-d5c1a8395797-300x300.webp)

![To make Easy Chicken Tikka Masala, gather these key ingredients: - 500g boneless chicken thighs, cut into bite-sized pieces - 1 cup plain yogurt - 2 tablespoons garam masala - 1 tablespoon ground cumin - 1 teaspoon ground coriander - 1 teaspoon paprika - 1 teaspoon turmeric - 1 tablespoon ginger, minced - 3 cloves garlic, minced - 1 onion, finely chopped - 1 can (400g) crushed tomatoes - 1 cup coconut milk - 2 tablespoons vegetable oil - Salt to taste - Fresh cilantro for garnish These ingredients create a rich, creamy sauce that brings the dish to life. The yogurt is key for tender chicken. The spices add depth and warmth, making every bite flavorful. You can customize your Chicken Tikka Masala with these optional ingredients: - Lemon juice for brightness - Green chili for heat - Bell peppers for crunch - Peas for color Adding these extras can change the flavor profile and make it your own. Feel free to mix and match based on your taste. If you have allergies, there are simple swaps you can use: - Use almond or soy yogurt instead of dairy yogurt. - Swap coconut milk for almond milk for a nut-free option. - Replace chicken with tofu or chickpeas for a vegan dish. These substitutions keep the dish delicious while catering to your dietary needs. Enjoy your cooking adventure! For the complete recipe, check out the Full Recipe link. First, grab a large bowl. Mix 1 cup of plain yogurt, 2 tablespoons of garam masala, 1 tablespoon of ground cumin, 1 teaspoon of ground coriander, 1 teaspoon of paprika, 1 teaspoon of turmeric, 1 tablespoon of minced ginger, 3 cloves of minced garlic, and a pinch of salt. Stir well until it’s smooth. Now, add 500g of bite-sized chicken thighs. Make sure each piece is coated well with the marinade. Cover the bowl with plastic wrap. Pop it in the fridge for at least 30 minutes. For the best taste, let it sit overnight. Next, heat 2 tablespoons of vegetable oil in a large skillet over medium-high heat. Once hot, add 1 finely chopped onion. Cook the onion for 5-7 minutes. You want it to turn golden brown and soft. This step adds a sweet flavor. After the onion is ready, add the marinated chicken. Cook it for about 8-10 minutes. Stir it occasionally to brown all sides evenly. Once the chicken is browned, it’s time to add more flavor. Pour in 1 can of crushed tomatoes. Stir gently to mix everything. Bring the mixture to a gentle simmer. Let it simmer for about 10 minutes. Stir it now and then to stop it from sticking. After that, slowly pour in 1 cup of coconut milk. Stir again to combine. Simmer for another 10 minutes. This makes the sauce thick and creamy. Taste and add more salt if needed. Finish by garnishing with fresh cilantro for a pop of color and taste. To get the best flavor in your Chicken Tikka Masala, start with fresh spices. Fresh spices give a robust taste that dried spices lack. Use whole spices when possible, and grind them yourself. This step unleashes their natural oils and aromas. Another key is the yogurt marinade. It adds tenderness and tang. Marinate your chicken for at least 30 minutes, but overnight is best. This waiting time allows the spices to soak in fully. For perfect chicken, cook it in batches. Overcrowding the pan steams the meat instead of browning it. Use medium-high heat to get a nice sear on the chicken. This creates a deep flavor that you want. Once you add the crushed tomatoes and coconut milk, let it simmer gently. This step helps the flavors meld together beautifully. You can make Chicken Tikka Masala ahead of time. Cook it fully, then let it cool. Store it in an airtight container in the fridge for up to three days. Reheat it on low heat, adding a splash of water if needed. This dish also freezes well. Portion it out and freeze it for up to three months. When you're ready, thaw it overnight in the fridge and reheat. For more details, check the Full Recipe. {{image_4}} You can easily make a vegetarian version of Chicken Tikka Masala. Replace the chicken with firm tofu or vegetables like bell peppers and zucchini. Tofu soaks up flavors well. Marinate it the same way as chicken. Cook it in the same sauce for that rich taste. This way, you keep the essence of the dish while making it meat-free. If you enjoy spicy food, add some heat to your Chicken Tikka Masala. You can include chopped green chilies or a pinch of cayenne pepper in the marinade. Adjust the spice level to your liking. Just remember, a little heat goes a long way! You can also serve it with a side of spicy chutney for an extra kick. You can swap chicken for other proteins too. Paneer, a fresh cheese, works great in this dish. Cut the paneer into cubes and marinate it just like the chicken. Cook it in the same way for a rich and creamy meal. Tofu and paneer both add their own unique texture and flavor to the dish. This makes it more exciting and diverse for your taste buds. For the complete recipe, check out the [Full Recipe]. To keep your Chicken Tikka Masala fresh, let it cool down first. Use an airtight container for storage. Place it in the fridge. It will stay good for about three to four days. For best results, store it without the rice or naan. To enjoy your Chicken Tikka Masala again, use the stove or microwave. If using the stove, heat it over low heat. Stir often to prevent sticking. If using the microwave, cover the dish and heat in short bursts. This way, it warms evenly. Always check the temperature to ensure it is hot throughout. You can freeze Chicken Tikka Masala if you want to save some for later. Place it in a freezer-safe container or bag. Make sure to leave some space for expansion. It can stay good for up to three months. When you’re ready to eat, thaw it in the fridge overnight. Reheat it on the stove or microwave, and enjoy this rich flavor again! For the full recipe, check the section above. You should marinate chicken for at least 30 minutes. For the best taste, let it sit overnight. This allows the spices to soak in deeply. The yogurt keeps the chicken tender while adding flavor. Yes, you can use bone-in chicken. It will add more flavor to your dish. Just be aware that it may take longer to cook. Adjust your cooking time to ensure the chicken is fully cooked. Serve Chicken Tikka Masala with fluffy basmati rice or warm naan. Both options soak up the rich sauce well. You can also add a side of cucumber salad for a fresh crunch. For the complete recipe, check out the Full Recipe section. You’ll find all the steps to make this rich, flavorful dish in no time! In this post, we covered the key ingredients for easy Chicken Tikka Masala, from marinade to sauce. I shared tips for perfect flavor and cooking techniques. You can even explore vegetarian options or different proteins like tofu. Storing leftovers properly ensures you enjoy this dish later. Remember, marinating the chicken is key, and you can customize it to your taste. With these steps, you’ll cook a delicious meal that’s sure to impress!](https://joymealplan.com/wp-content/uploads/2025/07/18c11e8b-b17f-4eb1-983f-851954d1111b-768x768.webp)