Chocolate Dipped Strawberries Delightful Dessert Treat
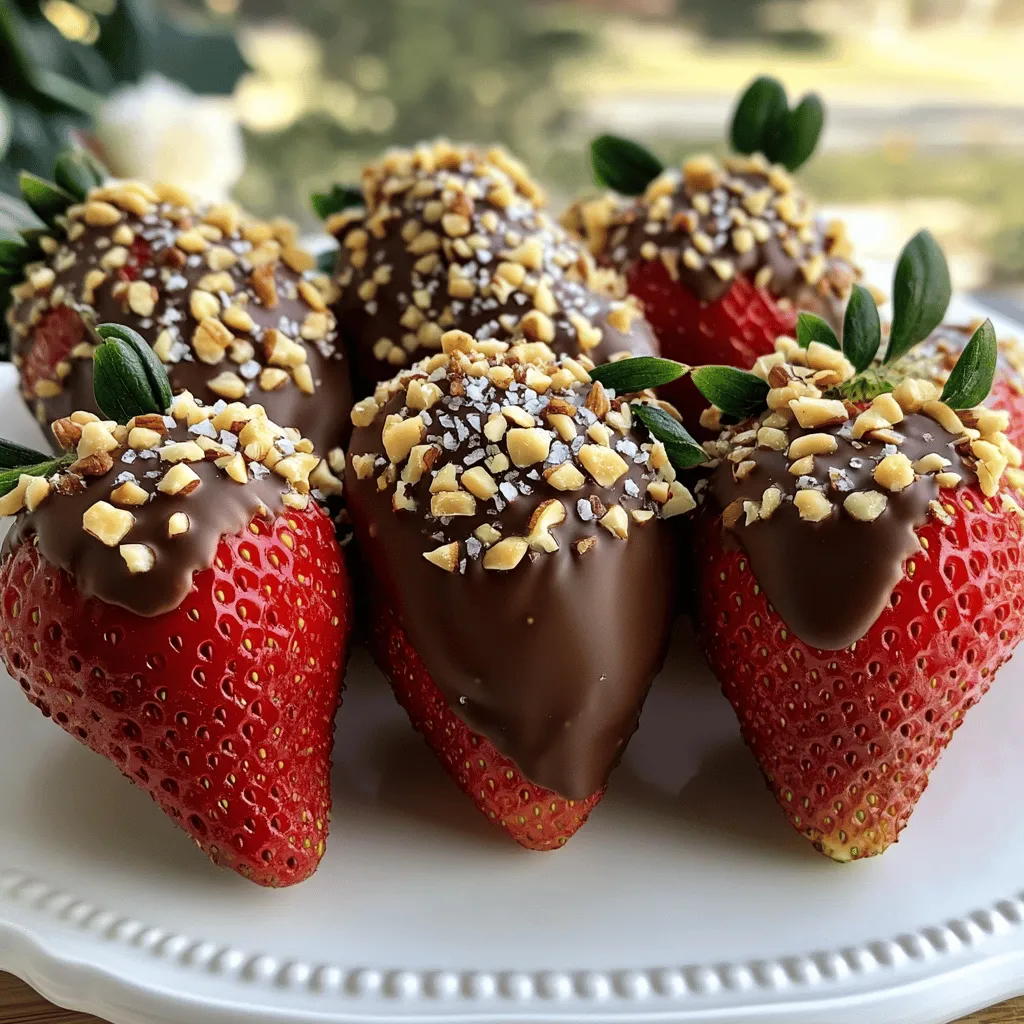
Are you ready to impress with a delightful dessert? Chocolate dipped strawberries are the perfect sweet treat for any occasion. In this article, I’ll guide you through every step, from choosing the freshest strawberries to achieving a smooth, shiny chocolate coating. With easy tips and fun variations, you’ll become a chocolate dipping pro in no time. Let’s dive right in and make something delicious together!
Ingredients
Fresh Strawberries
Choose 1 pound of fresh strawberries. Select berries that are bright red and firm. I prefer ones with stems, as they make dipping easier. Wash them gently under cold water. Dry them well with a paper towel to help the chocolate stick.
Types of Chocolate
You can use 8 ounces of dark chocolate, which should have at least 60% cocoa. Dark chocolate gives a rich flavor. Milk chocolate is sweeter and creamier, while white chocolate is smooth and very sweet. Each type gives a different taste, so pick what you love!
Optional Ingredients for Enhanced Flavor and Texture
Add 2 tablespoons of coconut oil for a silkier chocolate. This makes the chocolate smoother when melted. A sprinkle of 1 tablespoon of sea salt on top gives a nice contrast. For crunch, try 1 tablespoon of finely chopped nuts. You can also mix in 1 teaspoon of vanilla extract for extra flavor. These ingredients help take your chocolate-dipped strawberries to the next level.
Step-by-Step Instructions
Preparation of Strawberries
Start by rinsing your fresh strawberries under cold water. This step removes dirt and bacteria. After rinsing, use a clean paper towel to dry each strawberry carefully. Make sure they are completely dry. When the berries are wet, the chocolate won’t stick well.
Melting the Chocolate
Now, let’s melt the chocolate. You can use two methods. First, try the microwave. Place chocolate and coconut oil in a heatproof bowl. Heat it in 30-second bursts. Stir well between each burst until it is smooth. Alternatively, use a double boiler. Set the bowl over simmering water. Stir until the chocolate becomes glossy and melted. If you want, add vanilla extract for extra flavor.
Dipping the Strawberries
Grab a strawberry by the stem. Dip it into the melted chocolate. Swirl it around to coat well. Lift the berry out and let the extra chocolate drip back into the bowl. This gives you a nice, even layer.
Adding Toppings
While the chocolate is still wet, you can add toppings. If you like nuts, sprinkle finely chopped nuts on half of the strawberries. This adds a nice crunch and flavor.
Setting the Strawberries
Lay the dipped strawberries on a baking sheet lined with parchment paper. If you want a touch of salt, sprinkle sea salt on them right after dipping. This gives a tasty contrast to the sweet chocolate.
Chilling to Set
Place the baking sheet in the fridge. Let the strawberries chill for about 30 minutes. This allows the chocolate to firm up completely.
Serving Suggestions
When ready to serve, arrange the strawberries on a lovely platter. You can enjoy them right away. If you want to save them, keep them in the fridge for up to 24 hours for the best taste.
Tips & Tricks
Choosing the Best Strawberries
Select fresh strawberries with bright red color. Look for firm berries. They should have fresh green leaves on top. Avoid any berries with bruises or soft spots. The best time to pick them is in spring and summer. If you can, buy organic strawberries. They often taste better and are free from pesticides.
Achieving a Smooth Chocolate Coating
To get a smooth chocolate coating, chop the chocolate into small pieces. This helps it melt evenly. Use a microwave or a double boiler to melt it slowly. If you add coconut oil, it will make the coating silkier. Stir the chocolate often while it melts. This keeps it from burning and helps it stay shiny.
How to Avoid Chocolate Seizing
Chocolate can seize when it gets wet. To avoid this, make sure the strawberries are completely dry. Any water will cause the chocolate to clump. If your chocolate does seize, you can try adding a small amount of vegetable oil. This can help bring it back to a smooth state. Just remember, keep water away!

Variations
Different Types of Chocolate
You can use many types of chocolate for dipping strawberries. Dark chocolate gives a rich taste. Milk chocolate brings a creamier sweetness. White chocolate offers a smooth, sweet flavor. Each type can change the dessert’s taste. Feel free to mix different chocolates too. This creates layers of flavor that excite the taste buds.
Seasonal and Themed Toppings
Toppings make your chocolate-dipped strawberries fun and unique. During spring, consider pastel sprinkles for Easter. In summer, use crushed cookies for a beach vibe. For Halloween, try orange and black sprinkles. Around winter holidays, crushed peppermint can be a delightful option. Matching toppings to the season can add cheerful flair to your dessert.
Flavor Infusions and Alternatives
Want to spice things up? You can infuse flavors into your chocolate. Add a drop of peppermint extract for a minty kick. Orange zest gives a fresh citrus note. If you’re adventurous, try chili powder for a surprising heat. You can also use flavored chocolates, like hazelnut or coffee. The options are endless, so let your creativity shine!
Storage Info
Freshness Duration
Chocolate dipped strawberries taste best on the day you make them. They stay fresh for about 24 hours in the fridge. After that, the strawberries may lose moisture and the chocolate can become dull. If you want them to last longer, freezing is a good option.
Best Practices for Refrigeration
Store the strawberries in a single layer on a plate or tray. Cover them lightly with plastic wrap. Avoid stacking them, as that can cause the chocolate to smudge or break. Keep them in the coldest part of your fridge. Remember, moisture is the enemy, so ensure they are dry before storing.
Freezing Chocolate Dipped Strawberries
Freezing is a great way to save leftovers. To freeze, place the strawberries on a baking sheet lined with parchment paper. Freeze them for about an hour, until firm. Then, transfer them to a freezer-safe container. They can stay frozen for up to two months. When you’re ready to enjoy them, thaw in the fridge for a few hours. They may not be as crisp, but the flavor remains delightful.
FAQs
How long do chocolate-dipped strawberries last?
Chocolate-dipped strawberries stay fresh for about 24 hours in the fridge. After that, they start to lose their taste and texture. For the best flavor, enjoy them soon after making them.
Can I use milk or white chocolate instead of dark chocolate?
Yes, you can use milk or white chocolate! Each type offers a unique taste. Milk chocolate is sweeter, while white chocolate is creamy. Adjust your toppings to balance the flavors if you switch.
What can I use if I don’t have coconut oil?
If you don’t have coconut oil, use vegetable oil or butter. These options will help the chocolate stay smooth. You can also skip the oil entirely; just make sure to stir well while melting.
How do I make chocolate-dipped strawberries shine?
To achieve a glossy finish, melt the chocolate carefully. Avoid water, as it can cause the chocolate to seize. Adding a small amount of oil helps create a smooth, shiny coating.
Can I use frozen strawberries for this recipe?
Using frozen strawberries is not ideal. They release water as they thaw, making the chocolate slide off. Fresh strawberries work best for a great coating and taste. If you only have frozen, let them thaw first and dry well.
In this post, we discussed how to make chocolate-dipped strawberries. We covered ingredients, from fresh strawberries to types of chocolate. I shared detailed steps, tips for best results, and creative variations. Storing your treats correctly is key for freshness. Remember, enjoy making these sweet snacks, and let your creativity shine. These treats are fun and easy to customize. Happy dipping!




![To make these no-bake lemon cheesecake bites, gather the following ingredients: - 1 cup graham cracker crumbs - 1/4 cup unsalted butter, melted - 2 tablespoons granulated sugar - 8 oz cream cheese, softened to room temperature - 1/2 cup powdered sugar - 1/4 cup plain Greek yogurt - 2 tablespoons freshly squeezed lemon juice - Zest from 1 lemon - 1/2 teaspoon pure vanilla extract - Fresh berries (such as strawberries, blueberries, or raspberries) for garnish (optional) These ingredients create a creamy and zesty treat. The graham cracker crumbs form a delightful crust, while cream cheese adds richness. Greek yogurt gives a light tang, balancing the sweetness. Fresh lemon juice and zest provide a bright flavor that makes these bites so refreshing. The optional berries add color and a burst of fruitiness, making each bite even more tempting. For the complete recipe, check out the [Full Recipe]. - Start by combining the graham cracker crumbs, melted butter, and granulated sugar in a bowl. - Mix until it feels like damp sand and holds together. - Press this mixture firmly into the bottom of mini muffin tins or silicone molds. - Chill the crust in the fridge for about 10 minutes to set. - In a clean bowl, beat the softened cream cheese with powdered sugar until smooth. - Add in plain Greek yogurt, freshly squeezed lemon juice, lemon zest, and vanilla extract. - Mix these ingredients until you have a creamy and fluffy filling. - Spoon the lemon cheesecake filling into each crust. - Use a spatula to smooth the tops for an even look. - Return the molds to the fridge and chill for at least 2 hours, or until firm. You can find the Full Recipe for precise measurements and tips! Softened cream cheese is key for smooth cheesecake bites. If it’s too cold, it will clump. Let your cream cheese sit out for 30 minutes before mixing. Chilling helps the bites set and firm up. I recommend at least 2 hours in the fridge. This makes them easy to pop out and enjoy. Want a bolder lemon taste? Add extra lemon zest to the filling. This little trick brightens the flavor. You can also swap plain Greek yogurt for flavored yogurt. Lemon or vanilla yogurt adds a fun twist, making these bites even more delicious. Garnishing makes your cheesecake bites stand out. Fresh berries on top add color and taste. Drizzling honey brings out sweetness and shine. You can sprinkle extra lemon zest for a pop of brightness. Use a decorative platter to showcase your treats for friends and family. {{image_4}} You can easily change the flavor of your no-bake lemon cheesecake bites. Here are two fun ideas: - Berry cheesecake bites: Swap the lemon juice for mixed berry puree. Use strawberries, blueberries, or raspberries. This adds a sweet and fruity twist. The berry flavor pairs well with the creamy filling. - Chocolate lemon cheesecake bites: Mix in cocoa powder with the cream cheese. This gives a rich chocolate flavor. You still get the bright lemon taste, but with a chocolatey touch. Making these bites fit different diets is simple. Here’s how: - Gluten-free alternatives for crust: Use gluten-free graham cracker crumbs. You can also blend nuts or oats to make a crust. Just mix them with melted butter and sugar. - Substituting dairy for vegan options: Use vegan cream cheese instead of regular cream cheese. You can also replace yogurt with coconut yogurt. These swaps keep the bites creamy and delicious. Feel free to experiment with these variations. You can create a cheesecake treat that fits your taste and dietary needs. Enjoy! To keep your No-Bake Lemon Cheesecake Bites fresh, refrigeration is key. Store them in an airtight container. This helps to lock in moisture and keeps them from drying out. If you want to freeze them, place the bites in a single layer on a baking sheet. Once frozen, transfer them to a freezer-safe container or bag. Make sure to label it with the date. They are easy to grab for a quick treat later! How long do they last in the fridge? These cheesecake bites can last up to 5 days when stored properly in the refrigerator. After that, they may lose their taste and texture. Always check for freshness. Signs of spoilage to watch for include an off smell, discoloration, or an unusual texture. If you notice any of these signs, it’s best to toss them out. For the full recipe, check out the recipe section. No-Bake Lemon Cheesecake Bites need at least 2 hours to chill. This time lets them firm up. If you want them extra cold, you can chill them longer. Just ensure they are firm to the touch before serving. This helps create that perfect bite! Yes, you can use different cheeses! Cream cheese gives the best flavor and texture. However, you might try mascarpone for a richer taste. Cottage cheese can work too, but blend it well to avoid lumps. Each cheese adds a unique twist to these bites. If you don't have graham crackers, try crushed cookies or oat flour. Digestive biscuits work great too! For a gluten-free option, use gluten-free cookies or almond flour. These swaps can change the flavor, but they still make a good crust. Absolutely! These cheesecake bites are great to make a day ahead. Just chill them overnight. This allows the flavors to meld nicely. Be sure to cover them well to keep them fresh. They will taste even better the next day! To make these bites vegan, substitute cream cheese with a vegan cream cheese. For the crust, use coconut oil instead of butter. Replace Greek yogurt with a plant-based yogurt. You can also use maple syrup instead of powdered sugar. These changes keep the flavor while making it vegan-friendly. For the full recipe, check out the [Full Recipe]. You now have the steps to make delicious No-Bake Lemon Cheesecake Bites. We covered all ingredients, from graham cracker crumbs to fresh berries. I shared helpful tips for perfect texture and exciting flavor ideas. Variations let you adapt these bites for any taste or diet. Remember to store them properly for the best quality. Enjoy creating these treats, and don't hesitate to get creative!](https://joymealplan.com/wp-content/uploads/2025/07/839985c9-ca67-4b01-8b72-ff6921bf99fe-768x768.webp)
