
No Bake Zucchini Energy Bites Quick and Tasty Snack
![- 1 cup grated zucchini, well-drained - 1 cup rolled oats - 1/2 cup almond butter (or any preferred nut butter) - 1/4 cup honey or maple syrup - 1/2 cup dark chocolate chips - 1/4 cup shredded coconut - 1 teaspoon vanilla extract - 1/2 teaspoon ground cinnamon - Pinch of salt What is the nutritional value of zucchini? Zucchini is low in calories and high in vitamins. It has vitamin C and potassium. These nutrients help your body stay healthy and energized. What are the benefits of oats in energy bites? Oats give you energy and keep you full. They have fiber, which helps your digestion. Oats also provide vitamins and minerals that support your health. What are the advantages of using nut butter? Nut butter adds healthy fats and protein. This keeps you satisfied longer. It also adds a creamy texture and rich flavor to your energy bites. Nut butter is a great way to boost nutrition in snacks. These ingredients work together to create tasty bites. You get energy, flavor, and health benefits in each bite. You can find the full recipe to make these energy bites in just a few simple steps. To make great energy bites, you need to drain the zucchini well. Start by grating one cup of zucchini. Then, place it in a clean kitchen towel. Wrap it tightly and squeeze hard to get rid of extra moisture. This step is key. If the zucchini is too wet, your bites will be soggy. Next, grab a large mixing bowl. Add the well-drained zucchini, one cup of rolled oats, half a cup of almond butter, and a quarter cup of honey or maple syrup. Toss in half a cup of dark chocolate chips, a quarter cup of shredded coconut, one teaspoon of vanilla extract, half a teaspoon of ground cinnamon, and a pinch of salt. Mix everything together well. The blend should feel sticky and hold together well when pressed. Once mixed, it’s time to shape your bites. Use your hands to scoop about a tablespoon of the mixture. Roll it into a ball. Keep rolling until all the mixture is formed into bites. You want them to be about one inch in size. This size is perfect for snacking and easy to pop in your mouth. Now, refrigeration is important. Place the energy bites on a tray lined with parchment paper. Chill them in the fridge for at least 30 minutes. This helps them firm up and makes them easy to handle. The chilling time is vital for the perfect texture. After they are set, you can store them in an airtight container in the fridge. They will stay fresh and tasty for days. For the complete recipe, make sure to check the [Full Recipe]. - Over-squeezing zucchini: This may lead to dry energy bites. Remove just enough moisture to keep them moist yet firm. - Insufficient mixing of ingredients: A well-mixed blend ensures even flavor and texture. Take your time and mix until all ingredients are combined. - Suggestions for additional spices or additives: Try adding a pinch of nutmeg or a splash of almond extract for extra depth. You can also mix in some chopped nuts or dried fruit for a fun twist. - How to adjust firmness if the mixture is too sticky: If your mix feels too sticky, add more oats or shredded coconut. This will help the bites hold their shape. - Pairing ideas with other healthy snacks: Serve your energy bites with fresh fruit or yogurt for a balanced snack. They also pair well with nuts or seeds for extra crunch. - Creative ways to serve to guests: Arrange energy bites on a colorful platter. You can even use cupcake liners for individual servings. Add some dark chocolate drizzles on top for an elegant touch! {{image_4}} You can easily adapt the ingredients in these energy bites. If you need a nut-free option, try using sunflower seed butter. It works well and adds a nice flavor. You can also use tahini for a different twist. For sweeteners, you can swap honey or maple syrup with agave nectar or date syrup. Each sweetener offers a unique taste and sweetness level. Adding fruit or nuts can change the taste of your bites. Try adding dried cranberries or chopped apricots for a fruity touch. You can also mix in chopped walnuts or pecans for extra crunch. If you want to boost protein, add a scoop of your favorite protein powder. This makes the bites more filling and nutritious. You can modify these energy bites for different seasons. For summer, add fresh berries like blueberries or strawberries for a bright flavor. In winter, try adding spices like nutmeg or cloves for a cozy taste. For holidays, mix in festive ingredients like pumpkin puree or crushed peppermint. These small changes can make your energy bites perfect for any occasion. To keep your energy bites fresh, store them in an airtight container. This helps prevent moisture and keeps the bites from drying out. I recommend using glass containers as they seal well and do not absorb odors. Place the container in your fridge for the best results. The cold temperature helps maintain their texture and flavor. If you want to keep your energy bites for a longer time, freezing is a great option. To freeze, arrange the bites in a single layer on a baking sheet. Place the sheet in the freezer for about an hour. Once they are firm, transfer them to a freezer-safe bag or container. This method keeps them from sticking together. To thaw, just take out the desired number of bites and leave them at room temperature for about 15 minutes. They will be soft and ready to enjoy without losing their texture. In the fridge, your energy bites can stay fresh for about one week. Look for changes in color or smell as signs of spoilage. If they smell off or look dried out, it is best to toss them. Enjoying these bites fresh ensures you get the most flavor and nutrients. For long-term storage, consider freezing them as mentioned earlier. Yes, you can. Nut butter adds creaminess and flavor. Here are some tasty alternatives: - Peanut butter - Cashew butter - Sunflower seed butter (great for nut-free diets) - Hazelnut butter Each option brings a unique taste. Peanut butter gives a strong flavor, while cashew butter is mild and creamy. These energy bites stay fresh for up to one week in the fridge. Store them in an airtight container. They will keep their taste and texture well. If you want them to last longer, freeze them. They can last up to three months in the freezer. Just thaw in the fridge before eating. You can use other sweeteners! Here are some options: - Agave nectar - Coconut sugar - Stevia or monk fruit sweetener (for a low-calorie option) Each sweetener will change the taste slightly. Honey and maple syrup add a rich flavor. The other sweeteners are good, but may not have the same depth. Adjust the amount based on your taste preferences. This article covered the ingredients to make tasty No Bake Zucchini Energy Bites. We explored essential ingredients, their health benefits, and step-by-step instructions. I shared tips to avoid common mistakes and how to enhance flavor. You can also try different variations and learn the best ways to store these bites. In conclusion, these energy bites are easy to make and fun to customize. Enjoy the healthy benefits while delighting your taste buds!](https://joymealplan.com/wp-content/uploads/2025/06/d3b2a771-bd72-42e5-81fa-55c54917d2aa.webp)
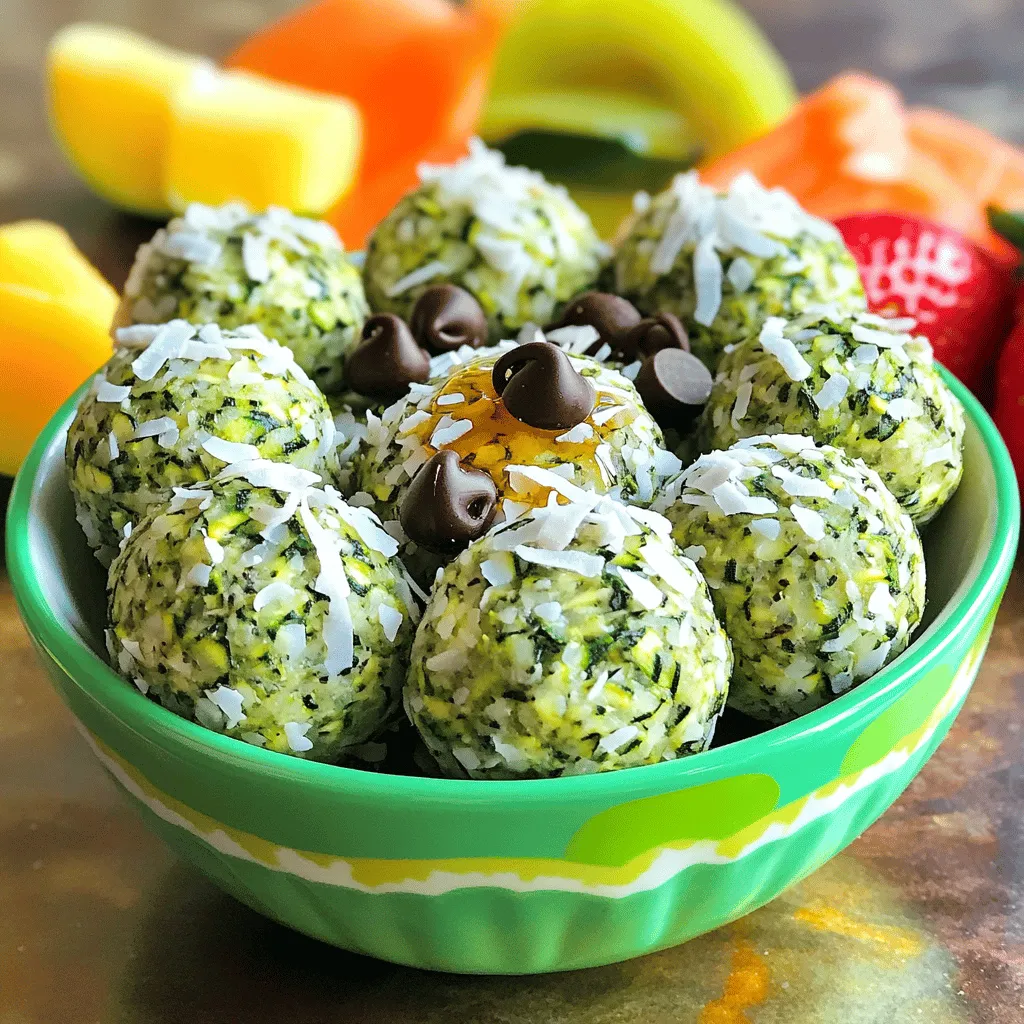
Looking for a quick and tasty snack that fits into your busy life? My No Bake Zucchini Energy Bites are not just easy to make; they’re packed with nutrients too! Combining zucchini, oats, and nut butter creates a satisfying treat that’s perfect for any time of day. Let’s dive into how you can whip up this delicious, healthy snack in no time!
Ingredients
List of Required Ingredients
– 1 cup grated zucchini, well-drained
– 1 cup rolled oats
– 1/2 cup almond butter (or any preferred nut butter)
– 1/4 cup honey or maple syrup
– 1/2 cup dark chocolate chips
– 1/4 cup shredded coconut
– 1 teaspoon vanilla extract
– 1/2 teaspoon ground cinnamon
– Pinch of salt
Healthy Benefits of Key Ingredients
What is the nutritional value of zucchini?
Zucchini is low in calories and high in vitamins. It has vitamin C and potassium. These nutrients help your body stay healthy and energized.
What are the benefits of oats in energy bites?
Oats give you energy and keep you full. They have fiber, which helps your digestion. Oats also provide vitamins and minerals that support your health.
What are the advantages of using nut butter?
Nut butter adds healthy fats and protein. This keeps you satisfied longer. It also adds a creamy texture and rich flavor to your energy bites. Nut butter is a great way to boost nutrition in snacks.
These ingredients work together to create tasty bites. You get energy, flavor, and health benefits in each bite.
Step-by-Step Instructions
Preparation of Zucchini
To make great energy bites, you need to drain the zucchini well. Start by grating one cup of zucchini. Then, place it in a clean kitchen towel. Wrap it tightly and squeeze hard to get rid of extra moisture. This step is key. If the zucchini is too wet, your bites will be soggy.
Mixing Ingredients
Next, grab a large mixing bowl. Add the well-drained zucchini, one cup of rolled oats, half a cup of almond butter, and a quarter cup of honey or maple syrup. Toss in half a cup of dark chocolate chips, a quarter cup of shredded coconut, one teaspoon of vanilla extract, half a teaspoon of ground cinnamon, and a pinch of salt. Mix everything together well. The blend should feel sticky and hold together well when pressed.
Shaping Energy Bites
Once mixed, it’s time to shape your bites. Use your hands to scoop about a tablespoon of the mixture. Roll it into a ball. Keep rolling until all the mixture is formed into bites. You want them to be about one inch in size. This size is perfect for snacking and easy to pop in your mouth.
Chilling Process
Now, refrigeration is important. Place the energy bites on a tray lined with parchment paper. Chill them in the fridge for at least 30 minutes. This helps them firm up and makes them easy to handle. The chilling time is vital for the perfect texture. After they are set, you can store them in an airtight container in the fridge. They will stay fresh and tasty for days.
Tips & Tricks
Common Mistakes to Avoid
– Over-squeezing zucchini: This may lead to dry energy bites. Remove just enough moisture to keep them moist yet firm.
– Insufficient mixing of ingredients: A well-mixed blend ensures even flavor and texture. Take your time and mix until all ingredients are combined.
Enhancing Flavor and Texture
– Suggestions for additional spices or additives: Try adding a pinch of nutmeg or a splash of almond extract for extra depth. You can also mix in some chopped nuts or dried fruit for a fun twist.
– How to adjust firmness if the mixture is too sticky: If your mix feels too sticky, add more oats or shredded coconut. This will help the bites hold their shape.
Serving Suggestions
– Pairing ideas with other healthy snacks: Serve your energy bites with fresh fruit or yogurt for a balanced snack. They also pair well with nuts or seeds for extra crunch.
– Creative ways to serve to guests: Arrange energy bites on a colorful platter. You can even use cupcake liners for individual servings. Add some dark chocolate drizzles on top for an elegant touch!
Variations
Alternative Ingredients
You can easily adapt the ingredients in these energy bites. If you need a nut-free option, try using sunflower seed butter. It works well and adds a nice flavor. You can also use tahini for a different twist. For sweeteners, you can swap honey or maple syrup with agave nectar or date syrup. Each sweetener offers a unique taste and sweetness level.
Flavor Combinations
Adding fruit or nuts can change the taste of your bites. Try adding dried cranberries or chopped apricots for a fruity touch. You can also mix in chopped walnuts or pecans for extra crunch. If you want to boost protein, add a scoop of your favorite protein powder. This makes the bites more filling and nutritious.
Seasonal Variations
You can modify these energy bites for different seasons. For summer, add fresh berries like blueberries or strawberries for a bright flavor. In winter, try adding spices like nutmeg or cloves for a cozy taste. For holidays, mix in festive ingredients like pumpkin puree or crushed peppermint. These small changes can make your energy bites perfect for any occasion.
Storage Info
Best Ways to Store Energy Bites
To keep your energy bites fresh, store them in an airtight container. This helps prevent moisture and keeps the bites from drying out. I recommend using glass containers as they seal well and do not absorb odors. Place the container in your fridge for the best results. The cold temperature helps maintain their texture and flavor.
Freezing Instructions
If you want to keep your energy bites for a longer time, freezing is a great option. To freeze, arrange the bites in a single layer on a baking sheet. Place the sheet in the freezer for about an hour. Once they are firm, transfer them to a freezer-safe bag or container. This method keeps them from sticking together. To thaw, just take out the desired number of bites and leave them at room temperature for about 15 minutes. They will be soft and ready to enjoy without losing their texture.
Shelf Life Expectations
In the fridge, your energy bites can stay fresh for about one week. Look for changes in color or smell as signs of spoilage. If they smell off or look dried out, it is best to toss them. Enjoying these bites fresh ensures you get the most flavor and nutrients. For long-term storage, consider freezing them as mentioned earlier.
FAQs
Can I use other nuts instead of almond butter?
Yes, you can. Nut butter adds creaminess and flavor. Here are some tasty alternatives:
– Peanut butter
– Cashew butter
– Sunflower seed butter (great for nut-free diets)
– Hazelnut butter
Each option brings a unique taste. Peanut butter gives a strong flavor, while cashew butter is mild and creamy.
How long do No Bake Zucchini Energy Bites last?
These energy bites stay fresh for up to one week in the fridge. Store them in an airtight container. They will keep their taste and texture well. If you want them to last longer, freeze them. They can last up to three months in the freezer. Just thaw in the fridge before eating.
Can I make these without honey or maple syrup?
You can use other sweeteners! Here are some options:
– Agave nectar
– Coconut sugar
– Stevia or monk fruit sweetener (for a low-calorie option)
Each sweetener will change the taste slightly. Honey and maple syrup add a rich flavor. The other sweeteners are good, but may not have the same depth. Adjust the amount based on your taste preferences.
This article covered the ingredients to make tasty No Bake Zucchini Energy Bites. We explored essential ingredients, their health benefits, and step-by-step instructions. I shared tips to avoid common mistakes and how to enhance flavor. You can also try different variations and learn the best ways to store these bites.
In conclusion, these energy bites are easy to make and fun to customize. Enjoy the healthy benefits while delighting your taste buds!
![- 1 cup grated zucchini, well-drained - 1 cup rolled oats - 1/2 cup almond butter (or any preferred nut butter) - 1/4 cup honey or maple syrup - 1/2 cup dark chocolate chips - 1/4 cup shredded coconut - 1 teaspoon vanilla extract - 1/2 teaspoon ground cinnamon - Pinch of salt What is the nutritional value of zucchini? Zucchini is low in calories and high in vitamins. It has vitamin C and potassium. These nutrients help your body stay healthy and energized. What are the benefits of oats in energy bites? Oats give you energy and keep you full. They have fiber, which helps your digestion. Oats also provide vitamins and minerals that support your health. What are the advantages of using nut butter? Nut butter adds healthy fats and protein. This keeps you satisfied longer. It also adds a creamy texture and rich flavor to your energy bites. Nut butter is a great way to boost nutrition in snacks. These ingredients work together to create tasty bites. You get energy, flavor, and health benefits in each bite. You can find the full recipe to make these energy bites in just a few simple steps. To make great energy bites, you need to drain the zucchini well. Start by grating one cup of zucchini. Then, place it in a clean kitchen towel. Wrap it tightly and squeeze hard to get rid of extra moisture. This step is key. If the zucchini is too wet, your bites will be soggy. Next, grab a large mixing bowl. Add the well-drained zucchini, one cup of rolled oats, half a cup of almond butter, and a quarter cup of honey or maple syrup. Toss in half a cup of dark chocolate chips, a quarter cup of shredded coconut, one teaspoon of vanilla extract, half a teaspoon of ground cinnamon, and a pinch of salt. Mix everything together well. The blend should feel sticky and hold together well when pressed. Once mixed, it’s time to shape your bites. Use your hands to scoop about a tablespoon of the mixture. Roll it into a ball. Keep rolling until all the mixture is formed into bites. You want them to be about one inch in size. This size is perfect for snacking and easy to pop in your mouth. Now, refrigeration is important. Place the energy bites on a tray lined with parchment paper. Chill them in the fridge for at least 30 minutes. This helps them firm up and makes them easy to handle. The chilling time is vital for the perfect texture. After they are set, you can store them in an airtight container in the fridge. They will stay fresh and tasty for days. For the complete recipe, make sure to check the [Full Recipe]. - Over-squeezing zucchini: This may lead to dry energy bites. Remove just enough moisture to keep them moist yet firm. - Insufficient mixing of ingredients: A well-mixed blend ensures even flavor and texture. Take your time and mix until all ingredients are combined. - Suggestions for additional spices or additives: Try adding a pinch of nutmeg or a splash of almond extract for extra depth. You can also mix in some chopped nuts or dried fruit for a fun twist. - How to adjust firmness if the mixture is too sticky: If your mix feels too sticky, add more oats or shredded coconut. This will help the bites hold their shape. - Pairing ideas with other healthy snacks: Serve your energy bites with fresh fruit or yogurt for a balanced snack. They also pair well with nuts or seeds for extra crunch. - Creative ways to serve to guests: Arrange energy bites on a colorful platter. You can even use cupcake liners for individual servings. Add some dark chocolate drizzles on top for an elegant touch! {{image_4}} You can easily adapt the ingredients in these energy bites. If you need a nut-free option, try using sunflower seed butter. It works well and adds a nice flavor. You can also use tahini for a different twist. For sweeteners, you can swap honey or maple syrup with agave nectar or date syrup. Each sweetener offers a unique taste and sweetness level. Adding fruit or nuts can change the taste of your bites. Try adding dried cranberries or chopped apricots for a fruity touch. You can also mix in chopped walnuts or pecans for extra crunch. If you want to boost protein, add a scoop of your favorite protein powder. This makes the bites more filling and nutritious. You can modify these energy bites for different seasons. For summer, add fresh berries like blueberries or strawberries for a bright flavor. In winter, try adding spices like nutmeg or cloves for a cozy taste. For holidays, mix in festive ingredients like pumpkin puree or crushed peppermint. These small changes can make your energy bites perfect for any occasion. To keep your energy bites fresh, store them in an airtight container. This helps prevent moisture and keeps the bites from drying out. I recommend using glass containers as they seal well and do not absorb odors. Place the container in your fridge for the best results. The cold temperature helps maintain their texture and flavor. If you want to keep your energy bites for a longer time, freezing is a great option. To freeze, arrange the bites in a single layer on a baking sheet. Place the sheet in the freezer for about an hour. Once they are firm, transfer them to a freezer-safe bag or container. This method keeps them from sticking together. To thaw, just take out the desired number of bites and leave them at room temperature for about 15 minutes. They will be soft and ready to enjoy without losing their texture. In the fridge, your energy bites can stay fresh for about one week. Look for changes in color or smell as signs of spoilage. If they smell off or look dried out, it is best to toss them. Enjoying these bites fresh ensures you get the most flavor and nutrients. For long-term storage, consider freezing them as mentioned earlier. Yes, you can. Nut butter adds creaminess and flavor. Here are some tasty alternatives: - Peanut butter - Cashew butter - Sunflower seed butter (great for nut-free diets) - Hazelnut butter Each option brings a unique taste. Peanut butter gives a strong flavor, while cashew butter is mild and creamy. These energy bites stay fresh for up to one week in the fridge. Store them in an airtight container. They will keep their taste and texture well. If you want them to last longer, freeze them. They can last up to three months in the freezer. Just thaw in the fridge before eating. You can use other sweeteners! Here are some options: - Agave nectar - Coconut sugar - Stevia or monk fruit sweetener (for a low-calorie option) Each sweetener will change the taste slightly. Honey and maple syrup add a rich flavor. The other sweeteners are good, but may not have the same depth. Adjust the amount based on your taste preferences. This article covered the ingredients to make tasty No Bake Zucchini Energy Bites. We explored essential ingredients, their health benefits, and step-by-step instructions. I shared tips to avoid common mistakes and how to enhance flavor. You can also try different variations and learn the best ways to store these bites. In conclusion, these energy bites are easy to make and fun to customize. Enjoy the healthy benefits while delighting your taste buds!](https://joymealplan.com/wp-content/uploads/2025/06/d3b2a771-bd72-42e5-81fa-55c54917d2aa-300x300.webp)

![- 3 cups unsweetened shredded coconut - 1/2 cup sweetened condensed milk - 2 large egg whites - 1/4 teaspoon vanilla extract - 1/4 teaspoon almond extract - Pinch of salt - 1/2 cup dark chocolate chips (optional) These ingredients create the base for your coconut macaroons. The unsweetened shredded coconut gives it that chewy texture. Sweetened condensed milk adds creaminess and sweetness, making each bite delightful. The egg whites are crucial for lightness and fluffiness. The extracts bring in a lovely depth of flavor. If you want to add a twist, dark chocolate chips can add a rich touch. - Gluten-free options: This recipe is naturally gluten-free, perfect for those with gluten issues. - Nut-free alternatives: You can enjoy these macaroons without nuts, making them safe for nut allergies. - Vegan substitutions: For a vegan version, try using aquafaba instead of egg whites and a plant-based condensed milk. These options help everyone enjoy this treat. Whether you have dietary needs or just want to try something new, there’s a way for you to make these coconut macaroons. You can find the full recipe above to get started! Start by preheating your oven to 325°F (160°C). This step is key to baking your macaroons evenly. While the oven heats, line a baking sheet with parchment paper. This helps prevent sticking and makes cleaning up easier later. In a large mixing bowl, combine 3 cups of unsweetened shredded coconut and 1/2 cup of sweetened condensed milk. Add 1/4 teaspoon of vanilla extract, 1/4 teaspoon of almond extract, and a pinch of salt. Stir well until everything is mixed together nicely. Now, in a separate bowl, take 2 large egg whites and whip them until they form stiff peaks. This is an important step because it gives your macaroons a light and airy texture. Next, gently fold the whipped egg whites into the coconut mixture. Use a spatula and be careful not to stir too hard. You want to keep the air in the egg whites. Fold until the egg whites are just mixed in; some lumps are okay. Using a tablespoon or a small cookie scoop, portion out the mixture onto the prepared baking sheet. Make sure to space each mound about 2 inches apart. This allows them to spread a bit while baking. Now, place the baking sheet in your preheated oven. Bake the macaroons for about 20 to 25 minutes. You want them to turn a lovely golden brown. Once done, take the tray out and let the macaroons cool for about 5 minutes on the sheet. This helps them firm up. After that, transfer them to a wire rack to cool completely. For those who love chocolate, you can melt some dark chocolate chips and dip the bottoms of each macaroon. Let the chocolate set on the parchment paper. Enjoy these delightful treats from the full recipe! To make great coconut macaroons, focus on the egg whites. Whipping them correctly is key. Use a clean bowl and beaters. Beat until stiff peaks form. This step adds lightness to the macaroons. Avoid overmixing when you fold them into the coconut mix. Gently combine the ingredients. Some lumps are okay. A light touch keeps the texture airy and nice. You can boost the flavor of your macaroons in fun ways. Try adding a pinch of cinnamon or nutmeg for warmth. These spices bring depth and richness. Another idea is to add citrus zest. Lemon or lime zest gives a fresh twist. Just a small amount can make a big difference in taste. How you serve your macaroons can impress your guests. Place them on a decorative platter to catch the eye. You can garnish with shredded coconut or fresh fruit. This adds color and flair. Arrange them in clusters for an inviting look. These small touches make your dessert stand out and look professional. For the full recipe, check out the Tropical Coconut Macaroons section. {{image_4}} You can make your macaroons even better by adding chocolate. Start by melting dark chocolate chips. Use a microwave-safe bowl. Heat in 30-second bursts, stirring after each. This helps prevent burning. Alternatively, you can use a double boiler for even heating. Once the chocolate is melted, dip the bottom of each macaroon in it. Make sure to coat it well. Place the dipped macaroons back on the parchment paper. Let the chocolate harden before serving. This adds a rich flavor that complements the coconut. Want to add some nuts? Almonds and pecans work great. Simply chop them finely and mix them in with the coconut. This adds a nice crunch to the soft macaroons. If you have nut allergies, you can skip the nuts. The recipe still tastes great without them. You can also use seeds like sunflower or pumpkin for a similar texture. Always be cautious and adjust based on your needs. There are endless flavor combinations for your macaroons. One tasty option is coconut-lime. Just add lime zest and a bit of lime juice to the coconut mixture. This gives a fresh twist. Another option is vanilla bean macaroons. Instead of vanilla extract, use the seeds from a vanilla bean. This adds a lovely fragrance and flavor. You can also mix in spices like cinnamon for a warm touch. Each variation brings a new taste to your delightful tropical treats. For the complete recipe, refer to the [Full Recipe]. Store your coconut macaroons at room temperature for the best taste. Keep them in a cool, dry place. Use an airtight container to keep them fresh. This helps avoid moisture and keeps them soft. If you live in a warm climate, consider refrigerating them. The cold can help them last longer. However, be aware that refrigeration may change their texture slightly. To freeze macaroons, let them cool completely first. Once cooled, place them in a single layer on a baking sheet. Freeze for about one hour. This step prevents them from sticking together. After they are firm, transfer them to a freezer-safe bag or container. When you want to enjoy a macaroon, take it out of the freezer. Let it thaw in the fridge overnight. For a quick thaw, leave it at room temperature for a few hours. Coconut macaroons can last up to one week at room temperature. If stored in the fridge, they can last for about two weeks. Check for signs of spoilage before eating. Look for changes in texture, color, or a sour smell. If you see any of these, it’s best to toss them out. Yes, you can make coconut macaroons without egg whites. Instead, use ground flaxseed or chia seeds mixed with water. This mixture acts as a binder. For every egg white, mix 1 tablespoon of ground flaxseed or chia seeds with 2.5 tablespoons of water. Let it sit for about 10 minutes to thicken. This will give your macaroons a nice texture while keeping them egg-free. To keep your macaroons from falling apart, mix the ingredients gently. Overmixing can cause them to break. When you fold in the egg whites, do it slowly and carefully. This helps maintain air and keeps the macaroons light. Make sure to space them well on the baking sheet. This allows them to bake evenly. A good tip is to form them tightly with your hands. This will help them hold their shape during baking. Leftover shredded coconut can be used in many ways. You can add it to smoothies for extra texture. It works well in oatmeal or yogurt for a tropical twist. Consider making coconut pancakes or muffins. You can also toast it for a crunchy topping on salads or desserts. If you enjoy baking, use it in granola or energy balls. This way, you won't waste any coconut, and you'll enjoy its rich flavor in other dishes. You now know how to make coconut macaroons from scratch. We covered the essential ingredients, step-by-step instructions, and storage tips. You learned about variations, dietary options, and how to enhance flavors. Give these tasty treats a try! They are fun to make and share. Don’t forget to experiment with flavors or coatings. Enjoy your baking, and let your creativity shine!](https://joymealplan.com/wp-content/uploads/2025/06/e4df15b8-ca64-4a89-a5eb-245e13ac6d80-768x768.webp)

![To make S’mores Cookie Bars, gather these key ingredients: - 1 cup unsalted butter, softened - 1 cup packed brown sugar - 1/2 cup granulated sugar - 2 large eggs - 1 teaspoon pure vanilla extract - 2 1/4 cups all-purpose flour - 1 teaspoon baking soda - 1/2 teaspoon salt - 1 cup semi-sweet or milk chocolate chips - 1 cup mini marshmallows - 3/4 cup crushed graham crackers - Additional chocolate chips and mini marshmallows for topping If you need swaps, here are a few ideas: - Use margarine instead of butter if needed. - Coconut sugar can replace brown sugar for a unique taste. - For a dairy-free option, try a plant-based butter and dairy-free chocolate chips. - You can also use large marshmallows cut into smaller pieces if mini ones are not available. When choosing your ingredients, consider these tips: - Select fresh butter for the best flavor. - Look for chocolate chips with a high cocoa content; they taste richer. - Check for freshness on your baking soda and flour. - Choose mini marshmallows that are soft and fluffy for the best texture. - For crushed graham crackers, buy a brand with simple, natural ingredients for the best taste. These ingredient insights will help you create the best S’mores Cookie Bars. Happy baking! 1. Preheat your oven to 350°F (175°C). 2. Prepare a 9x13 inch baking pan. You can grease it or line it with parchment paper for easy removal. 3. In a large bowl, cream 1 cup of softened butter, 1 cup of packed brown sugar, and 1/2 cup of granulated sugar. Beat until light and fluffy. 4. Add 2 large eggs, one at a time, and mix well after each addition. Stir in 1 teaspoon of pure vanilla extract. 5. In another bowl, mix together 2 1/4 cups of all-purpose flour, 1 teaspoon of baking soda, and 1/2 teaspoon of salt. 6. Gradually add the dry mix to the wet mix, stirring gently. Be careful not to overmix. 7. Fold in 1 cup of chocolate chips, 1 cup of mini marshmallows, and 3/4 cup of crushed graham crackers. Make sure they are evenly spread in the dough. 8. Take half of the cookie dough and spread it in the bottom of the pan. Press it down firmly. 9. Add a layer of chocolate chips and mini marshmallows over the dough. This will be your tasty filling. 10. With the remaining dough, dollop it over the filling. Gently spread it out, leaving some gaps for the marshmallows to peek through. 11. Top with extra chocolate chips and mini marshmallows. 12. Bake in the preheated oven for 25-30 minutes. Look for golden edges and a set center. 13. Once baked, let the bars cool in the pan for about 10 minutes. 14. Transfer the bars to a cutting board. Slice them into squares. 15. For the best experience, serve warm for a gooey bite or let them cool for firmer bars. You can even dust them with crushed graham crackers or serve with ice cream. This is a fun and easy way to enjoy S’mores in a cookie bar form. For the full recipe, check out the details above! To get the best texture for your S’mores cookie bars, focus on creaming the butter and sugars well. This step adds air to the dough, making it light. Don't overmix when adding the flour; this keeps the bars soft. Also, make sure to let your bars cool in the pan for a bit. This helps them set perfectly. One common mistake is overbaking. Keep an eye on the timer. The edges should look golden, but the center can be soft. Another mistake is not measuring the ingredients correctly. Use a kitchen scale when you can. Lastly, avoid pressing the dough too hard into the pan. You want a light touch for a better rise. To boost the flavor in your S’mores cookie bars, consider using dark chocolate instead of semi-sweet. It adds a richer taste. You can also mix in some toasted nuts for crunch. If you love a bit of spice, a pinch of cinnamon works wonders. Lastly, consider adding a dash of sea salt on top before baking. It enhances the sweetness and richness beautifully. For the full recipe, click here: [Full Recipe]. {{image_4}} You can elevate your S’mores cookie bars with gourmet ingredients. Try using high-quality chocolate, like dark chocolate or sea salt caramel chocolate. This gives a rich flavor that takes these bars to a new level. You can also add toasted coconut for a tropical twist. Another great idea is to sprinkle flaky sea salt on top right before serving. This adds a nice contrast to the sweetness. If you need a gluten-free option, you can easily adapt this recipe. Use gluten-free flour blends that measure cup-for-cup like regular flour. Make sure to check that your chocolate chips and graham crackers are also gluten-free. This way, everyone can enjoy these tasty bars without worry. For a fun twist, add unique flavors to your S’mores cookie bars. Swirl in Nutella or peanut butter into the dough before baking. You can also mix in chopped nuts for extra crunch. Try adding crushed peppermint candies for a festive touch during the holidays. The possibilities are endless, and you can customize these bars to fit any taste! For the complete recipe, check out [Full Recipe]. To keep your S’mores Cookie Bars fresh, store them in an airtight container. This helps avoid drying out. Place parchment paper between layers to prevent sticking. They will stay good at room temperature for about four days. If you want to keep them longer, refrigeration is a great option. Just remember to bring them to room temperature before serving for the best flavor. You can freeze S’mores Cookie Bars for up to three months. First, let them cool completely. Then, cut them into squares. Wrap each square in plastic wrap tightly. Place the wrapped bars in a freezer bag or container. Label it with the date. When you’re ready to enjoy, thaw them overnight in the fridge or for a few hours at room temperature. To reheat S’mores Cookie Bars, preheat your oven to 350°F (175°C). Place the bars on a baking sheet. Cover them loosely with foil to prevent burning. Heat for about 10 minutes or until warm. This will help restore their gooey texture and melt the chocolate again. Enjoy them warm for the best experience! For the full recipe, check out the recipe section above. S’mores cookie bars last about five days at room temperature. Store them in an airtight container. This keeps them fresh and soft. You can also refrigerate them for up to a week. Just remember to bring them to room temperature for the best taste. Yes, you can make these bars ahead of time. They are great for meal prep or parties. Bake and cool them completely. Then, cut them into squares and store them in an airtight container. You can also freeze them for up to three months. Just thaw them before serving. If you don't have mini marshmallows, you can use large marshmallows. Cut them into smaller pieces to fit. Alternatively, try using marshmallow fluff for a gooey texture. You can also skip marshmallows altogether and use caramel instead. This adds a different kind of sweetness. For the full recipe, visit the recipe section above. In this post, we covered how to make delicious s’mores cookie bars. We looked at the key ingredients and their best substitutes. You learned step-by-step how to prepare, bake, and serve these treats. We shared tips for perfect texture and flavor. You can also explore fun variations for added taste. Remember to store them well for freshness. With these tips, you're ready to create a tasty batch. Enjoy making and sharing your s’mores cookie bars!](https://joymealplan.com/wp-content/uploads/2025/07/947e80de-fe9c-4bdc-b9c7-cc0f2244d142-768x768.webp)