
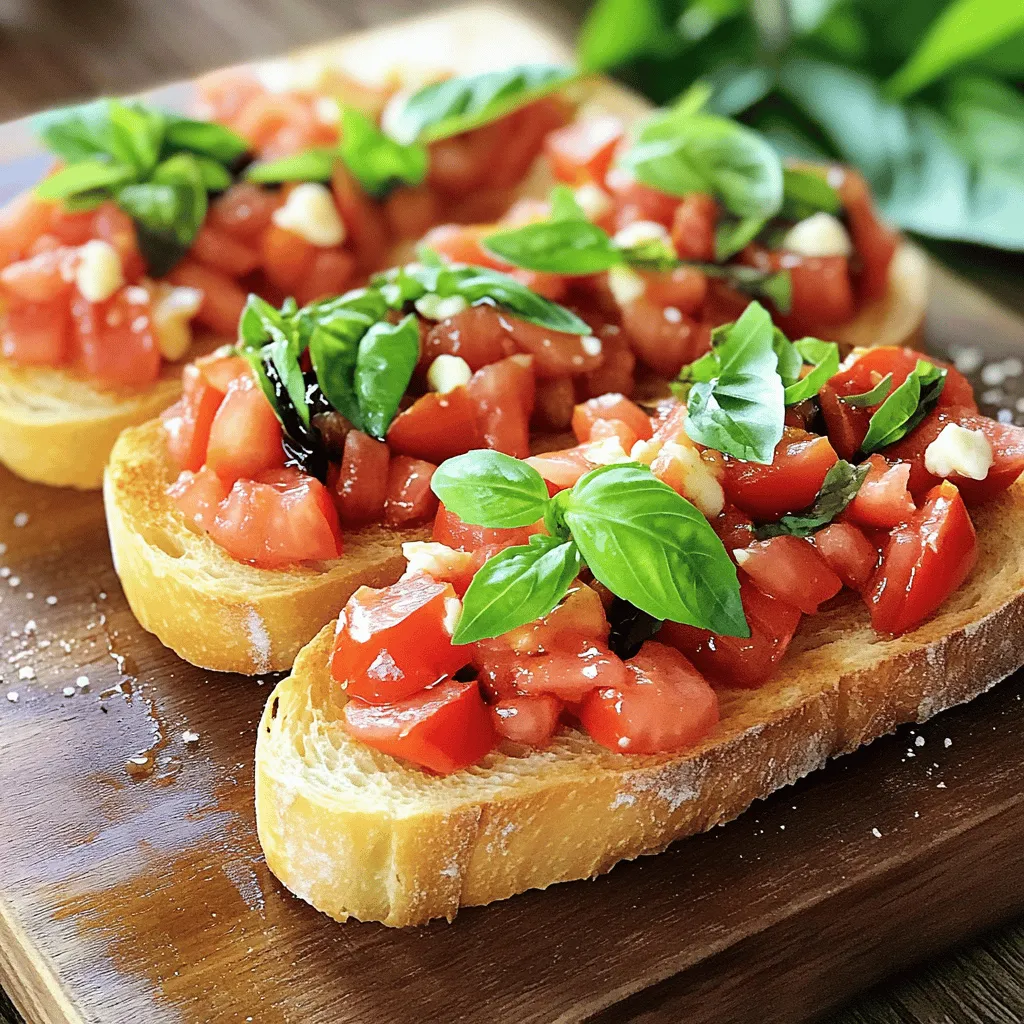
Fresh Tomato Basil Bruschetta Flavorful Appetizer Delight

If you’re looking for the perfect appetizer, Fresh Tomato Basil Bruschetta is a must-try! This delightful dish bursts with fresh flavors that will impress your guests. Made with ripe tomatoes, fragrant basil, and crunchy toasted bread, it’s easy to prepare and even easier to love. Follow my steps, and you’ll serve a tasty treat that everyone will enjoy. Let’s dive into the ingredients and create this classic Italian delight together!
Ingredients
Required Ingredients
– 4 ripe tomatoes, finely diced
– 1 cup fresh basil leaves, roughly chopped
– 2 cloves garlic, finely minced
– 1 tablespoon balsamic vinegar
– 3 tablespoons extra-virgin olive oil
– Salt and freshly ground pepper, to taste
– 1 French baguette or ciabatta loaf, sliced into 1/2-inch pieces
– Optional: Fresh mozzarella cheese, diced into small cubes
To create my fresh tomato basil bruschetta, I focus on using the best ingredients. Ripe tomatoes bring sweetness and color. Fresh basil adds a fragrant, vibrant touch. Garlic gives a nice kick, while balsamic vinegar adds depth. The richness of extra-virgin olive oil ties it all together.
I also love to include a crusty baguette or ciabatta. Toasting these slices gives a perfect crunch. You can even add fresh mozzarella for a creamy finish. Each ingredient plays a role in making this dish special.
Suggested Tools
– Medium mixing bowl
– Baking sheet
– Oven
You will need a few simple tools to make this recipe easy. A medium mixing bowl helps combine all the fresh ingredients. A baking sheet is great for toasting the bread evenly. Finally, your oven preheats to create that perfect crunch.
When you gather all these items, you set the stage for a delightful appetizer that everyone will enjoy.
Step-by-Step Instructions
Preparing the Tomato Mixture
First, take your ripe tomatoes and finely dice them. Next, chop your fresh basil leaves and mince the garlic. In a medium bowl, combine the diced tomatoes, basil, garlic, balsamic vinegar, and olive oil. Stir gently to mix everything well. Now, add salt and pepper to taste. Let the mixture sit for about 15 minutes. This resting time allows the flavors to blend beautifully.
Preparing and Toasting the Bread
Before you toast the bread, preheat your oven to 400°F (200°C). While it heats up, arrange your sliced baguette or ciabatta on a baking sheet in a single layer. Drizzle a bit of olive oil over each slice. This adds flavor and helps it toast nicely. Now, place the baking sheet in the oven. Toast for 5 to 7 minutes until the bread is golden and crispy. Keep an eye on it to avoid burning!
Assembling the Bruschetta
Once your bread is toasted, take it out and let it cool for a minute. Spoon the tasty tomato mixture onto each slice. Make sure to add some of the juices; they are full of flavor! If you want a creamy touch, sprinkle some diced fresh mozzarella on top. Serve the bruschetta right away for the best taste. Enjoy this delightful appetizer!
Tips & Tricks
Perfecting the Bruschetta
– Use ripe, seasonal tomatoes for optimal flavor. They taste sweeter and juicier.
– Allow the tomato mixture to rest for at least 15 minutes. This helps the flavors blend well.
Serving Suggestions
– Serve on a wooden board or chic platter. This adds a rustic touch.
– Garnish with whole basil leaves for presentation. It makes the dish look vibrant and fresh.
Common Mistakes to Avoid
– Over-toasting the bread can make it too hard. Aim for a light golden color.
– Skipping the resting period for the tomato mixture means missing out on great flavor. Give it time to shine.Enjoy your cooking!
Variations
Cheese Variations
You can add different cheeses to your bruschetta. Burrata gives a creamy taste. Feta adds a salty touch. Both options change the flavor and make it unique. You can try them to see which one you like best.
Flavor Enhancements
Want to make your bruschetta even better? Add some red onion. It brings a nice crunch and a sweet taste. You can also drizzle balsamic reduction on top. This adds depth and a hint of sweetness. These simple changes can elevate your dish.
Gluten-Free Options
If you need gluten-free options, don’t worry! You can use gluten-free bread instead. Look for a good brand that toasts well. This way, everyone can enjoy this tasty appetizer. You won’t lose any flavor by switching the bread.
Storage Info
How to Store Leftovers
To keep your bruschetta fresh, refrigerate the tomato mixture. Use an airtight container to prevent air from getting in. This helps keep the flavors intact. If you have leftover bread, toast it separately. Storing the tomato mix and bread apart keeps everything fresh.
Freezing Considerations
You can freeze the tomato mixture if you want to save it for later. First, place it in a freezer-safe container. Leave some space at the top, as the mixture may expand. When ready to use, thaw it in the fridge overnight. This way, it keeps a nice texture.
Shelf Life
The tomato mixture lasts about 3 days in the fridge. The bread stays good for 1 to 2 days if stored well. Always check for any signs of spoilage before eating. Keeping your ingredients fresh ensures you enjoy your bruschetta to the fullest.
FAQs
What type of tomatoes are best for bruschetta?
The best tomatoes for bruschetta are ripe and juicy. I recommend using Roma tomatoes. They have fewer seeds and a thicker flesh, which makes them ideal for this dish. You can also use heirloom tomatoes. They offer unique flavors and colors. For the best taste, choose tomatoes that are in season. Freshness matters!
Can bruschetta be made ahead of time?
Bruschetta is best enjoyed fresh. However, you can prep some parts ahead. Make the tomato mixture a few hours before serving. Just keep it in the fridge. Let it sit at room temperature for about 15 minutes before serving. This helps the flavors blend. Toast the bread right before serving. This will keep it crispy and warm.
How can I make bruschetta vegan?
To make bruschetta vegan, skip the mozzarella cheese. Instead, try adding avocado or a sprinkle of nutritional yeast. These options give a creamy texture without dairy. You can also add more herbs for flavor. Consider using vegan-friendly bread to keep the whole dish plant-based. Enjoy your tasty, fresh appetizer!
Bruschetta is a simple and tasty dish that anyone can make. You need ripe tomatoes, fresh basil, garlic, and a few other key ingredients. Remember to let your tomato mix sit for the best flavor. Whether you add mozzarella or other cheeses, the taste will shine. Avoid common mistakes like over-toasting the bread, and treat your guests to this dish on a stylish platter. With these tips, your bruschetta will impress. Enjoy creating and sharing this delightful offering!

![To make Pickle Ranch Snack Crackers, you need the following ingredients: - 1 cup all-purpose flour - 1/2 cup cornmeal - 1 teaspoon baking powder - 1/2 teaspoon baking soda - 1/2 teaspoon salt - 1 tablespoon ranch seasoning mix - 1/4 cup dill pickle juice - 1/4 cup melted butter (cooled slightly) - 1/2 cup shredded cheddar cheese - 1/4 cup dill pickle slices (finely chopped) You can swap some ingredients if needed. For the all-purpose flour, try using whole wheat flour for added fiber. If you prefer a gluten-free option, use a gluten-free flour blend. Instead of cornmeal, you can use fine breadcrumbs for a different texture. If you want to skip the ranch seasoning, use herbs like dill, garlic powder, or onion powder to create your own flavor. Each serving, which is about two crackers, provides: - Calories: 120 - Total Fat: 8g - Saturated Fat: 4g - Cholesterol: 20mg - Sodium: 150mg - Carbohydrates: 10g - Fiber: 1g - Sugar: 1g - Protein: 3g These crackers are tasty and balanced, making them a fun snack for any occasion. You can enjoy them without guilt! 1. Preheat your oven to 350°F (175°C). This is key for baking. 2. Line a baking sheet with parchment paper. This helps with easy cleanup. 3. In a large bowl, mix the flour, cornmeal, baking powder, baking soda, salt, and ranch seasoning. Use a whisk to mix well. 4. Slowly add the dill pickle juice and melted butter. Stir until a dough forms. 5. Fold in the cheddar cheese and chopped dill pickles. Make sure they spread evenly in the dough. 6. Roll the dough into small balls, about the size of a quarter. Place them on the sheet, leaving space between them. 1. Flatten each ball gently with a fork or your fingers. Aim for even thickness. 2. Bake the crackers for 12-15 minutes. Watch closely for a light golden brown color. 1. Once baked, let the crackers cool on the sheet for a few minutes. 2. Transfer them to a wire rack to cool completely. This makes them crispier. 3. For a fun serving idea, arrange them on a colorful platter. Add fresh dill sprigs or serve with ranch dip for a tasty snack. Enjoy your Pickle Ranch Snack Crackers! You can find the full recipe above for more details. To get the right texture for your Pickle Ranch Snack Crackers, focus on mixing. Combine the dry ingredients well to avoid lumps. When adding the wet ingredients, mix just until combined. Overmixing can make your crackers tough. Roll the dough into small balls. Keep them uniform in size to ensure even baking. Flatten them gently for a crispier edge. To boost flavor, consider adding more ranch seasoning. You could also try garlic powder or onion powder. A pinch of cayenne can add a nice kick if you like spice. Adding herbs like dill or parsley can enhance the pickle flavor. For extra richness, sprinkle some grated Parmesan cheese on top before baking. One common mistake is using hot melted butter. It can change the dough's texture. Be careful not to skip the cooling step after baking. Allowing them to cool helps the crackers firm up. Also, don’t crowd the baking sheet. If they are too close, they may stick together. Check them often while baking to avoid burning. For a full recipe, refer to the complete instructions. {{image_4}} You can add fun twists to Pickle Ranch Snack Crackers. Want some heat? Try adding cayenne pepper or crushed red pepper flakes. Just a pinch will do! For a cheesy version, swap in pepper jack cheese instead of cheddar. Mixing in some garlic powder can also boost flavor. These tweaks keep your snack game exciting! If you need a gluten-free option, use gluten-free all-purpose flour. It works well in this recipe. You can also try almond flour for a nutty taste. Make sure your ranch seasoning is gluten-free too. This way, everyone can enjoy these tasty crackers without worry. These crackers shine when paired with dips. Creamy ranch dip is a favorite, but you can also serve them with hummus or guacamole. For a fun party snack, arrange them on a platter with fresh veggies. They also taste great with cheese slices or charcuterie. Each bite will surprise your guests! Explore the [Full Recipe] to start making your own delicious Pickle Ranch Snack Crackers today! Store your Pickle Ranch Snack Crackers in an airtight container. This keeps them fresh and crisp. You can use a glass jar or a plastic container. Make sure they are completely cool before sealing. If you live in a humid area, consider adding a small bag of rice to absorb moisture. When stored properly, these crackers can last up to one week. They taste best in the first few days. After that, they may lose some crunch. If you want to keep them longer, you can freeze them. Just place them in a freezer-safe bag or container. If your crackers lose their crunch, you can reheat them. Preheat your oven to 300°F (150°C). Spread the crackers on a baking sheet in a single layer. Heat them for about 5-7 minutes. Check often to avoid burning. Let them cool before enjoying again. For the full recipe, refer to the earlier section. Pickle Ranch Snack Crackers are tasty, crunchy treats. They mix the flavors of dill pickles and ranch dressing. These snacks are perfect for parties or game nights. They are easy to make at home with simple ingredients. To make Pickle Ranch Snack Crackers at home, follow these steps: 1. Preheat your oven to 350°F (175°C). 2. Line a baking sheet with parchment paper. 3. Mix flour, cornmeal, baking powder, baking soda, salt, and ranch seasoning in a bowl. 4. Add dill pickle juice and cooled melted butter. Stir to form a dough. 5. Fold in cheddar cheese and chopped pickles. 6. Roll the dough into small balls. Flatten each ball on the baking sheet. 7. Bake for 12-15 minutes until golden. 8. Let them cool on a wire rack. For the full recipe, check the details provided above. Pickle Ranch Snack Crackers can be a fun snack. They contain some healthy ingredients like cheese and pickles. However, they also have butter and flour, which add calories. Enjoy them in moderation as part of a balanced diet. You can find Pickle Ranch Snack Crackers at many grocery stores. Look in the snack aisle or near the crackers. Some stores may also sell them online. Check popular websites for easy shopping options. These crackers pair well with many dips and spreads. Serve them with ranch dressing, creamy dip, or hummus. You can also enjoy them with cheese or fresh veggies. They make a great snack for any gathering. This blog post covers everything about Pickle Ranch Snack Crackers. We discussed the key ingredients, including substitutions, and shared helpful nutritional data. You learned precise steps for preparation and baking, along with cooling tips for best results. I shared easy tricks to get the perfect texture and flavor. You now know various tasty variations to try and how to store them properly. Finally, you have answers to common questions about these delicious snacks. Enjoy making and sharing your own Pickle Ranch Snack Crackers!](https://joymealplan.com/wp-content/uploads/2025/07/696f27ca-dd07-4295-82fd-de9c637e8141-768x768.webp)
![- Tortilla chips - Black beans - Corn kernels - Cherry tomatoes - Avocado - Cheddar cheese (or dairy-free alternative) - Pickled jalapeños - Red onion - Fresh cilantro - Olive oil - Ground cumin - Smoked paprika - Salt and pepper - Optional toppings: Sour cream or Greek yogurt, lime wedges To make loaded veggie nachos, gather fresh and flavorful ingredients. I love using crispy tortilla chips as the base. They hold all the toppings without getting soggy. Black beans add protein and texture. Rinsing and draining them keeps the flavors bright. Corn kernels bring sweetness and crunch. I often use fresh corn when it’s in season, but canned works well too. Next, halved cherry tomatoes burst with flavor. Diced avocado brings creaminess. I prefer ripe avocados for the best taste. Cheddar cheese is a must for gooey goodness. You can use a dairy-free version if needed. Pickled jalapeños give a nice kick, so add as many as you like. Red onion adds a sharp taste and crunch. Fresh cilantro brings brightness. I love the fresh herb flavor it adds. For the dressing, use olive oil, ground cumin, and smoked paprika. They bring warmth and depth. Lastly, don’t forget salt and pepper to enhance all the flavors. You can serve these nachos with optional toppings like sour cream or Greek yogurt. Lime wedges add a zesty finish. For the full recipe, check out the Ultimate Loaded Veggie Nachos. Start by preheating your oven to 350°F (175°C). This temperature helps the cheese melt just right. While the oven warms up, grab a mixing bowl for the veggies. Combine 1 cup of black beans, 1 cup of corn, 1 cup of halved cherry tomatoes, 1 ripe diced avocado, and 1/4 cup of chopped red onion. Drizzle 1 tablespoon of olive oil over this mix. Sprinkle in 1 teaspoon of ground cumin, 1 teaspoon of smoked paprika, and add salt and pepper to taste. Gently toss to blend the flavors. Now take a large baking sheet. Spread an even layer of tortilla chips across it. Make sure they are not crowded. This helps the chips stay crisp. Next, generously spoon the veggie mixture over the chips. Try to cover as many chips as you can. This way, each bite is packed with flavor. Sprinkle 1 cup of shredded cheddar cheese evenly over the veggie-covered chips. If you like spice, add pickled jalapeños on top. Place the baking sheet in your preheated oven. Bake for about 10 to 15 minutes. Watch closely until the cheese is melted and bubbly, but not burnt. Once baked, carefully take the nachos out of the oven. Garnish with 1/4 cup of freshly chopped cilantro. Serve them with lime wedges on the side. For a creamy touch, add sour cream or Greek yogurt. These extra touches make every bite a treat. Serve them on a large platter or in bowls. Enjoy this savory delight with friends or family! For the full recipe, check the detailed instructions above. Choose the right cheese for your nachos. I love using cheddar, but you can try Monterey Jack or a dairy-free alternative. These cheeses melt well and add rich flavor. For the best texture, shred your cheese fresh from the block. Pre-shredded cheese often has anti-clumping agents that can affect melting. When baking, keep an eye on the nachos. You want the cheese to bubble and slightly brown, which usually takes 10 to 15 minutes at 350°F. To kick up the flavor, think about adding spices. A pinch of chili powder or a dash of hot sauce can do wonders. If you enjoy tang, drizzle some lime juice over the nachos before serving. Fresh herbs like cilantro or green onions can also brighten the dish. Chopped jalapeños, fresh or pickled, add heat and flavor. Experiment with different combinations to find your favorite mix. I often serve nachos on a large platter, letting everyone dig in. For individual servings, use small bowls. This makes for a fun, personal touch. Pair your nachos with drinks like soda, beer, or a margarita for a complete experience. Dips like guacamole or salsa work great on the side too. They add extra flavor and keep the meal exciting. Remember to keep lime wedges handy for a fresh burst of flavor. For the complete recipe, check out the [Full Recipe]. {{image_4}} You can easily make loaded veggie nachos vegan. First, swap the cheddar cheese for a dairy-free cheese. Look for brands made from nuts or soy. These options melt well and taste great. For extra vegan toppings, try using cashew cream instead of sour cream. You can also add sliced black olives, diced bell peppers, or fresh spinach. These ingredients boost flavor and nutrients. To make gluten-free nachos, choose tortilla chips marked gluten-free. Many brands offer this option. Always check the label to ensure safety. You can also use other bases like baked sweet potatoes or zucchini slices. These alternatives add a unique twist and keep things healthy. Get creative with your toppings! You can add other veggies like mushrooms, bell peppers, or even roasted zucchini. For proteins, consider topping with lentils, chickpeas, or tofu. Specialty toppings can add unique flavors. Try fresh herbs like basil or mint, or drizzle with hot sauce for a kick. You can also scatter some pomegranate seeds for a sweet touch. After enjoying your loaded veggie nachos, store any leftovers properly. This helps maintain their taste and texture. Start by letting the nachos cool down. Place them in an airtight container. If you have extra toppings, like sour cream or avocado, store those separately. Use a small bowl or a bag to keep them fresh. Refrigerate the container within two hours. The nachos will stay good for about three days. To reheat your nachos, use the oven for best results. Preheat it to 350°F (175°C). Spread the nachos on a baking sheet in a single layer. Heat them for about 10 minutes. This helps revive their crunch. If you’re in a hurry, the microwave works too. Use a microwave-safe plate and heat for 30 seconds at a time. Keep an eye on them to avoid sogginess. Enjoy your nachos as if they were just made! Making homemade tortilla chips is easy and fun! Start with corn tortillas. Cut each tortilla into six triangles. Heat oil in a pan over medium heat. When the oil is hot, add a few triangles. Fry them until they turn golden brown. Remove them and place them on paper towels to drain excess oil. Sprinkle with salt while they are hot. Enjoy your fresh chips with loaded veggie nachos! Yes, you can prepare some parts in advance. You can chop the veggies and mix them a few hours before cooking. Store the veggie mixture in the fridge. However, I recommend adding the chips and cheese just before baking. This keeps the chips crispy and delicious! You can get creative with toppings! Try adding: - Sliced black olives - Diced bell peppers - Sliced radishes - Fresh spinach - Grilled chicken or beef - Different types of cheese like pepper jack or feta These options add fun flavors and textures to your nachos. Freezing nachos is tricky. I do not recommend freezing fully assembled nachos. The chips become soggy when thawed. However, you can freeze the veggie mixture and cheese separately. When you’re ready to eat, simply bake fresh chips and top them with the thawed mixture. It’s a great way to enjoy nachos anytime! For the full recipe, check out the Ultimate Loaded Veggie Nachos. In this blog post, I covered how to make delicious nachos, highlighting key ingredients and simple steps. You learned about assembling layers and baking for the best results. I shared tips for perfect cheese melting, flavor boosts, and customizable options to fit your needs. Don't forget storage advice and reheating methods to enjoy leftovers. Nachos are easy to make and adapt, so get creative and enjoy! Your nacho journey starts here, and I hope you relish every bite.](https://joymealplan.com/wp-content/uploads/2025/06/0185d0b5-b46a-4930-af15-477191a5be30-768x768.webp)