
Easy Chicken Fajitas Flavorful and Quick Dinner Recipe
![When making easy chicken fajitas, you need fresh and simple ingredients to bring out the best flavors. Here’s the detailed list: - 2 boneless, skinless chicken breasts, thinly sliced into strips - 1 red bell pepper, sliced into thin strips - 1 green bell pepper, sliced into thin strips - 1 medium onion, sliced into thin rings - 3 cloves garlic, minced - 2 tablespoons olive oil - 1 teaspoon chili powder - 1 teaspoon ground cumin - 1 teaspoon smoked paprika - Salt and freshly ground black pepper, to taste - Juice of 1 fresh lime - Flour tortillas, for serving - Fresh cilantro, chopped, for garnish - Sour cream and salsa, for serving (optional) - You can swap chicken for shrimp or beef if you prefer. - Use corn tortillas if you want a gluten-free option. - Lemon juice can replace lime juice for a different zing. - Look for high-quality chili powder and smoked paprika for a rich taste. - I trust McCormick and Penzeys for spices that boost flavor. - Fresh herbs like cilantro add a nice touch, so always use fresh when possible. For more details on how to prepare your ingredients and cook this dish, check the Full Recipe. To start, prepare your chicken and veggies. Take the two boneless, skinless chicken breasts. Slice them into thin strips. Next, grab one red bell pepper, one green bell pepper, and one medium onion. Slice these into thin strips and rings, respectively. Now, let’s marinate the chicken. In a large bowl, mix the sliced chicken with minced garlic, olive oil, chili powder, cumin, smoked paprika, lime juice, salt, and pepper. Toss everything well. Make sure the chicken is coated evenly with the spices. Let the chicken marinate for at least 15 minutes. You can refrigerate it for up to 2 hours for more flavor. When you are ready to cook, heat a large skillet on medium-high heat. Add the marinated chicken to the skillet. Cook it for about 5 to 7 minutes. Stir occasionally until it reaches an internal temperature of 165°F (75°C). After the chicken is cooked, add the sliced peppers and onion to the skillet. Sauté the mixture for another 5 to 7 minutes. Cook until the veggies are tender but still crunchy. Taste and adjust the seasoning with salt and pepper if needed. Now, let's assemble the fajitas. Start with warm flour tortillas. Place a generous portion of the chicken and vegetable mix in the center of each tortilla. For a lovely presentation, serve the fajitas on a bright platter. Stack the tortillas neatly on the side. Arrange toppings like sour cream and salsa in small bowls. This makes it colorful and inviting. When serving, don’t forget the garnishes. Sprinkle freshly chopped cilantro on top. This adds a fresh touch and enhances the flavor. Enjoy your easy chicken fajitas! For the full recipe, check out [Full Recipe]. To make your chicken fajitas burst with flavor, try these cooking tips: - Use a cast-iron skillet. This tool holds heat well and gives a nice sear to the chicken. - Preheat your pan. A hot pan helps to cook the chicken fast and keeps it juicy. - Don’t overcrowd the pan. Cook in batches if needed. This helps the chicken brown instead of steam. - Add a splash of broth. If the chicken seems dry, add a little chicken broth while cooking. Pair your chicken fajitas with these tasty sides: - Mexican rice. It adds a nice, filling touch. - Refried beans. They give a creamy texture and flavor. - Guacamole. This creamy dip adds richness to the meal. For extra flavor, consider these enhancers: - Squeeze fresh lime juice. It brightens the dish and adds a zesty kick. - Top with sliced avocado. This adds creaminess and balances the spices. - Drizzle with hot sauce. It brings heat and excitement to each bite. Explore the [Full Recipe] for detailed steps on creating this quick dinner. {{image_4}} You can change up the protein in your fajitas. Try shrimp or beef for a new twist. You can even use tofu or tempeh for a plant-based option. Each protein brings a different flavor, so have fun with it. For seasoning, you can mix things up too. Use taco seasoning for a spicier kick. You might enjoy adding lime zest for a fresh taste. Try using garlic powder or onion powder for extra flavor. Each option can make your dish unique. If you want to keep it low-carb, use lettuce wraps instead of tortillas. It gives you a crunchy bite and cuts down on carbs. You can also find low-carb tortillas at the store. For gluten-free options, use corn tortillas. They taste great and work well with the filling. If you're dairy-free, skip the sour cream and use avocado instead. It adds creaminess and flavor without the dairy. To keep your chicken fajitas fresh, store them in an airtight container. Make sure to separate the chicken from the tortillas and toppings. This helps keep everything tasty. You can refrigerate them for up to three days. If you want to save them longer, freeze the chicken and veggies in a freezer-safe bag. They can last for up to three months in the freezer. When you’re ready to eat, thaw them in the fridge overnight. To reheat, use a skillet over medium heat. This method keeps the chicken juicy and the veggies crisp. You can also microwave them, but be careful not to overcook. The expected shelf life for your chicken fajitas is about three days in the fridge. In the freezer, they last about three months. Always check for signs of spoilage before eating. If you see any off smells, discoloration, or mold, it’s best to toss the leftovers. Keeping track of freshness helps you enjoy your meal safely. What is the best way to marinate chicken for fajitas? To marinate chicken for fajitas, mix olive oil, lime juice, and spices. Use chili powder, cumin, and smoked paprika for a great flavor. Combine these in a bowl, add the chicken, and coat it well. Let it marinate for at least 15 minutes. Longer marinating, up to 2 hours, gives better taste. Can I prepare chicken fajitas ahead of time? Yes, you can prepare chicken fajitas ahead of time. Marinate the chicken and store it in the fridge. You can also slice the vegetables early. Just keep them in a sealed container. When you're ready, cook everything up quickly. This makes weeknight meals super easy! What toppings are best for chicken fajitas? Great toppings for chicken fajitas include fresh cilantro, sour cream, and salsa. You can also add sliced avocado, shredded cheese, or jalapeños for extra flavor. These toppings add color and taste, making your fajitas even better. What to do if the chicken is tough or dry? If your chicken is tough or dry, try cooking it at a lower heat next time. Overcooking can dry it out. Also, make sure to marinate the chicken well. This helps keep it juicy. If it happens, serve with a sauce or salsa to add moisture. How to avoid soggy tortillas? To avoid soggy tortillas, warm them briefly in a pan. This keeps them soft but not wet. You can also heat them in the oven wrapped in foil. Serve the hot filling right away to keep your tortillas crisp. How to add more spice to the dish? To add more spice, include extra chili powder or a pinch of cayenne pepper. You can also add sliced jalapeños to the mix. If you want heat at the table, serve hot sauce on the side. Adjust spice levels to suit your taste. Chicken fajitas are a tasty and fun meal to make. You learned about the right ingredients, how to cook them, and tips for perfect fajitas. Whether you want to change the protein or try new spices, options are endless. Store leftovers well to enjoy later. Keep these tips in mind for your next cooking adventure. Enjoy your delicious fajitas with family and friends!](https://joymealplan.com/wp-content/uploads/2025/06/5a93604c-472d-424a-a3e8-bce972c2f096.webp)
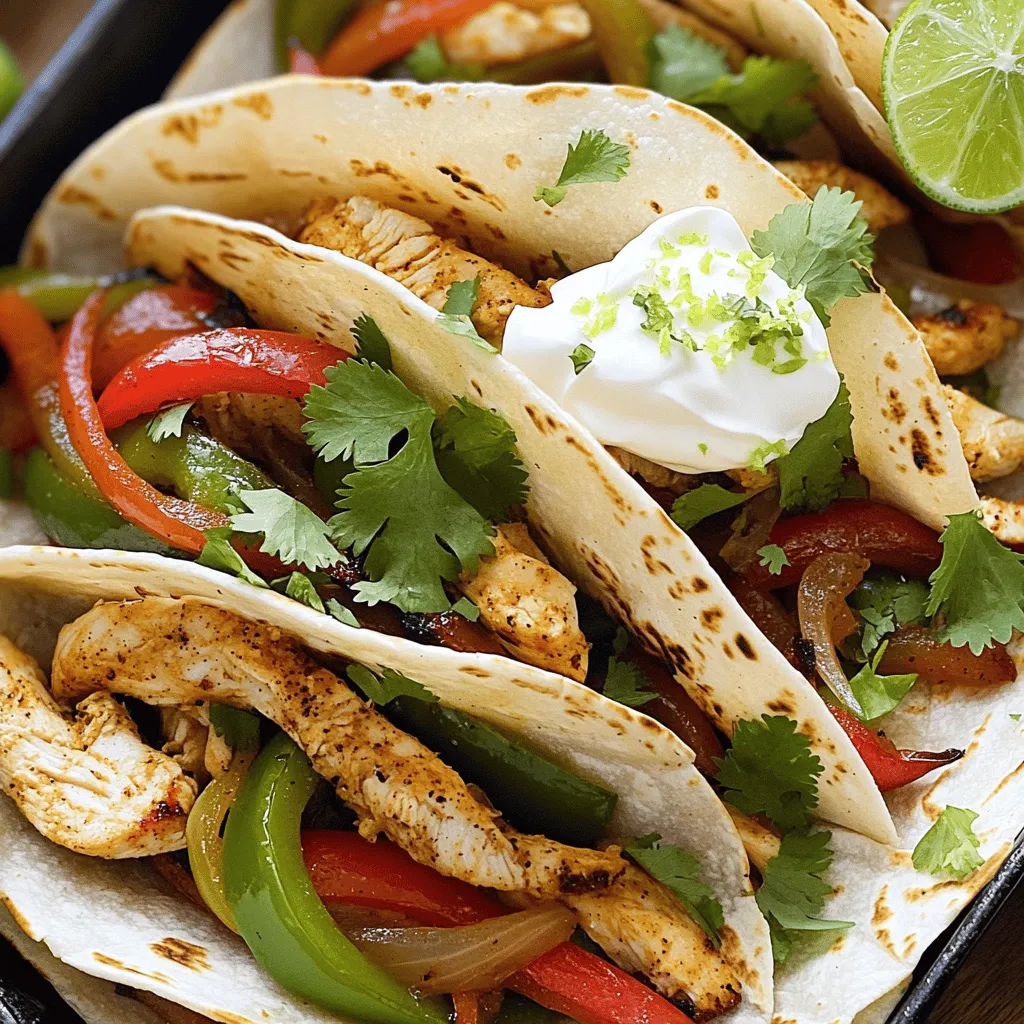
Are you craving a meal that’s both tasty and fast? Look no further! This Easy Chicken Fajitas recipe is not just simple; it’s bursting with flavor. Perfect for busy weeknights, these fajitas come together in no time. I’ll guide you through the ingredients, step-by-step cooking, and clever tips to make your dinner special. Let’s get started and spice up your kitchen!
Ingredients
When making easy chicken fajitas, you need fresh and simple ingredients to bring out the best flavors. Here’s the detailed list:
– 2 boneless, skinless chicken breasts, thinly sliced into strips
– 1 red bell pepper, sliced into thin strips
– 1 green bell pepper, sliced into thin strips
– 1 medium onion, sliced into thin rings
– 3 cloves garlic, minced
– 2 tablespoons olive oil
– 1 teaspoon chili powder
– 1 teaspoon ground cumin
– 1 teaspoon smoked paprika
– Salt and freshly ground black pepper, to taste
– Juice of 1 fresh lime
– Flour tortillas, for serving
– Fresh cilantro, chopped, for garnish
– Sour cream and salsa, for serving (optional)
Special Notes on Ingredient Substitutions
– You can swap chicken for shrimp or beef if you prefer.
– Use corn tortillas if you want a gluten-free option.
– Lemon juice can replace lime juice for a different zing.
Recommended Brands or Types of Spices
– Look for high-quality chili powder and smoked paprika for a rich taste.
– I trust McCormick and Penzeys for spices that boost flavor.
– Fresh herbs like cilantro add a nice touch, so always use fresh when possible.
Step-by-Step Instructions
Preparation Steps
To start, prepare your chicken and veggies. Take the two boneless, skinless chicken breasts. Slice them into thin strips. Next, grab one red bell pepper, one green bell pepper, and one medium onion. Slice these into thin strips and rings, respectively.
Now, let’s marinate the chicken. In a large bowl, mix the sliced chicken with minced garlic, olive oil, chili powder, cumin, smoked paprika, lime juice, salt, and pepper. Toss everything well. Make sure the chicken is coated evenly with the spices. Let the chicken marinate for at least 15 minutes. You can refrigerate it for up to 2 hours for more flavor.
When you are ready to cook, heat a large skillet on medium-high heat. Add the marinated chicken to the skillet. Cook it for about 5 to 7 minutes. Stir occasionally until it reaches an internal temperature of 165°F (75°C).
After the chicken is cooked, add the sliced peppers and onion to the skillet. Sauté the mixture for another 5 to 7 minutes. Cook until the veggies are tender but still crunchy. Taste and adjust the seasoning with salt and pepper if needed.
Assembly
Now, let’s assemble the fajitas. Start with warm flour tortillas. Place a generous portion of the chicken and vegetable mix in the center of each tortilla.
For a lovely presentation, serve the fajitas on a bright platter. Stack the tortillas neatly on the side. Arrange toppings like sour cream and salsa in small bowls. This makes it colorful and inviting.
When serving, don’t forget the garnishes. Sprinkle freshly chopped cilantro on top. This adds a fresh touch and enhances the flavor. Enjoy your easy chicken fajitas!
Tips & Tricks
Cooking Tips
To make your chicken fajitas burst with flavor, try these cooking tips:
– Use a cast-iron skillet. This tool holds heat well and gives a nice sear to the chicken.
– Preheat your pan. A hot pan helps to cook the chicken fast and keeps it juicy.
– Don’t overcrowd the pan. Cook in batches if needed. This helps the chicken brown instead of steam.
– Add a splash of broth. If the chicken seems dry, add a little chicken broth while cooking.
Serving Suggestions
Pair your chicken fajitas with these tasty sides:
– Mexican rice. It adds a nice, filling touch.
– Refried beans. They give a creamy texture and flavor.
– Guacamole. This creamy dip adds richness to the meal.
For extra flavor, consider these enhancers:
– Squeeze fresh lime juice. It brightens the dish and adds a zesty kick.
– Top with sliced avocado. This adds creaminess and balances the spices.
– Drizzle with hot sauce. It brings heat and excitement to each bite.
Variations
Customization Options
You can change up the protein in your fajitas. Try shrimp or beef for a new twist. You can even use tofu or tempeh for a plant-based option. Each protein brings a different flavor, so have fun with it.
For seasoning, you can mix things up too. Use taco seasoning for a spicier kick. You might enjoy adding lime zest for a fresh taste. Try using garlic powder or onion powder for extra flavor. Each option can make your dish unique.
Dietary Adjustments
If you want to keep it low-carb, use lettuce wraps instead of tortillas. It gives you a crunchy bite and cuts down on carbs. You can also find low-carb tortillas at the store.
For gluten-free options, use corn tortillas. They taste great and work well with the filling. If you’re dairy-free, skip the sour cream and use avocado instead. It adds creaminess and flavor without the dairy.
Storage Info
Storing Leftovers
To keep your chicken fajitas fresh, store them in an airtight container. Make sure to separate the chicken from the tortillas and toppings. This helps keep everything tasty. You can refrigerate them for up to three days. If you want to save them longer, freeze the chicken and veggies in a freezer-safe bag. They can last for up to three months in the freezer. When you’re ready to eat, thaw them in the fridge overnight. To reheat, use a skillet over medium heat. This method keeps the chicken juicy and the veggies crisp. You can also microwave them, but be careful not to overcook.
Shelf Life
The expected shelf life for your chicken fajitas is about three days in the fridge. In the freezer, they last about three months. Always check for signs of spoilage before eating. If you see any off smells, discoloration, or mold, it’s best to toss the leftovers. Keeping track of freshness helps you enjoy your meal safely.
FAQs
Common Questions
What is the best way to marinate chicken for fajitas?
To marinate chicken for fajitas, mix olive oil, lime juice, and spices. Use chili powder, cumin, and smoked paprika for a great flavor. Combine these in a bowl, add the chicken, and coat it well. Let it marinate for at least 15 minutes. Longer marinating, up to 2 hours, gives better taste.
Can I prepare chicken fajitas ahead of time?
Yes, you can prepare chicken fajitas ahead of time. Marinate the chicken and store it in the fridge. You can also slice the vegetables early. Just keep them in a sealed container. When you’re ready, cook everything up quickly. This makes weeknight meals super easy!
What toppings are best for chicken fajitas?
Great toppings for chicken fajitas include fresh cilantro, sour cream, and salsa. You can also add sliced avocado, shredded cheese, or jalapeños for extra flavor. These toppings add color and taste, making your fajitas even better.
Troubleshooting
What to do if the chicken is tough or dry?
If your chicken is tough or dry, try cooking it at a lower heat next time. Overcooking can dry it out. Also, make sure to marinate the chicken well. This helps keep it juicy. If it happens, serve with a sauce or salsa to add moisture.
How to avoid soggy tortillas?
To avoid soggy tortillas, warm them briefly in a pan. This keeps them soft but not wet. You can also heat them in the oven wrapped in foil. Serve the hot filling right away to keep your tortillas crisp.
How to add more spice to the dish?
To add more spice, include extra chili powder or a pinch of cayenne pepper. You can also add sliced jalapeños to the mix. If you want heat at the table, serve hot sauce on the side. Adjust spice levels to suit your taste.
Chicken fajitas are a tasty and fun meal to make. You learned about the right ingredients, how to cook them, and tips for perfect fajitas. Whether you want to change the protein or try new spices, options are endless. Store leftovers well to enjoy later. Keep these tips in mind for your next cooking adventure. Enjoy your delicious fajitas with family and friends!
![When making easy chicken fajitas, you need fresh and simple ingredients to bring out the best flavors. Here’s the detailed list: - 2 boneless, skinless chicken breasts, thinly sliced into strips - 1 red bell pepper, sliced into thin strips - 1 green bell pepper, sliced into thin strips - 1 medium onion, sliced into thin rings - 3 cloves garlic, minced - 2 tablespoons olive oil - 1 teaspoon chili powder - 1 teaspoon ground cumin - 1 teaspoon smoked paprika - Salt and freshly ground black pepper, to taste - Juice of 1 fresh lime - Flour tortillas, for serving - Fresh cilantro, chopped, for garnish - Sour cream and salsa, for serving (optional) - You can swap chicken for shrimp or beef if you prefer. - Use corn tortillas if you want a gluten-free option. - Lemon juice can replace lime juice for a different zing. - Look for high-quality chili powder and smoked paprika for a rich taste. - I trust McCormick and Penzeys for spices that boost flavor. - Fresh herbs like cilantro add a nice touch, so always use fresh when possible. For more details on how to prepare your ingredients and cook this dish, check the Full Recipe. To start, prepare your chicken and veggies. Take the two boneless, skinless chicken breasts. Slice them into thin strips. Next, grab one red bell pepper, one green bell pepper, and one medium onion. Slice these into thin strips and rings, respectively. Now, let’s marinate the chicken. In a large bowl, mix the sliced chicken with minced garlic, olive oil, chili powder, cumin, smoked paprika, lime juice, salt, and pepper. Toss everything well. Make sure the chicken is coated evenly with the spices. Let the chicken marinate for at least 15 minutes. You can refrigerate it for up to 2 hours for more flavor. When you are ready to cook, heat a large skillet on medium-high heat. Add the marinated chicken to the skillet. Cook it for about 5 to 7 minutes. Stir occasionally until it reaches an internal temperature of 165°F (75°C). After the chicken is cooked, add the sliced peppers and onion to the skillet. Sauté the mixture for another 5 to 7 minutes. Cook until the veggies are tender but still crunchy. Taste and adjust the seasoning with salt and pepper if needed. Now, let's assemble the fajitas. Start with warm flour tortillas. Place a generous portion of the chicken and vegetable mix in the center of each tortilla. For a lovely presentation, serve the fajitas on a bright platter. Stack the tortillas neatly on the side. Arrange toppings like sour cream and salsa in small bowls. This makes it colorful and inviting. When serving, don’t forget the garnishes. Sprinkle freshly chopped cilantro on top. This adds a fresh touch and enhances the flavor. Enjoy your easy chicken fajitas! For the full recipe, check out [Full Recipe]. To make your chicken fajitas burst with flavor, try these cooking tips: - Use a cast-iron skillet. This tool holds heat well and gives a nice sear to the chicken. - Preheat your pan. A hot pan helps to cook the chicken fast and keeps it juicy. - Don’t overcrowd the pan. Cook in batches if needed. This helps the chicken brown instead of steam. - Add a splash of broth. If the chicken seems dry, add a little chicken broth while cooking. Pair your chicken fajitas with these tasty sides: - Mexican rice. It adds a nice, filling touch. - Refried beans. They give a creamy texture and flavor. - Guacamole. This creamy dip adds richness to the meal. For extra flavor, consider these enhancers: - Squeeze fresh lime juice. It brightens the dish and adds a zesty kick. - Top with sliced avocado. This adds creaminess and balances the spices. - Drizzle with hot sauce. It brings heat and excitement to each bite. Explore the [Full Recipe] for detailed steps on creating this quick dinner. {{image_4}} You can change up the protein in your fajitas. Try shrimp or beef for a new twist. You can even use tofu or tempeh for a plant-based option. Each protein brings a different flavor, so have fun with it. For seasoning, you can mix things up too. Use taco seasoning for a spicier kick. You might enjoy adding lime zest for a fresh taste. Try using garlic powder or onion powder for extra flavor. Each option can make your dish unique. If you want to keep it low-carb, use lettuce wraps instead of tortillas. It gives you a crunchy bite and cuts down on carbs. You can also find low-carb tortillas at the store. For gluten-free options, use corn tortillas. They taste great and work well with the filling. If you're dairy-free, skip the sour cream and use avocado instead. It adds creaminess and flavor without the dairy. To keep your chicken fajitas fresh, store them in an airtight container. Make sure to separate the chicken from the tortillas and toppings. This helps keep everything tasty. You can refrigerate them for up to three days. If you want to save them longer, freeze the chicken and veggies in a freezer-safe bag. They can last for up to three months in the freezer. When you’re ready to eat, thaw them in the fridge overnight. To reheat, use a skillet over medium heat. This method keeps the chicken juicy and the veggies crisp. You can also microwave them, but be careful not to overcook. The expected shelf life for your chicken fajitas is about three days in the fridge. In the freezer, they last about three months. Always check for signs of spoilage before eating. If you see any off smells, discoloration, or mold, it’s best to toss the leftovers. Keeping track of freshness helps you enjoy your meal safely. What is the best way to marinate chicken for fajitas? To marinate chicken for fajitas, mix olive oil, lime juice, and spices. Use chili powder, cumin, and smoked paprika for a great flavor. Combine these in a bowl, add the chicken, and coat it well. Let it marinate for at least 15 minutes. Longer marinating, up to 2 hours, gives better taste. Can I prepare chicken fajitas ahead of time? Yes, you can prepare chicken fajitas ahead of time. Marinate the chicken and store it in the fridge. You can also slice the vegetables early. Just keep them in a sealed container. When you're ready, cook everything up quickly. This makes weeknight meals super easy! What toppings are best for chicken fajitas? Great toppings for chicken fajitas include fresh cilantro, sour cream, and salsa. You can also add sliced avocado, shredded cheese, or jalapeños for extra flavor. These toppings add color and taste, making your fajitas even better. What to do if the chicken is tough or dry? If your chicken is tough or dry, try cooking it at a lower heat next time. Overcooking can dry it out. Also, make sure to marinate the chicken well. This helps keep it juicy. If it happens, serve with a sauce or salsa to add moisture. How to avoid soggy tortillas? To avoid soggy tortillas, warm them briefly in a pan. This keeps them soft but not wet. You can also heat them in the oven wrapped in foil. Serve the hot filling right away to keep your tortillas crisp. How to add more spice to the dish? To add more spice, include extra chili powder or a pinch of cayenne pepper. You can also add sliced jalapeños to the mix. If you want heat at the table, serve hot sauce on the side. Adjust spice levels to suit your taste. Chicken fajitas are a tasty and fun meal to make. You learned about the right ingredients, how to cook them, and tips for perfect fajitas. Whether you want to change the protein or try new spices, options are endless. Store leftovers well to enjoy later. Keep these tips in mind for your next cooking adventure. Enjoy your delicious fajitas with family and friends!](https://joymealplan.com/wp-content/uploads/2025/06/5a93604c-472d-424a-a3e8-bce972c2f096-300x300.webp)
![- 2 cups cooked chicken, shredded - 1 cup canned black beans, rinsed and drained - 1 cup fresh or frozen corn kernels The main ingredients create the heart of the chicken enchiladas. First, shredded chicken offers a tender and juicy base. I love using rotisserie chicken for ease. Black beans add protein and fiber, making the meal hearty. Corn brings sweetness and a pop of color. Each ingredient plays a role in making this dish satisfying. - 1 small red onion, finely chopped - 2 cloves garlic, minced - 1 teaspoon ground cumin - 1 teaspoon chili powder Aromatics and seasonings elevate the flavor. The red onion adds a sweet, savory taste. Garlic brings depth and aroma that fills your kitchen. Cumin provides a warm, earthy note. Chili powder adds a gentle kick. These elements create a rich base for the enchiladas. - 8 small corn tortillas - 2 cups shredded cheese (cheddar or Mexican blend) - ¼ cup fresh cilantro, chopped (for garnish) Tortillas hold everything together. I prefer corn tortillas for their authentic flavor. They warm up nicely, making them easy to roll. Cheese melts beautifully, creating a creamy topping. I recommend using a blend for extra flavor. Fresh cilantro adds brightness and a fresh touch. Together, these elements create a delightful finish to your enchiladas. For the full recipe, check out the Spicy Chicken Enchiladas. - Preheat your oven to 350°F (175°C). - Sauté red onion and garlic until fragrant. Start by heating a drizzle of oil in a large skillet over medium heat. Add the finely chopped red onion. Sauté for about 3-4 minutes until the onion turns soft and clear. Then, add the minced garlic and cook for another minute. This step makes your kitchen smell amazing and sets the stage for great flavor. - Combine chicken, black beans, corn, onion-garlic mixture, salsa, cumin, and chili powder. In a big mixing bowl, add the shredded chicken, rinsed black beans, and corn. Pour in the sautéed onion and garlic mixture, along with your choice of salsa. To spice it up, add cumin and chili powder. Mix everything well. This filling is packed with protein and flavor, making your enchiladas both tasty and hearty. - Warm tortillas and fill with chicken mixture. - Roll and arrange in baking dish. Now, warm the corn tortillas in a dry skillet or microwave. This makes them soft and easy to roll. Take about ¼ cup of the chicken mixture and place it in the center of each tortilla. Sprinkle a little cheese on top, then roll them up tightly. Place the rolled tortillas seam-side down in a greased 9x13 inch baking dish. This step is where the magic begins! - Cover with salsa and cheese, bake with foil, then uncovered. Pour any remaining salsa over the top of the enchiladas. Sprinkle the rest of the cheese evenly on top. Cover your baking dish with aluminum foil to keep the moisture in. Bake in the preheated oven for 20 minutes. After that, remove the foil and bake for another 10 minutes. You want the cheese to melt and bubble. Once done, let the enchiladas cool for a few minutes. Garnish with fresh cilantro before serving. This adds a fresh flavor and a lovely touch. Enjoy your homemade chicken enchiladas! For more detailed steps, check out the Full Recipe. - Ensure tortillas are pliable to prevent cracking. Warm them in a skillet or microwave. - Use a mix of cheeses for more flavor. Try combining cheddar and pepper jack. - Serve with sour cream and additional cilantro for extra zest. - Integrate sides like rice or refried beans to complete the meal. - Overfilling tortillas can make them hard to roll. Stick to ¼ cup of filling. - Not letting them cool before serving can lead to a messy plate. Give them a few minutes. {{image_4}} You can make your chicken enchiladas even better for you. - Swap out cheese for a low-fat version. This change cuts calories. - Use whole wheat tortillas for extra fiber. This option boosts nutrition. Want to spice things up? Add some fun flavors! - Add jalapeños for extra heat. This will make your dish lively! - Experiment with different salsas. Try mild, medium, or spicy. Each adds a unique taste. Need to adjust for dietary needs? No problem! - Make it vegetarian by using black beans only. This keeps it hearty and filling. - Use corn tortillas for gluten-free options. They work perfectly in this dish. Feel free to explore these variations and make the recipe your own! To keep your chicken enchiladas fresh, store them in an airtight container. This helps prevent moisture loss and keeps flavors intact. Place them in the fridge where they can stay good for about 3-4 days. Label the container with the date, so you remember when you made them. If you want to save some for later, freezing is a great option. Wrap each enchilada tightly in foil before placing them in a freezer bag. This protects them from freezer burn. They can last for up to 3 months in the freezer. When you're ready to eat, simply thaw them overnight in the fridge. For the best taste and texture, reheat your enchiladas in the oven. Preheat your oven to 350°F (175°C). Place the enchiladas in a baking dish, cover with foil, and heat for about 20-25 minutes. Remove the foil for the last 5 minutes to crisp up the cheese. Enjoy them warm! Chicken enchiladas last about 3-4 days when stored properly. Keep them in an airtight container to maintain freshness. Always check for any signs of spoilage before eating leftovers. Yes, you can assemble chicken enchiladas ahead of time. Just prepare them and place them in the fridge before baking. This is a great way to save time, especially on busy days. You can add many tasty toppings to your enchiladas. Some options include: - Avocado - Guacamole - Green onions - Olives Feel free to get creative with your toppings. They can add color and flavor. You can easily customize this recipe. Adjust the spices to fit your taste. Add your favorite vegetables to the filling, like bell peppers or spinach. This makes the dish more personal and fun. Yes, you can use a slow cooker for this dish. Cook the filling in the slow cooker first. Then, assemble the enchiladas and bake them as usual. This method adds rich flavors and makes cooking easier. For the full recipe, check [Full Recipe]. Chicken enchiladas are simple and fun to make. You need cooked chicken, black beans, corn, and cheese. Follow the steps to prepare, mix, and bake them to perfection. Use tips to avoid common mistakes and enjoy variations for your taste. Remember, leftovers are easy to store and reheat. You can customize this dish with your favorite toppings too. Enjoy this tasty meal with friends and family!](https://joymealplan.com/wp-content/uploads/2025/07/08f715d1-a8ab-4086-9fca-7ff252efa8d5-768x768.webp)
![To make oven-baked chicken fajitas, you will need: - 1 lb boneless, skinless chicken breasts, sliced into thin strips - 1 red bell pepper, sliced into thin strips - 1 yellow bell pepper, sliced into thin strips - 1 medium onion, sliced into thin wedges - 3 tablespoons extra virgin olive oil - 2 teaspoons chili powder - 1 teaspoon ground cumin - 1 teaspoon smoked paprika - 1 teaspoon garlic powder - 1 teaspoon onion powder - Salt and freshly ground black pepper to taste - 8 small flour or corn tortillas These ingredients come together to create a burst of flavors. The chicken brings protein, while the peppers and onion add color and crunch. Seasonings like chili powder and cumin enhance the taste, making every bite exciting. You can elevate your fajitas with these optional toppings: - Sour cream - Guacamole - Freshly chopped cilantro - Lime wedges These toppings add creaminess, freshness, and zest. Feel free to mix and match based on your preference. Here are the tools you need to prepare your fajitas: - Large baking sheet - Parchment paper - Mixing bowl - Spatula or your hands for mixing - Knife and cutting board Using these tools makes the cooking process smooth. The baking sheet helps in even cooking, while the mixing bowl keeps things clean. If you follow the [Full Recipe], you will have a delicious meal ready in no time! To start, gather your ingredients. You will need: - 1 lb boneless, skinless chicken breasts, sliced into thin strips - 1 red bell pepper, sliced into thin strips - 1 yellow bell pepper, sliced into thin strips - 1 medium onion, sliced into thin wedges - 3 tablespoons extra virgin olive oil - 2 teaspoons chili powder - 1 teaspoon ground cumin - 1 teaspoon smoked paprika - 1 teaspoon garlic powder - 1 teaspoon onion powder - Salt and freshly ground black pepper to taste - 8 small flour or corn tortillas - Optional toppings: sour cream, guacamole, freshly chopped cilantro, lime wedges Begin by preheating your oven to 400°F (200°C). Line a large baking sheet with parchment paper. This helps with easy cleanup. In a big mixing bowl, combine all the sliced chicken and veggies. Drizzle the olive oil over them. Add the spices: chili powder, cumin, smoked paprika, garlic powder, onion powder, salt, and pepper. Now, mix everything well. Use your hands or a spatula to toss the chicken and veggies. Make sure every piece gets coated in oil and spices. This step is key for flavor. Spread the chicken and veggies evenly on the prepared baking sheet. Ensure there’s space between pieces for even cooking. Bake in the oven for 25 to 30 minutes. Halfway through, stir the mixture. Check that the chicken reaches an internal temperature of 165°F (75°C). The veggies should be tender and slightly caramelized. After baking, let the mixture rest for a few minutes. While it rests, warm your tortillas. You can microwave them wrapped in a damp paper towel or heat them in a skillet. To serve, place a generous scoop of the chicken and veggie mix in each tortilla. Add sour cream, guacamole, and cilantro. A squeeze of lime juice adds a nice touch! Enjoy this easy yet delicious meal. For the complete process, refer to the Full Recipe. To get juicy chicken, use thin strips. Thin pieces cook faster and stay tender. Always check the internal temperature. It should reach 165°F (75°C) for safety. If you have time, marinate the chicken in spices and olive oil for a few hours. This adds flavor and keeps it moist. Cut the vegetables into uniform sizes. This helps them cook evenly. Use a large baking sheet. Spread the veggies out to avoid steaming. Stir them halfway through baking. This promotes even browning and caramelization. Aim for a tender texture with some charred edges for extra flavor. Warm the tortillas before serving. You can use a microwave or a skillet. For the microwave, wrap them in a damp paper towel. Heat them in short bursts for a soft finish. If using a skillet, heat on medium until they become pliable. This makes them easier to fold and fill. For the full recipe, check the section earlier in the article. {{image_4}} You can switch chicken for shrimp or tofu. Shrimp cooks fast and adds a sweet taste. Just adjust the cooking time to around 15-20 minutes. Tofu is great for a plant-based meal. Use firm tofu for the best texture. Press it to remove excess water. Then, cut it into strips and season like chicken. Feel free to mix in other veggies. You can add zucchini, mushrooms, or even corn. Each veggie brings its own flavor and texture. Try using fresh jalapeños for a spicy kick. You can also use frozen veggies if fresh ones aren’t available. Just ensure they are thawed and well-drained before mixing. Get creative with your spices! You can try taco seasoning for a different taste. Or, mix in some lime zest for brightness. If you like heat, add cayenne pepper or chipotle powder. Experimenting with these flavors makes each meal unique. Don't be afraid to try unusual combinations. This is your chance to explore new tastes. Check out the Full Recipe for more ways to spice things up! After enjoying your oven-baked chicken fajitas, you may have some leftovers. To store them well, let the fajitas cool down to room temperature. Then, place them in an airtight container. This keeps the flavors fresh and prevents sogginess. You can store them in the fridge for up to three days. If you want to keep them longer, consider freezing. When you are ready to eat your leftovers, reheating them properly is key. For the best results, use an oven. Preheat your oven to 350°F (175°C). Spread the fajitas on a baking sheet and cover them with foil. Heat for about 10 to 15 minutes, or until warmed through. This method keeps the chicken juicy and the veggies crisp. You can also use a microwave, but this may make the tortillas soft. If you want to save your fajitas for later, freezing is easy. First, make sure they are completely cool. Then, place your fajitas in a freezer-safe bag or container. Remove as much air as possible before sealing. Label the bag with the date. You can freeze them for up to three months. When ready to enjoy, thaw the fajitas in the fridge overnight before reheating. This way, they taste just as good as when you first made them. For the full recipe, check out the earlier sections. To make your oven-baked chicken fajitas healthier, you can swap some ingredients. Use skinless chicken thighs instead of breast for more flavor. Add more veggies like zucchini or mushrooms for extra fiber. You can also replace olive oil with cooking spray to cut calories. Use whole grain tortillas rather than white flour ones. This change boosts fiber and nutrients. Finally, skip the sour cream or use a low-fat version. Yes, you can prepare fajitas ahead of time. Just season the chicken and veggies the night before. Store them in the fridge in a sealed container. This helps the flavors blend nicely. Bake them when you are ready to eat. If you want to save time, you can also cook the fajitas fully. Store the cooked fajitas in the fridge for up to three days. Reheat them in the oven for best results. The best tortillas for fajitas depend on your taste. Flour tortillas are soft and easy to fold. They are a classic choice. Corn tortillas have a nice flavor and are gluten-free. They can be a bit more fragile but pair well with fajitas. You can also try whole wheat tortillas for a healthier option. Choose the type you enjoy most, and your fajitas will shine. Check out the full recipe for more tips! In this article, we explored how to make delicious oven-baked chicken fajitas. We covered the main ingredients, cooking steps, and helpful tips for perfect results. You also learned about fun variations to customize your dish and smart ways to store leftovers. Now, you can enjoy tasty fajitas at home. Get creative with your toppings and enjoy sharing this meal with friends and family. The key is to have fun and make it your own. Happy cooking!](https://joymealplan.com/wp-content/uploads/2025/06/95795fac-5c59-44b7-b221-1c1b2c95851f-768x768.webp)
![- 1 lb chicken breast, sliced into strips - 2 tablespoons extra-virgin olive oil - 2 teaspoons dried oregano - 1 teaspoon garlic powder - 1 teaspoon smoked paprika - Salt and freshly ground black pepper to taste - 4 large pita breads - 1 cup shredded romaine lettuce - 1 large ripe tomato, diced - 1/2 medium red onion, thinly sliced - 1 cup cucumber, diced - 1/2 cup tzatziki sauce (store-bought or homemade) - Fresh parsley, finely chopped (for garnish) These ingredients create a tasty and fresh wrap. The chicken is the star, tender and juicy after marinating. The olive oil adds healthy fat, while oregano brings that classic Greek flavor. Garlic and smoked paprika give depth and warmth to each bite. You can mix in extras for fun twists. Consider adding: - Feta cheese for a salty touch - Bell peppers for a crunchy bite - Olives for a briny flavor - Avocado for creaminess These add-ins can make your gyro unique. You can customize it to fit your taste. Each ingredient brings health benefits. Chicken is high in protein, perfect for muscle repair. Olive oil is rich in good fats that support heart health. Fresh veggies like lettuce and cucumber offer fiber and hydration. Tomatoes add vitamins and antioxidants that fight disease. With these ingredients, you enjoy a meal that is not only delicious but good for you too. For the complete recipe, check out the Full Recipe. To start, I mix the chicken strips with olive oil, oregano, garlic powder, smoked paprika, salt, and pepper. This blend adds great flavor to the chicken. I make sure to coat the chicken well. After mixing, I cover the bowl with plastic wrap. I let it sit in the fridge for at least 30 minutes. For the best taste, I recommend marinating for up to 2 hours. Next, I heat my grill or skillet over medium-high heat. Once it's hot, I add the marinated chicken strips. I avoid overcrowding the pan to ensure even cooking. I let them cook for about 6-8 minutes. I flip them occasionally until they turn golden brown. I check that the internal temperature reaches 165°F. After cooking, I take the chicken off the heat and let it rest for a few minutes to keep it juicy. While the chicken rests, I prepare the pita bread. I warm it on the grill or in the microwave. If I use the microwave, I heat it for about 15-20 seconds. This helps the pita become soft and easy to wrap. Next, I chop the veggies. I dice the tomato and cucumber, and slice the red onion thinly. I also shred the romaine lettuce. These fresh toppings will add crunch and flavor to my wraps. Once everything is ready, I can start assembling the wraps. For the full recipe, check the details above! To get the best flavor in your chicken, use fresh ingredients. Start with quality chicken breast. Marinate it with olive oil, oregano, garlic powder, and smoked paprika. Each of these adds a unique taste. Let the chicken marinate for at least 30 minutes. For deeper flavor, marinate it for up to 2 hours. This gives the spices time to soak in. When cooking, use a hot grill or skillet. This helps to seal in the juices. Tzatziki sauce is key for your wraps. If you make it at home, use plain yogurt as the base. Add diced cucumber, minced garlic, lemon juice, and salt. Mix well for a refreshing taste. Chill the sauce for a bit to let the flavors blend. You can also buy tzatziki sauce if you're short on time. Make sure to taste it before you serve. Adjust the seasoning as needed to suit your taste. Wrapping your gyro properly is crucial. Start with a warm pita. This makes it pliable and easy to fold. Place a generous amount of tzatziki sauce in the center. Layer your veggies and chicken on top. When wrapping, tuck in the edges. This keeps all the tasty filling secure. Hold the wrap tightly as you eat. This way, you won't lose any delicious bites. Try this method for a neat and enjoyable meal. For more details, check out the Full Recipe. {{image_4}} If you want a meat-free meal, try using grilled vegetables or falafel. You can use zucchini, bell peppers, or eggplant. These veggies add a nice char and flavor. Place them in the marinade, just like you would with chicken. Cook them until they are soft and golden. This choice keeps the wrap tasty and satisfying. While tzatziki is classic, you can explore other sauces. Try hummus for a creamy texture. A spicy feta dip can add a kick. You might also enjoy adding a yogurt-based dressing or tahini sauce. Each sauce gives a new twist to your gyro wrap. Play around to find your favorite combination. Feel free to change up the veggies in your gyro wrap. Add roasted red peppers or olives for more flavor. Try shredded carrots or sliced radishes for some crunch. You can also use fresh herbs like dill or mint. Each addition gives your wrap a unique taste and makes it fun to create. After your meal, store any leftover gyro wraps in the fridge. Place them in an airtight container. This keeps them fresh for about 2-3 days. If you want to keep them longer, separate the chicken and veggies from the pita. This prevents sogginess. When reheating, use a skillet for the chicken. Heat it over medium heat for about 5 minutes, stirring gently. This helps keep the chicken juicy. For the pita, warm it in a microwave for 15-20 seconds. You can also use a skillet, heating it for about 1 minute per side. If you want to prepare ahead, you can freeze the chicken. Place cooked chicken strips in a freezer bag. Remove as much air as possible. They can last up to 3 months in the freezer. When ready to eat, thaw them in the fridge overnight before reheating. Avoid freezing the pita and fresh veggies; they taste best fresh. For more details, check the Full Recipe. Yes, you can use pre-cooked chicken. It saves time and effort. Just heat it before adding it to the wraps. You can also add your favorite spices to boost the flavor. This option is great for busy days or quick meals. Serve Greek Chicken Gyro Wraps warm. They taste best right after you make them. You can add extra tzatziki sauce on the side for dipping. Pair with a fresh salad or roasted veggies for a complete meal. It’s all about enjoying the flavors together. You can find ready-made Greek Chicken Gyro Wraps at many grocery stores. Look in the deli or prepared food section. Some restaurants also sell them for takeout. Check local Mediterranean or Greek eateries too. If you want a quick fix, this is a great option. For the full experience, try making them fresh at home using the [Full Recipe]. Greek chicken gyro wraps are full of flavor and easy to make. We covered key ingredients, from chicken to tzatziki. I shared marinating and cooking steps to help you nail it. You also learned tips for great wraps and tasty variations. Plus, I included storage info to keep your meal fresh. These wraps can fit any taste, and they are great for meal prep. Enjoy making your own gyro wraps, and feel free to get creative!](https://joymealplan.com/wp-content/uploads/2025/07/794e22a0-9e47-4100-a61d-0611f2557fa8-768x768.webp)