Summer Corn Salad Refreshing and Simple Delight

Summer is the perfect time to enjoy fresh flavors, and nothing beats a Summer Corn Salad. This dish is both refreshing and simple to make. You’ll love how easy it is to grab sweet corn and mix it with vibrant veggies. I’m excited to share my favorite tips for selecting the freshest ingredients and creating the perfect dressing. Join me in making a salad that will light up your summer meals!
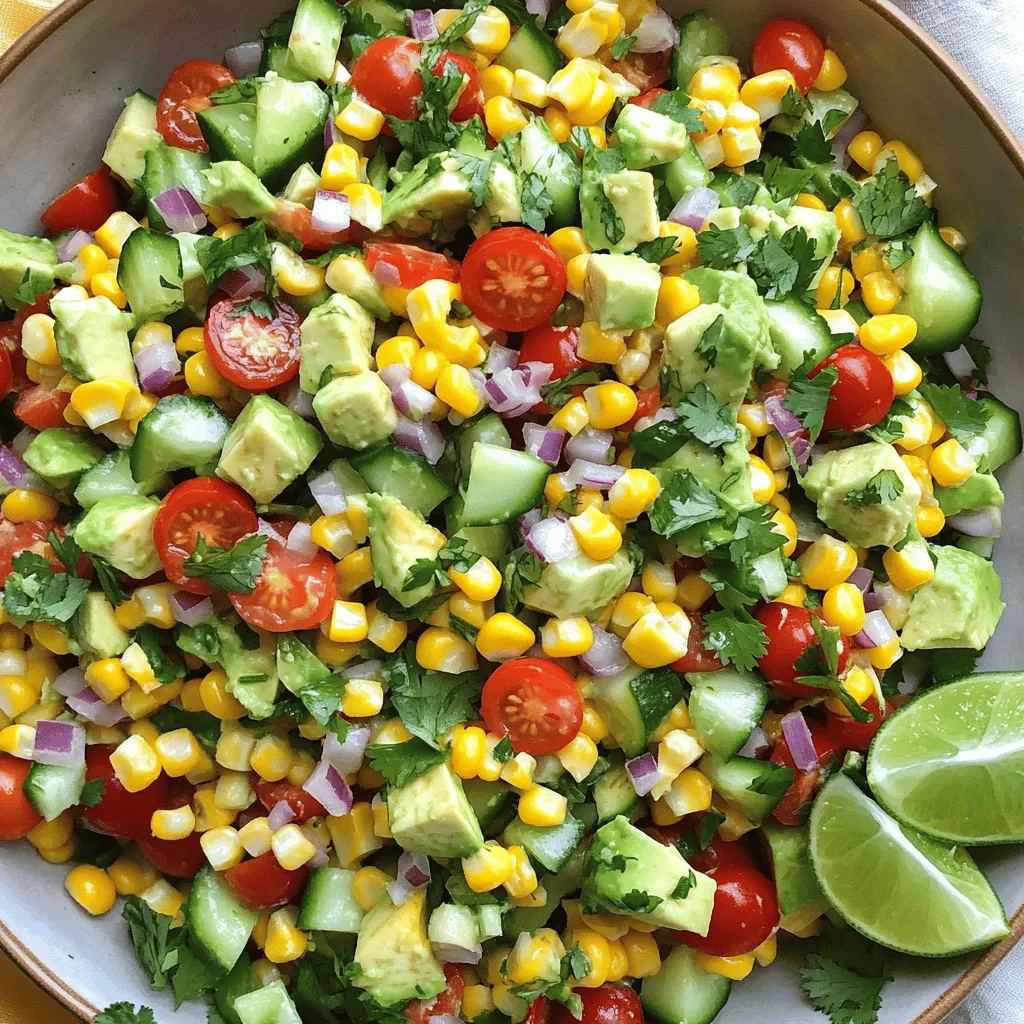
Ingredients
List of Ingredients for Summer Corn Salad
To make a bright and tasty summer corn salad, gather these fresh ingredients:
– 4 cups fresh corn kernels (approximately 6 ears of corn)
– 1 red bell pepper, diced into small pieces
– 1 cucumber, diced into small cubes
– ½ red onion, finely chopped
– 1 cup cherry tomatoes, halved
– 1 ripe avocado, diced into bite-sized pieces
– ½ cup fresh cilantro, chopped coarsely
– 3 tablespoons freshly squeezed lime juice
– 2 tablespoons extra virgin olive oil
– 1 teaspoon honey (optional, for a touch of sweetness)
– Salt and freshly cracked black pepper, to taste
Tips for Selecting Fresh Corn
Choosing the best corn is key for a great salad. Here are some tips:
– Look for bright green husks. They should be moist and tight.
– Check the silk. It should be brown and sticky, not dry.
– Feel the kernels. Press on the cob. It should feel plump and firm.
– Choose small to medium ears. They tend to be sweeter than large ones.
Optional Add-ins and Substitutes
You can customize your summer corn salad with these options:
– Beans: Black beans or chickpeas add protein.
– Feta cheese: Crumbled feta brings a salty flavor.
– Spices: Add chili powder for some heat.
– Other veggies: Try zucchini or radishes for crunch.
Feel free to mix and match these ingredients to make the salad your own.
Step-by-Step Instructions
How to Prepare Corn Kernels
To start, shuck the corn. Remove the husks and silk from each ear. Next, hold the corn upright in a bowl. Use a sharp knife to cut down the sides of the cob. You want to release the kernels into the bowl. This method helps catch any kernels that fall. Aim for about four cups of fresh corn.
Mixing the Vegetables
In a large mixing bowl, add the corn kernels you just cut. Then, dice the red bell pepper and cucumber into small pieces. Finely chop the red onion and halve the cherry tomatoes. Toss all these colorful veggies into the bowl. Mix them gently so they combine well. Finally, fold in the diced avocado and chopped cilantro. Be careful not to mash the avocado.
Whipping Up the Dressing
Grab a small bowl to make the dressing. Whisk together three tablespoons of lime juice and two tablespoons of olive oil. If you like a hint of sweetness, add one teaspoon of honey. Season the dressing with salt and cracked black pepper to taste. Once mixed, drizzle it over the salad. Use a spatula to toss the salad gently. Make sure every bite gets some of that zesty dressing. Let the salad sit for ten minutes to let the flavors blend.Enjoy making this simple and refreshing summer corn salad!
Tips & Tricks
Perfecting the Flavor Balance
To make your salad shine, focus on the ingredients. Fresh corn is sweet and crunchy, so let it be the star. The lime juice adds a zesty kick, while olive oil brings a smooth finish. If you want more sweetness, a teaspoon of honey can really help. Salt and pepper enhance all the flavors. Always taste your salad before serving. Adjust the seasoning as needed. Sometimes, a little extra lime juice makes a big difference.
Serving Suggestions and Pairings
This salad is perfect for summer picnics or family gatherings. It pairs well with grilled chicken or fish. You can also serve it as a side dish for tacos or BBQ. If you want to add protein, consider black beans or grilled shrimp. You might even enjoy it on top of nachos for a fun twist. For a refreshing drink, try serving it with iced tea or lemonade.
Best Practices for Presentation
A great presentation makes food more inviting. Serve the salad in a large, shallow bowl. This shows off the vibrant colors of the veggies. You can also use individual mason jars for a fun touch. Each jar becomes a mini serving that’s easy to grab. Garnish with extra cilantro on top for a fresh look. Adding lime wedges on the side brightens up the dish. These small details can make a big impact at your table.
Variations
Different Vegetables to Incorporate
You can change up the corn salad easily. Try adding diced zucchini for a nice crunch. You can also use grated carrots for a hint of sweetness. Chopped radishes add a peppery bite. For a colorful twist, add yellow bell pepper or diced green onions. Even a handful of spinach can boost the nutrients.
Dressing Alternatives for Unique Flavors
While lime and olive oil taste great, you can mix it up. Use apple cider vinegar for a tangy kick. A splash of balsamic vinegar brings a rich flavor. For a creamy option, add Greek yogurt or sour cream. You can also try a honey mustard dressing for a sweet and tangy twist.
Making it Spicy or Sweet
To add heat, toss in some chopped jalapeños or a pinch of cayenne pepper. If you prefer sweet, add diced mango or pineapple. A drizzle of agave syrup can also enhance sweetness without being overpowering. Adjust these additions to suit your taste for a perfect summer dish.
Storage Info
How to Store Leftovers
After enjoying your summer corn salad, store any leftovers in an airtight container. This keeps the flavors fresh. Place the salad in the fridge. It should stay good for about three days. If you notice any browning on the avocado, remove that part before serving again.
Freezing Corn for Future Use
If you have extra corn, freezing is a great option. Start by blanching the corn kernels in boiling water for two minutes. This locks in the flavor and color. After blanching, cool the corn in ice water. Drain and dry the kernels, then pack them in freezer bags. Remove as much air as you can. Frozen corn can last up to a year, making it a handy ingredient for future salads.
Shelf Life of Ingredients
Most ingredients in this salad have a good shelf life:
– Fresh corn: Use within 3-5 days for the best taste.
– Red bell pepper: Lasts about a week in the fridge.
– Cucumber: Stays fresh for about a week too.
– Red onion: Can last for a couple of weeks if stored in a cool place.
– Cherry tomatoes: Best within a week for optimal flavor.
– Avocado: Ripens quickly, so use it within a few days of buying.
– Cilantro: Good for about a week if kept in water like a bouquet.
Keeping track of these times helps you enjoy your summer corn salad at its best!
FAQs
Can I use canned corn?
Yes, you can use canned corn. It is quick and easy. Choose corn with no added sugar or salt. Drain and rinse the corn before adding it to the salad. This helps reduce the sodium. Canned corn may lack the sweet crunch of fresh corn. However, it works well in a pinch.
What are some gluten-free options?
This salad is already gluten-free. All the ingredients are safe for gluten-free diets. Fresh corn, veggies, and herbs are naturally gluten-free. Use gluten-free dressings if you want to add more flavors. Always check labels when buying packaged products.
How can I make this salad vegan-friendly?
To make this salad vegan, skip the honey in the dressing. Instead, add a splash of maple syrup for sweetness if desired. All other ingredients are plant-based. This keeps the salad light and fresh. You can also use a vegan dressing option for extra flavor. Enjoy the vibrant mix of tastes!
This blog covered everything you need for a great summer corn salad. You learned about fresh ingredients, preparation steps, and delicious variations. I shared tips for adding flavor and making the salad look great, with helpful storage info.
In the end, feel free to experiment with different veggies and dressings. Each bite can be unique! Enjoy your fresh salad at any summer gathering. It’s healthy, tasty, and fun to make.


![To make whipped feta dip, you need some key ingredients: - 1 cup crumbled feta cheese - 1/2 cup softened cream cheese - 1/4 cup creamy Greek yogurt - 2 tablespoons extra virgin olive oil - 1 tablespoon fresh lemon juice - 2 cloves garlic, minced finely - 1 teaspoon fresh thyme leaves (or 1/2 teaspoon dried thyme) - Salt and black pepper to taste These ingredients create a smooth and creamy base. The feta gives it a salty taste. The cream cheese and yogurt add richness. Olive oil adds a nice touch of flavor. Lemon juice brightens the dip, while garlic and thyme add depth. Toppings can elevate your dip and add color. Here are some great options: - Halved cherry tomatoes - Pitted olives - A sprinkle of fresh herbs Adding these toppings not only enhances the taste but also makes your dip look beautiful. Fresh herbs like parsley or basil pair well with feta's flavor. You can customize this dip with some easy swaps. If you want a lighter dip, use low-fat cream cheese or yogurt. For a vegan version, try using cashew cream instead of cream cheese. You can also use fresh herbs like oregano or dill in place of thyme. These changes let you enjoy the dip while fitting your taste or dietary needs. For the full recipe, you can refer to the recipe section above. Start by gathering your cheese ingredients. You need crumbled feta, cream cheese, and Greek yogurt. In a large bowl, mix them together. Make sure the cream cheese is soft. This helps it blend well. Use a spatula to combine them first. This step makes blending easier later. Next, grab your electric mixer or food processor. Blend the cheese mixture on medium speed. This should take about 2-3 minutes. You want it to be smooth and creamy. If you see lumps, keep blending. The goal is to make it fluffy. After blending, add olive oil, lemon juice, minced garlic, and thyme. Sprinkle in some salt and pepper. Blend again until everything is mixed well. Taste your dip and adjust seasoning if needed. When ready, transfer it to a nice bowl. Make a small well in the center and drizzle olive oil. For a pretty touch, add halved cherry tomatoes, olives, or fresh herbs on top. Serve it with pita chips or fresh veggies. Enjoy this creamy delight! For the full recipe, check out the Whipped Feta Delight Dip. To get the best texture, start with room-temperature cream cheese. It mixes better. Use a mixer or food processor for a smooth finish. Blend the cheeses for 2-3 minutes. This gives you a light and fluffy dip. If you want it creamier, add more yogurt or olive oil. The key to great flavor lies in your seasonings. Fresh garlic adds a strong kick. I love using fresh thyme. It brings a nice herbal touch. A squeeze of lemon juice brightens the dip. Taste as you go; adjust salt and pepper to your liking. If you want a little heat, add a pinch of red pepper flakes. Serve your whipped feta dip with crispy pita chips. Fresh veggies like carrots and cucumbers are great too. For a fun twist, use crusty bread. Garnish with cherry tomatoes or olives for color. This adds a nice pop to your dish. Explore different serving bowls to make it look fancy. You can find the Full Recipe above for more details. {{image_4}} To create a Mediterranean twist, add sun-dried tomatoes and black olives. These ingredients bring a burst of flavor that pairs perfectly with feta. You might also include fresh basil or mint for a refreshing note. Serve this dip with warm pita bread or crunchy veggies for a delightful snack. If you love heat, consider adding red pepper flakes or diced jalapeños. This will give your dip a fiery kick. You can also mix in a splash of hot sauce for an extra layer of flavor. Try serving with spicy tortilla chips or crispy celery sticks for a fun twist. For a vegan version, swap the feta and cream cheese for silken tofu and nutritional yeast. Blend them together with olive oil and lemon juice. This mix creates a creamy base that tastes great. Add your favorite herbs and spices for added flavor. Serve with fresh veggies for a healthy snack. Explore the [Full Recipe] to make your own whipped feta dip and customize it with these variations! To store whipped feta dip, place it in an airtight container. This keeps moisture out and flavors in. Make sure to press plastic wrap directly onto the dip before sealing the container. This extra layer helps prevent air from changing the dip's taste. You can enjoy whipped feta dip cold or warm. If you prefer it warm, gently heat it in the microwave. Start with 15 seconds, stir, and then heat in short bursts. Be careful not to overheat; you want it creamy, not hot. Whipped feta dip lasts about 4 to 5 days in the fridge. Check for any off odors or mold before using it. If it smells sour or looks different, toss it out. Freshness is key for this tasty dip! The best way to serve whipped feta dip is with a variety of dippers. I love using crispy pita chips, fresh veggies, or crusty bread. You can also pair it with crackers for added crunch. Place the dip in a nice bowl and drizzle some olive oil on top. Add colorful toppings like cherry tomatoes or olives for a pop of color. This makes the dip look great and taste even better. Yes, you can make whipped feta dip ahead of time. It stays fresh in the fridge for up to three days. Just store it in an airtight container. When you’re ready to serve, give it a quick stir. This keeps it creamy and smooth. If it thickens, add a little olive oil or yogurt to loosen it up. This way, you save time when guests arrive. If your dip is too salty, don't worry. You can fix it! Add a little more cream cheese or Greek yogurt to balance the salt. Blend it well to mix. You can also add a splash of lemon juice. This brings freshness and brightens the flavor. If you’re in a pinch, a pinch of sugar can help too. Taste as you go, so you get the flavor just right. We explored all about whipped feta dip, from essential ingredients to fun variations. You learned how to create a creamy dip that impresses friends. Remember, you can customize toppings and even make vegan options. Proper storage keeps your dip fresh and tasty. With these tips, whipping up this dish is easy and fun. Enjoy sharing your whipped feta dip at your next gathering. Trust me, it’s a crowd-pleaser!](https://joymealplan.com/wp-content/uploads/2025/07/35a48388-1c52-4076-af09-d3ade9d891c4-768x768.webp)