Buffalo Cauliflower Bites Flavorful and Healthy Snack

Looking for a snack that’s both tasty and good for you? Buffalo cauliflower bites are the answer! These bites pack a punch of flavor without the guilt. In this guide, I’ll show you how to make them step by step and share tips for perfecting this dish. Plus, I’ll offer fun variations and serving ideas. Let’s dive into this crunchy, spicy treat that everyone will love!
Ingredients
Main Ingredients for Buffalo Cauliflower Bites
To make these tasty bites, you need some fresh and simple ingredients. Here’s what you will need:
– 1 large head of cauliflower, cut into bite-sized florets
– 1 cup all-purpose flour
– 1 cup water
– 1 teaspoon garlic powder
– 1 teaspoon smoked paprika
– 1 teaspoon onion powder
– 1/2 teaspoon cayenne pepper (adjust this to fit your spice level)
– 1/4 teaspoon salt
– 1 cup buffalo sauce (store-bought or homemade for more flavor)
– 2 tablespoons olive oil
– Fresh parsley, finely chopped (for garnish)
These ingredients create a crunchy and flavorful snack that you can enjoy anytime.
Spices and Seasonings
The spices you choose make a big difference. Garlic powder adds a nice depth of flavor. Smoked paprika gives a warm touch, while onion powder brings out the taste of cauliflower. Cayenne pepper gives a kick. Adjust it based on how spicy you want your bites. The salt enhances all these flavors, making each bite better.
Serving Suggestions
Buffalo cauliflower bites are best served warm. I love to pair them with crunchy celery sticks and creamy ranch dressing. The cool ranch balances the heat from the buffalo sauce perfectly. You can also serve them with blue cheese dressing if you prefer. Enjoy experimenting with dips and sides to find your favorite combos.
Step-by-Step Instructions
Preparing the Cauliflower
First, wash the head of cauliflower. Cut it into bite-sized florets. Make sure the pieces are even in size for cooking. This helps them cook at the same rate. Once cut, set them aside. You are ready for the next step.
Making the Batter
In a bowl, mix 1 cup of all-purpose flour with 1 cup of water. Add 1 teaspoon of garlic powder, 1 teaspoon of smoked paprika, and 1 teaspoon of onion powder. Then, add 1/2 teaspoon of cayenne pepper and 1/4 teaspoon of salt. Whisk until smooth. The batter should not have lumps. This will coat the cauliflower well.
Baking and Coating the Cauliflower Bites
Preheat your oven to 450°F (230°C) and line a baking sheet with parchment paper. Dip each cauliflower floret into the batter. Make sure to coat it fully and let the extra batter drip off. Place the florets in a single layer on the baking sheet. Bake for 20-25 minutes. Remember to turn them halfway through. This will make them golden and crispy.
While baking, mix 1 cup of buffalo sauce with 2 tablespoons of olive oil in a bowl. Stir to blend. After baking, take the florets out and toss them in the buffalo sauce mixture. Coat them well for great flavor. Return them to the oven for another 10-15 minutes. Keep an eye on them as they crisp up.
When they look perfect, take them out and let them cool. Garnish with fresh parsley for color. Serve warm with celery sticks and ranch dressing. Enjoy these flavorful and healthy bites!
Tips & Tricks
Achieving Perfect Crispiness
To get that crunchy texture, start by using a dry cauliflower. After washing, pat it with a towel. This helps the batter stick well. When you dip the florets, make sure they are fully coated. The batter should not be too thick. Thin batter helps create a crispier bite. Remember to bake at a high temperature, like 450°F. This ensures they cook fast and turn golden. Flip the florets halfway through baking to keep them even. For extra crunch, you can broil them for the last few minutes. Just watch them closely to prevent burning.
How to Make Your Own Buffalo Sauce
Making your own buffalo sauce is simple and fun. You’ll need hot sauce and butter. Start by melting the butter in a pot over low heat. Once melted, slowly stir in your choice of hot sauce. For added flavor, mix in garlic powder and a pinch of salt. Adjust the heat by adding more or less hot sauce. This gives you control over the spice level. Let the sauce simmer for a few minutes to blend the flavors. Homemade sauce tastes fresher and can be tweaked to your liking. For a milder option, try mixing it with ranch dressing.
Recommended Cooking Tools
To make buffalo cauliflower bites, a few tools can make the process easier. Here’s what I recommend:
– Large baking sheet: A good size helps with even cooking.
– Parchment paper: This prevents sticking and makes cleanup fast.
– Mixing bowls: Have a couple on hand for batter and sauce.
– Whisk: A whisk helps mix the batter smoothly.
– Tongs: These make it easy to coat and flip the florets.
Using the right tools saves time and helps ensure success. Enjoy making and sharing these tasty bites!

Variations
Vegan & Gluten-Free Alternatives
You can easily make Buffalo cauliflower bites vegan and gluten-free. Instead of all-purpose flour, try using chickpea flour. It gives a nice texture and flavor. For a gluten-free option, use a gluten-free flour blend. Make sure to check the buffalo sauce label too. Some brands add gluten.
Flavor Variations (Different Sauces, Seasonings)
Buffalo sauce is great, but you can switch it up! Try BBQ sauce for a sweet twist. Teriyaki sauce gives a nice Asian flair. You can also mix sauces for a unique taste. Adding different spices can change the game. Try garlic powder, cayenne, or even some lemon zest.
Vegetables to Pair with Buffalo Flavor
Buffalo flavor goes well with many veggies. Try carrots, zucchini, or broccoli. These veggies add crunch and flavor. You can roast them alongside the cauliflower for a full meal. Another option is to make a veggie platter with celery sticks. They are perfect for dipping!
Storage Info
Best Practices for Storing Leftovers
To keep your buffalo cauliflower bites fresh, store them in an airtight container. Let them cool completely before sealing the container. This prevents moisture buildup. You can keep them in the fridge for up to three days. If you want them to last longer, consider freezing.
Reheating Methods to Maintain Crispiness
Crispy bites are the best! To reheat, use the oven or an air fryer. Preheat your oven to 350°F (175°C). Spread the bites on a baking sheet and heat for about 10-15 minutes. This method keeps them crispy. If using an air fryer, set it to 350°F (175°C) and cook for about 5-7 minutes.
Freezing Tips for Long-Term Storage
Freezing buffalo cauliflower bites is simple. After baking and cooling, arrange them in a single layer on a baking sheet. Freeze them for about an hour until firm. Then, transfer them to a freezer bag or container. They can stay frozen for up to three months. When ready to enjoy, bake them straight from the freezer. Just adjust the cooking time to ensure they heat through.
FAQs
How long to cook Buffalo Cauliflower Bites?
You should cook Buffalo Cauliflower Bites for about 30 to 40 minutes. Bake them at 450°F (230°C). The first bake takes 20 to 25 minutes. After applying the buffalo sauce, bake for an extra 10 to 15 minutes. This ensures they become crispy and golden brown.
Can I use frozen cauliflower instead of fresh?
Yes, you can use frozen cauliflower. However, I recommend thawing and draining it first. Frozen cauliflower may have more water, which can make the bites soggy. Pat it dry with a towel before you coat it in the batter. This will help maintain that desired crispiness.
What dipping sauces go well with Buffalo Cauliflower Bites?
Buffalo Cauliflower Bites pair well with many dipping sauces. Here are some great options:
– Ranch dressing
– Blue cheese dressing
– Vegan mayo
– Honey mustard
These sauces add a nice contrast to the heat of the buffalo sauce.
How to adjust spice levels in the recipe?
To adjust spice levels, simply change the amount of cayenne pepper. If you want less heat, use less than 1/2 teaspoon. For more spice, add more cayenne or a splash of hot sauce to the batter. You can also choose a milder buffalo sauce if you prefer.
What are the nutritional benefits of cauliflower?
Cauliflower is a superfood packed with nutrients. It is low in calories and high in fiber. Here are some benefits:
– Rich in vitamins C and K
– Contains antioxidants
– Supports heart health
– Aids in digestion
These benefits make cauliflower a great choice for healthy snacks like Buffalo Cauliflower Bites.
We covered how to make tasty Buffalo Cauliflower Bites. You learned about the best ingredients, step-by-step instructions, and helpful tips for perfect results. Remember, you can add your own flavors or store leftovers easily. Enjoy these bites with a dip and some crunch from celery sticks. Experiment and find your favorite way to serve them. These bites can be a fun and healthy treat for any gathering!

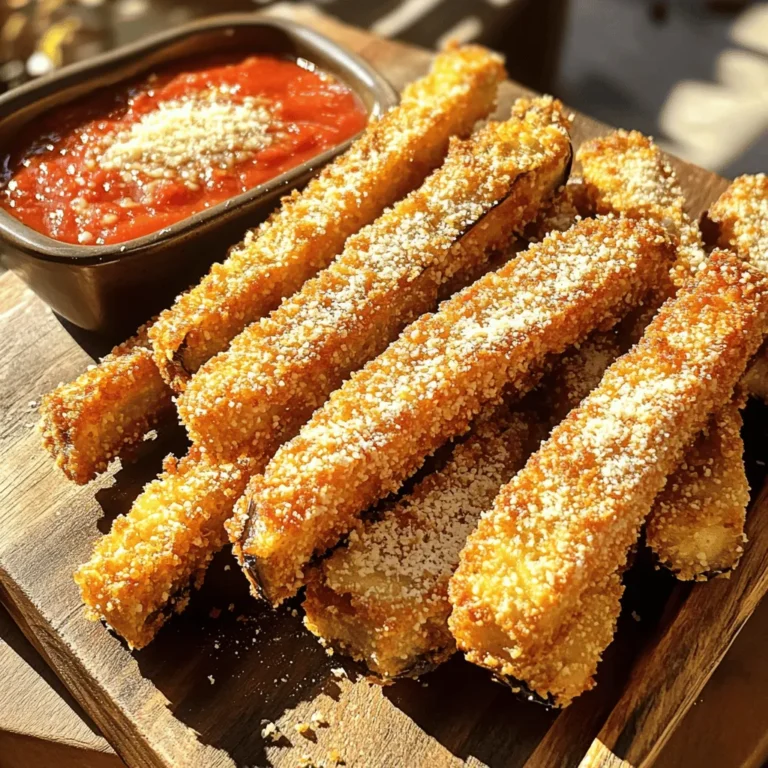
![- 2 pounds baby Yukon gold potatoes - 4 tablespoons extra-virgin olive oil - 4 cloves garlic, finely minced To start, gather your primary ingredients. Baby Yukon gold potatoes taste great and roast well. The olive oil keeps everything moist and smooth. Garlic adds a bold flavor that makes these potatoes shine. - 1/2 cup freshly grated Parmesan cheese - 1 teaspoon dried Italian herbs - Salt and freshly ground black pepper Next, we need to season our potatoes. Freshly grated Parmesan cheese gives a rich, cheesy taste. Italian herbs, like oregano and basil, add a nice touch. Don’t forget to season with salt and black pepper for balance. - 2 tablespoons fresh parsley, finely chopped Lastly, for a pop of color and freshness, use chopped parsley. It brightens the dish and makes it more appealing. You can find the Full Recipe online to get all the details and cooking steps. - Preheat the oven to 425°F (220°C). - Prepare the baking sheet with parchment paper. First, I make sure my oven is hot. Preheating helps the potatoes cook evenly. Lining the baking sheet with parchment paper makes cleaning easier. It also helps the potatoes not stick. - Combine the potatoes with olive oil and seasonings. - Toss to coat the potatoes evenly. Next, I grab a large bowl. I add the halved baby Yukon gold potatoes. Then, I pour in the extra-virgin olive oil and minced garlic. I also add dried Italian herbs, salt, and pepper. This mix gives the potatoes their flavor. I toss everything until each piece is coated well. - Arrange the potatoes on the baking sheet. - Initial roasting and adding Parmesan cheese. - Final roasting until crispy and golden. Now, I spread the seasoned potatoes on the baking sheet. I make sure they have space between them. This helps them roast, getting crispy on the outside. I place the sheet in the oven for about 20 minutes. After that, I take it out and sprinkle Parmesan cheese on top. I put it back in the oven for another 15-20 minutes. I want the potatoes golden brown and crispy. When they are done, I take them out and sprinkle fresh parsley on top for color. You can find the full recipe in the previous section. To ensure even seasoning, always mix your ingredients well. When you combine the potatoes with olive oil and spices, make sure every piece gets coated. This step is key for flavor. Next, place the potatoes on the baking sheet with space between them. This spacing helps them roast evenly and get crispy. If they touch, they might steam instead of roast. For golden brown potatoes, roast them at a high temperature. I recommend 425°F (220°C). This heat gives the potatoes that nice crunch you want. Halfway through cooking, check them. If they look brown, they are getting close to being done. You can adjust the time based on your oven. When serving, think about the dish you use. A rustic wooden bowl adds a cozy touch. You can also use a decorative platter for a nice presentation. For garnish, sprinkle fresh parsley on top. This adds color and a fresh taste. Consider pairing these potatoes with grilled chicken or steak for a complete meal. They also go well with a fresh salad! For more detailed steps, check out the Full Recipe. {{image_4}} You can make Garlic Parmesan Roasted Potatoes even tastier. Adding fresh herbs like rosemary or thyme boosts flavor. They add a nice, earthy note. You can also infuse your potatoes with a bit of lemon zest. This gives a bright, fresh taste. Red pepper flakes can add a spicy kick. Just a pinch can make a big difference. If you want variety, try different cheeses. Cheddar or gouda can work well too. Each cheese brings a unique flavor. For a vegan option, use nutritional yeast. It has a cheesy flavor and is a great substitute for Parmesan. Cashew cheese is another tasty choice. You don’t have to stick with Yukon gold potatoes. Try red or fingerling potatoes for a new twist. They have different textures and flavors. Sweet potatoes are a fun alternative too. They add sweetness and a vibrant color to the dish. Each type of potato can change the taste and look of your meal. For the full recipe, check out the [Full Recipe]. To store leftover Garlic Parmesan Roasted Potatoes, let them cool first. Place them in an airtight container. You can keep them in the fridge for up to four days. When you want to reheat, use the oven or air fryer for best results. This keeps them crispy. Heat at 350°F (175°C) for about 10-15 minutes. Yes, you can freeze Garlic Parmesan Roasted Potatoes. To do this, let them cool completely. Spread them on a baking sheet and freeze for a few hours. Once frozen, transfer them to a freezer bag. This helps prevent them from sticking together. When you're ready to eat, thaw them overnight in the fridge. Reheat in the oven for best texture. Leftovers last about four days in the fridge. Check for signs of spoilage, like a bad smell or slimy texture. If you notice these signs, it’s best to throw them away. Enjoy your tasty Garlic Parmesan Roasted Potatoes while they're fresh! For the complete recipe, check the Full Recipe. Yes, you can make Garlic Parmesan Roasted Potatoes ahead of time. Cook the potatoes fully and let them cool. Then, place them in an airtight container. Store them in the fridge for up to three days. When you are ready to eat, reheat them in the oven. This method keeps them crispy. You can also prepare and season the potatoes a day before. Just wait to roast them until you are ready. Garlic Parmesan Roasted Potatoes pair well with many dishes. Here are some great options: - Grilled chicken - Roasted vegetables - Steak or pork chops - A fresh green salad These sides enhance the meal and add more flavor to your plate. To achieve that perfect crispy texture, follow these tips: - Use baby Yukon gold potatoes, as they roast well. - Make sure to space the potatoes on the baking sheet. This allows hot air to circulate. - Toss them in olive oil and seasonings before roasting. - Roast at a high temperature, around 425°F (220°C). - For extra crispiness, broil them for a few minutes at the end. Yes, you can use pre-cut frozen potatoes. They save time and are convenient. However, keep a few things in mind: - Thaw them first to ensure even cooking. - Adjust the cooking time since frozen potatoes may take longer. - Check for doneness by piercing them with a fork. They should be tender inside. Using frozen potatoes can still yield tasty results with this recipe. Garlic Parmesan Roasted Potatoes are simple yet delicious. You learned how to choose the right ingredients, prepare, and roast the potatoes to perfection. We discussed enhancing the flavor with various herbs and cheeses. You can store leftovers and even freeze them for later meals. Embrace this recipe and make it your own. It’s perfect for any meal. Enjoy the crispy goodness with your favorite dishes!](https://joymealplan.com/wp-content/uploads/2025/07/f9349f8b-67c5-4d5e-a46e-da791f5e9156-768x768.webp)
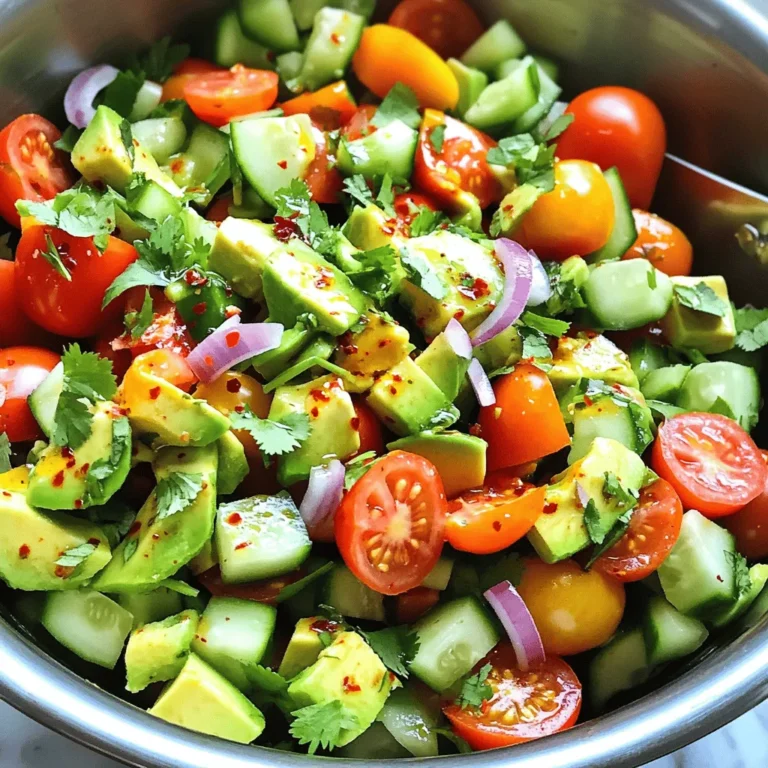
![- Tortilla chips - Black beans - Corn kernels - Cherry tomatoes - Avocado - Cheddar cheese (or dairy-free alternative) - Pickled jalapeños - Red onion - Fresh cilantro - Olive oil - Ground cumin - Smoked paprika - Salt and pepper - Optional toppings: Sour cream or Greek yogurt, lime wedges To make loaded veggie nachos, gather fresh and flavorful ingredients. I love using crispy tortilla chips as the base. They hold all the toppings without getting soggy. Black beans add protein and texture. Rinsing and draining them keeps the flavors bright. Corn kernels bring sweetness and crunch. I often use fresh corn when it’s in season, but canned works well too. Next, halved cherry tomatoes burst with flavor. Diced avocado brings creaminess. I prefer ripe avocados for the best taste. Cheddar cheese is a must for gooey goodness. You can use a dairy-free version if needed. Pickled jalapeños give a nice kick, so add as many as you like. Red onion adds a sharp taste and crunch. Fresh cilantro brings brightness. I love the fresh herb flavor it adds. For the dressing, use olive oil, ground cumin, and smoked paprika. They bring warmth and depth. Lastly, don’t forget salt and pepper to enhance all the flavors. You can serve these nachos with optional toppings like sour cream or Greek yogurt. Lime wedges add a zesty finish. For the full recipe, check out the Ultimate Loaded Veggie Nachos. Start by preheating your oven to 350°F (175°C). This temperature helps the cheese melt just right. While the oven warms up, grab a mixing bowl for the veggies. Combine 1 cup of black beans, 1 cup of corn, 1 cup of halved cherry tomatoes, 1 ripe diced avocado, and 1/4 cup of chopped red onion. Drizzle 1 tablespoon of olive oil over this mix. Sprinkle in 1 teaspoon of ground cumin, 1 teaspoon of smoked paprika, and add salt and pepper to taste. Gently toss to blend the flavors. Now take a large baking sheet. Spread an even layer of tortilla chips across it. Make sure they are not crowded. This helps the chips stay crisp. Next, generously spoon the veggie mixture over the chips. Try to cover as many chips as you can. This way, each bite is packed with flavor. Sprinkle 1 cup of shredded cheddar cheese evenly over the veggie-covered chips. If you like spice, add pickled jalapeños on top. Place the baking sheet in your preheated oven. Bake for about 10 to 15 minutes. Watch closely until the cheese is melted and bubbly, but not burnt. Once baked, carefully take the nachos out of the oven. Garnish with 1/4 cup of freshly chopped cilantro. Serve them with lime wedges on the side. For a creamy touch, add sour cream or Greek yogurt. These extra touches make every bite a treat. Serve them on a large platter or in bowls. Enjoy this savory delight with friends or family! For the full recipe, check the detailed instructions above. Choose the right cheese for your nachos. I love using cheddar, but you can try Monterey Jack or a dairy-free alternative. These cheeses melt well and add rich flavor. For the best texture, shred your cheese fresh from the block. Pre-shredded cheese often has anti-clumping agents that can affect melting. When baking, keep an eye on the nachos. You want the cheese to bubble and slightly brown, which usually takes 10 to 15 minutes at 350°F. To kick up the flavor, think about adding spices. A pinch of chili powder or a dash of hot sauce can do wonders. If you enjoy tang, drizzle some lime juice over the nachos before serving. Fresh herbs like cilantro or green onions can also brighten the dish. Chopped jalapeños, fresh or pickled, add heat and flavor. Experiment with different combinations to find your favorite mix. I often serve nachos on a large platter, letting everyone dig in. For individual servings, use small bowls. This makes for a fun, personal touch. Pair your nachos with drinks like soda, beer, or a margarita for a complete experience. Dips like guacamole or salsa work great on the side too. They add extra flavor and keep the meal exciting. Remember to keep lime wedges handy for a fresh burst of flavor. For the complete recipe, check out the [Full Recipe]. {{image_4}} You can easily make loaded veggie nachos vegan. First, swap the cheddar cheese for a dairy-free cheese. Look for brands made from nuts or soy. These options melt well and taste great. For extra vegan toppings, try using cashew cream instead of sour cream. You can also add sliced black olives, diced bell peppers, or fresh spinach. These ingredients boost flavor and nutrients. To make gluten-free nachos, choose tortilla chips marked gluten-free. Many brands offer this option. Always check the label to ensure safety. You can also use other bases like baked sweet potatoes or zucchini slices. These alternatives add a unique twist and keep things healthy. Get creative with your toppings! You can add other veggies like mushrooms, bell peppers, or even roasted zucchini. For proteins, consider topping with lentils, chickpeas, or tofu. Specialty toppings can add unique flavors. Try fresh herbs like basil or mint, or drizzle with hot sauce for a kick. You can also scatter some pomegranate seeds for a sweet touch. After enjoying your loaded veggie nachos, store any leftovers properly. This helps maintain their taste and texture. Start by letting the nachos cool down. Place them in an airtight container. If you have extra toppings, like sour cream or avocado, store those separately. Use a small bowl or a bag to keep them fresh. Refrigerate the container within two hours. The nachos will stay good for about three days. To reheat your nachos, use the oven for best results. Preheat it to 350°F (175°C). Spread the nachos on a baking sheet in a single layer. Heat them for about 10 minutes. This helps revive their crunch. If you’re in a hurry, the microwave works too. Use a microwave-safe plate and heat for 30 seconds at a time. Keep an eye on them to avoid sogginess. Enjoy your nachos as if they were just made! Making homemade tortilla chips is easy and fun! Start with corn tortillas. Cut each tortilla into six triangles. Heat oil in a pan over medium heat. When the oil is hot, add a few triangles. Fry them until they turn golden brown. Remove them and place them on paper towels to drain excess oil. Sprinkle with salt while they are hot. Enjoy your fresh chips with loaded veggie nachos! Yes, you can prepare some parts in advance. You can chop the veggies and mix them a few hours before cooking. Store the veggie mixture in the fridge. However, I recommend adding the chips and cheese just before baking. This keeps the chips crispy and delicious! You can get creative with toppings! Try adding: - Sliced black olives - Diced bell peppers - Sliced radishes - Fresh spinach - Grilled chicken or beef - Different types of cheese like pepper jack or feta These options add fun flavors and textures to your nachos. Freezing nachos is tricky. I do not recommend freezing fully assembled nachos. The chips become soggy when thawed. However, you can freeze the veggie mixture and cheese separately. When you’re ready to eat, simply bake fresh chips and top them with the thawed mixture. It’s a great way to enjoy nachos anytime! For the full recipe, check out the Ultimate Loaded Veggie Nachos. In this blog post, I covered how to make delicious nachos, highlighting key ingredients and simple steps. You learned about assembling layers and baking for the best results. I shared tips for perfect cheese melting, flavor boosts, and customizable options to fit your needs. Don't forget storage advice and reheating methods to enjoy leftovers. Nachos are easy to make and adapt, so get creative and enjoy! Your nacho journey starts here, and I hope you relish every bite.](https://joymealplan.com/wp-content/uploads/2025/06/0185d0b5-b46a-4930-af15-477191a5be30-768x768.webp)
![To make Garlic Parmesan Roasted Asparagus, gather these fresh items: - 1 bunch of fresh asparagus, trimmed - 3 tablespoons extra virgin olive oil - 4 cloves of garlic, finely minced - 1/2 cup freshly grated Parmesan cheese - 1 teaspoon freshly grated lemon zest - 1/2 teaspoon red pepper flakes (optional for a spicy kick) - Sea salt and freshly cracked black pepper to taste - Fresh parsley, chopped (for garnish) Using fresh ingredients makes a big difference. Fresh asparagus has a nice crunch and bright flavor. If you can't find fresh asparagus, you can use frozen, but the texture will change. Extra virgin olive oil adds a rich taste. You can swap it with avocado oil if desired. Minced garlic is key for flavor. If you want milder garlic, use garlic powder instead. Parmesan cheese brings a salty, nutty flavor. For a dairy-free option, try nutritional yeast for a cheesy taste. Lemon zest wakes up the dish. If you don’t have lemon, use lime zest for a different twist. Fresh ingredients are essential for great taste. They add vibrant flavors and textures that dried or stale items can’t match. The freshness of the asparagus shines through when roasted. It becomes tender and slightly crispy, perfect with garlic and cheese. Using fresh garlic enhances the aroma and flavor of the dish. Plus, fresh parsley adds a pop of color and freshness when you garnish the asparagus. Always choose fresh when you can. It makes a simple dish like Garlic Parmesan Roasted Asparagus truly stand out. For the full recipe, check out the details above! Start by trimming the asparagus. Hold a spear in your hand and bend it gently. The asparagus will snap at the right point. This is where the tough part ends. I usually take about an inch off. Rinse the asparagus under cold water to remove any dirt. Pat them dry with a clean towel. This step is key to getting a nice roast. In a large bowl, add the trimmed asparagus. Pour in the extra virgin olive oil. Use your hands to toss the asparagus, ensuring they are well-coated. Next, add the minced garlic, grated Parmesan cheese, and lemon zest. If you like spice, sprinkle in red pepper flakes. Season with sea salt and freshly cracked black pepper. Toss everything again until the asparagus is fully coated in the tasty mix. Now, arrange the asparagus on a lined baking sheet. Make sure they are in a single layer. This helps them cook evenly. Place the baking sheet in the oven set to 425°F (220°C). Roast for about 15 to 20 minutes. Check on them halfway through. You want them tender with crispy edges. When done, take them out and let them cool for a few minutes. Garnish with chopped parsley for a fresh look. For the full recipe, check the details above. To get that perfect crispiness, start with fresh asparagus. The thinner the spears, the better they crisp up. Make sure to coat them evenly with olive oil. This helps them roast nicely. Lay the asparagus in a single layer on the baking sheet. If they overlap, they can steam instead of roast. Keep an eye on them while they cook. You want them tender with slightly crispy edges. You can adjust the flavors to fit your taste. If you love garlic, add more minced cloves. For a kick, sprinkle in more red pepper flakes. If you prefer a milder taste, reduce the garlic or skip the flakes. Add a squeeze of lemon juice after roasting for extra brightness. Experiment until you find your perfect mix. Serve your Garlic Parmesan Roasted Asparagus warm. It pairs well with grilled meats or fish. You can also serve it alongside pasta dishes. For a fun twist, add it to salads or grain bowls. Garnish with fresh parsley for a pop of color. For more flavor, drizzle balsamic reduction over the top. This adds a sweet balance to the savory notes. Check out the Full Recipe for more ideas! {{image_4}} You can make Garlic Parmesan Roasted Asparagus more exciting. Try adding lemon juice for zest. A squeeze of fresh lime also brightens the dish. For a smoky flavor, add smoked paprika. You can also mix in nuts, like almonds or pine nuts, for added crunch. If you want a cheesy twist, use feta or goat cheese instead. The options are endless, and each adds a new layer of taste. If you prefer a vegan option, swap the Parmesan cheese for a plant-based cheese. Nutritional yeast is a great choice too. It gives a cheesy flavor without dairy. You can also use a mix of sunflower seeds and garlic powder to mimic the cheese flavor. This way, you still enjoy the savory goodness without any animal products. You can cook asparagus in many ways. Grilling gives it a nice smoky taste. To grill, toss the asparagus in oil and seasonings, then place it on the grill for about 5-7 minutes. Air frying is also a great method. It cooks the asparagus quickly while keeping it crisp. Just set your air fryer to 400°F (200°C) and cook for 8-10 minutes. Each method offers a unique flavor and texture, so feel free to experiment. For full details on the recipe, check the Full Recipe section! To store Garlic Parmesan Roasted Asparagus, first let it cool down. Place it in an airtight container. Make sure to keep it in the fridge. This keeps it fresh and tasty for later. You can also use a resealable plastic bag if you prefer. Just squeeze out the air before sealing. When you are ready to enjoy the leftovers, preheat your oven to 350°F (175°C). Spread the asparagus on a baking sheet. Heat for about 10 minutes. This will help restore its crispiness. If you want a quicker method, use the microwave. Heat it for 30 seconds at a time until warm. You can store Garlic Parmesan Roasted Asparagus in the fridge for up to 3 days. After that, it may lose its flavor and texture. If you want to keep it longer, consider freezing it. Wrap it well and store it in the freezer for up to 2 months. Just remember, the texture may change after freezing. For the best taste, enjoy it fresh or within a few days. For the full recipe, check out the earlier sections. Yes, you can use frozen asparagus. However, fresh asparagus tastes better. Frozen asparagus may have more water, which can affect the final texture. If you use frozen ones, reduce the roasting time. Cook them until they are tender but still hold their shape. Asparagus is perfectly roasted when it is bright green and tender. The tips should be slightly crispy. You can test doneness by piercing a spear with a fork. If it goes through easily, it is ready. Keep an eye on the time. Roasting takes about 15-20 minutes at 425°F. Yes, you can make this recipe in advance. Roast the asparagus, then cool it down. Store it in the fridge for up to 3 days. When ready to serve, reheat it in the oven for a few minutes. This keeps the flavors fresh and the texture nice. For the full recipe, check [Full Recipe]. This blog post covered how to make garlic parmesan roasted asparagus. You learned about key ingredients and how fresh ones make a big difference. I shared easy steps to prepare, mix, and roast the asparagus to perfection. You also found tips for crispiness, flavor, and serving ideas. Plus, variations let you explore new tastes, and I provided advice on storing leftovers. Use this guide to make a delicious dish. Enjoy your cooking and make your meals healthier and tastier!](https://joymealplan.com/wp-content/uploads/2025/06/31f02132-0972-47ce-ba26-05432beb78d0-768x768.webp)