
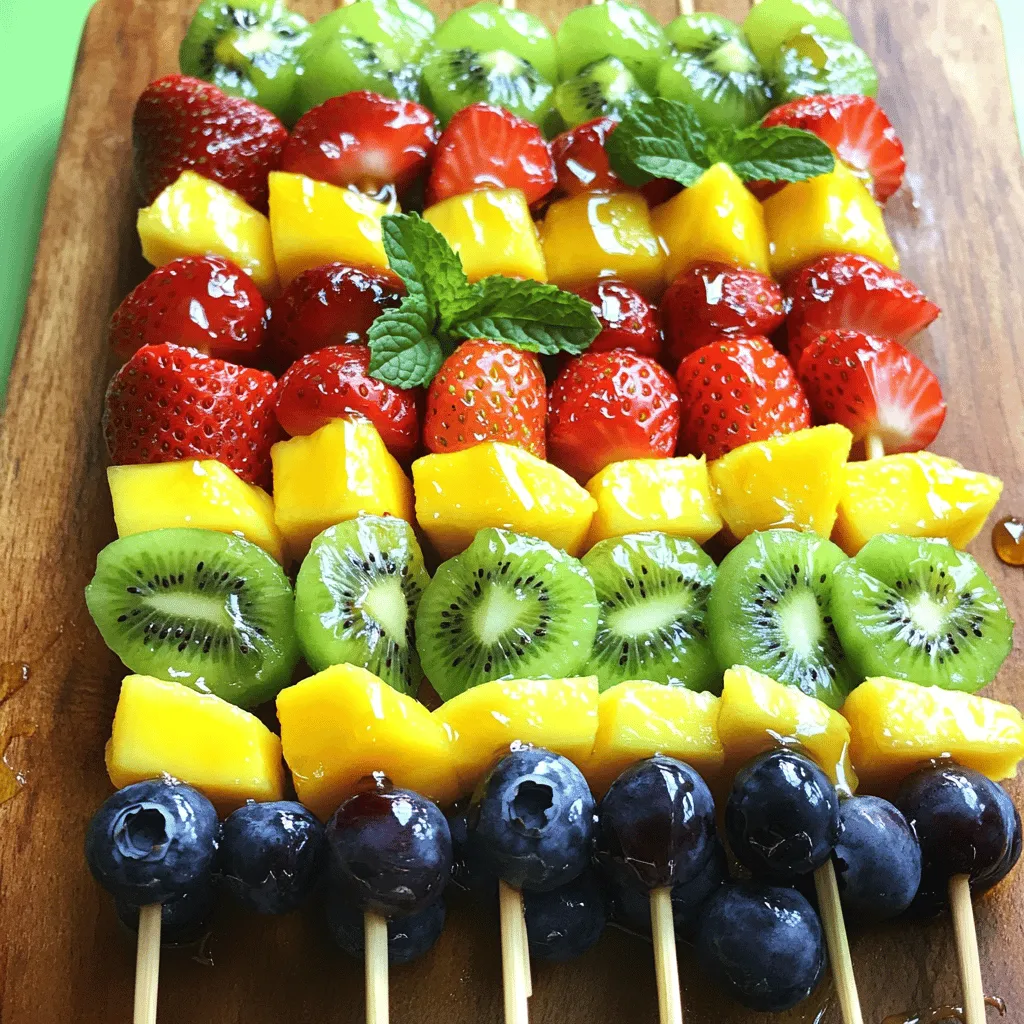
Rainbow Fruit Skewers Colorful and Simple Treats

Are you ready to brighten your snack time with Rainbow Fruit Skewers? These colorful treats are not only fun to make, but they also pack a nutritious punch! In this guide, I’ll share easy steps, helpful tips, and creative ideas for your skewers. You’ll learn how to prepare a vibrant mix of fruits that look great and taste amazing. Let’s dive into creating your new favorite snack!They are colorful, easy to make, and perfect for parties. This recipe takes only 15 minutes. You will enjoy the bright flavors and vibrant colors of the fruits. Use the following ingredients to create your own delicious skewers.
Essential Ingredients List
– 1 cup strawberries, hulled and halved
– 1 cup mango, diced into bite-sized pieces
– 1 cup kiwi, peeled and sliced into rounds
– 1 cup blueberries, rinsed
– 1 cup pineapple, diced
– 1 cup grapes (choose either red or green for variety)
– 2 tablespoons honey or agave syrup (for a vegan option)
– 1 tablespoon fresh lime juice
– Optional: fresh mint leaves for a vibrant garnish
Suggested Tools for Preparation
To make rainbow fruit skewers, you need a few simple tools:
– Wooden or metal skewers
– A cutting board
– A sharp knife
– Mixing bowl for the honey-lime drizzle
– Measuring spoons
– A small whisk or fork for mixing
With these ingredients and tools, you are ready to create your rainbow fruit skewers!
Step-by-Step Instructions
Fruit Preparation Process
Start by washing all your fruits well. Use cool, running water to clean them. For strawberries, remove the green tops and cut them in half. Dice your mango and pineapple into small pieces. Slice the kiwi into even rounds. Rinse the blueberries and stem the grapes. Having all fruit ready makes skewering easy.
How to Make Honey-Lime Drizzle
To make the honey-lime drizzle, grab a small bowl. Add two tablespoons of honey or agave syrup to the bowl. Squeeze fresh lime juice into the bowl, about one tablespoon. Mix them well until they blend together. This drizzle will add a sweet and tangy kick to your fruit skewers.
Perfect Skewering Techniques
Now it’s time to assemble your skewers. Take a skewer and start with a strawberry. Next, add a piece of mango, then a kiwi slice. Follow with a few blueberries, a piece of pineapple, and finish with grapes. Aim for a colorful mix as you layer the fruits. Keep your skewers filled with 4 to 6 pieces each. Have fun with different patterns and combinations!
Once finished, drizzle the honey-lime mixture over the skewers. This will give them a sweet touch that pairs well with the fruits. You can even add a mint leaf on top for extra flair. Enjoy your rainbow fruit skewers right away or chill them for a refreshing treat.
Tips & Tricks
Presentation Tips for Attractive Skewers
To make your rainbow fruit skewers pop, focus on color and order. Use a mix of bright fruits. Start with red strawberries, then orange mango, followed by green kiwi. Add blue blueberries, yellow pineapple, and finish with grapes. This pattern creates a vibrant display.
Consider using long wooden skewers for a dramatic look. If you want smaller bites, choose shorter skewers. You can also make mini versions with toothpicks. Add a fresh mint leaf on top for a touch of green. This not only looks great but adds freshness.
Storing and Serving Suggestions
Store your skewers in an airtight container. Place parchment paper between layers to prevent sticking. This keeps them fresh and tasty. If you prepare them in advance, refrigerate for up to 24 hours.
Serve them cold for a refreshing treat. They are great for parties or picnics. You can also lay them out on a colorful platter for guests. This makes for an eye-catching centerpiece.
Enhancing Flavor with Additional Ingredients
For a flavor boost, try adding a sprinkle of cinnamon or a dash of chili powder. This adds a fun twist to your skewers. You can also drizzle them with yogurt for a creamy touch.
If you want a vegan option, use agave syrup instead of honey. This keeps the dish sweet while catering to different diets.
Variations
Creative Fruit Combinations
You can mix and match fruits for fun flavors. Try adding apples for crunch. Peaches or plums can bring a sweet touch. If you like a tart twist, add raspberries or blackberries. The key is to keep your colors bright and varied. This makes your skewers not only tasty but also beautiful!
Seasonal Fruit Options
Using seasonal fruits makes your skewers fresh and vibrant. In spring and summer, strawberries and peaches shine. Fall brings apples and pears into play. Winter is the time for citrus fruits like oranges and grapefruits. By changing fruits with the seasons, you can enjoy different tastes all year round.
Skewers for Different Dietary Needs
These skewers can fit many diets. They are naturally vegan and gluten-free. For a nut-free option, skip any nut toppings. If you want added protein, you can include yogurt or cheese. Just remember to check for allergies when serving to others!
Nutritional Benefits
Health Advantages of Each Fruit
Each fruit in rainbow fruit skewers brings unique health benefits.
– Strawberries are rich in vitamin C. They help boost your immune system.
– Mangoes provide vitamin A, good for your eyes and skin.
– Kiwis are high in fiber, aiding digestion and keeping you full.
– Blueberries contain antioxidants, which protect your cells from damage.
– Pineapples offer bromelain, which may reduce inflammation.
– Grapes are hydrating and can improve heart health.
Low-Calorie Snack Options
Rainbow fruit skewers are a great low-calorie snack. Each fruit is naturally sweet yet low in calories.
– A skewer can have around 50-100 calories, depending on the fruits used.
– They satisfy your sweet tooth without added sugars or fats.
– You can enjoy them guilt-free any time of the day.
Boosting Vitamins and Minerals in Your Diet
These skewers help increase your daily intake of vitamins and minerals.
– Eating a variety of fruits ensures you get a broad range of nutrients.
– This mix can enhance your energy levels and overall well-being.
– Enjoying rainbow fruit skewers helps meet your recommended daily servings of fruit.
Rainbow fruit skewers are not just fun to make; they also pack a nutritional punch.
FAQs
Can I use frozen fruits for skewers?
Yes, you can use frozen fruits, but they may be mushy. Frozen fruits lose their texture when thawed. If you want to use them, pick fruits that hold up well, like blueberries. Thaw them in the fridge for a few hours. This keeps them cold without making them too soft.
How far in advance can I prepare fruit skewers?
You can prepare fruit skewers up to a day in advance. Store them in the fridge, covered with plastic wrap or in a sealed container. This helps keep them fresh. If you add the honey-lime drizzle, do it just before serving. This way, the fruits stay bright and tasty.
What is the best way to keep fruit fresh?
The best way to keep fruit fresh is to store it cold. Refrigerate your skewers in an airtight container. You can also sprinkle a little lemon juice over the fruits. This helps slow down browning. Avoid washing fruits until you’re ready to use them, as moisture can cause spoilage.Enjoy the burst of flavors!
This blog post covered how to make delicious fruit skewers. We discussed the key ingredients, tools, and step-by-step instructions. Tips for presentation, storing, and enhancing flavors make your skewers shine. We also explored fun variations and the health benefits of fruits.
In summary, these skewers can fit any occasion and diet. Get creative with fruit and enjoy a simple, tasty treat!

. To store unused tomato mixture, place it in an airtight container. This keeps the mix fresh for up to two days. If you have leftover bruschetta, avoid adding toppings until you're ready to serve. This prevents the bread from getting soggy. For the bread, store it in a paper bag. This helps maintain its crispness. Avoid plastic bags, as they trap moisture and make the bread soft. If you want to keep the bread fresh longer, freeze it. Just slice the bread before freezing for easy use later. You can freeze the tomato mixture and the bread separately. This helps keep each part fresh. To freeze the tomato mix, pour it into a freezer-safe bag. Remove excess air before sealing. When you're ready to eat, thaw the mixture overnight in the fridge. For the bread, place it in the oven at 350°F (175°C) for about 10 minutes to restore its crunch. Enjoy your bruschetta within three days for the best taste. Over time, the tomatoes may lose their fresh flavor. Look for signs of spoilage like discoloration or an off smell. If the bread feels soft or stale, it’s time to toss it. By following these simple storage tips, you can extend the life of your delicious bruschetta. Enjoy it fresh and vibrant every time! The best breads for bruschetta are Italian baguette or ciabatta. Both have a nice crust that crisps up well. You can also use sourdough for a tangy flavor. Choose a bread that is sturdy enough to hold the toppings. Yes! You can prepare the tomato mix a few hours ahead. Just store it in the fridge. This lets the flavors blend. Toast the bread right before serving for the best crunch. Keep the bread and topping separate until you serve. To serve more people, double the recipe. Use multiple loaves of bread. You can also make several batches of the tomato mix. It’s easy to scale up. Just remember to toast the bread in batches to keep it crisp. Bruschetta is best served fresh. The toasted bread should be warm. The tomato mix can be at room temperature. This combo gives a nice contrast. Serve it right after you assemble it for the best taste. Bruschetta pairs well with simple sides. Think of a light salad or soup. A fresh arugula salad works great. You can also serve it with olives or cheese. These add nice flavors and textures to your meal. In this post, we explored making bruschetta from fresh ingredients like ripe tomatoes, basil, and garlic. You learned how to prepare these components and create the perfect toast. We also covered tips for storage and common mistakes to avoid. Finally, I shared variations for different seasons and diets. Bruschetta is simple, fun, and a delightful treat. Enjoy experimenting and finding your favorite flavors!](https://joymealplan.com/wp-content/uploads/2025/07/10355497-7bd2-4922-b413-5484ea4e8a3f-768x768.webp)


. {{image_4}} Vegetarian Mini Quiche Cups For a tasty vegetarian option, use only veggies. You can add spinach, mushrooms, and bell peppers. Mix in some cheese for creaminess. This keeps the dish light yet filling. You can also use fresh herbs like basil or oregano for extra flavor. Try to use seasonal veggies for the best taste. Meat Lovers' Option If you love meat, this option is for you. Use diced ham, crispy bacon, or cooked sausage. Combine these with your favorite cheese and veggies. This mix gives a hearty bite to each quiche cup. You will enjoy the rich, savory flavors in every bite. Gluten-Free Crust Alternatives If you need a gluten-free crust, use almond flour or cornmeal. You can also find ready-made gluten-free pie crusts at the store. Another idea is to make a crustless quiche. Just pour the filling into greased muffin tins. This way, you skip the crust but keep all the flavor. Dairy-Free Ingredient Swaps For a dairy-free version, use plant-based milk like almond or soy. Swap regular cheese for dairy-free cheese options. Nutritional yeast can add a cheesy flavor without dairy. Try these swaps to enjoy mini quiche cups without dairy. It keeps the recipe tasty and friendly for all diets. For the full recipe, check out the details in the previous section. To keep your mini quiche cups fresh, proper storage is key. - Refrigerating Leftovers: Place any leftover mini quiche cups in an airtight container. They will stay fresh for up to 3 days in the fridge. Just make sure they cool down before sealing. You can also wrap them tightly in plastic wrap for extra protection. - Freezing for Long-Term Storage: If you want to save them longer, freezing works well. First, let the quiche cups cool completely. Then, place them on a baking sheet and freeze until solid. After that, transfer them to a freezer-safe bag or container. They can last up to 2 months in the freezer. Remember to label the container with the date you made them. When you're ready to enjoy your mini quiche cups again, follow these tips for the best results. - Best Methods for Serving Again: The oven is the best way to reheat quiche cups. Preheat your oven to 350°F (175°C). Place the cups on a baking sheet and heat for about 10-15 minutes. This method keeps the crust crisp and the filling warm. - Retaining Flavor and Texture: Avoid using a microwave if you can. Microwaving can make the crust soggy and the filling rubbery. If you must use a microwave, heat them in short bursts of 30 seconds. Check often to ensure they don’t overcook. Following these tips will help you enjoy your mini quiche cups just like fresh! For the full recipe, check the [Full Recipe]. Bake Mini Quiche Cups for 18 to 20 minutes at 375°F (190°C). The tops should turn golden brown. You want the centers set but still moist. Keep an eye on them in the last few minutes. Each oven heats a bit differently. Yes, you can make Mini Quiche Cups ahead of time. Prepare them and store in the fridge for up to two days. You can also freeze them for up to a month. Just be sure to cool them completely before storing. To reheat, place them in the oven at 350°F (175°C) until warm. Great ingredients include: - 6 large eggs - 1 cup milk (whole or 2%) - 1 cup shredded cheese (like cheddar or mozzarella) - 1 cup diced vegetables (bell peppers, spinach, or mushrooms) - 1/2 cup cooked ham or crispy bacon (optional) - Garlic powder and onion powder for flavor These create a tasty base for your quiche cups. You can mix and match fillings easily. Try different cheeses or veggies. For a spicy kick, add jalapeños. If you love herbs, include fresh basil or thyme. Think about seasonal produce too. This makes your quiche cups unique and fun. Mini quiche cups are fun and easy to make. You can mix eggs, dairy, cheese, meats, and veggies to create tasty treats. Remember to preheat your oven and choose the right crust. I shared tips on filling them just right and baking them perfectly. Explore variations like vegetarian or gluten-free options, and learn how to store leftovers. With these steps and ideas, you have all you need for quiche success. Enjoy making your own mini quiche cups! They’ll be a hit with everyone.](https://joymealplan.com/wp-content/uploads/2025/06/d5cf7460-7b4e-43b3-accb-372b25b26cc9-768x768.webp)