Savory Vegan Chocolate Cake Easy and Delicious Treat
![- 1 ½ cups all-purpose flour - 1 cup coconut sugar - ½ cup unsweetened cocoa powder - ½ cup dairy-free chocolate chips (optional) The main ingredients in this vegan chocolate cake make it rich and delightful. The all-purpose flour provides structure. Coconut sugar adds a slight caramel flavor, enhancing the cake's taste. Unsweetened cocoa powder gives the cake its deep chocolate flavor. If you want an extra treat, add dairy-free chocolate chips. They melt beautifully and create pockets of chocolatey goodness. - Plant-based milk options - Sugar substitutes for a healthier cake - Oil alternatives If you need a milk substitute, try almond, soy, or oat milk. Each brings its unique flavor but stays creamy. For sugar, you can use maple syrup or agave nectar. They add sweetness without refined sugar. If you want to cut back on oil, use applesauce or mashed bananas. These swaps keep the cake moist while lowering fat. Each alternative keeps your cake tasty while meeting your diet needs. For a detailed look at the full recipe, check out the Full Recipe section. Grease your cake pan with a thin layer of oil. You can also line it with parchment paper. This step helps the cake come out easily after baking. Next, preheat your oven to 350°F (175°C). Preheating ensures your cake bakes evenly and rises well. Start by sifting your dry ingredients together. This process breaks up clumps and helps mix them well. Use a whisk to combine the all-purpose flour, coconut sugar, cocoa powder, baking soda, and salt. If you see clumps in the cocoa powder, sift it again. It makes your cake smoother and more delicious. Use room temperature ingredients for the best results. Cold ingredients can cause the batter to be lumpy. In a bowl, mix the almond milk, vegetable oil, vanilla extract, and apple cider vinegar. The vinegar helps the cake rise and adds a nice texture. Whisk these ingredients until they blend well. Pour the wet mixture into the dry ingredients. Stir gently until just combined. Pour the batter into your prepared pan. Bake for 30 to 35 minutes. Check for doneness by inserting a toothpick in the center. It should come out clean or with a few moist crumbs. Let the cake cool for about 10 minutes in the pan, then transfer it to a wire rack. This cooling step helps the cake set and makes it easier to frost later. For the full recipe, you can refer to the complete instructions above. To get the best texture, avoid overmixing the batter. When you mix too much, the cake can turn out dense. Just mix until the dry and wet ingredients blend. This keeps the cake light and fluffy. The temperature of your ingredients matters too. Use room temperature milk and oil. Cold ingredients can slow down the rising process, making your cake less airy. Adding spices can take your cake to the next level. A pinch of cinnamon or a dash of espresso powder adds depth. You can also try vanilla extract or almond extract for a flavor boost. For a more indulgent cake, fold in dairy-free chocolate chips. They add richness and texture that you will love. When your cake is baked and cooled, it's time to make it pretty. Lightly dust the top with powdered sugar. You can also top it with fresh berries for a pop of color. For serving, consider a dollop of coconut whipped cream. This adds flavor and impresses your guests. For the full recipe, check out the link. Enjoy the process and the delightful results! {{image_4}} You can easily change the flavor of your vegan chocolate cake. Adding fruits or nuts can make it exciting. Try folding in chopped bananas, apples, or walnuts into the batter. These additions bring a new texture and taste. You can also use different types of cocoa powder. Dark cocoa gives a richer flavor, while raw cocoa offers a lighter taste. Experiment with both to see what you like best! This cake can fit many diets. If you need a gluten-free option, swap out all-purpose flour for almond or oat flour. Both work well and keep the cake moist. If you need nut-free alternatives, use rice milk or oat milk instead of almond milk. You can also use sunflower oil instead of vegetable oil to keep it nut-free. There are fun ways to serve this cake. You can layer cakes or make cupcakes for easy sharing. Layer cakes look great and taste amazing. You can also create mini vegan chocolate cakes for individual servings. These are perfect for parties or special events. Each person gets their own cake, making it a delightful treat! To keep your vegan chocolate cake fresh, place it in an airtight container. This helps lock in moisture and flavor. If you have leftover slices, separate them with parchment paper. This prevents them from sticking together. Store the cake at room temperature for up to three days. If you want to keep it longer, consider freezing it. To freeze the cake, wrap it tightly in plastic wrap. Then, place it in a freezer-safe bag. This helps avoid freezer burn. You can freeze the cake for up to three months. When you are ready to eat, thaw it in the fridge overnight. For best results, let it come to room temperature before serving. Enjoy the same great taste and texture as the day you made it! Yes, you can! Here are some good substitutes for all-purpose flour: - Whole wheat flour - Almond flour - Oat flour - Gluten-free flour blend Each option will change the texture and taste. Whole wheat flour adds a nutty flavor. Almond flour makes the cake moist. Oat flour gives a soft texture. Gluten-free blends work well for those with gluten issues. Always check the ratio for the best results. Yes, vinegar plays a key role in vegan baking. It helps the cake rise and stay light. When mixed with baking soda, it creates a reaction that makes the cake fluffy. If you skip the vinegar, the cake may turn out dense. Apple cider vinegar is the best choice for this recipe. You can easily boost the chocolate flavor! Here are some options: - Add an extra ¼ cup of unsweetened cocoa powder to the batter. - Drizzle chocolate ganache on top after baking. Using dairy-free chocolate chips also enhances the chocolate flavor. Mixing in some melted dark chocolate can make it richer. Each option adds depth, so feel free to experiment! You have many tasty options for frosting! Here are a few suggestions: - Vegan chocolate ganache - Coconut whipped cream - Peanut butter frosting Chocolate ganache is rich and creamy. Coconut whipped cream adds a light, fluffy touch. Peanut butter frosting gives a nutty contrast. Choose what you love best for a perfect pairing! For the full recipe, check out the [Full Recipe]. In this post, we covered how to make a delicious vegan chocolate cake from start to finish. You learned about key ingredients, alternatives, and step-by-step instructions to bake it perfectly. I shared tips for texture and flavor, plus creative serving ideas. Remember, you can customize this cake to fit different diets and tastes easily. Whether you’re baking for yourself or others, this cake is sure to impress. Enjoy the process and the tasty results you create!](https://joymealplan.com/wp-content/uploads/2025/06/282c7cbd-7bac-4bac-839f-8ad7be604c23.webp)
Are you ready to indulge in a moist and rich vegan chocolate cake that pleases every palate? In this post, I’ll share my easy recipe that uses simple ingredients like coconut sugar and dairy-free chocolate chips. You’ll learn step-by-step how to create a treat that is both delicious and guilt-free. Plus, I’ll include tips and variations to make it your own. Let’s dive in and bake something wonderful together!
Ingredients
Key Ingredients for Vegan Chocolate Cake
– 1 ½ cups all-purpose flour
– 1 cup coconut sugar
– ½ cup unsweetened cocoa powder
– ½ cup dairy-free chocolate chips (optional)
The main ingredients in this vegan chocolate cake make it rich and delightful. The all-purpose flour provides structure. Coconut sugar adds a slight caramel flavor, enhancing the cake’s taste. Unsweetened cocoa powder gives the cake its deep chocolate flavor. If you want an extra treat, add dairy-free chocolate chips. They melt beautifully and create pockets of chocolatey goodness.
Alternatives for Common Ingredients
– Plant-based milk options
– Sugar substitutes for a healthier cake
– Oil alternatives
If you need a milk substitute, try almond, soy, or oat milk. Each brings its unique flavor but stays creamy. For sugar, you can use maple syrup or agave nectar. They add sweetness without refined sugar. If you want to cut back on oil, use applesauce or mashed bananas. These swaps keep the cake moist while lowering fat. Each alternative keeps your cake tasty while meeting your diet needs.
Step-by-Step Instructions
Prepping Your Cake Pan
Grease your cake pan with a thin layer of oil. You can also line it with parchment paper. This step helps the cake come out easily after baking. Next, preheat your oven to 350°F (175°C). Preheating ensures your cake bakes evenly and rises well.
Mixing Dry Ingredients
Start by sifting your dry ingredients together. This process breaks up clumps and helps mix them well. Use a whisk to combine the all-purpose flour, coconut sugar, cocoa powder, baking soda, and salt. If you see clumps in the cocoa powder, sift it again. It makes your cake smoother and more delicious.
Combining Wet Ingredients
Use room temperature ingredients for the best results. Cold ingredients can cause the batter to be lumpy. In a bowl, mix the almond milk, vegetable oil, vanilla extract, and apple cider vinegar. The vinegar helps the cake rise and adds a nice texture. Whisk these ingredients until they blend well.
Baking the Cake
Pour the wet mixture into the dry ingredients. Stir gently until just combined. Pour the batter into your prepared pan. Bake for 30 to 35 minutes. Check for doneness by inserting a toothpick in the center. It should come out clean or with a few moist crumbs. Let the cake cool for about 10 minutes in the pan, then transfer it to a wire rack. This cooling step helps the cake set and makes it easier to frost later.
Tips & Tricks
Achieving the Perfect Texture
To get the best texture, avoid overmixing the batter. When you mix too much, the cake can turn out dense. Just mix until the dry and wet ingredients blend. This keeps the cake light and fluffy.
The temperature of your ingredients matters too. Use room temperature milk and oil. Cold ingredients can slow down the rising process, making your cake less airy.
Enhancing Flavor
Adding spices can take your cake to the next level. A pinch of cinnamon or a dash of espresso powder adds depth. You can also try vanilla extract or almond extract for a flavor boost.
For a more indulgent cake, fold in dairy-free chocolate chips. They add richness and texture that you will love.
Presentation Ideas
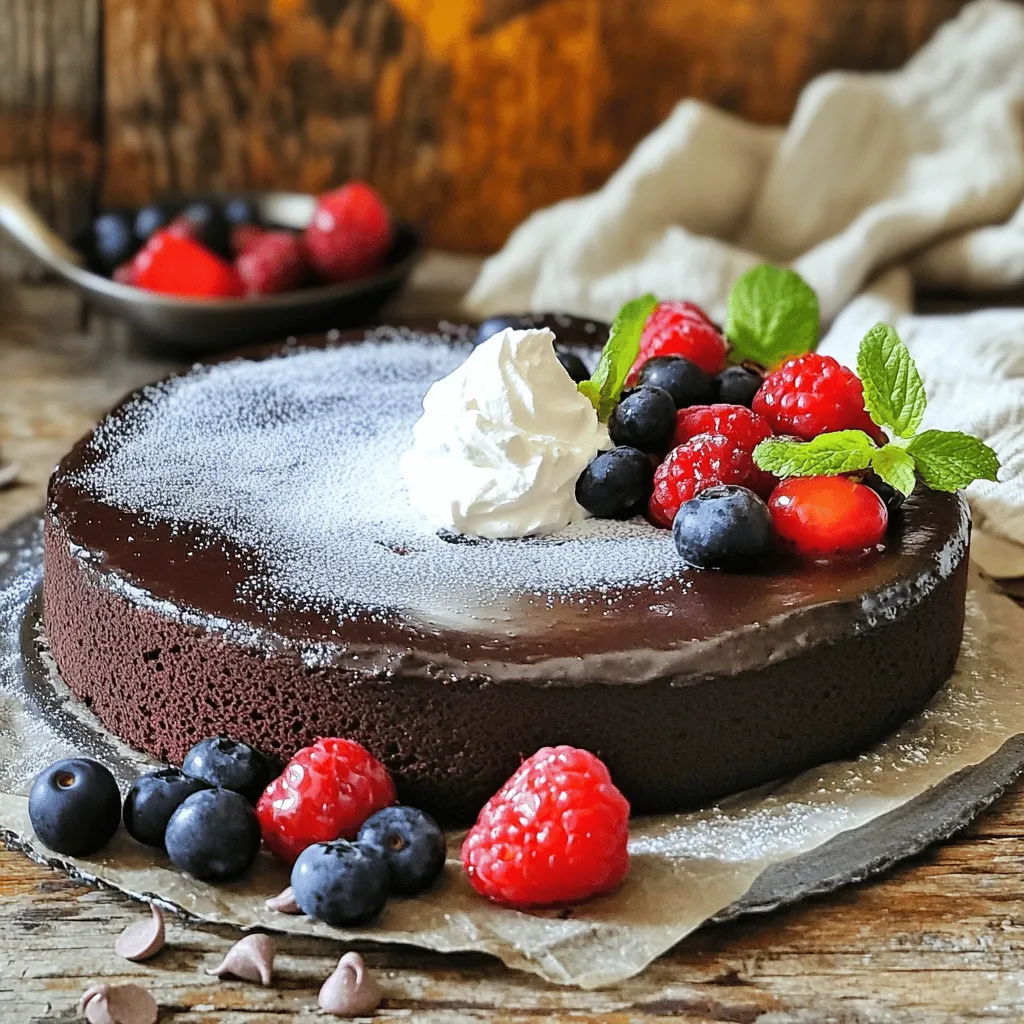
When your cake is baked and cooled, it’s time to make it pretty. Lightly dust the top with powdered sugar. You can also top it with fresh berries for a pop of color.
For serving, consider a dollop of coconut whipped cream. This adds flavor and impresses your guests.Enjoy the process and the delightful results!
Variations
Flavor Swaps
You can easily change the flavor of your vegan chocolate cake. Adding fruits or nuts can make it exciting. Try folding in chopped bananas, apples, or walnuts into the batter. These additions bring a new texture and taste. You can also use different types of cocoa powder. Dark cocoa gives a richer flavor, while raw cocoa offers a lighter taste. Experiment with both to see what you like best!
Dietary Restrictions
This cake can fit many diets. If you need a gluten-free option, swap out all-purpose flour for almond or oat flour. Both work well and keep the cake moist. If you need nut-free alternatives, use rice milk or oat milk instead of almond milk. You can also use sunflower oil instead of vegetable oil to keep it nut-free.
Different Serving Styles
There are fun ways to serve this cake. You can layer cakes or make cupcakes for easy sharing. Layer cakes look great and taste amazing. You can also create mini vegan chocolate cakes for individual servings. These are perfect for parties or special events. Each person gets their own cake, making it a delightful treat!
Storage Info
How to Store Leftovers
To keep your vegan chocolate cake fresh, place it in an airtight container. This helps lock in moisture and flavor. If you have leftover slices, separate them with parchment paper. This prevents them from sticking together. Store the cake at room temperature for up to three days. If you want to keep it longer, consider freezing it.
Freezing Instructions
To freeze the cake, wrap it tightly in plastic wrap. Then, place it in a freezer-safe bag. This helps avoid freezer burn. You can freeze the cake for up to three months. When you are ready to eat, thaw it in the fridge overnight. For best results, let it come to room temperature before serving. Enjoy the same great taste and texture as the day you made it!
FAQs
Can I use a different flour for this recipe?
Yes, you can! Here are some good substitutes for all-purpose flour:
– Whole wheat flour
– Almond flour
– Oat flour
– Gluten-free flour blend
Each option will change the texture and taste. Whole wheat flour adds a nutty flavor. Almond flour makes the cake moist. Oat flour gives a soft texture. Gluten-free blends work well for those with gluten issues. Always check the ratio for the best results.
Is it necessary to use vinegar in the cake?
Yes, vinegar plays a key role in vegan baking. It helps the cake rise and stay light. When mixed with baking soda, it creates a reaction that makes the cake fluffy. If you skip the vinegar, the cake may turn out dense. Apple cider vinegar is the best choice for this recipe.
How can I make this cake even more chocolatey?
You can easily boost the chocolate flavor! Here are some options:
– Add an extra ¼ cup of unsweetened cocoa powder to the batter.
– Drizzle chocolate ganache on top after baking.
Using dairy-free chocolate chips also enhances the chocolate flavor. Mixing in some melted dark chocolate can make it richer. Each option adds depth, so feel free to experiment!
What type of frosting pairs well with vegan chocolate cake?
You have many tasty options for frosting! Here are a few suggestions:
– Vegan chocolate ganache
– Coconut whipped cream
– Peanut butter frosting
Chocolate ganache is rich and creamy. Coconut whipped cream adds a light, fluffy touch. Peanut butter frosting gives a nutty contrast. Choose what you love best for a perfect pairing!
In this post, we covered how to make a delicious vegan chocolate cake from start to finish. You learned about key ingredients, alternatives, and step-by-step instructions to bake it perfectly. I shared tips for texture and flavor, plus creative serving ideas. Remember, you can customize this cake to fit different diets and tastes easily. Whether you’re baking for yourself or others, this cake is sure to impress. Enjoy the process and the tasty results you create!
![- 1 ½ cups all-purpose flour - 1 cup coconut sugar - ½ cup unsweetened cocoa powder - ½ cup dairy-free chocolate chips (optional) The main ingredients in this vegan chocolate cake make it rich and delightful. The all-purpose flour provides structure. Coconut sugar adds a slight caramel flavor, enhancing the cake's taste. Unsweetened cocoa powder gives the cake its deep chocolate flavor. If you want an extra treat, add dairy-free chocolate chips. They melt beautifully and create pockets of chocolatey goodness. - Plant-based milk options - Sugar substitutes for a healthier cake - Oil alternatives If you need a milk substitute, try almond, soy, or oat milk. Each brings its unique flavor but stays creamy. For sugar, you can use maple syrup or agave nectar. They add sweetness without refined sugar. If you want to cut back on oil, use applesauce or mashed bananas. These swaps keep the cake moist while lowering fat. Each alternative keeps your cake tasty while meeting your diet needs. For a detailed look at the full recipe, check out the Full Recipe section. Grease your cake pan with a thin layer of oil. You can also line it with parchment paper. This step helps the cake come out easily after baking. Next, preheat your oven to 350°F (175°C). Preheating ensures your cake bakes evenly and rises well. Start by sifting your dry ingredients together. This process breaks up clumps and helps mix them well. Use a whisk to combine the all-purpose flour, coconut sugar, cocoa powder, baking soda, and salt. If you see clumps in the cocoa powder, sift it again. It makes your cake smoother and more delicious. Use room temperature ingredients for the best results. Cold ingredients can cause the batter to be lumpy. In a bowl, mix the almond milk, vegetable oil, vanilla extract, and apple cider vinegar. The vinegar helps the cake rise and adds a nice texture. Whisk these ingredients until they blend well. Pour the wet mixture into the dry ingredients. Stir gently until just combined. Pour the batter into your prepared pan. Bake for 30 to 35 minutes. Check for doneness by inserting a toothpick in the center. It should come out clean or with a few moist crumbs. Let the cake cool for about 10 minutes in the pan, then transfer it to a wire rack. This cooling step helps the cake set and makes it easier to frost later. For the full recipe, you can refer to the complete instructions above. To get the best texture, avoid overmixing the batter. When you mix too much, the cake can turn out dense. Just mix until the dry and wet ingredients blend. This keeps the cake light and fluffy. The temperature of your ingredients matters too. Use room temperature milk and oil. Cold ingredients can slow down the rising process, making your cake less airy. Adding spices can take your cake to the next level. A pinch of cinnamon or a dash of espresso powder adds depth. You can also try vanilla extract or almond extract for a flavor boost. For a more indulgent cake, fold in dairy-free chocolate chips. They add richness and texture that you will love. When your cake is baked and cooled, it's time to make it pretty. Lightly dust the top with powdered sugar. You can also top it with fresh berries for a pop of color. For serving, consider a dollop of coconut whipped cream. This adds flavor and impresses your guests. For the full recipe, check out the link. Enjoy the process and the delightful results! {{image_4}} You can easily change the flavor of your vegan chocolate cake. Adding fruits or nuts can make it exciting. Try folding in chopped bananas, apples, or walnuts into the batter. These additions bring a new texture and taste. You can also use different types of cocoa powder. Dark cocoa gives a richer flavor, while raw cocoa offers a lighter taste. Experiment with both to see what you like best! This cake can fit many diets. If you need a gluten-free option, swap out all-purpose flour for almond or oat flour. Both work well and keep the cake moist. If you need nut-free alternatives, use rice milk or oat milk instead of almond milk. You can also use sunflower oil instead of vegetable oil to keep it nut-free. There are fun ways to serve this cake. You can layer cakes or make cupcakes for easy sharing. Layer cakes look great and taste amazing. You can also create mini vegan chocolate cakes for individual servings. These are perfect for parties or special events. Each person gets their own cake, making it a delightful treat! To keep your vegan chocolate cake fresh, place it in an airtight container. This helps lock in moisture and flavor. If you have leftover slices, separate them with parchment paper. This prevents them from sticking together. Store the cake at room temperature for up to three days. If you want to keep it longer, consider freezing it. To freeze the cake, wrap it tightly in plastic wrap. Then, place it in a freezer-safe bag. This helps avoid freezer burn. You can freeze the cake for up to three months. When you are ready to eat, thaw it in the fridge overnight. For best results, let it come to room temperature before serving. Enjoy the same great taste and texture as the day you made it! Yes, you can! Here are some good substitutes for all-purpose flour: - Whole wheat flour - Almond flour - Oat flour - Gluten-free flour blend Each option will change the texture and taste. Whole wheat flour adds a nutty flavor. Almond flour makes the cake moist. Oat flour gives a soft texture. Gluten-free blends work well for those with gluten issues. Always check the ratio for the best results. Yes, vinegar plays a key role in vegan baking. It helps the cake rise and stay light. When mixed with baking soda, it creates a reaction that makes the cake fluffy. If you skip the vinegar, the cake may turn out dense. Apple cider vinegar is the best choice for this recipe. You can easily boost the chocolate flavor! Here are some options: - Add an extra ¼ cup of unsweetened cocoa powder to the batter. - Drizzle chocolate ganache on top after baking. Using dairy-free chocolate chips also enhances the chocolate flavor. Mixing in some melted dark chocolate can make it richer. Each option adds depth, so feel free to experiment! You have many tasty options for frosting! Here are a few suggestions: - Vegan chocolate ganache - Coconut whipped cream - Peanut butter frosting Chocolate ganache is rich and creamy. Coconut whipped cream adds a light, fluffy touch. Peanut butter frosting gives a nutty contrast. Choose what you love best for a perfect pairing! For the full recipe, check out the [Full Recipe]. In this post, we covered how to make a delicious vegan chocolate cake from start to finish. You learned about key ingredients, alternatives, and step-by-step instructions to bake it perfectly. I shared tips for texture and flavor, plus creative serving ideas. Remember, you can customize this cake to fit different diets and tastes easily. Whether you’re baking for yourself or others, this cake is sure to impress. Enjoy the process and the tasty results you create!](https://joymealplan.com/wp-content/uploads/2025/06/282c7cbd-7bac-4bac-839f-8ad7be604c23-300x300.webp)
. Start by preheating the air fryer to 350°F (175°C). This step helps your donuts cook evenly. It only takes a few minutes, so don’t skip this part! In a mixing bowl, combine the dry ingredients. You’ll need: - 1 cup all-purpose flour - 1/2 cup granulated sugar - 1 1/2 teaspoons baking powder - 1/4 teaspoon salt - 1/2 teaspoon ground cinnamon - 1/4 teaspoon ground nutmeg (optional) Whisk these ingredients together until there are no lumps left. This ensures a smooth donut texture. Next, grab another bowl to mix the wet ingredients. You’ll need: - 1/2 cup milk - 1 large egg - 2 tablespoons unsalted butter, melted - 1 teaspoon vanilla extract Whisk these until the mixture is smooth. This adds flavor and moisture to your donuts. Now, slowly add the wet mixture to the dry ingredients. Stir gently until a soft dough starts to form. Be careful not to overmix. A delicate touch gives your donuts their light texture. Lightly flour your countertop. Roll the dough out to about 1/2 inch thick. Use a donut cutter or two round cutters to cut out the donuts. If you have dough scraps, reroll them to make more donuts. Place the shaped donuts in the air fryer basket. Make sure you don’t overcrowd them. Cook for 5-6 minutes until they turn golden brown. Flip them halfway through for even cooking. While your donuts cook, mix the cinnamon sugar in a shallow dish. Combine: - 1/4 cup granulated sugar - 1 tablespoon ground cinnamon This will give your donuts that sweet and spicy touch. Once the donuts are done, take them out of the air fryer. While they are still warm, roll each donut in the cinnamon sugar mixture. Make sure they are coated on all sides for a tasty finish. Let the coated donuts cool for a few minutes on a wire rack. This helps them set. Serve them warm or at room temperature. They are perfect for sharing or enjoying with a cup of coffee! For the full recipe, check out the details above. To make great donuts, the dough must be soft but not sticky. After mixing, it should feel smooth. If it’s too wet, add a little more flour. If it’s too dry, add a splash of milk. Remember, don’t overmix! This keeps the donuts light and fluffy. Use a donut cutter or two different-sized round cutters. Press straight down without twisting. Twisting can seal the edges and stop the donuts from rising. If you don’t have a cutter, use a glass for the larger circle. A small bottle cap works for the center hole. Preheat your air fryer to 350°F (175°C). Cook the donuts for 5-6 minutes. Flip them halfway to ensure they brown evenly. Keep an eye on them! Every air fryer cooks a bit differently, so check for a golden color. For a lovely look, serve your donuts on a pretty plate. Dust them with extra cinnamon for a nice touch. You can also put some cinnamon sugar in a small bowl for dipping. This makes it fun and tasty for everyone! Enjoy your homemade treats! {{image_4}} You can make chocolate glazed donuts with this base recipe. After cooking the donuts, melt some chocolate chips in a bowl. Dip each warm donut into the melted chocolate. Let excess chocolate drip off before placing them on a wire rack. You can add sprinkles on top for some fun color and texture. This adds a rich flavor that pairs well with the cinnamon sugar. To create pumpkin spice donuts, swap out some of the milk with pumpkin puree. Add a tablespoon of pumpkin pie spice to the dry ingredients. This gives the donuts a warm, fall flavor. The result is a moist donut that is perfect for autumn. Serve them fresh with a light dusting of cinnamon sugar. If you need nut-free donuts, just ensure all your ingredients are nut-free. Use regular all-purpose flour, which is safe for most people. For gluten-free donuts, you can use a gluten-free flour blend. Make sure the blend has xanthan gum to help with texture. This way, everyone can enjoy these tasty treats without worry. For more ideas, check out the Full Recipe. To keep your donuts fresh, place them in an airtight container. They can stay at room temperature for up to two days. For longer storage, refrigerate them. Just remember, cold donuts can lose some of their charm. If you want to save some donuts for later, freezing is a great option. Wrap each donut in plastic wrap and place them in a freezer-safe bag. They can last for up to three months in the freezer. Label the bag with the date so you know when to enjoy them! When you’re ready to enjoy your frozen donuts, take them out of the freezer. Let them thaw in the fridge overnight. You can warm them in the air fryer at 350°F for about 3 to 5 minutes. This will make them soft and tasty again, just like fresh! For more details, check the Full Recipe. Yes, you can use self-rising flour. Just skip the baking powder and salt. Self-rising flour has these ingredients already mixed in. Your donuts will still taste great! You can use unsweetened applesauce or mashed banana. About 1/4 cup works well as a replacement for one egg. This keeps your donuts moist and adds a bit of sweetness. To make the donuts healthier, you can reduce the sugar. Try using a sugar alternative like stevia or monk fruit. You can also add more whole grains by using whole wheat flour. It’s an easy swap! Yes, you can bake them! Just preheat your oven to 350°F (175°C). Place the donuts on a baking sheet and bake for about 10-12 minutes. They will not be as crispy, but they’ll still be tasty! These donuts stay fresh for about two days at room temperature. If you want them to last longer, store them in an airtight container in the fridge. You can also freeze them for up to three months. Just reheat when you're ready to enjoy! For the full recipe, check the details in the previous sections! This blog post covers everything you need to make air fryer donuts. We discussed the ingredients, step-by-step instructions, helpful tips, and fun variations. Remember to store your donuts well for freshness, and feel free to try different flavors. Donut-making can be simple and fun. I hope you enjoy making these tasty treats! Now go ahead and create your delicious batch!](https://joymealplan.com/wp-content/uploads/2025/07/9fe56699-c2ee-4d7f-b420-cb85b6682c39-768x768.webp)