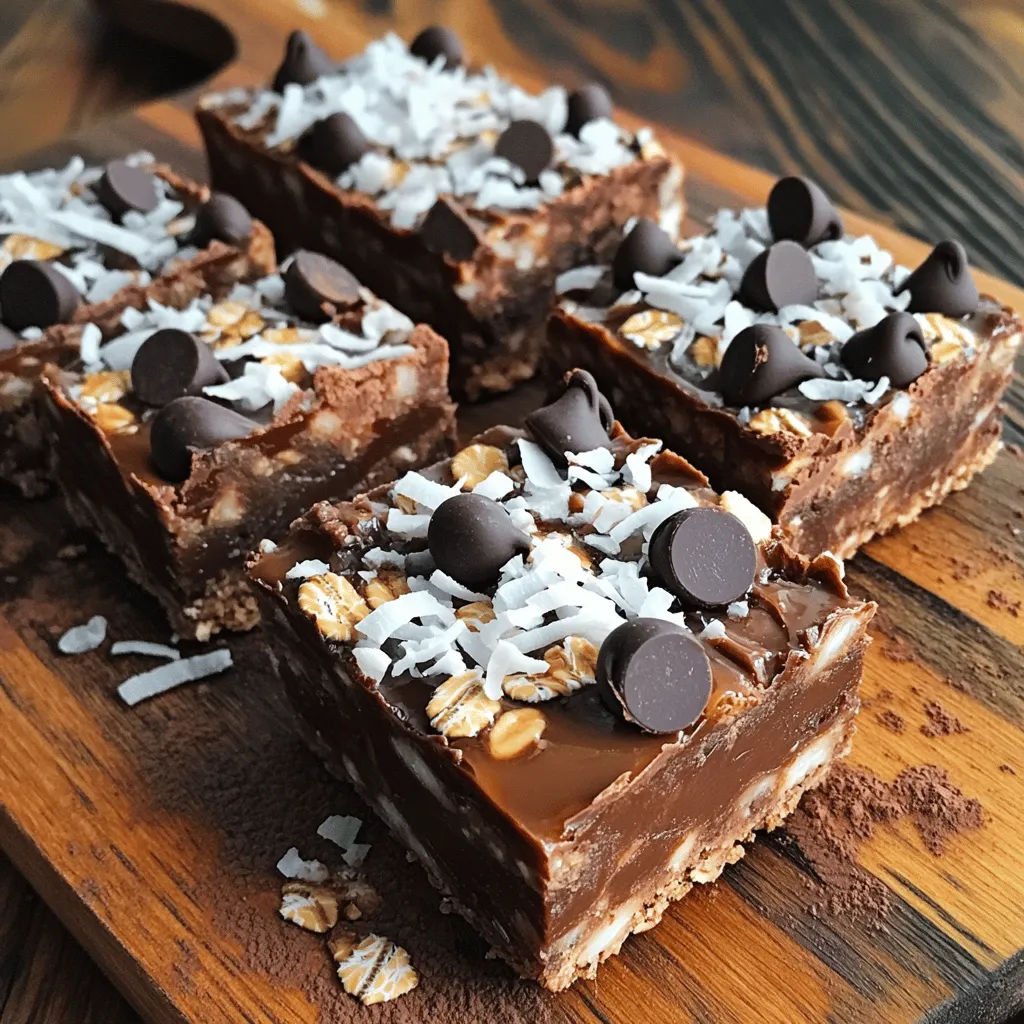
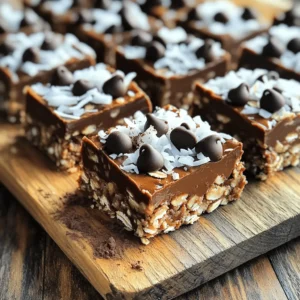
No-Bake Chocolate Oat Bars Crunchy and Tasty Treat

Are you craving a tasty treat that’s quick to make and healthy? These No-Bake Chocolate Oat Bars are crunchy, sweet, and packed with energy. With just a few simple ingredients, you can whip these up in no time! I’ll share how to create this delicious snack, plus tips for adding your own twist. Get ready to enjoy a delightful combination of flavor and texture in every bite!
Ingredients
To make these No-Bake Chocolate Oat Bars, you need simple ingredients that pack a punch. Here’s what you’ll need:
– 2 cups rolled oats
– 1 cup almond butter (or peanut butter)
– 1/2 cup honey or maple syrup
– 1/4 cup unsweetened cocoa powder
– 1/2 cup dark chocolate chips
– 1/4 cup shredded coconut (optional)
– 1/4 teaspoon salt
– 1 teaspoon vanilla extract
– Handful of chopped nuts (optional)
These ingredients work together to create a chewy, crunchy, and tasty treat. The oats provide great texture, while the nut butter gives a rich flavor. Honey or maple syrup adds just the right sweetness. Cocoa powder and dark chocolate chips bring that chocolatey goodness you love. You can even add shredded coconut or nuts if you want an extra crunch!The best part? You don’t need to bake anything! Just mix, press, and chill. Enjoy your delicious bars as a snack or dessert.
Step-by-Step Instructions
Preparation of Dry Mixture
To start, grab a large mixing bowl. Combine 2 cups of rolled oats, 1/4 cup of unsweetened cocoa powder, and 1/4 teaspoon of salt. Stir these dry ingredients well. If you like, add 1/4 cup of shredded coconut to the mix. This gives a nice flavor and crunch.
Heating the Wet Ingredients
Next, take a microwave-safe bowl. Warm 1 cup of almond butter and 1/2 cup of honey for about 20-30 seconds. This makes it easy to mix. After warming, add 1 teaspoon of vanilla extract. Stir until smooth.
Combining Ingredients
Now, pour the warm almond butter mix over the dry ingredients. Mix everything thoroughly. Ensure the dry ingredients get coated well. Then, gently fold in 1/2 cup of dark chocolate chips and a handful of chopped nuts if you want some extra crunch.
Setting the Mixture
Prepare an 8×8 inch square baking dish by lining it with parchment paper. Let some paper hang over the edges. This helps with easy removal later. Transfer the oat mixture into the dish. Press it down firmly with a spatula to create an even layer.
Chilling Process
Finally, place the baking dish in the refrigerator. Let it chill for at least 1 hour. This helps the bars firm up. After chilling, lift the bars out using the parchment paper. Cut them into squares or bars as you like.
Tips & Tricks
Perfecting Texture and Flavor
Using fresh ingredients makes a big difference in taste. Fresh oats and nut butter add rich flavor. If you want a twist, try different nut butters like cashew or sunflower. Each one brings its own unique taste. This keeps your treats exciting and new.
Presentation Ideas
For a lovely touch, dust your bars with cocoa powder or coconut before serving. This adds a nice look and extra flavor. Arrange the bars on a decorative platter. Pair them with tea or coffee for a cozy snack time. This small detail elevates your treat’s appeal.
Common Mistakes to Avoid
One key mistake is not pressing the mixture firmly enough into the dish. This can lead to crumbly bars. Make sure you press down hard to help them stay together. Another mistake is overheating the almond butter mixture. Heat it just enough to mix well. Too much heat can change the texture, making it less smooth. Following these tips ensures your no-bake chocolate oat bars turn out perfectly every time.
Variations
Flavor Customizations
You can change the taste of your No-Bake Chocolate Oat Bars easily. First, try adding dried fruits like cranberries or raisins. They give a sweet, chewy bite. You can also mix in spices like cinnamon or sea salt. Cinnamon adds warmth, while sea salt enhances the chocolate flavor.
Dietary Alternatives
If you need a vegan version, use maple syrup instead of honey. This will keep it sweet and tasty. For those with nut allergies, substitute almond butter with sunflower seed butter. This keeps the bars creamy and adds a nice nutty flavor. Explore these options to make the bars fit your needs!
Storage Information
How to Store Leftovers
To keep your no-bake chocolate oat bars fresh, store them in an airtight container in the fridge. This helps maintain their texture and flavor. If you want to keep them longer, you can freeze them. Just wrap each bar tightly in plastic wrap before placing them in a freezer-safe bag.
Shelf Life
These bars taste best when eaten within one week if kept in the fridge. If you freeze them, they can last up to two to three months. Just remember to let them thaw in the fridge before enjoying. This way, you will always have a tasty treat ready for snacking!
FAQs
Can I use quick oats instead of rolled oats?
Yes, but the texture will differ slightly. Quick oats are more processed. They will blend in better but may lose that chewy bite. Rolled oats give a nice, hearty crunch.
How to make No-Bake Chocolate Oat Bars gluten-free?
Use certified gluten-free oats and ensure all other ingredients are gluten-free. Check labels closely. Not all honey or sweeteners are gluten-free, so be cautious.
Can I modify the sweetener used?
Absolutely, you can use agave nectar or other liquid sweeteners. Brown rice syrup works too. Each sweetener has its own flavor, so feel free to experiment!
What are some serving suggestions for these bars?
Pair them with yogurt or serve with fresh fruit for a balanced snack. They also taste great with a glass of milk. You can even crumble them over ice cream for a treat!
You learned how to make tasty no-bake chocolate oat bars. Gathering simple ingredients like oats, nut butter, and cocoa powder is easy. Following step-by-step instructions helps you mix and chill the bars perfectly. Remember to press the mixture firmly for the best texture. Don’t forget about fun flavor variations and clever storage tips! Enjoy these bars as snacks or desserts, and feel free to share them with friends and family. Making these bars can add joy to your day.
![For a delicious Strawberry Shortcake Trifle, you will need fresh and simple ingredients. Here’s what you need to gather: - 2 cups fresh strawberries, hulled and sliced - 1/4 cup granulated sugar (for macerating strawberries) - 1 cup heavy whipping cream - 1/4 cup powdered sugar (for the whipped cream) - 1 teaspoon pure vanilla extract - 1 package (10 oz) ladyfinger cookies or sponge cake, cut into bite-sized pieces - 1 cup vanilla pudding (store-bought or homemade) - Fresh mint leaves, for garnish (optional) Each ingredient plays a key role. The strawberries need sugar to bring out their flavor. The heavy cream and powdered sugar create a light, airy whipped cream. The ladyfingers or sponge cake form the base. Lastly, the vanilla pudding adds creaminess to the trifle. When you layer these ingredients, you create a beautiful and tasty dessert. For the full recipe, you can check [Full Recipe]. Enjoy making this sweet treat! To macerate the strawberries, start by slicing them. Place 2 cups of fresh strawberries in a bowl. Add 1/4 cup of granulated sugar on top. Gently stir the strawberries to coat them with sugar. Let them sit for 15 to 20 minutes. This helps draw out their sweet juices, creating a syrup. For optimal syrup extraction, keep an eye on the time. The longer you let them sit, the more syrup you will get. Just don’t let them sit too long, or they may become mushy. For the perfect whipped cream, you will need a large mixing bowl and a hand or stand mixer. Start by adding 1 cup of heavy whipping cream, 1/4 cup of powdered sugar, and 1 teaspoon of pure vanilla extract to the bowl. Whip the mixture on medium-high speed. Watch closely for soft peaks to form. Stop mixing as soon as you see those peaks. Overwhipping can turn your cream into butter, and we want it light and fluffy! Now comes the fun part: layering! In a large trifle bowl or individual glasses, start with ladyfinger pieces or sponge cake at the bottom. Use enough pieces to cover the base. Next, spoon a layer of vanilla pudding over the cake. Spread it evenly. Then, add a layer of your macerated strawberries, syrup included. Finish this layer with a dollop of whipped cream. Repeat these steps. Add another layer of ladyfingers, pudding, strawberries, and another dollop of cream. Keep going until you reach the top. The last layer should be whipped cream for a nice finish. Chill your trifle for at least 1 hour. Cover it with plastic wrap or a lid. If you have more time, chill it longer. The flavors blend better that way. Refrigerating helps the ladyfingers absorb moisture from the pudding and strawberries. This makes every bite taste amazing! Plus, it keeps your trifle fresh and cool, perfect for a warm summer day. For the full recipe, check out the complete instructions. To keep your trifle layers from turning soggy, use fresh, dry ladyfingers or sponge cake. Make sure to layer them quickly after preparation. You can also lightly toast the ladyfingers for added texture. This helps them hold their shape better. To whip cream correctly, start with cold equipment. Cold bowls and beaters help the cream whip faster. Whip the cream at medium speed until soft peaks form. Stop as soon as the cream holds its shape. Overwhipping makes the cream grainy and hard. Serve your trifle in a clear glass bowl to show off the layers. You can also use small jars for individual servings. This adds a fun touch for guests. For garnishes, fresh mint leaves or extra strawberry slices on top create a beautiful finish. You can also sprinkle some crushed cookies for crunch. One common mistake is not preparing ingredients well. Make sure your strawberries are hulled and sliced evenly. This ensures great flavor throughout. Layering inconsistently can lead to a messy trifle. Each layer should be even and flat. This keeps your trifle looking nice and appetizing. For the full recipe, check the Strawberry Shortcake Trifle Delight section. {{image_4}} You can change the fruit in your trifle to mix things up. Blueberries work great in place of strawberries. Peaches add a sweet twist, too. You can also try different pudding flavors. Chocolate pudding gives a rich taste, while banana adds a fun touch. Each swap gives your trifle a new vibe. If you need gluten-free options, use gluten-free ladyfingers or sponge cake. Many stores sell these now. For a dairy-free version, use coconut cream instead of heavy cream. Dairy-free pudding is also easy to find. These swaps keep the trifle tasty for all diets. You can make themed trifles for special times of the year. For example, add pumpkin spice for fall or berries for a Fourth of July treat. You can also create fun trifle recipes for parties. Layer with seasonal fruits and colorful toppings for a festive look. This way, your trifle is always a showstopper. For a full recipe, check the [Full Recipe]. To keep your trifle fresh, store it in the fridge. Use an airtight container to avoid unwanted smells. Cover the top with plastic wrap if you don't have a lid. This helps keep the layers intact. It's best to eat your trifle within three days. This way, you enjoy the best taste and texture. Avoid stacking heavy items on top of it, as this can cause squishing. Your stored trifle stays good in the fridge for up to three days. After this, the ingredients start to separate. If you see watery layers, it’s a sign that it’s no longer fresh. Trust your nose and eyes; if it smells off, it's time to toss it. Always check for any strange colors or textures before diving in. You can freeze the trifle, but it changes the texture. Freeze only the layers separately for best results. Make sure to wrap each layer tightly in plastic wrap. When you're ready to eat, thaw them in the fridge overnight. Avoid refreezing once it's thawed, as it affects quality. For the best flavor and texture, enjoy your trifle fresh, but freezing can work in a pinch. For the complete recipe, check the Full Recipe link. Making a strawberry shortcake trifle takes about 30 minutes of prep time. You will need an hour for chilling. This allows all the flavors to mix well and makes the trifle taste its best. Yes, you can make this trifle ahead of time! I suggest preparing it a few hours before serving. This gives the layers time to blend. Just keep it covered in the fridge until you are ready to serve. If you can't find ladyfingers or sponge cake, you can use pound cake or angel food cake. Both options work well. Cut them into smaller pieces, just like the ladyfingers. To avoid sogginess, use less liquid in your layers. You can also layer quickly and serve soon after making it. If you chill it too long, the cake may soak up too much liquid. Yes! You can use gluten-free ladyfingers or sponge cake. Make sure to check the labels on all ingredients. Also, consider using gluten-free pudding mix for a fully gluten-free dessert. You can use frozen strawberries! Just thaw them first and drain excess liquid. This keeps your trifle layers from becoming too wet. Frozen strawberries still give a sweet flavor, making them a great substitute. For the full recipe, check here. Now you know how to create a delicious strawberry shortcake trifle. We walked through each step, from fresh ingredients to layering tips. You learned how to prepare strawberries, whip cream, and avoid common mistakes. Remember to chill your trifle for maximum flavor. Feel free to try different fruits or flavors to make it your own. With careful preparation and creativity, your trifle will impress everyone. Enjoy serving this delightful dessert at your next gathering!](https://joymealplan.com/wp-content/uploads/2025/07/d4c251d2-a8a0-4e84-a7ee-6717c5d98257-768x768.webp)