Homemade Peach Ice Cream Simple and Delicious Treat
Do you crave a sweet, creamy treat that brings summer right to your kitchen? Look no further! Homemade peach ice cream is simple to make and bursts with fresh flavor. With just a few ingredients and easy steps, you can impress family and friends alike. Join me as I show you how to whip up this delicious delight that will keep you cool all season long!
Ingredients for Homemade Peach Ice Cream
Essential Ingredients
– Fresh peaches: Use ripe peaches for the best flavor. They add sweetness and a nice texture.
– Heavy cream: This gives the ice cream its rich, creamy feel. You can use lighter cream, but it will change the texture.
– Granulated sugar: This sweetens the ice cream. It also helps create a smooth texture by lowering the freezing point.
Optional Add-ins
– Flavor enhancers: Adding pure vanilla extract gives depth. A splash of lemon juice brightens the flavor.
– Mix-ins: Consider adding crunchy nuts or chocolate chips for extra fun. You can also swirl in some peach jam for more peach flavor.
Step-by-Step Instructions
Preparation of Peaches
Start by washing the peaches well. Use ripe peaches for the best taste. Next, peel each peach. A sharp knife works well for this. After peeling, dice the peaches into small chunks. Aim for pieces that are about half an inch. This size helps them blend well.
For blending, place the diced peaches in a high-speed blender. Add granulated sugar and fresh lemon juice. Blend on medium speed. Stop when it’s creamy but still has small chunks. This gives the ice cream a nice texture.
Mixing the Base
In a large mixing bowl, combine heavy cream, whole milk, and sugar. Use a whisk to mix them well. Make sure the sugar dissolves completely. Add pure vanilla extract and a pinch of salt. This will enhance the flavor. Whisk the mixture until it becomes smooth.
Now, fold in the peach puree. Use a rubber spatula for this. Be gentle and do not overmix. You want to see swirls of peach in the mixture. This adds to the ice cream’s look.
Churning Process
Pour the mixture into an ice cream maker. Follow the manufacturer’s instructions for churning. Usually, this takes about 20-25 minutes. Watch for a soft-serve consistency; this means you are close.
When it’s ready, transfer the ice cream to a lidded container. Smooth the top so it freezes evenly. Freeze for at least 4 hours. This helps it become firm and scoopable. Before serving, let it sit at room temperature for 5-10 minutes. This softens it just enough for easy scooping.Enjoy this sweet treat!
Tips & Tricks
Achieving Optimal Texture
To get the best texture in your peach ice cream, follow these tips:
– Freezing guidelines for best results: After churning in the ice cream maker, pour your mixture into a container. Freeze it for at least 4 hours. This helps it firm up nicely.
– Softening tips before serving: When ready to serve, let the ice cream sit at room temperature for 5-10 minutes. This softens it just enough to scoop easily.
Common Mistakes to Avoid
Avoid these common pitfalls for perfect peach ice cream:
– Overmixing and its consequences: When folding in the peach puree, be gentle. Overmixing can turn your ice cream into a uniform color, losing those pretty peach swirls.
– Incorrect churning times: Follow the manufacturer’s instructions for your ice cream maker. Churning for too long can cause ice crystals to form, ruining the creamy texture you want.
By keeping these tips in mind, your homemade peach ice cream will be a delightful treat every time.

Variations of Peach Ice Cream
Flavor Combinations
You can easily change up your peach ice cream by adding herbs or spices. Fresh basil adds a lovely twist. Cinnamon gives a warm, cozy feel. A pinch of nutmeg can also work well. Mixing peaches with other fruits creates fun surprises. Try adding strawberries for sweetness or blueberries for tartness. Each fruit brings a new flavor that keeps it exciting.
Dietary Adjustments
If you’re looking for dairy-free options, coconut cream works great. It gives a rich taste and smooth texture. Almond milk can also be a lighter choice. For those who want to cut sugar, try using honey or maple syrup. These options keep your ice cream sweet without adding processed sugar. Remember, you can always adjust the recipe to fit your needs.
Storage Info
Best Practices for Freezing
To keep your peach ice cream fresh, choose the right container. Use a lidded plastic or glass container. Make sure it’s airtight to prevent ice crystals from forming. You can also line the container with plastic wrap before sealing. This extra layer helps keep the ice cream creamy.
You can store peach ice cream for up to two weeks. After that, it may lose flavor and texture. If you plan to keep it longer, consider freezing it in smaller portions. This way, you can enjoy a scoop whenever you want.
How to Revive Hard Ice Cream
Sometimes, ice cream can get too hard in the freezer. To soften it, remove the container and let it sit at room temperature for 10 minutes. This will make it easier to scoop.
If it’s still too hard, try adding a splash of milk or cream. Stir it in gently to adjust the texture. This can bring back that smooth and creamy feel. Enjoy your homemade peach ice cream any time!
FAQs about Homemade Peach Ice Cream
Can I use frozen peaches instead?
Yes, you can use frozen peaches. They can work well in ice cream. However, there are a few things to keep in mind. First, make sure the peaches are thawed and drained of excess water. This helps avoid watery ice cream. Also, frozen peaches may lack the fresh flavor and sweetness of ripe, fresh ones. If you choose frozen, try to pick high-quality fruits for the best taste.
What equipment do I need?
To make homemade peach ice cream, you need some basic tools:
– A high-speed blender for mixing
– A large mixing bowl for combining ingredients
– A rubber spatula for folding the mixtures
– An ice cream maker for churning
– A lidded container for freezing
These tools help make the process smooth and enjoyable. Having them ready will save you time and effort.
How does this recipe compare to store-bought?
Homemade peach ice cream beats store-bought options in many ways. First, you control the ingredients. You can choose fresh peaches and avoid preservatives. Second, the flavor is often brighter and more vibrant. Homemade ice cream usually has a creamier texture, with real fruit pieces adding a delightful crunch. Plus, making it at home gives you a fun experience and a tasty reward.
Where did peach ice cream originate?
Peach ice cream has a rich history. It likely began in the southern United States, where peaches grow abundantly. The first known recipes appeared in the 1800s. People cherished peaches for their sweet flavor. Over time, this treat spread and evolved, with many regions adding their own twist. Today, peach ice cream is loved across the globe and enjoyed in various ways.
Homemade peach ice cream uses fresh peaches and simple ingredients. The process is fun and rewarding. You’ll blend, churn, and freeze to create creamy goodness. Remember to avoid common mistakes like overmixing. Explore flavor variations for a unique touch. Store it properly to keep it fresh. Making this treat at home is enjoyable. Now, you can impress your friends and family with your tasty peach ice cream. Enjoy every scoop!

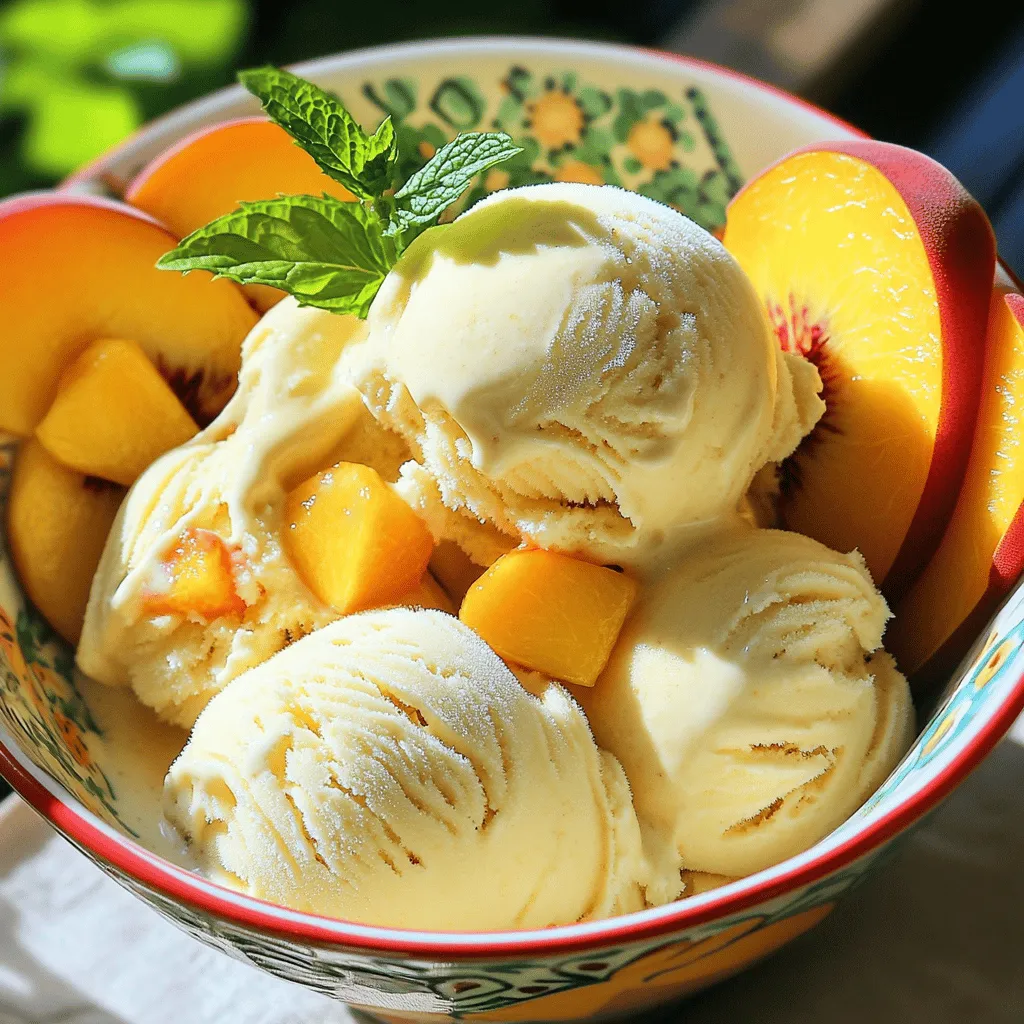
![- 2 cups Greek yogurt - 1 cup fresh cherries, pitted and halved - 1/2 cup granola Greek yogurt serves as the base. It gives the parfait its creamy texture. You can use plain yogurt for a tangy taste or vanilla for sweetness. Fresh cherries add a burst of flavor. They are juicy and sweet, making them perfect for this dish. Granola adds a nice crunch. Choose your favorite variety to enhance the flavor. - 2 tablespoons honey or maple syrup - 1 teaspoon vanilla extract - A pinch of cinnamon You can sweeten the yogurt with honey or maple syrup. Adjust the sweetness to your liking. Adding vanilla extract brings out a warm aroma. A pinch of cinnamon can add a cozy spice. These add-ins can elevate the yogurt's flavor, making it even more delicious. - Fresh mint leaves - Additional toppings Garnishing with fresh mint makes the parfait look pretty. It adds a pop of color and freshness. You may also add more toppings like nuts or seeds for extra texture. These simple touches can make your parfait stand out even more. For the full recipe, check the section above! - In a mixing bowl, combine 2 cups of Greek yogurt, 2 tablespoons of honey, 1 teaspoon of vanilla extract, and a pinch of cinnamon if you like. - Stir the ingredients well until the mixture is smooth and creamy. This step is key for a rich texture. - Start your parfait by adding a generous spoonful of the yogurt mixture at the bottom of your serving glass. - Next, add a layer of the halved fresh cherries on top of the yogurt. Their sweetness will shine through. - Follow this with a sprinkle of granola. This adds a nice crunch to each bite. - Repeat the layering process. Add another layer of yogurt, then more cherries and granola. - Keep layering until your glass is full, ensuring the top showcases a colorful mix of cherries and granola. - Before serving, place a fresh mint leaf on top. This not only looks good but adds a fresh touch. For the complete recipe, check the [Full Recipe]. For the best Cherry Greek Yogurt Parfaits, start with the yogurt. You can choose plain or flavored Greek yogurt. Plain yogurt gives a nice tartness. Flavored options, like vanilla, add a sweet touch. Next, consider fat content. Full-fat yogurt is creamy and rich. Low-fat yogurt has fewer calories but is still tasty. Pick what suits your taste and diet goals. You might want to adjust sweetness levels in your parfait. Adding honey or maple syrup can help. Start with a small amount and taste as you go. You can always add more if needed. Using seasonal fruits can boost flavor too. Fresh cherries are perfect for summer. In fall, consider apples or pears. In winter, try citrus fruits for a zesty twist. Your glassware matters for presentation. Tall, clear glasses show off the layers well. You can also use small jars for a rustic feel. Make sure they are clean and dry before use. For accompaniments, consider serving with herbal tea or coffee. A light snack like nuts or dark chocolate pairs nicely too. These options round out the experience and make it special. For the full recipe, check the Cherry Greek Yogurt Parfaits 🥄 section above. {{image_4}} You can switch up the fruit in your parfaits. Berries are a great choice. Strawberries, blueberries, and raspberries work well. They all add a burst of flavor. You can also use stone fruits like peaches or plums. These fruits bring a sweet and juicy taste to your dish. If you need vegan options, use plant-based yogurt. Almond or coconut yogurt is tasty. For granola, look for gluten-free brands. They add crunch without the gluten. These swaps make the parfait friendly for more diets. Want to change the flavor? Add spices like nutmeg or ginger. A few drops of almond extract can also enhance taste. For a warm cherry flavor, cook the cherries down into a compote. Just simmer them with a bit of sugar until soft. Add this layer for a delicious twist. The Cherry Greek Yogurt Parfaits can last in the fridge for up to three days. Store them in an airtight container to keep them fresh. Glass jars work well because they seal tightly and let you see the layers. You can use plastic containers too, but make sure they close securely. You can freeze these parfaits, but it may change the texture. The yogurt can become icy, and the granola might get soggy. If you decide to freeze, layer the yogurt and cherries without granola. This way, you can add fresh granola after thawing. When ready to eat, let the parfait thaw in the fridge overnight. Serve it once it's soft, and add the granola just before enjoying. To keep your parfait crunchy, store granola separately until serving. Mix it in right before you eat. This keeps it from getting soggy. Also, layer the parfaits carefully. This helps maintain the visual appeal and keeps the layers fresh longer. To make Cherry Greek Yogurt Parfaits, follow these simple steps: 1. Start with Greek yogurt in a bowl. 2. Mix in honey or maple syrup, vanilla extract, and a pinch of cinnamon. 3. Stir until the mixture is smooth and creamy. 4. Choose serving glasses and add a layer of yogurt at the bottom. 5. Add fresh cherries on top of the yogurt. 6. Sprinkle granola for some crunch. 7. Repeat these layers until glasses are full. 8. Finish with a mint leaf on top for a nice touch. This method gives you a tasty treat with layers of flavor and texture. You can find the Full Recipe for the exact amounts and instructions. Greek yogurt is a powerhouse of nutrition. Here are some key benefits: - High in Protein: Greek yogurt has more protein than regular yogurt. This helps you feel full longer. - Low in Sugar: It usually contains less sugar than other yogurts. This is great for your health. - Rich in Calcium: Calcium keeps your bones strong and healthy. - Contains Probiotics: These are good bacteria that help digestion. They can also boost your immune system. Eating Greek yogurt is a smart choice for a healthy diet. Yes, you can prepare Cherry Greek Yogurt Parfaits ahead of time. Here are some tips: - Layer Carefully: Build your parfaits in jars. This keeps layers intact. - Use Airtight Containers: Store parfaits in airtight jars to lock in freshness. - Add Granola Later: Keep granola separate until serving. This helps it stay crunchy. Making these parfaits in advance saves time and lets you enjoy a quick, healthy treat. In this post, we explored how to make delicious Cherry Greek Yogurt Parfaits. We detailed the main ingredients, including Greek yogurt, fresh cherries, and granola. You learned layering techniques and garnishes to enhance presentation. We also discussed tips for choosing yogurt and flavoring your parfaits. To wrap up, this recipe is simple and adaptable. Enjoy customizing it to fit your taste. Perfect for breakfast or a snack, these parfaits will impress everyone.](https://joymealplan.com/wp-content/uploads/2025/07/65733fee-5e95-4d8b-a9d5-f01ab2a2564e-768x768.webp)