Pesto Mozzarella Stuffed Tomatoes Flavorful and Fresh
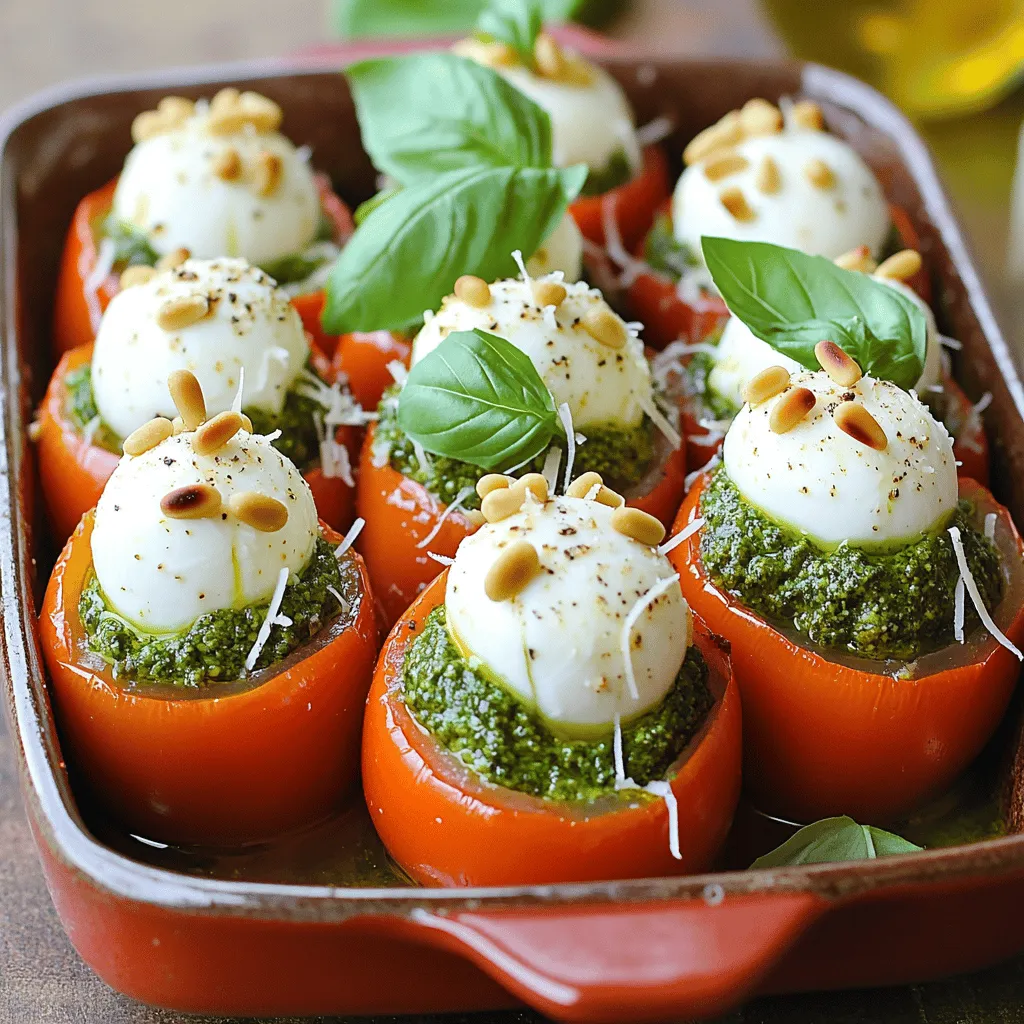
Get ready to elevate your mealtime with my Pesto Mozzarella Stuffed Tomatoes recipe! These tasty treats burst with flavor and freshness, making them the perfect dish for any occasion. I’ll share my favorite ingredients, easy steps, and helpful tips to create a dish that will impress your family and friends. Whether you are a novice cook or a kitchen pro, this recipe is bound to become a new favorite. Let’s dive in!
Ingredients
List of Ingredients
– 4 large, ripe tomatoes
– 1 cup fresh mozzarella balls (bocconcini)
– 1/2 cup basil pesto, fresh or store-bought
– 1/4 cup grated Parmesan cheese
– 1/4 cup pine nuts, toasted for added flavor
– Salt and pepper, to taste
– Fresh basil leaves, for garnish
Ingredient Tips
How to choose ripe tomatoes:
Look for tomatoes that are firm but slightly soft to touch. Their color should be bright and even. Smell the stem end; it should have a sweet, fresh scent.
Selecting high-quality cheese:
Choose mozzarella that is fresh and creamy. For Parmesan, look for aged cheese with a nutty flavor. Always buy from trusted brands for the best taste.
Recommended brands for basil pesto:
If you go for store-bought, I recommend brands like Buitoni or Barilla. They offer great flavor without any preservatives. If you have the time, making your own pesto at home adds freshness and taste.
Step-by-Step Instructions
Preparing the Oven and Tomatoes
Start by preheating the oven to 375°F (190°C). Preheating is key. It ensures even cooking and helps the cheese melt just right. Next, grab your tomatoes. Cut off the tops carefully. Use a sharp knife for a clean cut. Now, take a spoon and gently scoop out the insides. Aim to leave about a 1/4-inch thick shell. This keeps the tomatoes sturdy. You can toss the seeds and pulp or save them for another tasty recipe.
Making the Filling
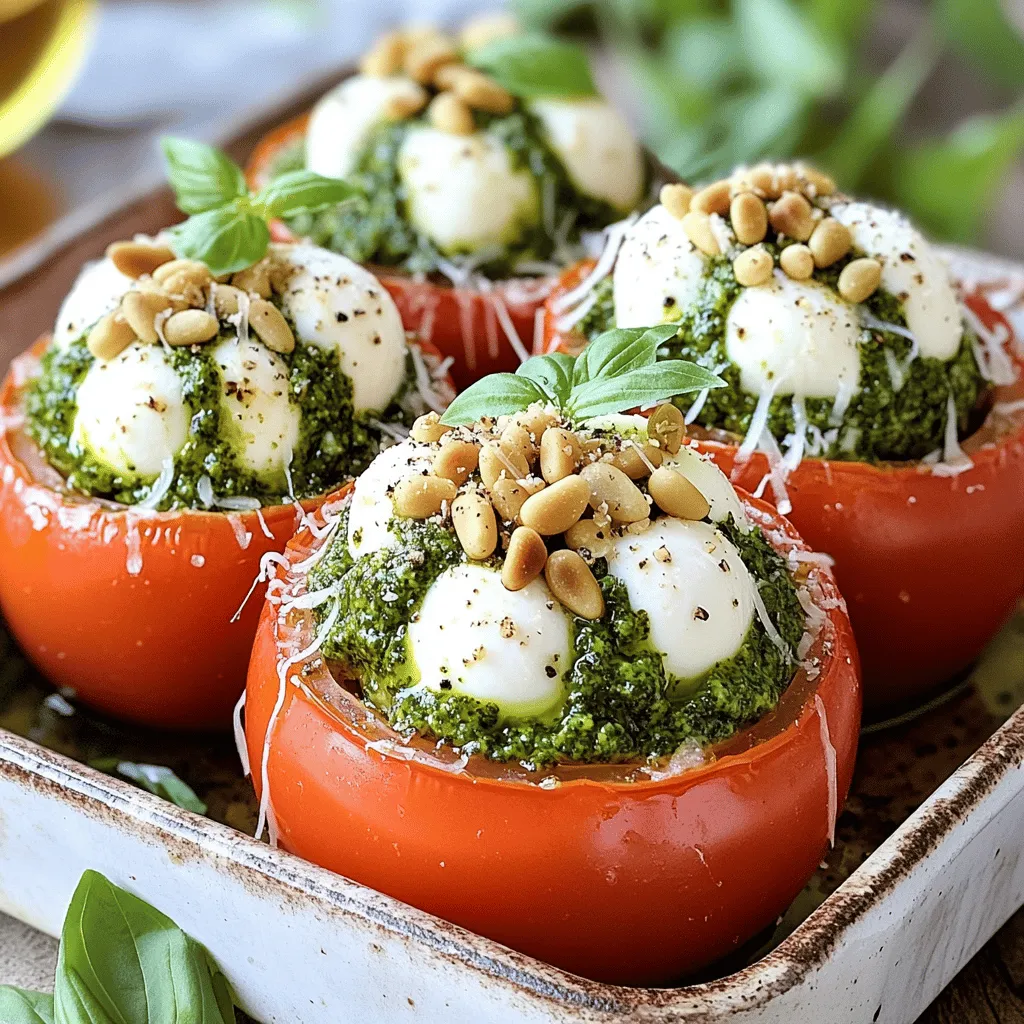
In a medium-sized bowl, mix together the fresh mozzarella balls, basil pesto, grated Parmesan cheese, and toasted pine nuts. Use a spatula or spoon to blend everything well. Make sure every bite has a bit of each flavor. After mixing, taste the filling. Add salt and pepper to season it. Proper seasoning makes a big difference in flavor.
Baking the Stuffed Tomatoes
Once your tomatoes are filled, place them upright in a baking dish. Make sure they stand securely without wobbling. This helps them cook evenly. Now, pop the dish in the preheated oven. Bake for about 20-25 minutes. You want the tomatoes to be tender and the cheese to be bubbly and golden. Keep an eye on them during baking to avoid overcooking.
Tips & Tricks
Enhancing Flavor Profiles
To boost the flavor of your pesto mozzarella stuffed tomatoes, try adding some spices or herbs. A pinch of red pepper flakes can add a nice kick. Fresh thyme or oregano can also give a lovely aroma to the dish. If you want a different texture, consider mixing in some finely chopped sun-dried tomatoes or even artichoke hearts. These additions can change the whole vibe of the dish while keeping it fresh.
Serving Suggestions
Pair your stuffed tomatoes with a crisp side salad or some garlic bread. A light, tangy vinaigrette complements the rich flavors of the tomatoes. For garnishing, sprinkle some extra grated Parmesan cheese on top after baking. Fresh basil leaves not only add color but also enhance the taste. You could even drizzle some high-quality balsamic glaze for a touch of sweetness.
Common Mistakes to Avoid
One common mistake is overstuffing the tomatoes. This can lead to a mess and uneven cooking. Make sure to leave enough space for the filling to expand. Another error is not preheating the oven properly. This step is crucial for even cooking. If the oven is not hot enough, your tomatoes may end up soggy instead of tender and flavorful.
Variations
Alternative Fillings
You can switch up the filling for your pesto mozzarella stuffed tomatoes. Try different cheeses for new flavors. Creamy goat cheese or tangy feta can add a nice twist. If you want protein, add cooked chicken or turkey for a heartier dish. For vegetarians, consider adding diced bell peppers or zucchini for a fresh crunch. Vegan options are also easy! Use dairy-free cheese and a nut-free pesto made from sunflower seeds. This way, everyone can enjoy a tasty treat.
Serving Styles
When it comes to serving, you have options. You can enjoy these stuffed tomatoes warm or cold. Warm tomatoes are comforting, while cold ones are refreshing on a hot day. If you want a fun twist, you can turn them into a salad. Simply chop the stuffed tomatoes and mix them with greens, olives, and a light dressing. This is a great way to serve them as an appetizer or a side dish. No matter how you serve them, these tomatoes will impress at any meal.
Storage Info
Storing Leftovers
To keep your pesto mozzarella stuffed tomatoes fresh, place them in an airtight container. Refrigerate them right away after they cool down. They stay good for about three days. If you notice any moisture, dab it with a paper towel. This helps avoid soggy tomatoes and keeps flavors intact.
Reheating Methods
When it comes to reheating, you have two great options: the microwave or the oven. The microwave is quick but can make the tomatoes soft. Heat them in short bursts of 30 seconds. Check often to avoid mushiness.
Using the oven is better for keeping texture. Preheat it to 350°F (175°C). Place the tomatoes in a baking dish and cover them loosely with foil. Heat for about 10-15 minutes. This method warms them up without losing that lovely taste. Enjoy your meal, whether fresh or reheated!
FAQs
How do I prevent tomatoes from becoming too watery?
To keep your tomatoes firm, start by choosing the right tomatoes. Look for ripe, meaty ones. Before stuffing, scoop out the seeds and excess pulp. This removes extra moisture. You can also sprinkle the insides with salt. Let them sit for 10-15 minutes. This draws out more liquid, helping to keep your filling intact.
Can I use canned tomatoes instead?
Yes, you can use canned tomatoes if fresh ones aren’t available. Canned tomatoes are often more convenient. However, they can be more watery and less flavorful. If using canned, drain them well. Pat them dry with a paper towel to reduce moisture.
What can I serve with pesto mozzarella stuffed tomatoes?
These stuffed tomatoes pair well with many dishes. Serve them with a fresh salad for a light meal. Garlic bread or crusty bread also complements them nicely. For a heartier option, try pairing with grilled chicken or fish. You could even serve them over pasta for a filling dinner.
How do I know when the tomatoes are done baking?
To check if the tomatoes are ready, look for a few signs. They should be tender and slightly wrinkled. The cheese on top should be bubbly and golden brown. If you insert a fork, it should glide in easily. This indicates they are perfectly cooked and ready to enjoy.
In summary, we explored the ingredients needed for delicious stuffed tomatoes, including fresh tomatoes, quality cheeses, and the right basil pesto. I shared tips on selecting ripe tomatoes and making flavorful fill-ups. We discussed baking and serving techniques to enhance your dish. Remember, variations are key; you can try different fillings and serving styles based on your taste. Keep these tips in mind to create a dish that impresses. Enjoy your cooking adventure!


![- 2 large cucumbers, diced into bite-sized cubes - 3 medium tomatoes, diced into equal-sized pieces - 1 red bell pepper, diced Fresh vegetables are the heart of a Greek salad. Cucumbers add crunch and hydration. Tomatoes provide sweetness and color. Red bell peppers add a nice crunch and a touch of sweetness. Together, they make a refreshing mix. - 1 cup Kalamata olives, pitted and halved - 1 red onion, thinly sliced into rings - 1/3 cup feta cheese, crumbled (omit for a vegan version) Next, we have Kalamata olives. They bring a salty, rich flavor to the salad. Red onion adds a sharp bite that balances the sweetness of the other veggies. Feta cheese adds creaminess and a tangy taste. If you prefer a vegan salad, simply leave out the feta. - 1/4 cup extra virgin olive oil - 2 tablespoons red wine vinegar (use apple cider vinegar for a unique flavor twist) - 1 teaspoon dried oregano, preferably Mediterranean The dressing ties everything together. Extra virgin olive oil makes it rich and smooth. Red wine vinegar adds a nice tang. Dried oregano brings a hint of earthiness. This simple dressing enhances the fresh flavors without overpowering them. You can find the full recipe online for detailed steps. Start by washing all your fresh vegetables. Clean them well to remove any dirt. Next, dice the cucumbers and tomatoes into small, even pieces. This helps make each bite enjoyable. Add these diced vegetables to a large mixing bowl. Then, chop the red bell pepper and halve the Kalamata olives. Thinly slice the red onion into rings. Mix all these vibrant ingredients together in the bowl. This colorful blend makes your salad look great! In a small bowl, mix the extra virgin olive oil and red wine vinegar. Whisk them together until they blend well. Add in the dried oregano for that nice Mediterranean flavor. Season your dressing with salt and freshly ground black pepper. This adds taste and balance to the salad. Taste your dressing and adjust the salt if needed. Now, pour the prepared dressing over the bowl of vegetables. Gently toss everything together with a large spoon or salad tongs. Make sure all the vegetables are covered in the dressing. If you want feta cheese, sprinkle the crumbled cheese on top. Toss it lightly again to mix the feta in with the salad. Finally, garnish with chopped fresh parsley for a pop of color. Enjoy your healthy Greek salad! For the complete recipe, see [Full Recipe]. To make your Greek salad shine, start with high-quality olive oil. This oil adds rich taste and depth. Look for extra virgin, as it has the best flavor. A simple drizzle makes a big difference. Next, add a squeeze of fresh lemon juice. This brightens the salad and adds zing. The citrus lifts the flavors and makes each bite refreshing. Use it right before serving for the best taste. When it comes to serving, think about your style. You can serve in a large bowl for a family meal. This lets everyone help themselves. Or, you can serve in individual bowls for a fancy touch. This makes each portion feel special. Garnishes also help with presentation. Fresh herbs like parsley add color. A slice of lemon on the side gives a nice look. These small touches make your salad more inviting. Want to boost the health factor? Add more vegetables. You can include radishes, carrots, or even spinach. Each veggie adds unique nutrients and flavors. More colors mean more vitamins! If you're watching your fat intake, think about cheese options. Use low-fat feta or skip the cheese entirely for a vegan choice. You still get a tasty salad without the extra calories. This way, you can enjoy a healthy Greek salad without worry. For the full recipe, check out the Mediterranean Bliss Greek Salad. {{image_4}} You can easily change the Greek salad to fit your diet. For a vegan version, swap feta cheese with tofu or avocado. Tofu adds protein and a nice texture. Avocado gives a creamy flavor without dairy. Both are great choices. This salad is also gluten-free. All the ingredients are naturally gluten-free. You can enjoy it without worry if you have gluten sensitivities. To add more flavor, think about adding protein. Chickpeas are a great option. They are filling and nutritious. Grilled chicken is another tasty choice if you prefer meat. It adds a smoky taste that pairs well with the salad. You can also introduce different herbs and spices. Fresh dill or mint can brighten the dish. A pinch of red pepper flakes can add a nice kick. Each tweak gives the salad a unique twist. Feel free to switch up the vegetables too. Grape tomatoes are sweeter and add a pop of color. You can also try different colored bell peppers for a vibrant look. Another fun swap is with olives. While Kalamata olives are classic, green olives can give a tangy taste. Each type of olive brings its own flavor, making your salad exciting. For the full recipe, check out the Mediterranean Bliss Greek Salad. To keep your Healthy Greek Salad fresh in the fridge, follow these tips: - Use an airtight container to seal in moisture and flavors. - Place a paper towel inside the container to absorb extra moisture. - Store the salad in the fridge for up to three days. For long-term storage, keep the salad ingredients separate. Here’s how: - Store the vegetables in their own container. This keeps them crisp. - Keep dressing in a small jar or bottle. You can freeze extra dressing for later use. To tell if your salad is no longer fresh, watch for these signs: - Look for wilted greens or soggy vegetables. - Check for an off smell or sour taste. - Discard any ingredients showing mold or discoloration. Proper disposal methods include throwing spoiled food in the trash or composting if safe. Enjoy the Healthy Greek Salad fresh, and savor every bite! For the full recipe, check out the Mediterranean Bliss Greek Salad. Greek salad is full of fresh veggies. These ingredients give many health benefits. Cucumbers keep you hydrated with their high water content. Tomatoes are rich in vitamins A and C, which are good for your skin. Red bell peppers provide antioxidants that help fight disease. Kalamata olives offer healthy fats, which are good for your heart. Feta cheese adds calcium for strong bones, but you can skip it if you prefer vegan options. The dressing made with olive oil is also good for heart health. Eating this salad can help you feel full and satisfied without many calories. Yes, you can prep your Greek salad ahead of time. To keep it fresh, chop the veggies but store them separately from the dressing. This way, they stay crisp and colorful. You can mix the dressing in another bowl. When you are ready to eat, combine everything. This keeps the salad tasting fresh and not soggy. If you want to add feta, do this right before serving, so it stays creamy. Absolutely! This salad is perfect for meal prep. You can easily make a big batch and store it in your fridge. Use airtight containers to keep it fresh. The veggies will stay good for about three days. If you want to eat it later, avoid adding the dressing until just before serving. This keeps the flavors bright and the textures right. Greek salad pairs well with many dishes. You can serve it with grilled chicken for added protein. It also goes great with pita bread or hummus for a light meal. If you are looking for a heartier option, try it with grilled fish. Adding some quinoa or brown rice on the side is also a nice touch. This makes for a balanced meal that is both tasty and healthy. You can find the Full Recipe for a Mediterranean Bliss Greek Salad to try today! In this article, we explored how to make a fresh and healthy Greek salad. I covered the ingredients and steps, plus tips for flavor and presentation. You learned about variations and storage to keep your salad fresh. Remember, this dish is not just tasty but also packed with nutrients. Whether you enjoy it as a side or main dish, its flavors and colors will impress everyone. By adding your twist, you can make it your own. Happy salad making!](https://joymealplan.com/wp-content/uploads/2025/06/c94f07f9-b700-4cfc-a1be-56f301f39c39-768x768.webp)

![- 8 oz rice noodles - 1 red bell pepper, thinly sliced - 1 cup shredded carrots - 1 cucumber, julienned - 1 cup bean sprouts - 1/4 cup fresh cilantro, roughly chopped - 1/4 cup roasted peanuts, coarsely crushed - 2 green onions, sliced - 3 tablespoons fish sauce (or vegetarian alternative, soy sauce) - 2 tablespoons freshly squeezed lime juice - 1 tablespoon brown sugar - 1 tablespoon toasted sesame oil - 1–2 tablespoons sriracha (adjust based on heat preference) This salad is light yet filling. It has about 250 calories per serving. The rice noodles provide carbs for energy. Fresh veggies add fiber, vitamins, and minerals. Peanuts offer healthy fats and protein. The dressing gives a zing with fish sauce and lime. You can swap fish sauce for soy sauce if needed. Eating this salad supports good health due to its fresh ingredients. The mix of flavors and textures makes it a delight. Enjoy every bite! Check out the Full Recipe for full details. Start by boiling water in a pot. Add 8 oz of rice noodles to the water. Cook them as per the package instructions. Once the noodles soften, drain them. Rinsing with cold water is key. This stops cooking and keeps them from getting sticky. Set the noodles aside until you need them. Grab a sharp knife and a cutting board. Thinly slice the red bell pepper. Shred the carrots with a grater. Julienne the cucumber into thin strips. Add 1 cup of bean sprouts. In a large bowl, mix all the veggies. Toss them gently to combine. This makes sure each vegetable is evenly mixed. In a smaller bowl, mix the dressing. Whisk together 3 tablespoons of fish sauce, 2 tablespoons of lime juice, and 1 tablespoon of brown sugar. Add 1 tablespoon of toasted sesame oil. For spice, include 1–2 tablespoons of sriracha. Taste the dressing and adjust as needed. You can make it sweeter or spicier based on your choice. Now, add the cooled rice noodles to the big bowl of vegetables. Pour the dressing over the top. Use gentle tossing motions to mix everything. This ensures each noodle and veggie gets coated with the tasty dressing. Transfer the salad to a colorful serving platter. Top it off with crushed roasted peanuts for crunch. Sprinkle fresh cilantro on top for flavor and color. For a nice touch, add lime wedges on the side. This salad looks great and tastes even better! Check the Full Recipe for more details. To boost flavor, add fresh lime juice. Lime brings great brightness. You can also add more herbs. Fresh mint or basil works well. If you want it spicier, adjust the sriracha. Start with one tablespoon and taste. Add more if you like heat! If you need gluten-free, choose rice noodles. They are a great alternative. For sauces, use tamari instead of soy sauce. If you want to skip fish sauce, use soy sauce or coconut aminos. These options keep the taste fresh. To make this salad in advance, cook the noodles and chop the veggies. Store ingredients separately in the fridge. This keeps everything crisp. When ready, mix them with dressing just before serving. This way, the salad tastes fresh. {{image_4}} You can add shrimp, chicken, or tofu to your Spicy Thai Noodle Salad. Each protein brings its own flavor and texture. For shrimp, cook them in a hot pan for just a few minutes until they turn pink. Use about 8 oz for a nice boost of protein. If chicken is your choice, grill or sauté about 1 cup of diced chicken until cooked through. For a plant-based option, use firm tofu. Cube about 8 oz and pan-fry until golden. Each of these options enhances the salad and makes it more filling. To make a vegan version, simply eliminate fish sauce and any meat. Replace fish sauce with soy sauce or a mix of soy and lime juice. This keeps the flavor rich while staying plant-based. You can add more vegetables like snap peas or radishes for crunch. Avocado is also a great addition for creaminess. Feel free to mix and match veggies based on what you love or have at home. Change your salad with the seasons by using fresh, local veggies. In spring, consider adding asparagus or peas. Summer is perfect for ripe tomatoes or zucchini. Fall brings hearty options like shredded Brussels sprouts or roasted squash. In winter, you can add kale or root vegetables. Adapting your recipe with seasonal ingredients keeps it exciting and fresh all year round. Explore new flavors and textures with each season. You can check the [Full Recipe] for more ideas to elevate your dish! To store leftovers properly, place the salad in an airtight container. Make sure to keep the salad separate from the dressing if you plan to eat it later. This helps maintain the crunch of the veggies. When stored this way, the salad lasts about three days in the fridge. If you mix the dressing in, aim to eat it within two days for the best taste. You can freeze the Spicy Thai Noodle Salad, but it's not ideal. Freezing can change the texture of the vegetables. If you decide to freeze it, use a freezer-safe container. Thaw the salad in the fridge overnight for best results. To serve, let it sit at room temperature for about 15 minutes after thawing. This helps bring back some freshness. To reheat the salad, use a microwave at low power. Heat it in 30-second intervals, stirring in between. This method keeps the noodles and veggies from becoming mushy. If you prefer it cold, serve it straight from the fridge. A squeeze of fresh lime juice can brighten the flavors after refrigeration. Preparing Spicy Thai Noodle Salad takes about 15 minutes. Cooking the rice noodles adds another 10 minutes. In total, you spend around 25 minutes. This recipe yields 4 servings, perfect for sharing or meal prep. Yes, you can make this salad ahead of time. I suggest preparing the vegetables and dressing first. Store them in separate containers. When you're ready to serve, combine everything. This keeps the salad fresh and crisp. If you need a substitute for fish sauce, soy sauce works well. It’s great for vegetarians. You can also use coconut aminos for a milder flavor. These alternatives maintain the dish's salty taste. Absolutely! You can add protein like shrimp, chicken, or tofu. You can also swap out vegetables based on your taste. Try adding mango for sweetness or radishes for a crunch. The options are endless. To make this salad gluten-free, use rice noodles. For the dressing, ensure you pick gluten-free soy sauce. Check labels when buying ingredients to avoid hidden gluten. This way, everyone can enjoy the salad. The Spicy Thai Noodle Salad recipe combines vibrant ingredients for a tasty dish. You learned how to cook rice noodles, prepare fresh vegetables, and create a zesty dressing. The nutritional benefits of the main ingredients make this salad a healthy choice. Remember, you can adjust flavors and ingredients to suit your taste. Try adding proteins or seasonal veggies for new twists. Follow proper storage tips to enjoy leftovers or make it ahead of time. With these guidelines, you’re set for a flavorful, customizable meal.](https://joymealplan.com/wp-content/uploads/2025/07/00f7a476-2e89-474b-9c80-2d6783f3d5a0-768x768.webp)
![- Preheat the oven to 400°F (200°C). - Rinse and trim the asparagus. First, I set my oven to 400°F (200°C). This temperature roasts the asparagus just right. Next, I rinse the asparagus under cold water. I clean each stalk well. To trim, I gently bend the end until it snaps. This removes the tough part. If you prefer, use a knife for a clean cut. - Mix garlic, olive oil, lemon zest, lemon juice, and seasonings. Now, let’s make the marinade! In a small bowl, I combine minced garlic, olive oil, lemon zest, and lemon juice. I add sea salt, black pepper, and red pepper flakes for a little heat. Whisk all these together until well mixed. This marinade brings a burst of flavor to our asparagus. - Toss asparagus in marinade. - Roast asparagus for 12-15 minutes in preheated oven. Next, I lay the asparagus on a baking sheet. I drizzle the marinade over them, making sure each spear gets coated. I use my hands or a spoon to toss gently. Then, I spread them out in a single layer. I place the tray in the hot oven. I roast the asparagus for 12-15 minutes. Halfway through, I give them a stir. This helps them cook evenly. When done, they should be tender with a bit of crispness. If you want, sprinkle grated Parmesan cheese over the asparagus in the last two minutes of roasting. It melts nicely and adds richness. Once finished, I take them out and garnish with fresh parsley. This adds color and makes the dish pop! For the complete recipe, check out the [Full Recipe]. How do you tell when asparagus is done cooking? Look for a bright green color. The stalks should be tender but still firm. You can also poke them with a fork to check for tenderness. If they bend easily but don’t break, they’re perfect! Want to boost the flavor? Try adding fresh herbs like thyme or basil. You can also use spices like garlic powder or onion powder. If you like a kick, sprinkle red pepper flakes on top. Just a pinch adds great heat without overpowering the dish. How can you serve Garlic Lemon Asparagus? First, arrange the asparagus on a nice platter. Keep them in a single layer for a neat look. You can sprinkle some extra lemon zest on top for brightness. Finally, add fresh parsley for a splash of color. This makes your dish pop and look tasty! For the full recipe, check out the complete guide. {{image_4}} You can cook Garlic Lemon Asparagus in different ways. Each method gives a unique taste. - Grilling: This adds a smoky flavor. You will get nice grill marks. But you should watch it closely. It cooks fast and may burn. - Roasting: This method brings out the natural sweetness. You will get a tender inside with a slight crisp. It takes a short time at high heat, which is perfect for busy cooks. - Sautéing on the stovetop: This is quick and easy. Heat oil in a pan, add the asparagus, and cook for a few minutes. You get a fresh taste and a bright green color. You can switch ingredients to suit your taste or diet. - Cheese Options: If you want a vegan dish, skip the Parmesan. You can use nutritional yeast for a cheesy taste without dairy. Feta cheese is also a great option if you want a different flavor. - Citrus Variations: Instead of lemon, try lime or orange. Each fruit brings its own twist. Lime gives a tangy kick, while orange adds sweetness. Many people have different diets. You can easily adapt this dish. - Gluten-Free: This recipe is already gluten-free. Just make sure any added ingredients are too. - Dairy-Free: Skip the cheese or use a dairy-free alternative. This keeps the dish light and fresh. - Low-Carb: Asparagus is low in carbs, making it perfect for health-conscious eaters. You can enjoy it without worries about carbs. Try these variations to make Garlic Lemon Asparagus your own! For the complete recipe, check the [Full Recipe]. To keep your Garlic Lemon Asparagus fresh, follow these tips: - Refrigeration: Place leftovers in an airtight container. This helps keep moisture in and prevents odors from other foods. Store them in the fridge for best results. - Freezing: If you want to save them longer, consider freezing. First, blanch the asparagus in boiling water for two minutes. Then cool them in ice water. Drain and place in freezer bags. Remove air to avoid freezer burn. When it's time to enjoy them again, you should reheat properly. - Reheating: For the best taste, heat in a skillet over medium heat. Add a splash of olive oil to keep them moist. Stir occasionally for even heating. You can also reheat them in the oven at 350°F (175°C) for about 10 minutes. Garlic Lemon Asparagus lasts about 3 to 5 days in the fridge. - Check for freshness: Look for any signs of spoilage, like discoloration or a sour smell. If they seem off, it's best to toss them. To maintain texture after storage, try these tips: - Avoid overcrowding in the container. This helps air circulate and keeps them crisp. - When reheating, don't overcook them. This keeps their vibrant color and crunch. Following these steps will help you enjoy your Garlic Lemon Asparagus longer, keeping the flavors fresh and delicious! For the complete preparation guide, check the Full Recipe. What are the health benefits of asparagus? Asparagus is low in calories and high in nutrients. It is rich in vitamins A, C, E, and K. This vegetable also has folate, which helps with cell growth. Asparagus is a good source of fiber, aiding digestion. Plus, it has antioxidants that fight free radicals in the body. Can I prepare Garlic Lemon Asparagus in advance? Yes, you can prepare Garlic Lemon Asparagus in advance. You can wash and trim the asparagus a day before. Mix the marinade and store it in the fridge. When you are ready to eat, toss the asparagus in the marinade and roast them. This helps the flavors meld well. Can I use frozen asparagus for this recipe? Yes, you can use frozen asparagus for this recipe. However, fresh asparagus will taste better. If using frozen, thaw them first. Drain excess water to avoid sogginess. Then proceed with the marinade and roasting steps. How can I make this recipe spicier? To make this recipe spicier, add more red pepper flakes. You can also add sliced fresh jalapeños or a dash of hot sauce. Mix these into the marinade for an extra kick. Start with a small amount and adjust to your taste. What dishes pair well with Garlic Lemon Asparagus? Garlic Lemon Asparagus pairs well with many dishes. It complements grilled chicken, fish, or steak. You can also serve it with pasta or rice. A light salad also works nicely with this dish. How can I incorporate this recipe into a meal prep plan? Incorporate Garlic Lemon Asparagus into your meal prep by adding it to your favorite meals. Roast a big batch and store it in the fridge. Use it as a side dish throughout the week. It can add color and flavor to your meals. In this blog post, we covered a simple yet delicious Garlic Lemon Asparagus recipe. We explored fresh ingredients, step-by-step cooking instructions, and useful tips for perfecting your dish. You learned about different cooking methods and diet modifications, plus how to store leftovers. Garlic Lemon Asparagus is a versatile side that enhances any meal. Try it out and enjoy creating your own flavors!](https://joymealplan.com/wp-content/uploads/2025/07/a67e5927-9a3c-4503-bb74-543c28219cb2-768x768.webp)