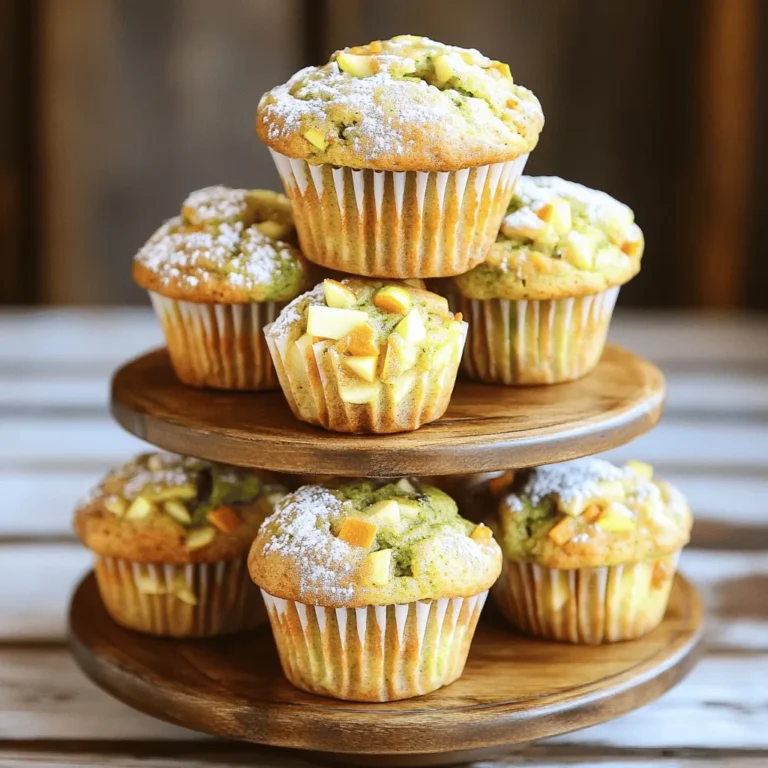
Buttery Lemon Blueberry Loaf Fresh and Flavorful Delight

Brighten your day with my Buttery Lemon Blueberry Loaf! This moist, flavorful treat combines tangy lemon and sweet blueberries for a delightful burst in every bite. In this post, I’ll share a simple recipe with easy steps, helpful tips, and variations to make it your own. Let’s get started on creating this fresh and flavorful delight that will impress everyone and leave them wanting more!
Ingredients
To make the Buttery Lemon Blueberry Loaf, you need these ingredients:
– 1 ½ cups all-purpose flour
– 1 teaspoon baking powder
– ½ teaspoon baking soda
– ½ teaspoon salt
– ½ cup unsalted butter, softened
– 1 cup granulated sugar
– 2 large eggs, at room temperature
– Zest of 1 lemon (about 1 tablespoon)
– 2 tablespoons fresh lemon juice
– 1 teaspoon vanilla extract
– ½ cup buttermilk (or use milk mixed with 1 teaspoon vinegar)
– 1 ½ cups fresh blueberries (or frozen if fresh are not available)
– 2 tablespoons flour (for coating blueberries)
These ingredients work together for a moist and flavorful loaf. The flour gives structure, while the butter adds richness. The sugar not only sweetens but helps with browning. Fresh lemon juice and zest bring a bright and tangy taste. Blueberries add bursts of sweetness in every bite. The buttermilk keeps the loaf tender and moist. Remember to coat your blueberries with flour to keep them suspended in the batter. This way, they won’t sink to the bottom during baking. Each element plays a key role in making this loaf a delightful treat.
Step-by-Step Instructions
Preheat the Oven and Prepare the Pan
Start by preheating your oven to 350°F (175°C). This temperature helps the loaf rise perfectly. Prepare a 9×5-inch loaf pan. You can grease it with butter and lightly dust it with flour, or use parchment paper. Parchment makes it easy to lift the loaf out later.
Combine Dry Ingredients
In a medium bowl, mix 1 ½ cups of all-purpose flour, 1 teaspoon of baking powder, ½ teaspoon of baking soda, and ½ teaspoon of salt. Whisk these together until they are well blended. Set this bowl aside for later.
Creaming Butter and Sugar
In a large mixing bowl, take ½ cup of softened unsalted butter and 1 cup of granulated sugar. Use an electric mixer to beat them together. Mix until the mixture is light and fluffy, which should take about 3 to 4 minutes. This step is key for a soft loaf.
Adding Eggs and Flavors
Now, add 2 large eggs to your creamy mixture one at a time. Make sure to mix well after each egg. Next, stir in the zest of 1 lemon, 2 tablespoons of fresh lemon juice, and 1 teaspoon of vanilla extract. Mix until everything is combined smoothly.
Mixing Wet and Dry Ingredients
Gradually add your dry ingredient mix to the butter and egg mixture. Alternate this with ½ cup of buttermilk, starting and ending with the dry mix. This helps keep your batter smooth. Mix only until just combined, being careful not to overmix.
Preparing and Folding in Blueberries
In a small bowl, take 1 ½ cups of fresh blueberries and coat them with 2 tablespoons of flour. This will help keep them from sinking in the batter. Gently fold these blueberries into your batter using a spatula. Make sure they are evenly distributed without breaking them.
Baking the Loaf
Pour your blueberry batter into the prepared loaf pan. Smooth the top with a spatula. Bake in your preheated oven for 55 to 65 minutes. To check for doneness, insert a toothpick into the center. If it comes out clean, your loaf is ready. If the top browns too quickly, loosely cover it with aluminum foil.
Cooling and Slicing
Once baked, remove the loaf from the oven and let it cool in the pan for about 10 minutes. After that, transfer the loaf to a wire rack. Let it cool completely before slicing. This cooling time helps the loaf set, ensuring clean slices. Enjoy your buttery lemon blueberry loaf!
Tips & Tricks
Perfecting the Texture
To make a moist loaf, you need to balance your wet and dry ingredients. Use room temperature butter and eggs. This helps the mixture blend smoothly. Overmixing can lead to a tough loaf. Mix just until you see no dry flour. Adding buttermilk keeps the loaf soft. The acidity in buttermilk works wonders.
Serving Suggestions
Slice the loaf after it cools. Serve it on a pretty plate. Dust with powdered sugar for charm. Add fresh blueberries and lemon slices for a pop of color. It pairs well with a cup of tea or coffee. You can also serve it with whipped cream or yogurt for extra richness.
Common Mistakes to Avoid
One mistake is forgetting to coat the blueberries. This can cause them to sink in the batter. Another issue is not checking your oven’s temperature. An oven that is too hot can burn the top. Always use a toothpick to check if it’s done. If it comes out clean, your loaf is ready.

Variations
Ingredient Substitutions
You can easily change some ingredients in this recipe. Here are a few swaps:
– Butter: Use coconut oil or a dairy-free butter for a vegan option.
– Sugar: Try using honey or maple syrup instead of granulated sugar. Adjust the liquid in the recipe to balance it.
– Buttermilk: If you don’t have buttermilk, mix milk with 1 teaspoon of vinegar or lemon juice to sour it.
These changes help fit your dietary needs while keeping that great flavor.
Flavor Enhancements
To make this loaf even tastier, think about adding new flavors. Here are some ideas:
– Spices: A pinch of cinnamon or nutmeg can add warmth to the loaf.
– Extracts: Swap vanilla extract for almond extract for a unique twist.
– Zest: Mix in zest from oranges or limes for a different citrus flavor.
These enhancements can turn this loaf into a surprising treat.
Seasonal Variations
Using seasonal fruits can make this loaf special all year. Here are a few suggestions:
– Summer: Use fresh raspberries or strawberries instead of blueberries for a berry blend.
– Fall: Add chopped apples and a sprinkle of cinnamon for a cozy autumn flavor.
– Winter: Try using cranberries with some orange zest for a bright, festive touch.
Changing the fruit lets you enjoy this loaf in new ways with each season.
Storage Info
Best Storage Practices
To keep your buttery lemon blueberry loaf fresh, wrap it tightly in plastic wrap. This helps keep moisture in. You can also place it in an airtight container. Store it at room temperature if you plan to eat it within a few days. If you want it to last longer, the fridge is a good option.
Freezing Guidelines
Freezing your loaf is easy. First, let it cool completely. Then, wrap it tightly in plastic wrap. After that, cover it with aluminum foil for extra protection. You can freeze it for up to three months. When you’re ready to enjoy it, thaw the loaf in the fridge overnight. For a quicker method, you can leave it at room temperature for a few hours.
Shelf Life
When stored correctly, your loaf can last up to a week at room temperature. In the fridge, it stays fresh for about two weeks. If you freeze it, remember to eat it within three months for the best taste. Following these tips keeps your buttery lemon blueberry loaf fresh and flavorful.
FAQs
Can I use frozen blueberries?
Yes, you can use frozen blueberries. They are a great option when fresh ones are not available. To use them, do not thaw them before adding to the batter. Toss them in flour as you would with fresh berries. This helps keep them from sinking in the loaf. When using frozen blueberries, the loaf may take a few extra minutes to bake. Check for doneness as you normally would.
Is there a gluten-free version of this loaf?
You can make a gluten-free version of the Buttery Lemon Blueberry Loaf. Replace all-purpose flour with a gluten-free flour blend. Make sure it includes xanthan gum for the right texture. You can also use almond flour or coconut flour, but adjust the liquid. Each flour has different absorption rates. Experiment to find the mix that works best for you.
How can I make the loaf more lemony?
To boost the lemon flavor, add more lemon zest. You can use the zest of two lemons instead of one. Adding a bit more lemon juice will also help. Just be careful not to add too much or it may make the loaf soggy. For a fun twist, consider adding a touch of lemon extract for more brightness.
Why does my loaf sink in the middle?
A sinking loaf can be caused by a few factors. If the batter is too wet, it may not hold its shape. Make sure to measure your ingredients accurately. Overmixing the batter can also cause this issue. Mix just until combined. Lastly, ensure your oven temperature is correct. An oven that is too hot can cause the loaf to rise and then collapse.
Can I add nuts to the recipe?
Yes, you can add nuts to the loaf. Walnuts or pecans work well with the flavors. Chop them into small pieces and fold them into the batter with the blueberries. This adds a nice crunch and extra flavor. Just remember to reduce the amount of blueberries a bit to keep the balance right.
This blog post outlined how to create a delicious Buttery Lemon Blueberry Loaf. We covered ingredients, step-by-step baking instructions, tips, and storage advice. You can make tasty variations or adjustments to suit your needs. Remember to avoid common mistakes for the best results. With this knowledge, you can bake confidently. Enjoy your fresh loaf with friends or family, and share your success. Happy baking!


![- Strawberries - Blueberries - Kiwi - Mango - Pineapple When making honey lime fruit salad, choose bright and fresh fruits. Fresh strawberries add sweetness, while blueberries offer a burst of flavor. Kiwi adds a tangy kick, and mango brings a tropical twist. Pineapple adds juicy texture and sweetness. Each fruit shines in this salad. - Pure honey - Freshly squeezed lime juice - Lime zest The honey and lime mixture brightens the salad. Use pure honey for a rich flavor. Fresh lime juice offers a zesty taste, and lime zest adds a fragrant note. Mix these ingredients well to create a smooth dressing. This blend enhances the fruits and ties everything together. - Fresh mint leaves for decoration Fresh mint leaves add a pop of color and a refreshing aroma. They make the salad look beautiful and inviting. Just sprinkle them on top before serving. This final touch makes the dish feel special and fun. For the full recipe, check out the details above. Start by cleaning the fruits well. Rinse strawberries in cold water and hull them. Slice them into thin pieces. For blueberries, just rinse them off and set them aside. Peel the kiwi and dice it into small chunks. Next, peel the mango and cut it into cubes. Finally, chop the pineapple into bite-sized pieces. Using fresh fruits makes the salad taste better and look bright. Fresh fruits add flavor and nutrition to your dish. Grab a small bowl and add two tablespoons of pure honey. Next, squeeze two tablespoons of fresh lime juice into the bowl. Then, use a zester to add the zest from one lime. Using a whisk, mix these three ingredients together. You want the honey to blend smoothly with the lime juice and zest. This dressing brings a sweet and tangy flavor to your fruit salad. Now, pour the honey lime dressing over the bowl of fruits. Use a large spoon to gently toss everything together. Be careful! You want to coat the fruits without bruising them. After mixing, let the salad rest for about 10 minutes. This time helps the flavors blend together. Just before serving, stir the salad again. If you wish, add a bit more honey to sweeten it. Enjoy this refreshing dish served in bowls or on a platter. When picking fruits, go for seasonal options. They taste best and are often cheaper. Seasonal fruits are ripe and ready to eat. Off-season fruits can be harder and less sweet. Always check for ripeness. Squeeze the fruit gently; it should feel slightly soft. Look for bright colors, which show freshness. Avoid fruits with bruises or dark spots. To make your salad even better, adjust the sweetness. If you want it sweeter, add more honey. A little goes a long way. You can also add a small pinch of salt. It may seem odd, but salt brings out the natural sweetness. Just a touch can make a big difference. How you serve the fruit salad matters. You can use bowls for individual servings or a platter for a group. A platter looks nice and allows everyone to help themselves. To make it more appealing, use fresh mint leaves. They add color and a fresh scent. Just sprinkle a few on top right before serving. For a full guide on making this dish, check the [Full Recipe]. {{image_4}} You can mix in many fruits for more flavor. Try adding bananas for creaminess. Apples give a nice crunch. You can also use grapes or pomegranate seeds. These fruits add color and taste. They can also change the texture, making it fun to eat. Adding nuts or seeds brings a crunchy twist. Chia seeds are a great choice. They add fiber and healthy fats. Walnuts or almonds give a rich, nutty flavor. Just sprinkle them on top before serving. This will make your salad even more satisfying. You can turn your fruit salad into a meal. Adding protein makes it hearty. Greek yogurt is a tasty option. It adds creaminess and protein. Cottage cheese is another great choice. Both give a nice balance to the sweetness of the fruits. You can serve it in a bowl or mix it right in. Enjoy your Honey Lime Fruit Salad Delight! For the full recipe, check the section above. To keep your Honey Lime Fruit Salad fresh, use airtight containers. These containers help lock in moisture and flavors. Glass or plastic containers work well. If you don’t have these, a bowl covered tightly with plastic wrap can also be a good option. To prevent browning in fruits like apples or bananas, use lemon juice. You can also add extra lime juice to the salad. The acidity slows down oxidation. Keep your fruit salad in the fridge to stay crisp and tasty. For the best taste, eat the salad within three days. After this, the fruits may lose their texture. If you store it properly, it can last up to five days. However, the fresher, the better! Enjoy it while it's full of flavor. For the full recipe, check out the earlier section. Yes, you can use other sweeteners. Some good options are maple syrup and agave nectar. Each sweetener has a unique flavor. Maple syrup adds warmth, while agave is mild. Adjust the amount based on your taste. Use the same amount of these sweeteners as honey. This keeps the balance of flavors intact. You can prepare this salad ahead, but keep some tips in mind. Cut the fruits and store them separately. This helps keep them fresh. Mix the honey lime dressing and store it in the fridge. Combine everything just before serving. This keeps the fruits from getting mushy and preserves the crunchiness. Certain fruits may not mix well with lime. Avoid bananas, as they brown quickly and can turn mushy. Apples may also not hold up well with lime juice. Citrus fruits like oranges can overpower the salad. Stick to fruits that stay fresh and vibrant for the best taste. This blog post showed you how to create a delightful fruit salad. We covered the best fresh fruits like strawberries and mangoes, and the sweet honey-lime dressing. You learned how to prepare and combine the ingredients for a tasty dish. We shared tips on choosing fruits, enhancing flavors, and presentation tricks. In the end, you can make this salad your own by adding nuts or different fruits. With these steps, your salad will be fresh and enjoyable every time. Now, you’re ready to impress with your new skills!](https://joymealplan.com/wp-content/uploads/2025/06/73b51031-810e-4f51-94b6-bb966ad7c4ea-768x768.webp)
![- Ripe avocados: Choose avocados that feel soft but not mushy. Ripe avocados add creaminess. They bring healthy fats and nutrients to the mousse. When selecting avocados, look for dark green skin. A little give when pressed is a good sign. Avoid avocados with large dark spots or cracks. - Cocoa powder: The type of cocoa powder you use matters. Choose high-quality, unsweetened cocoa for the best flavor. Dutch-processed cocoa has a smooth taste. Regular cocoa has a rich chocolate flavor. Both are great choices. - Sweeteners: Maple syrup and agave syrup are both tasty options. Maple syrup gives a unique flavor. It adds a slight caramel note. Agave syrup is milder and sweeter. It blends well without changing the taste much. You can adjust the sweetness based on your preference. - Non-dairy milk options: You can use almond, coconut, or oat milk. Almond milk is light and nutty. Coconut milk adds creaminess and a hint of tropical flavor. Oat milk is thick and wholesome. Any of these choices work well to create a smooth texture. - Flavor enhancers: Vanilla extract adds warmth and depth. A little cinnamon gives an extra layer of flavor. Both options are simple and enhance the chocolate taste. You can try adding a pinch to see what you like best. - Garnish suggestions: Dark chocolate shavings are a rich topping. They add elegance and extra chocolate flavor. Fresh berries like raspberries or strawberries bring brightness. Their color and tartness balance the rich mousse perfectly. These garnishes make the dish even more appealing. You can find the full recipe at the beginning of this article. First, you need to prepare your avocados. To peel and pit them easily, slice the avocado in half. Twist the halves apart. Use a spoon to scoop out the pit. Then, scoop the green flesh into a bowl. Next, measure your ingredients. For this mousse, you will need: - 2 ripe avocados, peeled and pitted - 1/2 cup unsweetened cocoa powder - 1/3 cup maple syrup (or agave syrup) - 1/4 cup almond milk (or any non-dairy milk of your choice) - 1 teaspoon vanilla extract - 1/4 teaspoon sea salt - A pinch of cinnamon (optional) Combine all these ingredients in a food processor. Now, let’s blend for that creamy texture. Start blending on high speed. Stop occasionally to scrape down the sides. This ensures everything mixes well. Blend until it’s smooth. Taste your mousse after blending. If you desire more sweetness, add extra maple syrup. Blend again to mix in the syrup. Adjust to your liking for the best flavor. Chilling the mousse is very important. It allows the flavors to develop and the mousse to thicken. Cover the individual dishes with plastic wrap. Chill them in the fridge for at least 30 minutes. For serving, get creative! Garnish your mousse with dark chocolate shavings or fresh berries. This adds a pop of color and texture. You can serve it in small bowls or glasses for a fun touch. Enjoy your rich and creamy vegan chocolate avocado mousse! - Over-blending the mousse: Blending too long makes it thin. Blend just until smooth. You want a creamy texture, not soup. - Using unripe avocados: Unripe avocados are hard and bitter. Always pick ripe ones. They should feel slightly soft. - Balancing sweetness: Taste your mousse before serving. If it's too bitter, add more maple syrup. Start with a little more. Keep tasting until it’s just right. - Experimenting with additional flavorings: You can try adding a pinch of espresso or a drop of peppermint extract. These flavors can make the mousse even more exciting. - Best food processors for smooth blending: Look for a powerful food processor. A 600-watt model works well. It blends the ingredients evenly and quickly. - Storage containers for chilling the mousse: Use small bowls with lids. This keeps the mousse fresh. Glass containers are a great choice. They help keep the mousse cool and tasty. For the full recipe, check out the [Full Recipe]. {{image_4}} You can make your Vegan Chocolate Avocado Mousse even more fun by adding nut butters. Try almond or peanut butter for a rich and creamy taste. These nut butters enhance the texture and add healthy fats. You can also infuse flavors like coffee or mint. A splash of coffee brings a deep, bold taste. Mint adds a refreshing twist that brightens up the dessert. Both options create a unique mousse that surprises and delights. For those with dietary needs, gluten-free variations are easy to make. All the ingredients in this mousse are naturally gluten-free. This makes it a great choice for anyone avoiding gluten. You can also opt for sugar-free alternatives. Using stevia or monk fruit keeps the mousse sweet without added sugar. These substitutes do not change the creamy texture. You can enjoy a guilt-free treat that still tastes amazing. Transform your mousse into parfaits for a stunning dessert. Layer the mousse with fresh fruits or granola in clear cups. This adds color and texture, making your dessert look beautiful. You can use the mousse as a filling for cakes or other desserts. It works well between layers of cake or as a filling for tart shells. This gives you a chance to be creative with your presentation. For the complete recipe, check out the Full Recipe section. To keep your Vegan Chocolate Avocado Mousse fresh, follow these steps: - Chill the mousse: After making it, cover your mousse with plastic wrap or a lid. This helps prevent air from getting in. - Use airtight containers: Store the mousse in airtight containers. This keeps it from absorbing other flavors in the fridge. - Refrigerate promptly: Place it in the fridge as soon as it's ready. This helps maintain its creamy texture. The mousse stays fresh for about 3 to 5 days in the fridge. Always check for any changes in smell or texture before serving. Can you freeze Vegan Chocolate Avocado Mousse? Yes, you can! Freezing is a great option if you want to store it longer. - Portion it out: Divide the mousse into small portions before freezing. This makes it easy to thaw only what you need. - Use freezer-safe containers: Make sure to use containers that are safe for freezing. This prevents freezer burn. When you're ready to enjoy it again, follow these steps to thaw: - Thaw in the fridge: Place the frozen mousse in the fridge overnight. This keeps it at a safe temperature while it thaws. - Stir before serving: After thawing, give the mousse a quick stir. This helps regain its smooth texture. By following these storage and freezing tips, you can enjoy your Vegan Chocolate Avocado Mousse at its best. For the complete recipe, check out the Full Recipe section. Yes, you can use different sweeteners. Honey or agave syrup works well too. Each sweetener changes the taste slightly. Honey adds a floral note, while agave is milder. You can experiment to find your favorite. Just keep the amount similar to maple syrup for the best results. This mousse stays fresh for about three days in the fridge. Store it in an airtight container to keep it from drying out. The mousse may thicken as it sits, so stirring it gently can help restore its creamy texture. Enjoy it within this timeframe for the best flavor and quality. Yes, this dessert is quite healthy! Avocados are full of good fats and nutrients. They can boost heart health and provide fiber. Cocoa powder is also rich in antioxidants, adding to the health benefits. This mousse is a guilt-free treat that satisfies your sweet tooth while nourishing your body. Absolutely! To make it nut-free, choose oat milk or soy milk instead of almond milk. Both options work well and keep the mousse creamy. Ensure your cocoa powder is also nut-free. With these swaps, you can enjoy this tasty dessert without any nut allergy concerns. Vegan Chocolate Avocado Mousse is simple and fun to make. You learned about key ingredients like ripe avocados, cocoa powder, and sweeteners. I shared tips on preparation, blending, and storing your mousse. Mixing in flavors or making parfaits adds creativity. Remember, use ripe avocados for the best taste. This mousse is healthy and easily customizable for different diets. Enjoy your tasty treat, and don't hesitate to share your own variations!](https://joymealplan.com/wp-content/uploads/2025/06/f08f53b2-ba89-49fb-bc73-48bd2b3a08b2-768x768.webp)