Spooky Halloween Snack Mix Festive and Fun Recipe

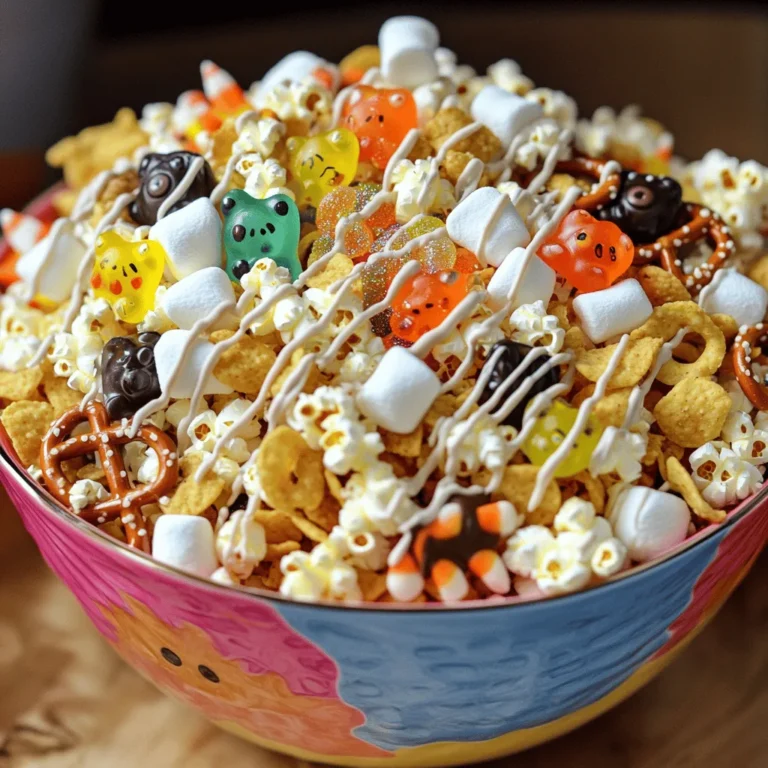
Ready to make Halloween extra special? This Spooky Halloween Snack Mix is a must-try! It’s easy, fun, and perfect for any spooky gathering. With just a few simple ingredients, you’ll create a treat that’s both sweet and salty, ideal for kids and adults alike. Let’s dive into this festive recipe and make a snack that looks great and tastes even better! Get your ingredients ready; the fun is about to start!
Ingredients
Detailed Ingredient List
To create a fun Spooky Halloween Snack Mix, gather the following ingredients:
– 2 cups popcorn (popped)
– 1 cup pretzel sticks
– 1 cup candy corn
– 1 cup chocolate-covered pretzels
– 1 cup mixed nuts (almonds, peanuts, cashews)
– 1 cup Halloween-themed gummy candies (worms, spiders, etc.)
– 1/2 cup orange candy melts
– 1/2 cup purple candy melts
– 1 teaspoon sea salt
– Optional decorations: edible glitter or Halloween-themed sprinkles
Each item brings its own flavor and texture. The popcorn adds lightness, while pretzel sticks give a salty crunch. Candy corn offers sweetness, and chocolate-covered pretzels add richness. The mixed nuts introduce a savory element, and gummy candies bring fun shapes and tastes.
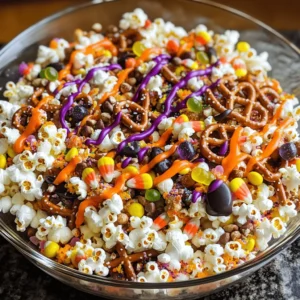
The candy melts are key for that spooky look. Melted orange and purple candy create an eye-catching drizzle that makes this mix a true Halloween treat.
Feel free to adjust the quantities or swap some ingredients. You can make this mix your own.Enjoy making this festive snack!
Step-by-Step Instructions
Preparing the Snack Base
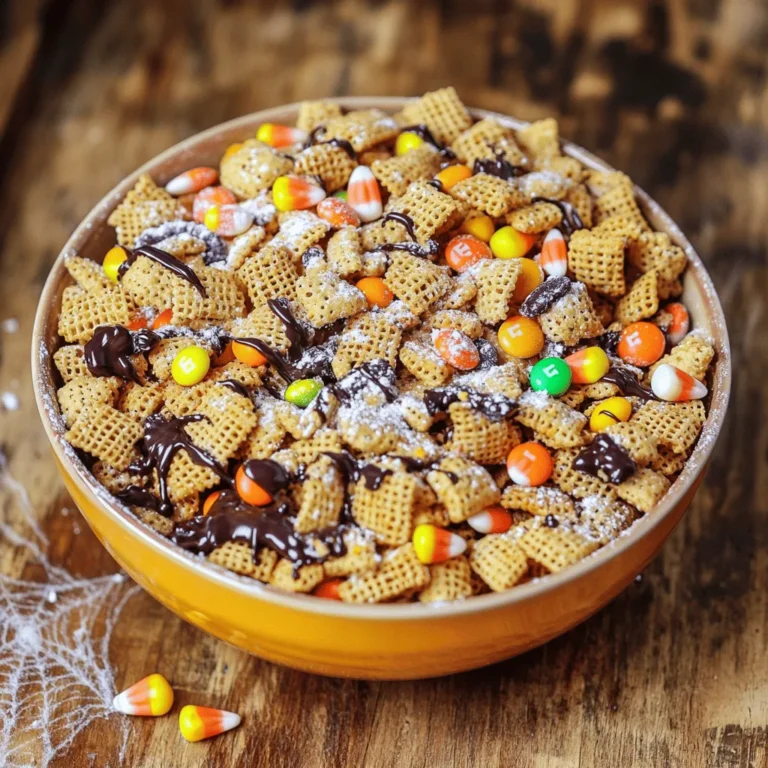
– Mix the Base Ingredients: In a large bowl, add the popcorn, pretzel sticks, candy corn, chocolate-covered pretzels, mixed nuts, and gummy candies. This mix is fun and colorful!
– Toss for Even Distribution: Use your hands or a spatula to gently toss everything together. You want the flavors to mix well without breaking anything.
Melting the Candy
– Use Microwave-Safe Bowls: Grab two separate microwave-safe bowls. One is for orange melts, and the other is for purple melts. This keeps it organized.
– Heating Instructions: Microwave each bowl for 30 seconds. After each time, stir until the candy is smooth. Repeat until melted. This step makes your mix pop with color!
Drizzling and Adding Flavors
– Pouring the Melted Candy: Start with the orange candy. Drizzle it over the snack mix. Let it cover as much as possible. Then, do the same with the purple candy. The colors create a spooky swirl!
– Seasoning with Sea Salt: Evenly sprinkle sea salt over the snack mix. This little touch makes the sweet flavors stand out. It’s a simple yet tasty step!
Now you have a delightful spooky snack mix ready to enjoy!
Tips & Tricks
Enhancing Flavor
– Recommended Mixing Tips: Mix the snack base gently. You want all flavors to blend well. Avoid crushing the pretzels or popcorn.
– Balancing Sweet and Savory Elements: Use sea salt to enhance the sweetness. This balance makes each bite exciting. Try adding more nuts for a rich taste.
Presentation Ideas
– Creative Serving Suggestions: Serve in orange or black bowls. Use clear bags tied with spooky ribbons for gifts.
– Thematic Decoration Options: Add plastic spiders or toy bats to your serving dish. This will impress your guests. You can even use fake cobwebs for a haunted look.
Making it Spooky
– Incorporating Seasonal Elements: Add pumpkin spice or cinnamon to the mix. It adds a cozy fall flavor.
– Fun Add-ins for a Festive Twist: Try using Halloween-themed marshmallows or candy eyes. These will make your mix extra fun and spooky.

Variations
Alternative Ingredients
You can get creative with your spooky snack mix. Adding different nuts or snacks makes it more fun. Try using:
– Almonds
– Peanuts
– Cashews
– Sunflower seeds
– Flavored chips
These options change the taste and crunch. You can also use various gummy candies. Instead of just worms or spiders, think about:
– Gummy bears
– Sour gummies
– Candy eyeballs
Mixing these can bring new flavors and excitement.
Dietary Substitutions
If you want to make this snack mix gluten-free, swap the pretzel sticks for gluten-free options. You can use rice cakes or gluten-free crackers. For a vegan alternative, choose dairy-free chocolate-covered pretzels. You can also use vegan candy melts for the drizzle. These small changes help everyone enjoy the mix.
Holiday-Specific Themes
This mix isn’t just for Halloween! You can make Christmas or Thanksgiving variants. For Christmas, add red and green candies. Use peppermint bark for a festive flair. For Thanksgiving, mix in autumn-themed candies like pumpkins or acorns. You can also make it for birthday celebrations. Choose colors that match the birthday theme. This makes your snack mix suitable all year round!
Storage Info
Best Storage Practices
– Airtight Containers: Store your spooky snack mix in airtight containers. This keeps it fresh and crunchy.
– Keeping Freshness: Avoid exposure to air and moisture. This prevents the mix from getting soggy or stale.
Shelf Life
– How Long It Lasts: General Guidelines: If stored properly, your spooky snack mix lasts about 1-2 weeks. Check for any off smells or textures before eating.
Freezing and Reheating Tips
– Can You Freeze Snack Mix?: Yes, you can freeze it! Place it in a freezer-safe bag or container. This helps keep it fresh longer.
– Best Ways to Restore Texture: When ready to eat, let the mix thaw at room temperature. This helps keep its original crunch. Avoid microwaving, as it may make it chewy.
FAQs
What is a Spooky Halloween Snack Mix?
A Spooky Halloween Snack Mix is a fun treat for Halloween. It combines sweet and salty snacks. Common ingredients include:
– 2 cups popcorn (popped)
– 1 cup pretzel sticks
– 1 cup candy corn
– 1 cup chocolate-covered pretzels
– 1 cup mixed nuts (almonds, peanuts, cashews)
– 1 cup Halloween-themed gummy candies (like worms and spiders)
– 1/2 cup orange candy melts
– 1/2 cup purple candy melts
– 1 teaspoon sea salt
This mix is colorful and festive. You can even add edible glitter or Halloween sprinkles for extra fun.
How can I make my mix less sweet?
To make your snack mix less sweet, focus on the salty components. Here are some tips:
– Use less candy corn and chocolate-covered pretzels.
– Add more pretzel sticks or mixed nuts.
– Consider adding popcorn without any coating.
– Use a pinch of sea salt to balance the flavors.
These changes will help create a mix that is not overly sweet. You can also use dark chocolate instead of milk chocolate for a richer taste.
Can I make this snack mix ahead of time?
Yes, you can make this snack mix ahead of time. Here’s how:
– Prepare the mix up to two days in advance.
– Store the mix in an airtight container.
– Keep it in a cool, dry place to maintain freshness.
This way, you can enjoy your Spooky Halloween Snack Mix whenever you want. It will still be tasty and fun!
This blog post explains how to create a fun and spooky Halloween snack mix. You learned about the key ingredients, preparation steps, and tips to enhance flavor and presentation. I shared variations for different dietary needs and themes, plus storage tips to keep your mix fresh.
Making snack mixes can be a fun project. Customize it for any occasion, and enjoy sharing it with friends and family! With simple steps, you’ll have a delicious treat everyone will love.

. {{image_4}} Vegetarian Mini Quiche Cups For a tasty vegetarian option, use only veggies. You can add spinach, mushrooms, and bell peppers. Mix in some cheese for creaminess. This keeps the dish light yet filling. You can also use fresh herbs like basil or oregano for extra flavor. Try to use seasonal veggies for the best taste. Meat Lovers' Option If you love meat, this option is for you. Use diced ham, crispy bacon, or cooked sausage. Combine these with your favorite cheese and veggies. This mix gives a hearty bite to each quiche cup. You will enjoy the rich, savory flavors in every bite. Gluten-Free Crust Alternatives If you need a gluten-free crust, use almond flour or cornmeal. You can also find ready-made gluten-free pie crusts at the store. Another idea is to make a crustless quiche. Just pour the filling into greased muffin tins. This way, you skip the crust but keep all the flavor. Dairy-Free Ingredient Swaps For a dairy-free version, use plant-based milk like almond or soy. Swap regular cheese for dairy-free cheese options. Nutritional yeast can add a cheesy flavor without dairy. Try these swaps to enjoy mini quiche cups without dairy. It keeps the recipe tasty and friendly for all diets. For the full recipe, check out the details in the previous section. To keep your mini quiche cups fresh, proper storage is key. - Refrigerating Leftovers: Place any leftover mini quiche cups in an airtight container. They will stay fresh for up to 3 days in the fridge. Just make sure they cool down before sealing. You can also wrap them tightly in plastic wrap for extra protection. - Freezing for Long-Term Storage: If you want to save them longer, freezing works well. First, let the quiche cups cool completely. Then, place them on a baking sheet and freeze until solid. After that, transfer them to a freezer-safe bag or container. They can last up to 2 months in the freezer. Remember to label the container with the date you made them. When you're ready to enjoy your mini quiche cups again, follow these tips for the best results. - Best Methods for Serving Again: The oven is the best way to reheat quiche cups. Preheat your oven to 350°F (175°C). Place the cups on a baking sheet and heat for about 10-15 minutes. This method keeps the crust crisp and the filling warm. - Retaining Flavor and Texture: Avoid using a microwave if you can. Microwaving can make the crust soggy and the filling rubbery. If you must use a microwave, heat them in short bursts of 30 seconds. Check often to ensure they don’t overcook. Following these tips will help you enjoy your mini quiche cups just like fresh! For the full recipe, check the [Full Recipe]. Bake Mini Quiche Cups for 18 to 20 minutes at 375°F (190°C). The tops should turn golden brown. You want the centers set but still moist. Keep an eye on them in the last few minutes. Each oven heats a bit differently. Yes, you can make Mini Quiche Cups ahead of time. Prepare them and store in the fridge for up to two days. You can also freeze them for up to a month. Just be sure to cool them completely before storing. To reheat, place them in the oven at 350°F (175°C) until warm. Great ingredients include: - 6 large eggs - 1 cup milk (whole or 2%) - 1 cup shredded cheese (like cheddar or mozzarella) - 1 cup diced vegetables (bell peppers, spinach, or mushrooms) - 1/2 cup cooked ham or crispy bacon (optional) - Garlic powder and onion powder for flavor These create a tasty base for your quiche cups. You can mix and match fillings easily. Try different cheeses or veggies. For a spicy kick, add jalapeños. If you love herbs, include fresh basil or thyme. Think about seasonal produce too. This makes your quiche cups unique and fun. Mini quiche cups are fun and easy to make. You can mix eggs, dairy, cheese, meats, and veggies to create tasty treats. Remember to preheat your oven and choose the right crust. I shared tips on filling them just right and baking them perfectly. Explore variations like vegetarian or gluten-free options, and learn how to store leftovers. With these steps and ideas, you have all you need for quiche success. Enjoy making your own mini quiche cups! They’ll be a hit with everyone.](https://joymealplan.com/wp-content/uploads/2025/06/d5cf7460-7b4e-43b3-accb-372b25b26cc9-768x768.webp)