
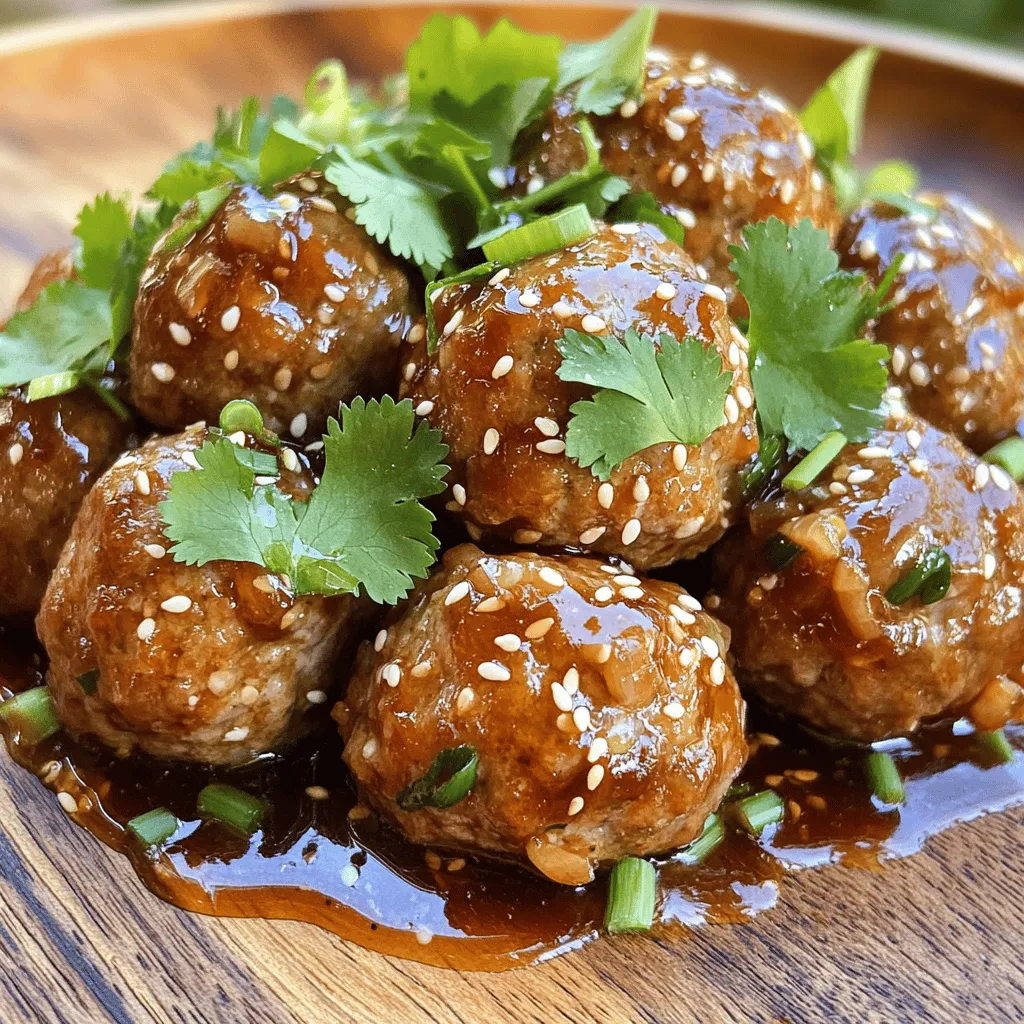
Teriyaki Meatballs Flavorful and Easy Recipe Guide

Are you ready to elevate your dinner game? My Teriyaki Meatballs recipe is not only flavorful but also simple to make! With juicy meat, a rich sauce, and just a few key ingredients, you’ll impress your family or guests in no time. Follow along as I guide you from mixing to plating, with tips and variations to make this dish your own. Let’s get cooking!
Ingredients
Essential Ingredients for Teriyaki Meatballs
– Ground meat options: You can use ground chicken or turkey. Both are lean and perfect for meatballs.
– Breadcrumbs: I recommend panko. It gives the meatballs a great crunchy texture.
– Flavor enhancers: Garlic, ginger, and green onions add depth to the meatballs. They make the dish pop with flavor.
Teriyaki Sauce Components
– Soy sauce: This is the heart of teriyaki sauce. It brings a salty, umami flavor that enhances the meatballs.
– Brown sugar: It adds a sweet touch, balancing the saltiness of the soy sauce. Rice vinegar also adds a nice tang.
– Sesame oil: This oil gives a rich, nutty flavor. Toss in sesame seeds at the end for a crunchy finish.
Step-by-Step Instructions
Prepping for Success
1. First, preheat your oven to 400°F (200°C). This step is key for even cooking.
2. Next, line a baking sheet with parchment paper. This keeps the meatballs from sticking.
3. In a large bowl, mix the ground chicken or turkey, panko breadcrumbs, and chopped green onions.
4. Add minced garlic, grated ginger, and a pinch of salt and pepper.
5. Use your hands or a spatula to blend everything well. This ensures all the flavors combine.
Forming and Baking the Meatballs
1. Now, shape the mixture into small meatballs. Make each one about one inch in size.
2. Place the meatballs on the lined baking sheet. Make sure they have space between them.
3. Bake the meatballs for about 20 minutes. They should turn golden brown and reach 165°F (75°C) inside.
Creating the Teriyaki Sauce
1. While the meatballs bake, let’s make the teriyaki sauce.
2. In a small saucepan over medium heat, mix soy sauce, brown sugar, rice vinegar, sesame oil, and sesame seeds.
3. Stir the sauce until the sugar dissolves. Cook for 2-3 minutes until it simmers.
Finishing Touches
1. After the meatballs are done, transfer them to a large bowl.
2. Pour the warm teriyaki sauce over the meatballs. Gently toss them to coat.
3. To serve, plate the meatballs neatly. Drizzle extra sauce on top for added flavor.
4. Garnish with sesame seeds and fresh cilantro or sliced green onions for a pop of color.Enjoy your cooking!
Tips & Tricks
Perfecting Your Meatballs
To get the best meatball texture, use ground chicken or turkey. Both meats keep them moist. Panko breadcrumbs are key for crunch. They soak up juices but stay light. Mix the meat and breadcrumbs well. This helps bind them together. When shaping, keep them about one inch wide. This size cooks evenly and stays juicy. Seasoning is important. Use salt, pepper, garlic, and ginger for flavor. Balance the taste to keep it interesting.
Enhancing the Teriyaki Flavor
You can boost teriyaki flavor with extra ingredients. Try adding pineapple juice for sweetness. A dash of chili flakes brings heat. You can also mix in sesame seeds for crunch. Let the meatballs sit in the sauce for a few minutes. This step helps the flavors blend. The longer they sit, the better they taste.
Presentation Ideas
For a beautiful plate, use a large platter. Arrange the meatballs in a circle or a line. Drizzle extra teriyaki sauce over the top. Garnish with sesame seeds and green onions. Fresh cilantro adds a nice touch. Offer small bowls for extra sauce. Serve with rice or steamed vegetables on the side. This will create a complete meal.
Variations
Alternate Protein Options
You can switch up the protein in your teriyaki meatballs. Ground beef or pork works well. If you prefer a plant-based option, try lentils or chickpeas. When using beef or pork, you may need to cook longer. Always check the internal temperature to reach 165°F for safety.
Unique Flavor Add-Ins
Want to make your meatballs more fun? Add chopped bell peppers or carrots to the mix. You can also incorporate fruits, like pineapple, for a sweet twist. If you like heat, try adding chili paste to the teriyaki sauce. It gives a spicy kick that balances the sweetness.
Different Cooking Methods
You can bake your meatballs, but frying them on the stovetop gives a nice crust. If you’re short on time, use a slow cooker or an instant pot. Both methods keep the meatballs juicy and tender. Adjust the cooking time to ensure they are fully cooked through.
Storage Info
How to Store Leftover Meatballs
To keep your teriyaki meatballs fresh, follow these steps:
– Refrigeration: Place the meatballs in an airtight container. They last up to four days in the fridge.
– Freezing: For longer storage, freeze them. Use freezer-safe bags or containers. They can last up to three months.
Make sure to label your containers with the date. This helps you know when to use them.
Reheating Instructions
When reheating, you want to keep your meatballs moist. Here’s how:
– Microwave: Place meatballs on a microwave-safe plate. Cover them with a damp paper towel. Heat in 30-second intervals until warm. This method is quick but can dry them out if overcooked.
– Oven: Preheat your oven to 350°F (175°C). Place the meatballs on a baking sheet. Cover with foil to keep them moist. Bake for about 10-15 minutes or until heated through. This method helps maintain their texture better.
With these storage and reheating tips, you can enjoy your teriyaki meatballs anytime!
FAQs
What can I use instead of panko breadcrumbs?
You can use regular breadcrumbs, crushed crackers, or even oats. If you need gluten-free options, try ground almonds or gluten-free breadcrumbs. Regular breadcrumbs will make your meatballs softer and less crunchy. Panko gives a nice crunch and texture.
Can I make teriyaki meatballs ahead of time?
Yes, you can! Prepare the meatballs and store them in the fridge for up to two days. You can also freeze them for later. When ready to eat, thaw in the fridge overnight. Reheat them in the oven at 350°F (175°C) for 15-20 minutes. This keeps them juicy and warm.
Is teriyaki sauce gluten-free?
Not all teriyaki sauces are gluten-free. Many use soy sauce, which contains gluten. Look for gluten-free soy sauce brands, like tamari. You can also make homemade gluten-free teriyaki sauce. Combine gluten-free soy sauce, brown sugar, rice vinegar, and sesame oil. This way, you can enjoy teriyaki safely!
Teriyaki meatballs are a delicious dish that you can easily make at home. We covered key ingredients like ground meat, panko breadcrumbs, and flavor enhancers. You learned step-by-step instructions for prepping, baking, and making the sauce. We also explored tips for perfect texture and ways to enhance flavor.
These meatballs are not only tasty but also customizable. Try different proteins or cooking methods to suit your taste. Enjoy your cooking adventure!

. To store unused tomato mixture, place it in an airtight container. This keeps the mix fresh for up to two days. If you have leftover bruschetta, avoid adding toppings until you're ready to serve. This prevents the bread from getting soggy. For the bread, store it in a paper bag. This helps maintain its crispness. Avoid plastic bags, as they trap moisture and make the bread soft. If you want to keep the bread fresh longer, freeze it. Just slice the bread before freezing for easy use later. You can freeze the tomato mixture and the bread separately. This helps keep each part fresh. To freeze the tomato mix, pour it into a freezer-safe bag. Remove excess air before sealing. When you're ready to eat, thaw the mixture overnight in the fridge. For the bread, place it in the oven at 350°F (175°C) for about 10 minutes to restore its crunch. Enjoy your bruschetta within three days for the best taste. Over time, the tomatoes may lose their fresh flavor. Look for signs of spoilage like discoloration or an off smell. If the bread feels soft or stale, it’s time to toss it. By following these simple storage tips, you can extend the life of your delicious bruschetta. Enjoy it fresh and vibrant every time! The best breads for bruschetta are Italian baguette or ciabatta. Both have a nice crust that crisps up well. You can also use sourdough for a tangy flavor. Choose a bread that is sturdy enough to hold the toppings. Yes! You can prepare the tomato mix a few hours ahead. Just store it in the fridge. This lets the flavors blend. Toast the bread right before serving for the best crunch. Keep the bread and topping separate until you serve. To serve more people, double the recipe. Use multiple loaves of bread. You can also make several batches of the tomato mix. It’s easy to scale up. Just remember to toast the bread in batches to keep it crisp. Bruschetta is best served fresh. The toasted bread should be warm. The tomato mix can be at room temperature. This combo gives a nice contrast. Serve it right after you assemble it for the best taste. Bruschetta pairs well with simple sides. Think of a light salad or soup. A fresh arugula salad works great. You can also serve it with olives or cheese. These add nice flavors and textures to your meal. In this post, we explored making bruschetta from fresh ingredients like ripe tomatoes, basil, and garlic. You learned how to prepare these components and create the perfect toast. We also covered tips for storage and common mistakes to avoid. Finally, I shared variations for different seasons and diets. Bruschetta is simple, fun, and a delightful treat. Enjoy experimenting and finding your favorite flavors!](https://joymealplan.com/wp-content/uploads/2025/07/10355497-7bd2-4922-b413-5484ea4e8a3f-768x768.webp)
![- 8 oz rice noodles - 1 red bell pepper, thinly sliced - 1 cup shredded carrots - 1 cucumber, julienned - 1 cup bean sprouts - 1/4 cup fresh cilantro, roughly chopped - 1/4 cup roasted peanuts, coarsely crushed - 2 green onions, sliced - 3 tablespoons fish sauce (or vegetarian alternative, soy sauce) - 2 tablespoons freshly squeezed lime juice - 1 tablespoon brown sugar - 1 tablespoon toasted sesame oil - 1–2 tablespoons sriracha (adjust based on heat preference) This salad is light yet filling. It has about 250 calories per serving. The rice noodles provide carbs for energy. Fresh veggies add fiber, vitamins, and minerals. Peanuts offer healthy fats and protein. The dressing gives a zing with fish sauce and lime. You can swap fish sauce for soy sauce if needed. Eating this salad supports good health due to its fresh ingredients. The mix of flavors and textures makes it a delight. Enjoy every bite! Check out the Full Recipe for full details. Start by boiling water in a pot. Add 8 oz of rice noodles to the water. Cook them as per the package instructions. Once the noodles soften, drain them. Rinsing with cold water is key. This stops cooking and keeps them from getting sticky. Set the noodles aside until you need them. Grab a sharp knife and a cutting board. Thinly slice the red bell pepper. Shred the carrots with a grater. Julienne the cucumber into thin strips. Add 1 cup of bean sprouts. In a large bowl, mix all the veggies. Toss them gently to combine. This makes sure each vegetable is evenly mixed. In a smaller bowl, mix the dressing. Whisk together 3 tablespoons of fish sauce, 2 tablespoons of lime juice, and 1 tablespoon of brown sugar. Add 1 tablespoon of toasted sesame oil. For spice, include 1–2 tablespoons of sriracha. Taste the dressing and adjust as needed. You can make it sweeter or spicier based on your choice. Now, add the cooled rice noodles to the big bowl of vegetables. Pour the dressing over the top. Use gentle tossing motions to mix everything. This ensures each noodle and veggie gets coated with the tasty dressing. Transfer the salad to a colorful serving platter. Top it off with crushed roasted peanuts for crunch. Sprinkle fresh cilantro on top for flavor and color. For a nice touch, add lime wedges on the side. This salad looks great and tastes even better! Check the Full Recipe for more details. To boost flavor, add fresh lime juice. Lime brings great brightness. You can also add more herbs. Fresh mint or basil works well. If you want it spicier, adjust the sriracha. Start with one tablespoon and taste. Add more if you like heat! If you need gluten-free, choose rice noodles. They are a great alternative. For sauces, use tamari instead of soy sauce. If you want to skip fish sauce, use soy sauce or coconut aminos. These options keep the taste fresh. To make this salad in advance, cook the noodles and chop the veggies. Store ingredients separately in the fridge. This keeps everything crisp. When ready, mix them with dressing just before serving. This way, the salad tastes fresh. {{image_4}} You can add shrimp, chicken, or tofu to your Spicy Thai Noodle Salad. Each protein brings its own flavor and texture. For shrimp, cook them in a hot pan for just a few minutes until they turn pink. Use about 8 oz for a nice boost of protein. If chicken is your choice, grill or sauté about 1 cup of diced chicken until cooked through. For a plant-based option, use firm tofu. Cube about 8 oz and pan-fry until golden. Each of these options enhances the salad and makes it more filling. To make a vegan version, simply eliminate fish sauce and any meat. Replace fish sauce with soy sauce or a mix of soy and lime juice. This keeps the flavor rich while staying plant-based. You can add more vegetables like snap peas or radishes for crunch. Avocado is also a great addition for creaminess. Feel free to mix and match veggies based on what you love or have at home. Change your salad with the seasons by using fresh, local veggies. In spring, consider adding asparagus or peas. Summer is perfect for ripe tomatoes or zucchini. Fall brings hearty options like shredded Brussels sprouts or roasted squash. In winter, you can add kale or root vegetables. Adapting your recipe with seasonal ingredients keeps it exciting and fresh all year round. Explore new flavors and textures with each season. You can check the [Full Recipe] for more ideas to elevate your dish! To store leftovers properly, place the salad in an airtight container. Make sure to keep the salad separate from the dressing if you plan to eat it later. This helps maintain the crunch of the veggies. When stored this way, the salad lasts about three days in the fridge. If you mix the dressing in, aim to eat it within two days for the best taste. You can freeze the Spicy Thai Noodle Salad, but it's not ideal. Freezing can change the texture of the vegetables. If you decide to freeze it, use a freezer-safe container. Thaw the salad in the fridge overnight for best results. To serve, let it sit at room temperature for about 15 minutes after thawing. This helps bring back some freshness. To reheat the salad, use a microwave at low power. Heat it in 30-second intervals, stirring in between. This method keeps the noodles and veggies from becoming mushy. If you prefer it cold, serve it straight from the fridge. A squeeze of fresh lime juice can brighten the flavors after refrigeration. Preparing Spicy Thai Noodle Salad takes about 15 minutes. Cooking the rice noodles adds another 10 minutes. In total, you spend around 25 minutes. This recipe yields 4 servings, perfect for sharing or meal prep. Yes, you can make this salad ahead of time. I suggest preparing the vegetables and dressing first. Store them in separate containers. When you're ready to serve, combine everything. This keeps the salad fresh and crisp. If you need a substitute for fish sauce, soy sauce works well. It’s great for vegetarians. You can also use coconut aminos for a milder flavor. These alternatives maintain the dish's salty taste. Absolutely! You can add protein like shrimp, chicken, or tofu. You can also swap out vegetables based on your taste. Try adding mango for sweetness or radishes for a crunch. The options are endless. To make this salad gluten-free, use rice noodles. For the dressing, ensure you pick gluten-free soy sauce. Check labels when buying ingredients to avoid hidden gluten. This way, everyone can enjoy the salad. The Spicy Thai Noodle Salad recipe combines vibrant ingredients for a tasty dish. You learned how to cook rice noodles, prepare fresh vegetables, and create a zesty dressing. The nutritional benefits of the main ingredients make this salad a healthy choice. Remember, you can adjust flavors and ingredients to suit your taste. Try adding proteins or seasonal veggies for new twists. Follow proper storage tips to enjoy leftovers or make it ahead of time. With these guidelines, you’re set for a flavorful, customizable meal.](https://joymealplan.com/wp-content/uploads/2025/07/00f7a476-2e89-474b-9c80-2d6783f3d5a0-768x768.webp)
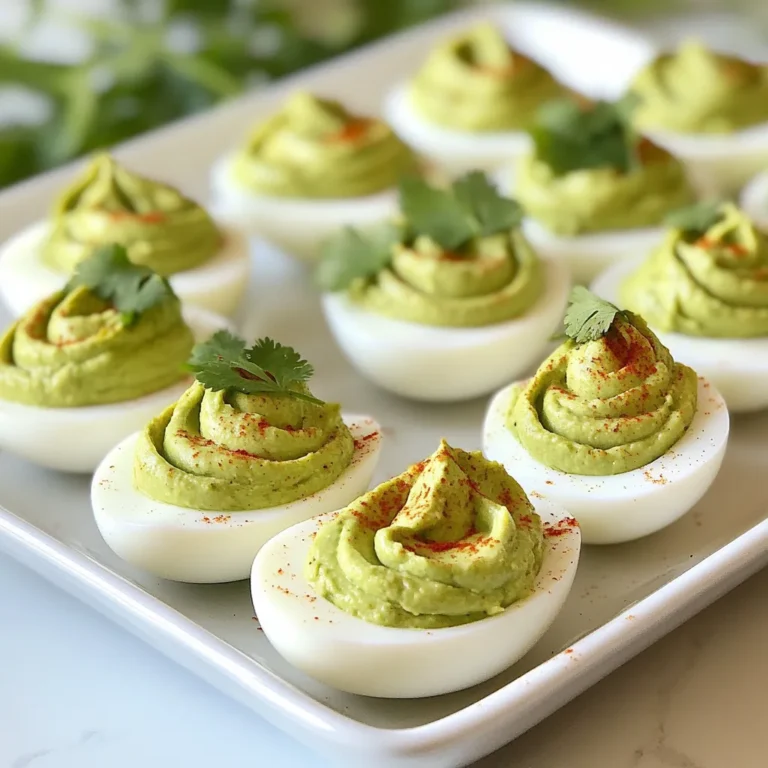
![- 1 can (15 oz) chickpeas, thoroughly drained and rinsed - 1 perfectly ripe avocado, peeled and pitted - 1 cup cherry tomatoes, halved - 1 medium cucumber, diced - 1/4 red onion, finely chopped - 1/4 cup fresh cilantro, chopped - 2 tablespoons freshly squeezed lemon juice - 1 tablespoon high-quality olive oil - Sea salt and freshly ground black pepper - 1/4 teaspoon ground cumin - Extra herbs for garnish - Each serving has about 200 calories. - Key vitamins include vitamin C, vitamin K, and fiber. This avocado chickpea salad packs a punch of flavor and nutrients! You get protein from chickpeas, healthy fats from avocado, and lots of vitamins from fresh veggies. The combo is not just tasty; it is good for you too. Pair this salad with pita chips for a crunchy bite. For the full recipe, check out the [Full Recipe]. To start, you need to mash the avocado. Take a ripe avocado and cut it in half. Remove the pit and scoop the flesh into a bowl. Use a fork to mash it. You want it creamy but still chunky. This adds a nice texture to your salad. Next, mix in the chickpeas. Open a can of chickpeas, drain and rinse them well. Carefully add them to the mashed avocado. Gently fold the chickpeas into the avocado. Be careful not to mash them. You want to keep the chickpeas whole for great bites. Now it's time to add in your vegetables. Chop up one cup of cherry tomatoes in half, dice a cucumber, and finely chop a quarter of a red onion. Don’t forget the cilantro! Add all these colorful veggies to your bowl. Gently mix everything together until the ingredients are well combined and coated in avocado. Then, you’ll make the dressing. In a small bowl, whisk together two tablespoons of freshly squeezed lemon juice and one tablespoon of high-quality olive oil. Add sea salt and freshly ground black pepper to taste. If you like, you can add a quarter teaspoon of ground cumin for extra flavor. This dressing will brighten the salad and tie everything together nicely. Now, drizzle the dressing over the chickpea and avocado mixture. Toss the salad gently. Make sure each ingredient gets a nice coat of dressing. Taste the salad. If it needs more flavor, adjust your seasoning. You can add more salt or lemon juice if you want it brighter. For the best taste, serve your salad right away. If you have time, let it chill in the refrigerator for 15-20 minutes. This allows the flavors to mix well. Don’t forget to check out the Full Recipe for more details! To select ripe avocados, look for ones that yield slightly when pressed. They should feel soft but not mushy. If they are hard, leave them at room temperature for a few days. Once ripe, keep them in the fridge to slow down the ripening process. To store leftover salad, use an airtight container. This keeps the salad fresh for up to two days. If you notice browning from the avocado, add a bit more lemon juice to help keep it vibrant. For a tasty pairing, serve your salad with crispy pita chips. The crunch adds a fun texture. You can also enjoy it on toasted bread for a quick meal. To present the salad, use a colorful bowl. Garnish with extra cilantro for a lively look. A sprinkle of sea salt on top can enhance the visual appeal, too. One common mistake is over-mashing the avocado. You want a creamy yet chunky texture. This keeps the salad interesting. Another mistake is not seasoning adequately. Be sure to taste and adjust your salt and lemon juice. Proper seasoning brings out all the fresh flavors in this dish. {{image_4}} You can easily boost your avocado chickpea salad with protein. Here are two great options: - Grilled chicken or shrimp: Both add a delicious, savory flavor. Just grill them and slice them up before mixing in. - Tofu for a vegetarian option: Tofu is a great meat substitute. Use firm tofu, press it, and cube it. Then toss it in for added protein. Adding new flavors can make your salad even better. Try these ideas: - Adding feta cheese: Crumbled feta adds a tangy taste that pairs well with the creamy avocado. - Experimenting with different dressings: You can switch up the dressing to change the flavor. Try balsamic, ranch, or a spicy vinaigrette for a twist. Using fresh, seasonal ingredients makes your salad shine. Here are some tips: - Incorporating seasonal veggies: Add bell peppers, radishes, or zucchini when they are in season for extra crunch and flavor. - Switching up herbs for different flavors: Try basil, parsley, or dill instead of cilantro to give your salad a new taste. These variations can turn your avocado chickpea salad into a unique dish every time you make it. For the full recipe, check out the earlier section. To keep your salad fresh, store it in the fridge. Use an airtight container to seal in the flavors. This method helps prevent browning and keeps the salad crisp. If you have space, consider using glass containers. They do not absorb odors and help you see the salad clearly. This salad lasts about three days in the fridge. After that, the ingredients may start to spoil. Check for signs like brown avocado or a sour smell. If you see either, it’s best to toss the salad. Freshness is key to enjoying this dish. Can you freeze avocado chickpea salad? I do not recommend freezing it. The avocado and tomatoes do not freeze well. They can become mushy when thawed. If you want to freeze, store the chickpeas and veggies separately. This way, you can mix fresh ingredients when you’re ready to eat. To make your avocado chickpea salad creamy, mash the ripe avocado well. Use a fork for this step. Aim for a mix of smooth and chunky textures. This keeps it interesting. Combine the mashed avocado with chickpeas gently. Folding helps maintain the shape of the chickpeas. Also, add a drizzle of olive oil for extra creaminess. Finally, use fresh lemon juice to brighten the flavors. These steps ensure your salad has a rich, creamy base. Yes, you can prepare this salad in advance. Start by chopping all the vegetables and storing them separately. This keeps them fresh and crisp. Mash the avocado just before serving. If you mash it early, it may brown. To keep the salad fresh, store it in an airtight container. You can also add lemon juice to the avocado to slow down browning. Chill the salad in the fridge for about 20 minutes before serving. This helps the flavors blend well. If you want to switch things up, try other legumes. White beans are a great option. They have a mild taste and a creamy texture. Black beans can add a fun twist with a bolder flavor. You can also use lentils for a different texture. Each legume gives a unique taste to the salad. So, feel free to get creative with your choices. Yes, this salad is gluten-free. All the main ingredients, like chickpeas and vegetables, are naturally free from gluten. This makes it a great option for those with gluten sensitivities. Always check your ingredient labels, especially for dressings. Some pre-made dressings may contain gluten. Using fresh lemon juice and olive oil ensures your dressing stays gluten-free. Enjoy this light and healthy salad without worry! For the full recipe, check out this Creamy Avocado Chickpea Delight. This blog post covered how to make a tasty avocado chickpea salad. We discussed key ingredients and gave precise steps for preparation. I shared helpful tips on freshness, serving ideas, and common mistakes to avoid. You can customize it with proteins or seasonal veggies. In summary, this salad is simple, nutritious, and versatile. It’s perfect for any meal. I encourage you to try it and share it with others. Enjoy crafting your delicious creation!](https://joymealplan.com/wp-content/uploads/2025/06/f9e70452-dbea-4dff-b8d7-5421933c3ab4-768x768.webp)