
Chocolate Chip Banana Bread Muffins Delightful Treat
![To make these tasty chocolate chip banana bread muffins, gather these simple ingredients: - 3 ripe bananas, thoroughly mashed - 1/2 cup granulated sugar - 1/4 cup brown sugar, firmly packed - 1/3 cup unsalted butter, melted and slightly cooled - 1 large egg, at room temperature - 1 teaspoon vanilla extract - 1 teaspoon baking soda - 1/4 teaspoon salt - 1 teaspoon ground cinnamon - 1 1/2 cups all-purpose flour - 1 cup semi-sweet chocolate chips - 1/2 cup chopped walnuts (optional, for added crunch) Using the right amounts matters! Here’s a quick guide for measuring: - Bananas: Use ripe ones for natural sweetness. - Sugars: Granulated sugar is your base, while brown sugar adds moisture. - Butter: Melt it but let it cool a bit so it won’t cook the egg. - Flour: Spoon it into your cup and level it off for accuracy. You can swap some ingredients for different flavors or dietary needs: - Butter: Use coconut oil for a dairy-free option. - Sugar: Try honey or maple syrup for a natural sweetener. - Flour: Use whole wheat flour for more fiber. - Nuts: Feel free to skip walnuts or use pecans instead. For the full recipe, check the [Full Recipe]. First, gather your ingredients. You will need: - 3 ripe bananas, thoroughly mashed - 1/2 cup granulated sugar - 1/4 cup brown sugar, firmly packed - 1/3 cup unsalted butter, melted and slightly cooled - 1 large egg, at room temperature - 1 teaspoon vanilla extract - 1 teaspoon baking soda - 1/4 teaspoon salt - 1 teaspoon ground cinnamon - 1 1/2 cups all-purpose flour - 1 cup semi-sweet chocolate chips - 1/2 cup chopped walnuts (optional, for added crunch) Next, preheat your oven to 350°F (175°C). Prepare a muffin tin by lining it with paper liners or greasing it with cooking spray. This keeps the muffins from sticking. In a large bowl, mash the bananas well. Then, add the granulated sugar, brown sugar, and melted butter. Mix until smooth and creamy. Now, crack the egg into the bowl. Add the vanilla extract, and whisk until everything is mixed well. Sprinkle the baking soda, salt, and ground cinnamon over the banana mix. Stir gently to combine. Gradually sift in the all-purpose flour. Mix lightly with a spatula until just combined. Be careful not to over-mix, or your muffins may turn out dense. Finally, fold in the chocolate chips and walnuts, if using. This adds great texture and flavor to the muffins. Now, divide your batter evenly among the muffin tin cups. Fill each cup about two-thirds full. This allows the muffins to rise nicely. Place the muffin tin in the oven. Bake for 18-20 minutes. You will know they are done when a toothpick inserted into the center comes out clean or with a few moist crumbs. Once baked, take the muffins out of the oven. Let them cool in the tin for about 5 minutes. After that, carefully transfer them to a wire rack to cool completely. For an extra touch, serve the muffins warm. Lightly dust them with powdered sugar. You can also add a few extra chocolate chips on top. Pair them with coffee or tea for a delightful treat. For the full recipe, check out the Choco-Banana Bliss Muffins! To get soft and fluffy muffins, follow a few key steps. Use ripe bananas; they add natural sweetness and moisture. Mash them well, leaving no lumps. This helps blend the flavors. Don't over-mix the batter. Stir just until the flour disappears. Over-mixing can lead to tough muffins. When adding chocolate chips, fold them in gently. This keeps them evenly spread without breaking apart. A few common mistakes can ruin your muffins. First, check your oven temperature. An oven that is too hot can burn the muffins. Use an oven thermometer if needed. Avoid using cold ingredients. Always let your egg and butter come to room temperature. This helps your muffins rise better. Also, remember to fill your muffin cups only 2/3 full. This allows room for rising. These muffins are great on their own. For a special touch, serve them warm. Dust them with powdered sugar, and add extra chocolate chips on top. Pair them with coffee or tea for a cozy treat. You can also enjoy them with a dollop of yogurt or a scoop of ice cream. These options add a fun twist to your muffin experience. For the full recipe, check out the [Full Recipe]. {{image_4}} You can make these muffins gluten-free. Use a gluten-free flour blend instead of all-purpose flour. Many blends work well, like almond or coconut flour. Always check the package to ensure it is gluten-free. This option keeps the muffins soft and tasty while being safe for those with gluten issues. For a vegan version, swap the egg with a flax egg. To make a flax egg, mix 1 tablespoon of ground flaxseed with 2.5 tablespoons of water. Let it sit for 5 minutes until it thickens. Use coconut oil or vegan butter in place of regular butter. Also, choose dairy-free chocolate chips to keep it all plant-based. Want to boost nutrition? Add nuts like walnuts or pecans for crunch and healthy fats. You can also mix in ground flaxseed for extra fiber. This addition makes the muffins heartier and adds a nutty flavor. Just fold these ingredients into the batter before baking. For the full recipe, check out the Choco-Banana Bliss Muffins section above. You can store your chocolate chip banana bread muffins at room temperature. Place them in an airtight container. They stay fresh for about 2 to 3 days. If your kitchen is warm, refrigerate them to keep them from spoiling. Just remember, the fridge may dry them out a bit. To keep muffins longer, freeze them. First, let them cool completely. Wrap each muffin in plastic wrap. Then, place them in a freezer bag. Label the bag with the date. These muffins can last up to 3 months in the freezer. When ready to eat, just thaw them at room temperature or microwave for a quick treat. Reheat muffins for the best taste. You can use a microwave for about 15-20 seconds. This warms them up and melts the chocolate chips. If you want a crispy top, use an oven. Preheat to 350°F (175°C) and bake for about 5-10 minutes. Enjoy them warm for a delightful treat! For the full recipe, check out the Choco-Banana Bliss Muffins. You can check if your muffins are done by using a toothpick. Insert it into the center of one muffin. If it comes out clean or with a few moist crumbs, they are ready. The muffins should also look golden brown on top. If they are still wet, bake them for a few more minutes. Always keep an eye on them as oven times can vary. Yes, you can use frozen bananas! Just make sure to thaw them first. Once thawed, mash them well. Frozen bananas can actually make your muffins even sweeter. They also add moisture, making your muffins soft and delicious. They’re a great way to avoid waste if you have ripe bananas at home. You can add a few things to boost the flavor. Here are some options: - Nuts: Add chopped walnuts or pecans for a nice crunch. - Spices: Try adding nutmeg or extra cinnamon for warmth. - Extracts: A splash of almond extract can add a nice twist. - Fruits: Diced apples or berries can enhance the taste. - Zest: A bit of lemon or orange zest can brighten the flavors. Explore your own ideas, too! Cooking is all about creativity. Check the Full Recipe for more details on how to make these muffins. You learned about making delicious muffins from start to finish. We covered ingredients, measurements, and tasty alternatives. The step-by-step guide helps you bake easily. Tips and tricks will help you dodge common mistakes and perfect muffin texture. You also discovered fun variations, like gluten-free options and healthy extras. Lastly, we discussed storage tips to keep muffins fresh. I hope you feel ready to bake and enjoy these muffins with creative twists.](https://joymealplan.com/wp-content/uploads/2025/07/4f3c9815-0868-484a-ae71-7a97e3378a4a.webp)
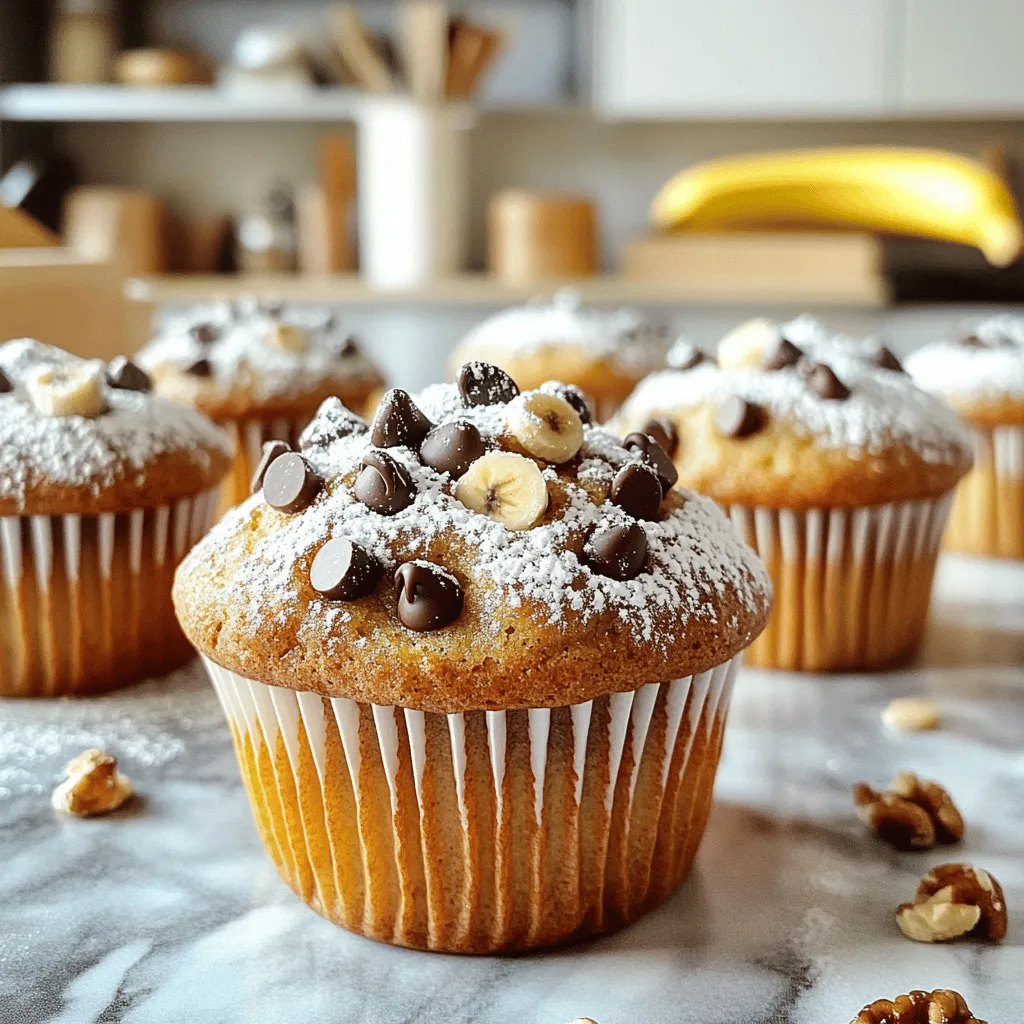
If you love the warm, comforting smell of fresh muffins, you’ll adore these Chocolate Chip Banana Bread Muffins. They’re easy to make and perfect for breakfast or a snack. With just a few simple ingredients, you can create a delightful treat your family will enjoy. Let’s dive in and discover how to bake these tasty muffins step by step! You won’t want to miss out on this delicious recipe!
Ingredients
List of Ingredients
To make these tasty chocolate chip banana bread muffins, gather these simple ingredients:
– 3 ripe bananas, thoroughly mashed
– 1/2 cup granulated sugar
– 1/4 cup brown sugar, firmly packed
– 1/3 cup unsalted butter, melted and slightly cooled
– 1 large egg, at room temperature
– 1 teaspoon vanilla extract
– 1 teaspoon baking soda
– 1/4 teaspoon salt
– 1 teaspoon ground cinnamon
– 1 1/2 cups all-purpose flour
– 1 cup semi-sweet chocolate chips
– 1/2 cup chopped walnuts (optional, for added crunch)
Measurement Guide
Using the right amounts matters! Here’s a quick guide for measuring:
– Bananas: Use ripe ones for natural sweetness.
– Sugars: Granulated sugar is your base, while brown sugar adds moisture.
– Butter: Melt it but let it cool a bit so it won’t cook the egg.
– Flour: Spoon it into your cup and level it off for accuracy.
Substitutions and Alternatives
You can swap some ingredients for different flavors or dietary needs:
– Butter: Use coconut oil for a dairy-free option.
– Sugar: Try honey or maple syrup for a natural sweetener.
– Flour: Use whole wheat flour for more fiber.
– Nuts: Feel free to skip walnuts or use pecans instead.
Step-by-Step Instructions
Preparation Steps
First, gather your ingredients. You will need:
– 3 ripe bananas, thoroughly mashed
– 1/2 cup granulated sugar
– 1/4 cup brown sugar, firmly packed
– 1/3 cup unsalted butter, melted and slightly cooled
– 1 large egg, at room temperature
– 1 teaspoon vanilla extract
– 1 teaspoon baking soda
– 1/4 teaspoon salt
– 1 teaspoon ground cinnamon
– 1 1/2 cups all-purpose flour
– 1 cup semi-sweet chocolate chips
– 1/2 cup chopped walnuts (optional, for added crunch)
Next, preheat your oven to 350°F (175°C). Prepare a muffin tin by lining it with paper liners or greasing it with cooking spray. This keeps the muffins from sticking.
In a large bowl, mash the bananas well. Then, add the granulated sugar, brown sugar, and melted butter. Mix until smooth and creamy.
Now, crack the egg into the bowl. Add the vanilla extract, and whisk until everything is mixed well. Sprinkle the baking soda, salt, and ground cinnamon over the banana mix. Stir gently to combine.
Gradually sift in the all-purpose flour. Mix lightly with a spatula until just combined. Be careful not to over-mix, or your muffins may turn out dense.
Finally, fold in the chocolate chips and walnuts, if using. This adds great texture and flavor to the muffins.
Baking Process
Now, divide your batter evenly among the muffin tin cups. Fill each cup about two-thirds full. This allows the muffins to rise nicely.
Place the muffin tin in the oven. Bake for 18-20 minutes. You will know they are done when a toothpick inserted into the center comes out clean or with a few moist crumbs.
Cooling and Serving Suggestions
Once baked, take the muffins out of the oven. Let them cool in the tin for about 5 minutes. After that, carefully transfer them to a wire rack to cool completely.
For an extra touch, serve the muffins warm. Lightly dust them with powdered sugar. You can also add a few extra chocolate chips on top. Pair them with coffee or tea for a delightful treat.
Tips & Tricks
Perfecting the Muffin Texture
To get soft and fluffy muffins, follow a few key steps. Use ripe bananas; they add natural sweetness and moisture. Mash them well, leaving no lumps. This helps blend the flavors.
Don’t over-mix the batter. Stir just until the flour disappears. Over-mixing can lead to tough muffins. When adding chocolate chips, fold them in gently. This keeps them evenly spread without breaking apart.
Common Baking Mistakes to Avoid
A few common mistakes can ruin your muffins. First, check your oven temperature. An oven that is too hot can burn the muffins. Use an oven thermometer if needed.
Avoid using cold ingredients. Always let your egg and butter come to room temperature. This helps your muffins rise better. Also, remember to fill your muffin cups only 2/3 full. This allows room for rising.
Serving Suggestions and Pairings
These muffins are great on their own. For a special touch, serve them warm. Dust them with powdered sugar, and add extra chocolate chips on top.
Pair them with coffee or tea for a cozy treat. You can also enjoy them with a dollop of yogurt or a scoop of ice cream. These options add a fun twist to your muffin experience.
Variations
Gluten-Free Chocolate Chip Banana Bread Muffins
You can make these muffins gluten-free. Use a gluten-free flour blend instead of all-purpose flour. Many blends work well, like almond or coconut flour. Always check the package to ensure it is gluten-free. This option keeps the muffins soft and tasty while being safe for those with gluten issues.
Vegan Substitutes for a Dairy-Free Option
For a vegan version, swap the egg with a flax egg. To make a flax egg, mix 1 tablespoon of ground flaxseed with 2.5 tablespoons of water. Let it sit for 5 minutes until it thickens. Use coconut oil or vegan butter in place of regular butter. Also, choose dairy-free chocolate chips to keep it all plant-based.
Healthy Additions (e.g., nuts, flaxseed)
Want to boost nutrition? Add nuts like walnuts or pecans for crunch and healthy fats. You can also mix in ground flaxseed for extra fiber. This addition makes the muffins heartier and adds a nutty flavor. Just fold these ingredients into the batter before baking.
Storage Info
Short-Term Storage
You can store your chocolate chip banana bread muffins at room temperature. Place them in an airtight container. They stay fresh for about 2 to 3 days. If your kitchen is warm, refrigerate them to keep them from spoiling. Just remember, the fridge may dry them out a bit.
Long-Term Freezing Guide
To keep muffins longer, freeze them. First, let them cool completely. Wrap each muffin in plastic wrap. Then, place them in a freezer bag. Label the bag with the date. These muffins can last up to 3 months in the freezer. When ready to eat, just thaw them at room temperature or microwave for a quick treat.
Reheating Recommendations
Reheat muffins for the best taste. You can use a microwave for about 15-20 seconds. This warms them up and melts the chocolate chips. If you want a crispy top, use an oven. Preheat to 350°F (175°C) and bake for about 5-10 minutes. Enjoy them warm for a delightful treat!
FAQs
How do I know when my muffins are done?
You can check if your muffins are done by using a toothpick. Insert it into the center of one muffin. If it comes out clean or with a few moist crumbs, they are ready. The muffins should also look golden brown on top. If they are still wet, bake them for a few more minutes. Always keep an eye on them as oven times can vary.
Can I use frozen bananas for this recipe?
Yes, you can use frozen bananas! Just make sure to thaw them first. Once thawed, mash them well. Frozen bananas can actually make your muffins even sweeter. They also add moisture, making your muffins soft and delicious. They’re a great way to avoid waste if you have ripe bananas at home.
What can I add to make these muffins more flavorful?
You can add a few things to boost the flavor. Here are some options:
– Nuts: Add chopped walnuts or pecans for a nice crunch.
– Spices: Try adding nutmeg or extra cinnamon for warmth.
– Extracts: A splash of almond extract can add a nice twist.
– Fruits: Diced apples or berries can enhance the taste.
– Zest: A bit of lemon or orange zest can brighten the flavors.
Explore your own ideas, too! Cooking is all about creativity.
You learned about making delicious muffins from start to finish. We covered ingredients, measurements, and tasty alternatives. The step-by-step guide helps you bake easily. Tips and tricks will help you dodge common mistakes and perfect muffin texture. You also discovered fun variations, like gluten-free options and healthy extras. Lastly, we discussed storage tips to keep muffins fresh. I hope you feel ready to bake and enjoy these muffins with creative twists.
![To make these tasty chocolate chip banana bread muffins, gather these simple ingredients: - 3 ripe bananas, thoroughly mashed - 1/2 cup granulated sugar - 1/4 cup brown sugar, firmly packed - 1/3 cup unsalted butter, melted and slightly cooled - 1 large egg, at room temperature - 1 teaspoon vanilla extract - 1 teaspoon baking soda - 1/4 teaspoon salt - 1 teaspoon ground cinnamon - 1 1/2 cups all-purpose flour - 1 cup semi-sweet chocolate chips - 1/2 cup chopped walnuts (optional, for added crunch) Using the right amounts matters! Here’s a quick guide for measuring: - Bananas: Use ripe ones for natural sweetness. - Sugars: Granulated sugar is your base, while brown sugar adds moisture. - Butter: Melt it but let it cool a bit so it won’t cook the egg. - Flour: Spoon it into your cup and level it off for accuracy. You can swap some ingredients for different flavors or dietary needs: - Butter: Use coconut oil for a dairy-free option. - Sugar: Try honey or maple syrup for a natural sweetener. - Flour: Use whole wheat flour for more fiber. - Nuts: Feel free to skip walnuts or use pecans instead. For the full recipe, check the [Full Recipe]. First, gather your ingredients. You will need: - 3 ripe bananas, thoroughly mashed - 1/2 cup granulated sugar - 1/4 cup brown sugar, firmly packed - 1/3 cup unsalted butter, melted and slightly cooled - 1 large egg, at room temperature - 1 teaspoon vanilla extract - 1 teaspoon baking soda - 1/4 teaspoon salt - 1 teaspoon ground cinnamon - 1 1/2 cups all-purpose flour - 1 cup semi-sweet chocolate chips - 1/2 cup chopped walnuts (optional, for added crunch) Next, preheat your oven to 350°F (175°C). Prepare a muffin tin by lining it with paper liners or greasing it with cooking spray. This keeps the muffins from sticking. In a large bowl, mash the bananas well. Then, add the granulated sugar, brown sugar, and melted butter. Mix until smooth and creamy. Now, crack the egg into the bowl. Add the vanilla extract, and whisk until everything is mixed well. Sprinkle the baking soda, salt, and ground cinnamon over the banana mix. Stir gently to combine. Gradually sift in the all-purpose flour. Mix lightly with a spatula until just combined. Be careful not to over-mix, or your muffins may turn out dense. Finally, fold in the chocolate chips and walnuts, if using. This adds great texture and flavor to the muffins. Now, divide your batter evenly among the muffin tin cups. Fill each cup about two-thirds full. This allows the muffins to rise nicely. Place the muffin tin in the oven. Bake for 18-20 minutes. You will know they are done when a toothpick inserted into the center comes out clean or with a few moist crumbs. Once baked, take the muffins out of the oven. Let them cool in the tin for about 5 minutes. After that, carefully transfer them to a wire rack to cool completely. For an extra touch, serve the muffins warm. Lightly dust them with powdered sugar. You can also add a few extra chocolate chips on top. Pair them with coffee or tea for a delightful treat. For the full recipe, check out the Choco-Banana Bliss Muffins! To get soft and fluffy muffins, follow a few key steps. Use ripe bananas; they add natural sweetness and moisture. Mash them well, leaving no lumps. This helps blend the flavors. Don't over-mix the batter. Stir just until the flour disappears. Over-mixing can lead to tough muffins. When adding chocolate chips, fold them in gently. This keeps them evenly spread without breaking apart. A few common mistakes can ruin your muffins. First, check your oven temperature. An oven that is too hot can burn the muffins. Use an oven thermometer if needed. Avoid using cold ingredients. Always let your egg and butter come to room temperature. This helps your muffins rise better. Also, remember to fill your muffin cups only 2/3 full. This allows room for rising. These muffins are great on their own. For a special touch, serve them warm. Dust them with powdered sugar, and add extra chocolate chips on top. Pair them with coffee or tea for a cozy treat. You can also enjoy them with a dollop of yogurt or a scoop of ice cream. These options add a fun twist to your muffin experience. For the full recipe, check out the [Full Recipe]. {{image_4}} You can make these muffins gluten-free. Use a gluten-free flour blend instead of all-purpose flour. Many blends work well, like almond or coconut flour. Always check the package to ensure it is gluten-free. This option keeps the muffins soft and tasty while being safe for those with gluten issues. For a vegan version, swap the egg with a flax egg. To make a flax egg, mix 1 tablespoon of ground flaxseed with 2.5 tablespoons of water. Let it sit for 5 minutes until it thickens. Use coconut oil or vegan butter in place of regular butter. Also, choose dairy-free chocolate chips to keep it all plant-based. Want to boost nutrition? Add nuts like walnuts or pecans for crunch and healthy fats. You can also mix in ground flaxseed for extra fiber. This addition makes the muffins heartier and adds a nutty flavor. Just fold these ingredients into the batter before baking. For the full recipe, check out the Choco-Banana Bliss Muffins section above. You can store your chocolate chip banana bread muffins at room temperature. Place them in an airtight container. They stay fresh for about 2 to 3 days. If your kitchen is warm, refrigerate them to keep them from spoiling. Just remember, the fridge may dry them out a bit. To keep muffins longer, freeze them. First, let them cool completely. Wrap each muffin in plastic wrap. Then, place them in a freezer bag. Label the bag with the date. These muffins can last up to 3 months in the freezer. When ready to eat, just thaw them at room temperature or microwave for a quick treat. Reheat muffins for the best taste. You can use a microwave for about 15-20 seconds. This warms them up and melts the chocolate chips. If you want a crispy top, use an oven. Preheat to 350°F (175°C) and bake for about 5-10 minutes. Enjoy them warm for a delightful treat! For the full recipe, check out the Choco-Banana Bliss Muffins. You can check if your muffins are done by using a toothpick. Insert it into the center of one muffin. If it comes out clean or with a few moist crumbs, they are ready. The muffins should also look golden brown on top. If they are still wet, bake them for a few more minutes. Always keep an eye on them as oven times can vary. Yes, you can use frozen bananas! Just make sure to thaw them first. Once thawed, mash them well. Frozen bananas can actually make your muffins even sweeter. They also add moisture, making your muffins soft and delicious. They’re a great way to avoid waste if you have ripe bananas at home. You can add a few things to boost the flavor. Here are some options: - Nuts: Add chopped walnuts or pecans for a nice crunch. - Spices: Try adding nutmeg or extra cinnamon for warmth. - Extracts: A splash of almond extract can add a nice twist. - Fruits: Diced apples or berries can enhance the taste. - Zest: A bit of lemon or orange zest can brighten the flavors. Explore your own ideas, too! Cooking is all about creativity. Check the Full Recipe for more details on how to make these muffins. You learned about making delicious muffins from start to finish. We covered ingredients, measurements, and tasty alternatives. The step-by-step guide helps you bake easily. Tips and tricks will help you dodge common mistakes and perfect muffin texture. You also discovered fun variations, like gluten-free options and healthy extras. Lastly, we discussed storage tips to keep muffins fresh. I hope you feel ready to bake and enjoy these muffins with creative twists.](https://joymealplan.com/wp-content/uploads/2025/07/4f3c9815-0868-484a-ae71-7a97e3378a4a-300x300.webp)
![This cinnamon roll casserole is simple and fun. It combines cinnamon rolls, eggs, and milk. You can whip it up in just 10 minutes. This dish is great for breakfast or brunch. You can serve it warm and drizzled with icing. - 1 can (16 oz) refrigerated cinnamon rolls - 6 large eggs - 1 cup milk - 1/2 cup packed brown sugar - 1 teaspoon vanilla extract - 1 teaspoon ground cinnamon - 1/4 teaspoon salt - 1/2 cup chopped pecans or walnuts - 1/2 cup raisins These optional add-ins make the casserole richer. You can mix in nuts for crunch or raisins for sweetness. Feel free to customize it to your taste! To make this tasty cinnamon roll casserole, gather your ingredients first. You need a few easy items. The process is simple and quick, perfect for busy mornings. 1. Preheat the Oven: Start by preheating your oven to 350°F (175°C). This helps the casserole cook evenly. 2. Prepare the Cinnamon Rolls: Open the can of cinnamon rolls. Take each roll and cut it into quarters. This makes them easier to mix. 3. Mix the Egg Mixture: In a big bowl, add the eggs, milk, brown sugar, vanilla, ground cinnamon, and salt. Whisk until it’s smooth. This mix gives flavor and richness. 4. Combine with Cinnamon Rolls: Gently fold the cut cinnamon rolls into the egg mixture. Stir carefully so you don’t break them. If you like nuts or raisins, add them now. 5. Transfer to Casserole Dish: Pour the mixture into a greased 9x13-inch casserole dish. Spread it out evenly with a spatula. 6. Bake to Perfection: Place the casserole in the oven. Bake for 25-30 minutes. It’s ready when the center is set and the top is golden brown. 7. Cool Slightly: Take the casserole out of the oven. Let it cool for about 5 minutes. This helps it firm up for easy serving. 8. Add Icing: Drizzle the icing from the can over the warm casserole. This sweet touch makes it even better. You can find the full recipe for this delightful dish above. Now, let’s get cooking! To make your casserole fluffy, use fresh cinnamon rolls. The fresher the rolls, the better the rise. When mixing, fold the rolls gently into the egg mixture. Avoid pressing down too hard, as you want to keep air pockets. Bake at 350°F for the right texture. If your oven runs hot, check early to prevent overbaking. Serve the casserole warm, just out of the oven. This helps the icing melt and adds to the flavor. If you let it cool too much, it may become dense. A warm casserole is best for a cozy breakfast. You can also reheat leftovers in the microwave for 20-30 seconds if needed. One common mistake is cutting the rolls too small. If you chop them too tiny, they won’t hold their shape during baking. Also, don’t skip the resting time after baking. Letting it cool for five minutes helps it set. Lastly, remember not to overload with extra ingredients. Stick to the recipe for the best results. {{image_4}} You can change the flavor of your cinnamon roll casserole easily. Try adding fresh fruit like apples or berries for a sweet twist. You can also use different flavored cinnamon rolls, like caramel or orange, to surprise your taste buds. If you love chocolate, mix in some mini chocolate chips. They melt and create gooey pockets of goodness. If you need to make the dish healthier, swap regular eggs for egg whites or a flaxseed mixture. Use almond milk instead of regular milk for a dairy-free option. You can also replace the brown sugar with maple syrup or a sugar substitute. This keeps the dish tasty while fitting your needs. Make your casserole special for the season. In the fall, add pumpkin puree and pumpkin spice to the mix. For winter, mix in crushed peppermint candies for a festive flavor. In the spring, consider using lemon zest for a bright and fresh taste. You can even make it a summer dish by adding strawberries or peaches. For the complete recipe, check the [Full Recipe]. To keep your cinnamon roll casserole fresh, store leftovers in an airtight container. Make sure it cools completely before you seal it. You can keep it in the fridge for up to three days. If you want to enjoy it later, freezing is a good option. Always label your container with the date for easy tracking. When you're ready to enjoy leftovers, preheat your oven to 350°F (175°C). Place the casserole in an oven-safe dish and cover it with foil. Heat it for about 15-20 minutes or until warm. You can also use the microwave. Just heat a portion on medium for about 1-2 minutes. Make sure it’s warm throughout. To freeze, cut the casserole into portions and wrap each piece tightly in plastic wrap. Then, place them in a freezer-safe bag or container. You can freeze the casserole for up to two months. When you're ready to eat, thaw it overnight in the fridge, then reheat as mentioned above. Enjoy the sweet flavors even after freezing! Yes, you can make this casserole ahead of time. Prepare it the night before. Just follow the steps until you pour it into the dish. Cover it tightly with plastic wrap and store it in the fridge. In the morning, take it out and let it sit for 10-15 minutes. Then, bake it as directed. This saves time and gives you an easy breakfast! To check if the casserole is done, look for a golden brown top. You can also insert a toothpick in the center. If it comes out clean, it is ready. The center should be set, not jiggly. Baking should take about 25-30 minutes in a preheated oven. You can serve this casserole with a variety of sides. Fresh fruit adds a nice touch. Sliced strawberries or blueberries work well. You might also enjoy it with yogurt for creaminess. If you like a heartier meal, pair it with scrambled eggs or bacon. These choices make a complete and tasty breakfast! For the full recipe and more details, check out the [Full Recipe]. In this post, we explored how to make a delicious Cinnamon Roll Casserole. We covered the key ingredients, cooking steps, and tips for a fluffy dish. You learned how to customize flavors and find the best storage practices. Remember, you can alter the recipe for different diets. Avoid common mistakes to make the best casserole. With these steps, you will create a treat everyone will love. Enjoy the cooking process and share your tasty results!](https://joymealplan.com/wp-content/uploads/2025/06/38cd94bd-2978-4cba-9687-581b6c0fa5a5-768x768.webp)
![To make these tasty cookies, you need simple ingredients that work well together. Here is what you will need: - 1 cup unsalted butter, softened to room temperature - 1 cup powdered sugar, plus extra for dusting - 1 teaspoon pure vanilla extract - 2 cups all-purpose flour, sifted - 1/2 teaspoon pure almond extract - 1/4 teaspoon sea salt - 1 cup raspberry jam (store-bought or homemade) - 1/2 cup sliced almonds (for topping) These key ingredients create a rich and buttery base for the cookies. The powdered sugar adds sweetness, while the extracts bring depth of flavor. The raspberry jam provides a fruity burst in every bite. You can customize these cookies to suit your taste. Here are some optional ingredients to consider: - Different jams: Swap raspberry jam for strawberry, apricot, or blueberry for new flavors. - Citrus zest: Add a teaspoon of lemon or orange zest for a bright twist. - Chopped nuts: Use pecans or walnuts instead of almonds for a different crunch. These optional ingredients let you make the cookies your own. Feel free to mix and match to create your perfect treat. For the complete details on how to put these ingredients together, check out the Full Recipe. To start, gather your ingredients. You will need butter, powdered sugar, vanilla extract, almond extract, flour, sea salt, raspberry jam, and sliced almonds. First, preheat your oven to 350°F (175°C). Line a baking sheet with parchment paper to avoid sticking. In a large bowl, cream the softened butter and powdered sugar. Use an electric mixer on medium speed for about 3-4 minutes. You want the mixture to be light and fluffy. Next, add in the vanilla and almond extracts. Beat until smooth. In another bowl, mix the sifted flour and sea salt. Gradually add this to the butter mix. Stir gently, just until it forms a dough. Avoid overmixing. With a tablespoon, scoop the dough and roll it into balls. Place them on the baking sheet about 2 inches apart. Now, make a small indentation in each dough ball using your thumb or a spoon. This will hold the jam. Spoon 1/2 teaspoon of raspberry jam into each well. Be careful not to overflow. Next, sprinkle sliced almonds around the jam. Press them lightly into the dough for a nice crunch. Bake in the preheated oven for 15-18 minutes. Look for a light golden brown on the edges. Once baked, let the cookies rest for 5 minutes on the sheet. Then, transfer them to a wire rack to cool completely. When cool, dust them with extra powdered sugar for a nice touch. For a beautiful presentation, arrange the cookies on a decorative plate. Scatter fresh raspberries around them for color. Enjoy your delicious Raspberry Almond Thumbprint Cookies! For the full recipe, refer to the earlier section. To bake the best raspberry almond thumbprint cookies, follow these tips: - Use softened butter: This helps create a creamy texture. - Sift your flour: Sifting aerates the flour, leading to lighter cookies. - Space them out: Place cookies 2 inches apart on the baking sheet. This prevents them from sticking together. - Check the time: Bake until the edges are light golden brown, about 15-18 minutes. Many home bakers face pitfalls while baking. Avoid these common mistakes: - Overmixing the dough: This makes cookies tough. Mix just until combined. - Not measuring flour correctly: Use a spoon to fill the measuring cup, then level it off. - Skipping the cooling time: Let the cookies rest before moving them. This helps them set. You can add extra flavors to your cookies for a twist. Consider these options: - Zest of lemon or orange: A little zest brightens the cookie's taste. - Chopped dark chocolate: Mix in for a rich contrast to the raspberry jam. - Coconut flakes: Add for a tropical touch and added texture. These tips will help you create the perfect batch of raspberry almond thumbprint cookies. For the complete recipe, check the Full Recipe section. {{image_4}} You can use different jam flavors in these cookies. Try strawberry or apricot for a fresh twist. Blueberry jam also works well and adds a nice color. Each jam gives the cookies its own unique taste. Experimenting with flavors keeps things exciting. If you want to change the nuts, you have many choices. Pecans or walnuts add a rich flavor. You can even skip the nuts if you prefer a nut-free cookie. Just remember, the crunch will be lost, but the jam will still shine. To make gluten-free thumbprint cookies, use a gluten-free flour blend. Brands like Bob’s Red Mill or King Arthur Flour work well. Just check that the blend has xanthan gum to bind everything together. This way, everyone can enjoy these tasty treats! Follow the [Full Recipe] for the main steps and enjoy your baking journey! To keep your Raspberry Almond Thumbprint Cookies fresh, store them in an airtight container. This will help keep them soft and tasty. If you stack them, place wax paper between layers. This helps prevent sticking. You can also use a cookie tin for a charming touch. When stored properly, these cookies will last about one week at room temperature. If you place them in the fridge, they may last up to two weeks. However, cold air can dry them out. So, if you want the best taste, enjoy them fresh! Freezing cookies is a great idea for later cravings. Allow the cookies to cool completely first. Then, place them in a single layer on a baking sheet. Freeze them for about an hour. After that, transfer them to a freezer-safe bag. They can last up to three months in the freezer. When ready to eat, thaw them in the fridge overnight or let them sit at room temperature for a few hours. For the full recipe, check out the details above! If you don’t have almond extract, you can use vanilla extract instead. This will still give your cookies great flavor. You can also try hazelnut extract for a unique twist. The cookies will still taste delicious! Yes, you can use other nuts! If you prefer, try pecans, walnuts, or even pistachios. Just chop them finely and use them in place of sliced almonds. Each nut adds a different flavor and texture. To make cookies softer, add an extra tablespoon of butter. This will give them a chewier texture. For firmer cookies, bake them a minute longer. Keep an eye on them to avoid overbaking. Adjusting these small details can really change your cookie experience. Raspberry almond thumbprint cookies are easy and fun to make. You learned about key ingredients, simple steps, and helpful tips to bake them perfectly. We also explored tasty variations and storage methods. If you follow these instructions and suggestions, your cookies will impress. Enjoy sharing this sweet treat with others. Baking can be simple and rewarding. So, gather your ingredients and start creating!](https://joymealplan.com/wp-content/uploads/2025/07/b4014d7b-fb87-49bc-9ed6-2b0ba339c469-768x768.webp)