
Chocolate Covered Banana Bites Irresistible Treat
Looking for a quick, tasty treat? Chocolate covered banana bites are your answer! These sweet snacks mix the creamy goodness of bananas with rich chocolate. You can whip them up easily, and they make a great dessert or snack. Join me as we explore the simple steps to make these irresistible treats. You’ll also learn how to customize them with fun toppings and flavors. Let’s get started!
Ingredients
Main Ingredients for Chocolate Covered Banana Bites
To make these tasty treats, you need just a few main ingredients:
– 2 ripe bananas
– 1 cup dark chocolate chips
– 1 tablespoon coconut oil
These ingredients work together to create a sweet and creamy bite. Ripe bananas add natural sweetness. Dark chocolate gives a rich flavor, while coconut oil helps the chocolate melt smoothly.
Optional Ingredients and Toppings
You can also add some fun toppings and extras to your banana bites:
– 1/4 cup chopped nuts (almonds, hazelnuts, or walnuts)
– A pinch of sea salt (optional)
Chopped nuts add a nice crunch. Sea salt brings out the flavor of chocolate. Feel free to mix and match toppings to suit your taste.
Nutritional Benefits of Bananas and Dark Chocolate
Bananas are not only delicious but also very healthy. They are high in potassium, which is great for your heart. They also provide energy and fiber.
Dark chocolate has health benefits too. It is rich in antioxidants, which help fight free radicals. Eating dark chocolate in moderation can improve heart health and boost mood.
Together, bananas and dark chocolate make a tasty and nutritious treat. You can enjoy these chocolate-covered banana bites without guilt!
Step-by-Step Instructions
Preparing the Bananas
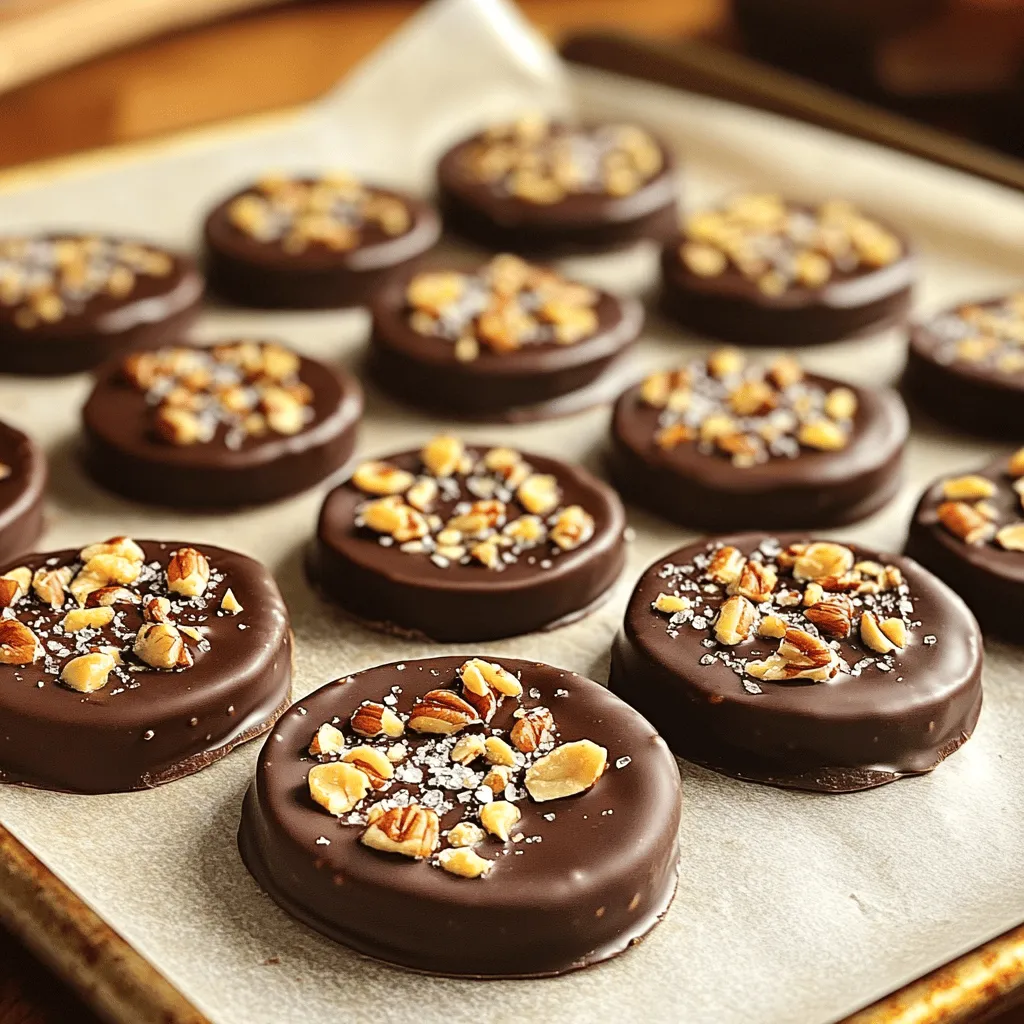
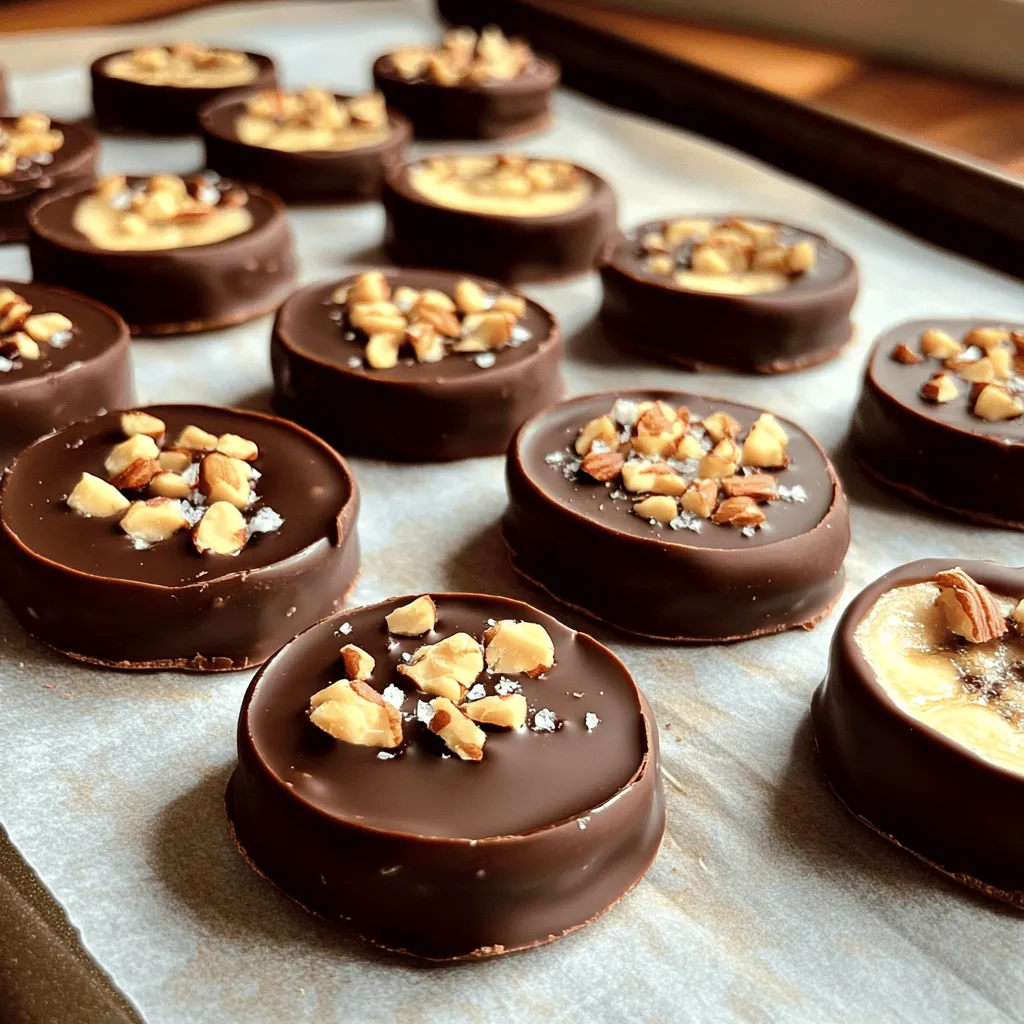
Start by peeling the bananas. This is easy and fun! Slice each banana into thick rounds, about 1 inch wide. Lay the banana slices on a baking sheet lined with parchment paper. This helps keep them from sticking. Make sure they are evenly spaced out.
Melting the Chocolate Mixture
In a microwave-safe bowl, mix the dark chocolate chips with the coconut oil. The oil will help the chocolate melt smoothly. Heat the bowl in the microwave in 30-second bursts. Stir the mixture after each interval. This will take about 1 to 2 minutes. You want the chocolate to be velvety and smooth.
Dipping and Decorating the Banana Bites
Now comes the fun part! Take each banana slice and dip it into the melted chocolate. Ensure the slice is fully coated. Let any extra chocolate drip off. Place the chocolate-covered slice back on the baking sheet. While the chocolate is wet, sprinkle chopped nuts on half of the bites. For the other half, add a pinch of sea salt. This adds a nice crunch and flavor. Freeze the baking sheet for about 30 minutes. This helps the chocolate set. Once firm, move the bites to an airtight container. You can keep them in the freezer for up to two weeks. Enjoy them anytime for a tasty treat!
Tips & Tricks
Tips for Achieving Perfect Chocolate Coating
To get a great chocolate coating on your banana bites, follow these steps:
– Use high-quality dark chocolate chips. They melt better and taste great.
– Add coconut oil to your chocolate. This makes the coating smooth and shiny.
– Melt the chocolate slowly in the microwave. Stir every 30 seconds to avoid burning.
– Dip the banana slices quickly. This helps the chocolate stick well.
– Let excess chocolate drip off. This keeps the bites from being too messy.
How to Store Leftover Chocolate or Bananas
If you have leftover chocolate or bananas, here’s what to do:
– Store leftover melted chocolate in a sealed container. Keep it in the fridge for up to a week.
– If your bananas are still fresh, wrap them in plastic wrap. Keep them in the fridge for a few days.
– If your banana bites are not all gone, place them in an airtight container. Store in the freezer for up to two weeks.
Suggestions for Serving and Presentation
For a stunning presentation, try these ideas:
– Arrange the chocolate-covered banana bites on a nice platter.
– Drizzle any leftover melted chocolate over the bites for flair.
– Use colorful plates to make the treats pop and look even more tempting.
– Serve with toothpicks for easy eating. This makes them fun for parties!
These tips will help you enjoy your chocolate-covered banana bites even more.
Variations
Alternative Coatings and Toppings
You can switch up the chocolate. Try white chocolate or milk chocolate for a change. You can also add fun toppings. Think about shredded coconut, sprinkles, or crushed pretzels. These add color and crunch to your bites. Each option gives a new twist to the flavor.
Vegan and Dairy-Free Options
To keep it vegan, use dairy-free chocolate chips. They melt just as well as regular chocolate. You could also use nut butter instead of chocolate. Almond or peanut butter adds a creamy texture. This option is rich in flavor and dairy-free.
Flavor Combinations with Spices or Extracts
Add a pinch of cinnamon or nutmeg for warmth. These spices can bring out the banana’s flavor. You can also use vanilla or almond extract. Just a few drops can enhance the taste. Experimenting with these flavors makes each bite unique.
Storage Info
Best Practices for Freezing Chocolate Covered Banana Bites
To keep your chocolate covered banana bites fresh, follow these steps:
– Cool Completely: Make sure the bites are fully set before freezing.
– Use an Airtight Container: This prevents freezer burn and keeps flavors intact.
– Single Layer: Place the bites in a single layer to avoid sticking. You can stack layers with parchment paper in between.
How Long Do They Last in the Freezer?
Chocolate covered banana bites can last up to two weeks in the freezer. After that, they may lose texture and taste. Keep an eye on them to enjoy their best flavor.
Reheating Instructions for Enjoying Later
If you want to enjoy your treats later, here’s how:
– Thaw in the Fridge: Move them from the freezer to the fridge a few hours before eating.
– Skip the Microwave: Avoid reheating in the microwave as it can melt the chocolate. Instead, let them soften at room temperature for a few minutes.
FAQs
Can I use milk chocolate instead of dark chocolate?
Yes, you can use milk chocolate. It will make the bites sweeter. The taste will change, but they will still be delicious. Just melt the milk chocolate the same way as dark chocolate. The process is simple. You can use the same amount of milk chocolate chips as dark chocolate.
What other fruits can I cover in chocolate?
You can cover many fruits in chocolate. Strawberries, apples, and oranges all work well. Try using pineapple for a tropical twist. Dipping dried fruits like apricots or figs is also tasty. Each fruit gives a unique flavor and texture. Get creative and find your favorite combinations.
Are chocolate-covered banana bites healthy?
Chocolate-covered banana bites have health benefits. Bananas provide fiber and potassium. Dark chocolate has antioxidants that are good for your heart. However, they are still a treat. Enjoy them in moderation for a balanced snack. If you want to make them healthier, use less chocolate or try dark chocolate.
You now know how to make delicious chocolate-covered banana bites. We explored the main and optional ingredients, highlighting the health benefits of bananas and dark chocolate. You learned step-by-step instructions and useful tips for making them perfect. Plus, we discussed neat variations to excite your taste buds. Lastly, I shared the best ways to store and enjoy them later. These bites are fun, simple, and tasty treats to enjoy at any time.
![- Ripe avocados: Choose avocados that feel soft but not mushy. Ripe avocados add creaminess. They bring healthy fats and nutrients to the mousse. When selecting avocados, look for dark green skin. A little give when pressed is a good sign. Avoid avocados with large dark spots or cracks. - Cocoa powder: The type of cocoa powder you use matters. Choose high-quality, unsweetened cocoa for the best flavor. Dutch-processed cocoa has a smooth taste. Regular cocoa has a rich chocolate flavor. Both are great choices. - Sweeteners: Maple syrup and agave syrup are both tasty options. Maple syrup gives a unique flavor. It adds a slight caramel note. Agave syrup is milder and sweeter. It blends well without changing the taste much. You can adjust the sweetness based on your preference. - Non-dairy milk options: You can use almond, coconut, or oat milk. Almond milk is light and nutty. Coconut milk adds creaminess and a hint of tropical flavor. Oat milk is thick and wholesome. Any of these choices work well to create a smooth texture. - Flavor enhancers: Vanilla extract adds warmth and depth. A little cinnamon gives an extra layer of flavor. Both options are simple and enhance the chocolate taste. You can try adding a pinch to see what you like best. - Garnish suggestions: Dark chocolate shavings are a rich topping. They add elegance and extra chocolate flavor. Fresh berries like raspberries or strawberries bring brightness. Their color and tartness balance the rich mousse perfectly. These garnishes make the dish even more appealing. You can find the full recipe at the beginning of this article. First, you need to prepare your avocados. To peel and pit them easily, slice the avocado in half. Twist the halves apart. Use a spoon to scoop out the pit. Then, scoop the green flesh into a bowl. Next, measure your ingredients. For this mousse, you will need: - 2 ripe avocados, peeled and pitted - 1/2 cup unsweetened cocoa powder - 1/3 cup maple syrup (or agave syrup) - 1/4 cup almond milk (or any non-dairy milk of your choice) - 1 teaspoon vanilla extract - 1/4 teaspoon sea salt - A pinch of cinnamon (optional) Combine all these ingredients in a food processor. Now, let’s blend for that creamy texture. Start blending on high speed. Stop occasionally to scrape down the sides. This ensures everything mixes well. Blend until it’s smooth. Taste your mousse after blending. If you desire more sweetness, add extra maple syrup. Blend again to mix in the syrup. Adjust to your liking for the best flavor. Chilling the mousse is very important. It allows the flavors to develop and the mousse to thicken. Cover the individual dishes with plastic wrap. Chill them in the fridge for at least 30 minutes. For serving, get creative! Garnish your mousse with dark chocolate shavings or fresh berries. This adds a pop of color and texture. You can serve it in small bowls or glasses for a fun touch. Enjoy your rich and creamy vegan chocolate avocado mousse! - Over-blending the mousse: Blending too long makes it thin. Blend just until smooth. You want a creamy texture, not soup. - Using unripe avocados: Unripe avocados are hard and bitter. Always pick ripe ones. They should feel slightly soft. - Balancing sweetness: Taste your mousse before serving. If it's too bitter, add more maple syrup. Start with a little more. Keep tasting until it’s just right. - Experimenting with additional flavorings: You can try adding a pinch of espresso or a drop of peppermint extract. These flavors can make the mousse even more exciting. - Best food processors for smooth blending: Look for a powerful food processor. A 600-watt model works well. It blends the ingredients evenly and quickly. - Storage containers for chilling the mousse: Use small bowls with lids. This keeps the mousse fresh. Glass containers are a great choice. They help keep the mousse cool and tasty. For the full recipe, check out the [Full Recipe]. {{image_4}} You can make your Vegan Chocolate Avocado Mousse even more fun by adding nut butters. Try almond or peanut butter for a rich and creamy taste. These nut butters enhance the texture and add healthy fats. You can also infuse flavors like coffee or mint. A splash of coffee brings a deep, bold taste. Mint adds a refreshing twist that brightens up the dessert. Both options create a unique mousse that surprises and delights. For those with dietary needs, gluten-free variations are easy to make. All the ingredients in this mousse are naturally gluten-free. This makes it a great choice for anyone avoiding gluten. You can also opt for sugar-free alternatives. Using stevia or monk fruit keeps the mousse sweet without added sugar. These substitutes do not change the creamy texture. You can enjoy a guilt-free treat that still tastes amazing. Transform your mousse into parfaits for a stunning dessert. Layer the mousse with fresh fruits or granola in clear cups. This adds color and texture, making your dessert look beautiful. You can use the mousse as a filling for cakes or other desserts. It works well between layers of cake or as a filling for tart shells. This gives you a chance to be creative with your presentation. For the complete recipe, check out the Full Recipe section. To keep your Vegan Chocolate Avocado Mousse fresh, follow these steps: - Chill the mousse: After making it, cover your mousse with plastic wrap or a lid. This helps prevent air from getting in. - Use airtight containers: Store the mousse in airtight containers. This keeps it from absorbing other flavors in the fridge. - Refrigerate promptly: Place it in the fridge as soon as it's ready. This helps maintain its creamy texture. The mousse stays fresh for about 3 to 5 days in the fridge. Always check for any changes in smell or texture before serving. Can you freeze Vegan Chocolate Avocado Mousse? Yes, you can! Freezing is a great option if you want to store it longer. - Portion it out: Divide the mousse into small portions before freezing. This makes it easy to thaw only what you need. - Use freezer-safe containers: Make sure to use containers that are safe for freezing. This prevents freezer burn. When you're ready to enjoy it again, follow these steps to thaw: - Thaw in the fridge: Place the frozen mousse in the fridge overnight. This keeps it at a safe temperature while it thaws. - Stir before serving: After thawing, give the mousse a quick stir. This helps regain its smooth texture. By following these storage and freezing tips, you can enjoy your Vegan Chocolate Avocado Mousse at its best. For the complete recipe, check out the Full Recipe section. Yes, you can use different sweeteners. Honey or agave syrup works well too. Each sweetener changes the taste slightly. Honey adds a floral note, while agave is milder. You can experiment to find your favorite. Just keep the amount similar to maple syrup for the best results. This mousse stays fresh for about three days in the fridge. Store it in an airtight container to keep it from drying out. The mousse may thicken as it sits, so stirring it gently can help restore its creamy texture. Enjoy it within this timeframe for the best flavor and quality. Yes, this dessert is quite healthy! Avocados are full of good fats and nutrients. They can boost heart health and provide fiber. Cocoa powder is also rich in antioxidants, adding to the health benefits. This mousse is a guilt-free treat that satisfies your sweet tooth while nourishing your body. Absolutely! To make it nut-free, choose oat milk or soy milk instead of almond milk. Both options work well and keep the mousse creamy. Ensure your cocoa powder is also nut-free. With these swaps, you can enjoy this tasty dessert without any nut allergy concerns. Vegan Chocolate Avocado Mousse is simple and fun to make. You learned about key ingredients like ripe avocados, cocoa powder, and sweeteners. I shared tips on preparation, blending, and storing your mousse. Mixing in flavors or making parfaits adds creativity. Remember, use ripe avocados for the best taste. This mousse is healthy and easily customizable for different diets. Enjoy your tasty treat, and don't hesitate to share your own variations!](https://joymealplan.com/wp-content/uploads/2025/06/f08f53b2-ba89-49fb-bc73-48bd2b3a08b2-768x768.webp)
![- 1 cup pumpkin puree - 1 ½ cups crushed graham crackers - ½ teaspoon pumpkin spice - ½ cup powdered sugar - 1 teaspoon vanilla extract - 8 oz dark chocolate - 1 tablespoon coconut oil - Flaky sea salt To create chocolate covered pumpkin truffles, you need simple yet flavorful ingredients. Start with pumpkin puree, either canned or homemade. This is the base for your truffles. Next, grab crushed graham crackers. They give the truffles a unique texture and sweetness. Pumpkin spice adds warmth and flavor. You can adjust the amount if you want a stronger taste. Powdered sugar sweetens the mixture, making each bite a delight. Vanilla extract rounds out the flavor profile beautifully. For the chocolate coating, use dark chocolate. It contrasts nicely with the sweetness of the truffles. Adding coconut oil to the chocolate helps it melt smoothly. Finally, a sprinkle of flaky sea salt on top enhances the flavor, making each truffle even more irresistible. - Mixing bowl - Spoon or spatula - Measuring cups and spoons - Parchment paper - Baking sheet - Double boiler or microwave-safe bowl You will need a few tools to make these truffles. A mixing bowl is essential for combining your ingredients. A spoon or spatula helps you mix everything well. Measuring cups and spoons ensure that your ingredients are precise. Parchment paper is key for lining your baking sheet. It keeps the truffles from sticking. You also need a baking sheet to hold the truffles while they chill. Finally, a double boiler or a microwave-safe bowl helps melt the chocolate evenly. With these ingredients and tools, you're ready to create chocolate covered pumpkin truffles that everyone will love. For the complete recipe, check out the Full Recipe link. Start by mixing the pumpkin puree with the dry ingredients. In a large bowl, add: - 1 cup pumpkin puree - 1 ½ cups crushed graham crackers - ½ teaspoon pumpkin spice - ½ cup powdered sugar - 1 teaspoon vanilla extract Use a spatula or wooden spoon to blend these together. Mix until you have a smooth, dough-like consistency. The mixture should be firm enough to hold its shape. Next, it’s time to shape the truffles. With clean hands, scoop out tablespoon-sized portions. Roll each portion into a ball, about 1 inch in diameter. Place the balls on a parchment-lined baking sheet. Make sure to space them apart. This helps them keep their shape. After shaping, cover the baking sheet with plastic wrap and chill in the fridge for about 30 minutes. While the truffles chill, let’s melt the chocolate. You can use a double boiler or the microwave. If you choose the double boiler, place a heatproof bowl over a pot of simmering water. Stir the chocolate and coconut oil together until smooth. If using the microwave, heat in 20-second bursts, stirring in between. Make sure the chocolate is silky before dipping. Once the truffles are chilled, it’s time to coat them. Dip each ball into the melted chocolate. Make sure it’s fully covered. Use a fork to lift it out, letting the excess chocolate drip back into the bowl. Place the coated truffles back on the parchment-lined sheet. While the chocolate is still wet, sprinkle a pinch of flaky sea salt on each truffle. This adds a burst of flavor that balances the sweetness. Let the truffles sit at room temperature until the chocolate sets. You can speed up this process by placing them in the fridge for about 15-20 minutes. Now, your delicious chocolate-covered pumpkin truffles are ready to enjoy. You can find the full recipe above for more details on each step. Chilling the truffles is key. It helps them hold their shape better when you dip them. After you roll the truffles, place them in the fridge for about 30 minutes. This step makes a big difference in texture. To roll smooth truffles, make sure your hands are clean and dry. Use a light touch as you form the balls. If your mixture is sticky, wet your hands slightly. This helps shape them without making a mess. Melting chocolate can be tricky. To melt chocolate evenly, I recommend using a double boiler. Fill a pot with a bit of water, then place a heatproof bowl on top. Stir the chocolate as it melts. This method prevents burning. If you want a nice shine, add a tablespoon of coconut oil to the chocolate. It will make your truffles look glossy and appealing. Get creative when it comes to serving. You can sprinkle a little cinnamon on top for extra flavor. Pumpkin seeds also add a nice crunch and look great on a dessert table. These truffles pair well with coffee or a spiced chai. Consider serving them at your next fall gathering or holiday party. They will surely impress your guests! For the full recipe, check the main section. {{image_4}} You can easily change the taste of your truffles. Try adding almond extract for a nutty twist. A bit of orange zest will give your truffles a fresh, fruity kick. You can also swap out the pumpkin spice for cinnamon or nutmeg. Each spice brings a new flavor to your truffles. If you need gluten-free options, look for gluten-free graham crackers. Many brands offer these, and they work just as well. For those who prefer dairy-free treats, use dairy-free chocolate for the coating. There are great dairy-free chocolate chips available that melt nicely. Want to make your truffles extra special? Roll them in crushed nuts like pecans or walnuts. This adds a nice crunch. You can also use colorful sprinkles for a fun look. If dark chocolate isn’t your thing, try coating the truffles in white chocolate instead. It adds a sweet, creamy flavor that pairs well with pumpkin. For the full recipe, check out the [Full Recipe]. To keep your chocolate covered pumpkin truffles fresh, store them in the fridge. The cool temperature helps maintain their texture and flavor. Place the truffles in an airtight container to prevent them from drying out. This way, they can stay yummy for up to one week. If you want to enjoy them longer, try to avoid leaving them out at room temperature for too long. If you want to save some truffles for later, freezing is a great option. First, place the truffles on a baking sheet, making sure they don’t touch. Freeze them for about an hour until they are firm. Once frozen, transfer the truffles to a freezer-safe bag or container. They can last for up to three months in the freezer. When you’re ready to enjoy them, simply take out the number of truffles you want. Let them thaw in the fridge for a few hours or at room temperature for about 30 minutes. Avoid using heat to thaw, as this can ruin their texture. Now they're ready to be devoured! Chocolate covered pumpkin truffles can last about one week in the fridge. Store them in an airtight container to keep them fresh. After a week, check for signs of spoilage, such as a change in smell or texture. If they feel sticky or smell off, it's best to toss them. Yes, you can easily make these truffles vegan! Use dairy-free chocolate instead of dark chocolate. Swap the coconut oil for a plant-based butter or more coconut oil. This keeps the rich flavor while making it suitable for a vegan diet. These truffles shine at holiday gatherings and parties. They also make great gifts for friends and family. Their festive look and delicious taste fit well with autumn themes. Serve them during Halloween, Thanksgiving, or any cozy get-together. Yes, you can find chocolate covered pumpkin truffles at many bakeries. Look for local shops that specialize in gourmet treats. Some popular brands also offer these truffles online. You can enjoy them without all the fuss of making them at home. For a homemade touch, check out the Full Recipe for a delightful DIY version! Creating chocolate covered pumpkin truffles is simple and fun. We covered key ingredients like pumpkin puree, graham crackers, and dark chocolate. You learned tools needed, step-by-step instructions, and tips for easy truffle-making. We also looked at flavors, variations, storage, and common questions. These truffles make a perfect treat for any occasion. Enjoy making these delightful bites and share them with friends! You’ll impress everyone with your tasty skills.](https://joymealplan.com/wp-content/uploads/2025/07/35417da5-91a5-48e5-8a48-b090ca73d24b-768x768.webp)