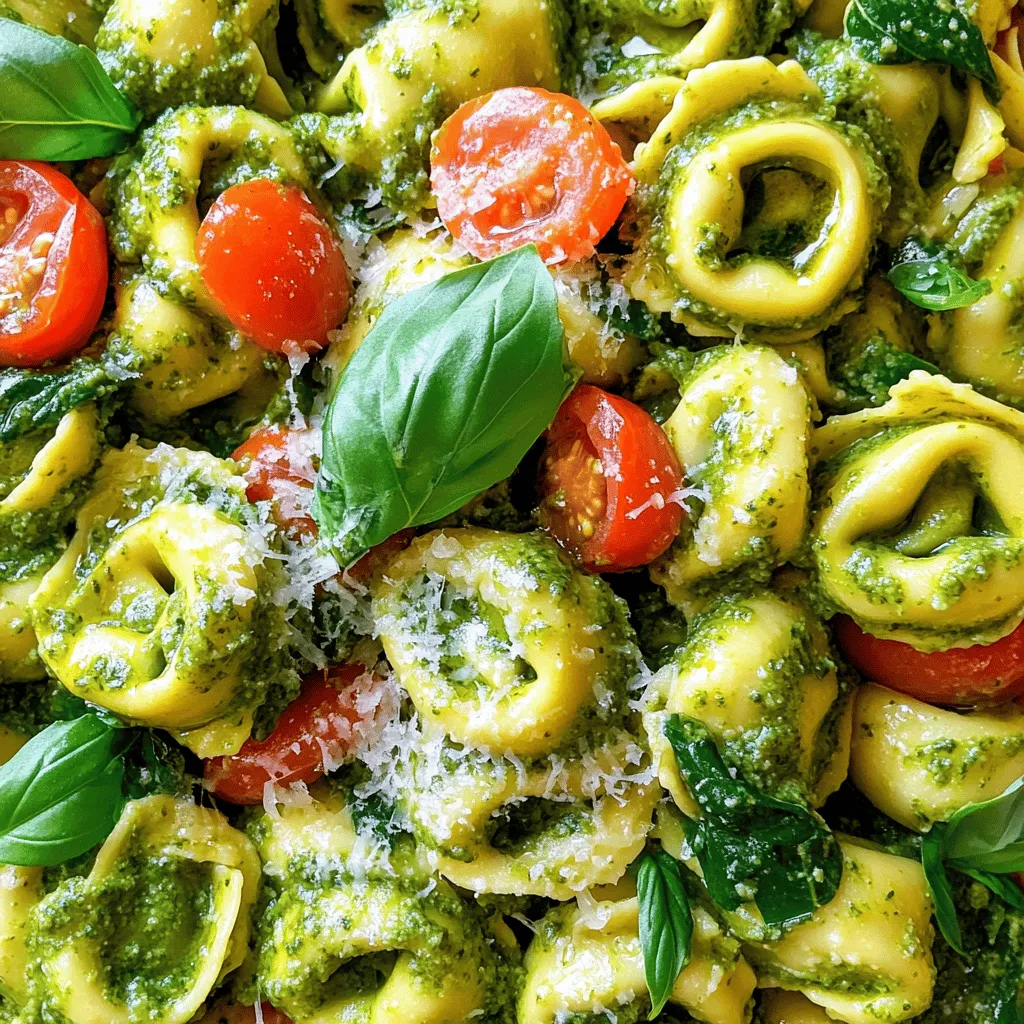
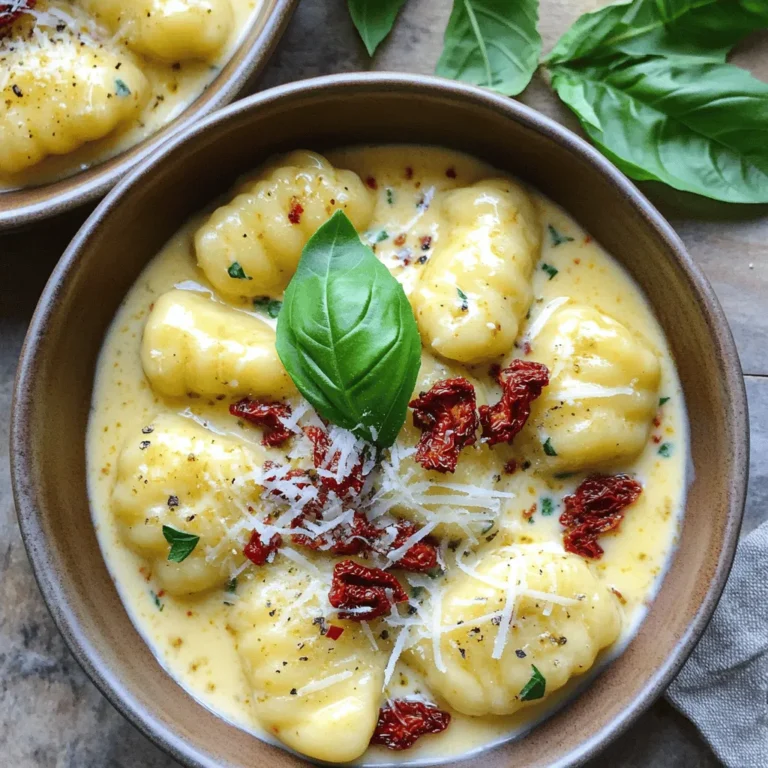
Creamy Pesto Tortellini Savory Dinner Delight
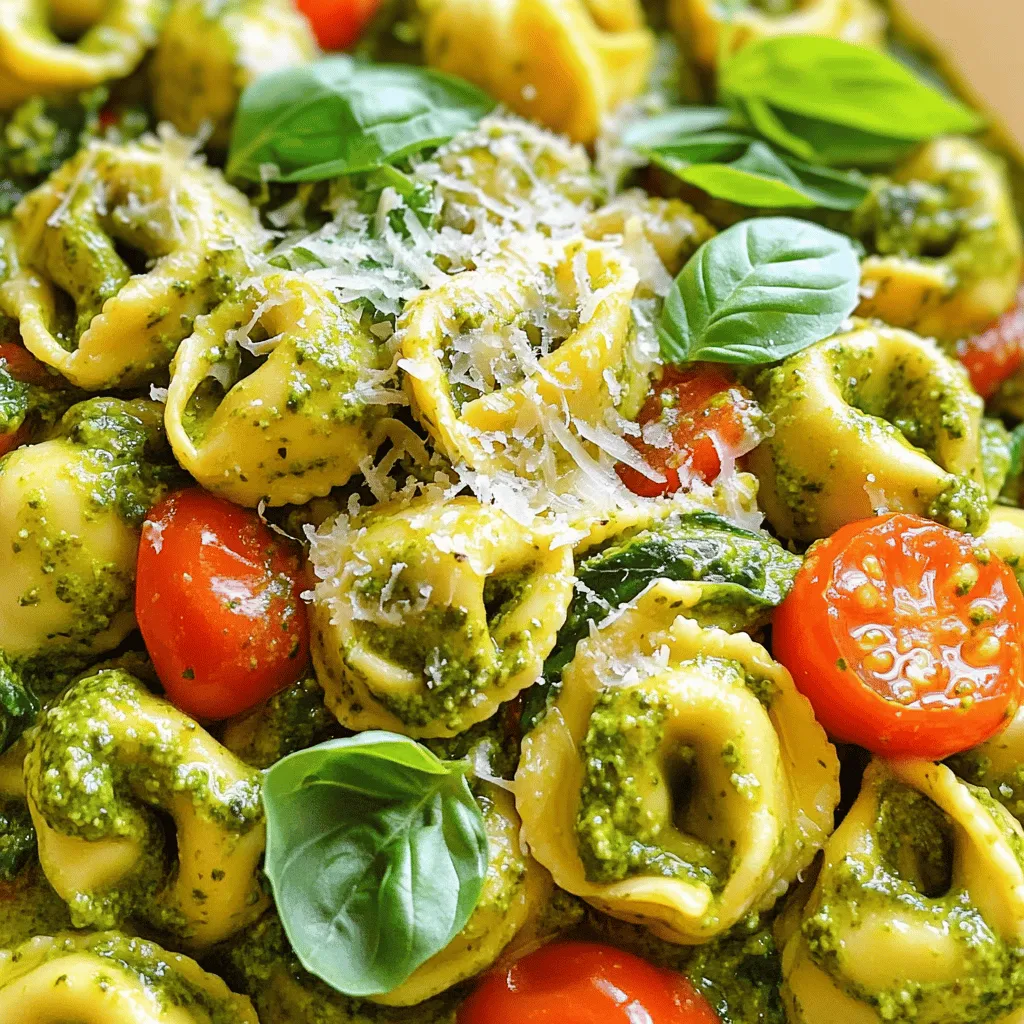
Are you ready to take your dinner game up a notch? Creamy Pesto Tortellini is a simple yet delectable meal that impresses every time. With rich flavors from cheese tortellini, bright cherry tomatoes, and fresh basil, it’s a dish you can whip up quickly. Follow my easy guide to create a savory delight that will have everyone asking for seconds. Dive in and discover how to make this creamy, comforting pasta!
Ingredients
Main Ingredients
– 12 ounces cheese tortellini (fresh or frozen)
– 1 cup heavy cream
– 1/2 cup pesto sauce (store-bought or homemade)
Vegetables
– 1 cup cherry tomatoes, halved
– 1 cup baby spinach
Seasonings and Extras
– 2 cloves garlic, minced
– 1/4 cup freshly grated Parmesan cheese
– 2 tablespoons extra virgin olive oil
– Salt and freshly ground black pepper to taste
– Fresh basil leaves for garnish
This creamy pesto tortellini dish is pure comfort food. You will love how easy it is to make. Each ingredient plays a vital role in the taste and texture.
First, the cheese tortellini is the star. It adds a rich, cheesy flavor and a soft bite. Next, the heavy cream makes the sauce smooth and luscious. This creamy base is perfect for the vibrant pesto. The pesto brings fresh herbs and a hint of garlic.
Then come the vegetables. Cherry tomatoes add a burst of sweetness. Baby spinach brings a mild flavor and extra color. The garlic gives a warm and aromatic touch. Always use fresh garlic for the best taste.
Finally, we have the seasonings. Parmesan cheese adds depth and a salty kick. Extra virgin olive oil enhances the flavor profile. Salt and black pepper tie all the ingredients together.
Don’t forget the fresh basil leaves for garnish. They add a pop of color and a fragrant finish. Each ingredient creates a warm, delicious, and inviting dish.
Step-by-Step Instructions
Cooking the Tortellini
To cook the tortellini, start by filling a large pot with water. Add a generous amount of salt. Bring the water to a rolling boil. This step is crucial for good flavor. Once boiling, add 12 ounces of cheese tortellini. Cook fresh tortellini for about 3-5 minutes, or longer if they are frozen. After cooking, drain the tortellini but keep about half a cup of pasta water.
Making the Sauce
Next, make the creamy sauce. Heat a large skillet over medium heat. Pour in 2 tablespoons of extra virgin olive oil. Once the oil is hot, add 2 cloves of minced garlic. Sauté the garlic for 1-2 minutes. Stir often to keep it from browning. When the garlic is fragrant, slowly pour in 1 cup of heavy cream. Stir as you pour to mix well. Let the mixture simmer gently. This helps the flavors blend nicely. After a minute, add 1/2 cup of pesto sauce. Stir it in and let the sauce simmer for 2-3 minutes. If it gets too thick, add a splash of reserved pasta water.
Combining Ingredients
Now, it’s time to combine everything. Add the cooked tortellini to the skillet. Toss in 1 cup of halved cherry tomatoes and 1 cup of baby spinach. Gently mix all the ingredients together. Cook for another 2-3 minutes. This allows the spinach to wilt and everything to heat up. Lastly, sprinkle in 1/4 cup of freshly grated Parmesan cheese. Stir until the cheese melts into the sauce. Season with salt and freshly ground black pepper to taste. Adjust to your liking. Now, your creamy pesto tortellini is ready to serve!
Tips & Tricks
Perfecting the Sauce
To make the sauce just right, you can adjust the thickness with pasta water. After cooking the tortellini, save some of that water. If your sauce feels thick, add a splash of this water. It will help the sauce cling better to the tortellini.
To enhance flavor, try adding more garlic or a pinch of red pepper flakes. You can also mix in a bit of lemon juice for a fresh twist. This adds brightness to the rich creamy pesto.
Cooking the Tortellini
For fresh tortellini, boil salted water, then cook for about 3-5 minutes. They cook fast! If you use frozen tortellini, they may take a bit longer, about 5-7 minutes. Always check the package for specific times. Both types will taste great in this dish.
Serving Suggestions
When plating, use shallow bowls. This makes the dish look fancy. Drizzle a little extra pesto on top for color. You can also sprinkle more Parmesan cheese for added flavor.
For garnishing, fresh basil leaves work well. They add a nice pop of green and enhance the dish’s taste. Enjoy this creamy pesto tortellini with family and friends!
Variations
Alternative Ingredients
You can switch up the tortellini for fun. Try different kinds like spinach or mushroom tortellini. These options add new flavors and colors to your dish. For the cream, you can use half-and-half or even plant-based milk. This change can make your meal lighter or fit dietary needs.
Add-Ins
Want to add more veggies? Toss in bell peppers, zucchini, or peas. These will bring extra crunch and flavor. You can also add protein. Grilled chicken or shrimp works well. If you want plant-based protein, try chickpeas or tofu. These options make your meal heartier and more filling.
Flavor Twists
Pesto comes in many flavors. You can use sun-dried tomato pesto for a tangy twist. Or try a spicy arugula pesto for heat. For extra depth, add spices like red pepper flakes or fresh herbs like thyme or oregano. These small changes can make your creamy pesto tortellini a unique delight every time you cook it.
Storage Info
Storing Leftovers
To keep your creamy pesto tortellini fresh, place leftovers in the fridge. Use an airtight container to avoid air exposure. This helps maintain taste and texture. You can store it for up to three days. Always let the dish cool to room temperature before sealing the container.
Reheating Instructions
When it’s time to enjoy leftovers, you want them warm but not dry. The best way to reheat tortellini is on the stove. Use a non-stick skillet over medium heat. Add a splash of water or cream to keep it moist. Stir occasionally until heated through, about 5-7 minutes. You can also use a microwave; just cover it and heat in short bursts, stirring in between.
Freezing Options
If you want to save some creamy pesto tortellini for later, freezing is a great choice. Allow the dish to cool completely, then portion it into freezer-safe bags or containers. Remove as much air as possible to prevent freezer burn. It can last up to three months in the freezer.
To thaw, move it to the fridge overnight. For a quicker option, use the microwave on low power, stirring often. Always reheat thoroughly before serving.
FAQs
Can I use homemade pesto?
Yes, you can use homemade pesto. Homemade pesto has bright flavors and fresher taste. You can adjust the ingredients to your liking. You can add nuts or extra cheese for texture. Store-bought pesto saves time but may lack some freshness. If you have the time, I recommend making your own.
Is this dish suitable for meal prep?
Yes, creamy pesto tortellini is great for meal prep. You can cook the tortellini and sauce in advance. Store them in separate containers. This keeps the tortellini from getting soggy. Reheat the dish gently in a skillet with a splash of water. This method helps maintain the creamy texture.
What can I serve with creamy pesto tortellini?
You can serve creamy pesto tortellini with various sides. Here are some suggestions:
– Garlic bread for a crunchy texture
– A fresh salad with mixed greens
– Roasted vegetables for added flavor
– Grilled chicken or shrimp for protein
These pairings enhance the meal and make it more filling. Enjoy mixing flavors to create a delightful dinner!
This blog post covered how to make creamy pesto tortellini, highlighting key ingredients and steps. You learned about the main components, like cheese tortellini and heavy cream, alongside vegetables and seasonings. I shared important tips for perfecting your sauce and enhancing flavors. We also explored variations to make the dish your own. Lastly, I provided storage info and answered common questions. Enjoy cooking this delicious meal, and feel free to experiment. Your kitchen adventure can lead to new favorites!

![- 1 pound large shrimp, peeled and deveined - 2 cups broccoli florets - 1 cup cherry tomatoes, halved - 1 medium yellow bell pepper, sliced into strips - 3 tablespoons extra virgin olive oil - 4 cloves garlic, finely minced - Zest and juice of 1 large lemon - 1 teaspoon dried oregano - 1 teaspoon dried thyme - Salt and freshly cracked black pepper to taste - Fresh parsley for garnish The main ingredients in this recipe create a bright, fresh dish. The shrimp are the star. Their sweet flavor pairs well with the crunchy broccoli and juicy tomatoes. The yellow bell pepper adds color and sweetness. For the drizzle, I love using olive oil. It adds richness and helps the garlic blend well with the other flavors. The lemon brings a zesty kick. Its zest adds a fragrant aroma, while the juice brightens the dish. Dried oregano and thyme lend an earthy note. They balance the freshness of the lemon and shrimp. Finally, salt and pepper bring out all the flavors. Fresh parsley adds a splash of color and a hint of freshness when you serve. You can find the full recipe here: [Full Recipe]. Enjoy cooking! 1. First, preheat your oven to 400°F (200°C). 2. Line a large baking sheet with parchment paper. This makes cleanup simple. 3. In a big bowl, mix 1 pound of shrimp, 2 cups of broccoli, 1 cup of halved cherry tomatoes, and 1 sliced yellow bell pepper. Toss them gently to combine. 1. In a small bowl, whisk together 3 tablespoons of olive oil, 4 minced garlic cloves, the zest of 1 lemon, and its juice. 2. Then, add 1 teaspoon each of dried oregano and thyme, plus salt and pepper. Mix it well. 1. Pour the lemon herb mix over the shrimp and veggies. Toss everything together to coat well. 2. Spread the mixture evenly on the baking sheet. 3. Place it in the oven and bake for about 12-15 minutes. The shrimp should turn pink, and the veggies should soften. 4. After baking, sprinkle chopped parsley on top for a fresh look and taste. This recipe is quick and makes a colorful dish that bursts with flavor. For the full recipe, check the details above. To know when shrimp are done, look for a bright pink color. They should also be opaque. If you see these signs, they are ready to eat. Cooking time may change with different ovens. Start checking for doneness at around 12 minutes. Your oven may cook faster or slower, so keep an eye on them. Adding more flavors can make this dish even better. You might try a pinch of red pepper flakes for some heat. A dash of smoked paprika adds a nice smoky taste. Fresh herbs are key in this dish. They give a bright and fresh flavor that dried herbs can't match. Always use fresh parsley for a vibrant finish. You can serve the shrimp right from the baking sheet. This gives a fun, casual feel. If you want to impress, transfer them to a nice platter. Drizzle with extra lemon juice for zing. Pair this dish with a light salad or some rice to soak up the juices. These sides complement the shrimp beautifully. For the full recipe, check out the details above. {{image_4}} You can use many vegetables in this dish. Instead of broccoli and bell peppers, try zucchini or asparagus. These options add color and flavor. You can also use seasonal veggies. In summer, fresh corn or green beans work well. In fall, add butternut squash or Brussels sprouts. Mix and match to suit your taste. If you want to change the protein, scallops or chicken are great swaps. Scallops cook fast like shrimp. They need about 8-10 minutes in the oven. Chicken takes longer, around 20-25 minutes. Cut it into small pieces for even cooking. Adjust your bake time based on the protein you choose. This recipe is easy to adapt for different diets. For a gluten-free option, make sure your seasonings are gluten-free. You can also make it dairy-free. Just skip any dairy-based sides. Want a vegan version? Use chickpeas or tofu instead of shrimp. Season them the same way for a delicious meal. Store leftover shrimp and veggies in an airtight container. Keep it in the fridge for up to two days. If you want to save some for later, freezing is a good option. Place shrimp and vegetables in a freezer-safe bag. Remove as much air as you can before sealing. They can last up to three months in the freezer. When reheating, use the oven or stovetop for best results. Preheat your oven to 350°F (175°C) and place the shrimp and veggies on a baking sheet. Heat for about 10 minutes. This keeps everything warm and tasty. You can also use a skillet on low heat. Stir gently to warm the dish without overcooking the shrimp. Avoid the microwave if possible, as it can make shrimp tough. For the full recipe of Sheet Pan Lemon Herb Shrimp, check the earlier section! Shrimp cook quickly. The best time is 12 to 15 minutes at 400°F. They turn pink and opaque when done. Overcooking makes them tough, so watch closely. Each oven is different, so check them a little early. Yes, you can prep this dish in advance. Mix the shrimp and veggies, then store them in the fridge. You can also make the marinade ahead. Just keep the shrimp and marinade separate until you are ready to bake. This keeps the shrimp fresh. This shrimp pairs well with many sides. Here are some great options: - Quinoa salad for a healthy touch - Garlic bread for a filling option - Steamed rice for a classic choice - A fresh garden salad for crunch These sides balance the flavors and make a complete meal. In this post, I shared how to make a delicious sheet pan lemon herb shrimp dish. We covered main ingredients, step-by-step instructions, and tips for perfecting the recipe. I also included variations based on your taste. Cooking should be fun and easy. With quick steps and fresh ingredients, you can create a meal everyone will love. Enjoy experimenting with flavors and make this recipe your own!](https://joymealplan.com/wp-content/uploads/2025/06/8195c318-04ef-4784-9bf9-d5c1a8395797-768x768.webp)
![- 1 pound boneless, skinless chicken breasts - Marinade: 1 cup buttermilk - Breading elements: 1 cup panko breadcrumbs, 1/2 cup all-purpose flour - Seasonings: 1 teaspoon garlic powder, 1 teaspoon onion powder, 1 teaspoon smoked paprika, 1/2 teaspoon salt, 1/2 teaspoon black pepper, 1/4 teaspoon cayenne pepper (optional) - Cooking oil: 2 tablespoons extra virgin olive oil - Garnish: Fresh parsley, finely chopped I love using fresh, simple ingredients for my crispy baked chicken tenders. The chicken breasts are the star here. I always choose boneless and skinless for easy handling. This keeps them juicy and tender. For the marinade, I use buttermilk. It helps to make the chicken soft and adds great flavor. Soak the chicken for at least 30 minutes. You can go up to two hours for the best taste. Next comes the breading. I prefer panko breadcrumbs because they give the best crunch. The all-purpose flour helps the breadcrumbs stick. Mixing garlic powder, onion powder, smoked paprika, salt, and pepper adds a nice depth of flavor. I add cayenne pepper for those who like a bit of heat. It’s optional, but it gives a great kick. Finally, a drizzle of extra virgin olive oil helps the tenders bake to a golden brown. You can finish with fresh parsley for a pop of color. Want the full recipe? Check out the [Full Recipe]. It’s a delicious way to enjoy chicken! First, set your oven to 425°F (220°C). While it heats up, grab a baking sheet. Line it with parchment paper. This will help the chicken not stick. It also makes cleanup easy. Take a big bowl and pour in the buttermilk. Add the chicken strips. Make sure they are all covered. Cover the bowl with plastic wrap. Let it sit for at least 30 minutes. For even more flavor, you can marinate it for up to 2 hours in the fridge. In another shallow dish, mix the flour, garlic powder, onion powder, smoked paprika, salt, black pepper, and cayenne pepper. Whisk it well. In a separate bowl, place the panko breadcrumbs. This is what will give your chicken that crunchy outside. After marinating, take the chicken out of the buttermilk. Let the excess drip off. Next, coat each piece in the flour mixture. Make sure each strip is covered. Gently shake off the extra flour. For extra crunch, dip the chicken back into the buttermilk. Then, roll it in the panko breadcrumbs. Press down a bit to help the crumbs stick. Arrange the coated chicken on the lined baking sheet. Drizzle a little olive oil on top. This helps it get golden brown. Bake the chicken for 20-25 minutes. Check with a meat thermometer. It should reach 165°F (75°C). Once the chicken is baked, take it out of the oven. Let it rest for about 5 minutes. This helps keep the juices in. Finally, garnish with fresh parsley. It adds a nice touch. Serve hot with your favorite sauces. Don't forget to check the Full Recipe for all the details! For the crispiest chicken tenders, use panko breadcrumbs. Panko adds a light and airy crunch that regular breadcrumbs can't match. Their larger flakes create a wonderful texture. To take it up a notch, use the double-dipping technique. First, coat the chicken in flour, then dip it back into the buttermilk before rolling it in panko. This extra layer of breading will give you an amazing crunch. To make your chicken tenders more flavorful, add spices to the breading mix. Garlic powder, onion powder, and smoked paprika all work great. Feel free to adjust the amounts to fit your taste. You can also try different marinades. A simple mix of lemon juice and herbs can change the flavor profile entirely. Experiment with your favorites to find the perfect taste. If you want a healthier option, consider using an air fryer. It cooks the chicken tenders with less oil while still keeping them crispy. Adjust the cooking time to about 12-15 minutes at 400°F (200°C). Another great tip is to place the chicken tenders on a wire rack. This allows hot air to circulate around the tenders, leading to even cooking and a crispier finish. {{image_4}} You can easily change the flavor of your chicken tenders. Here are two fun ideas: - Lemon pepper chicken tenders: Add lemon zest and black pepper to the flour mix. This gives a bright and zesty taste that wakes up your meal. - BBQ chicken tenders: Brush the tenders with your favorite BBQ sauce before baking. This adds a sweet and tangy flavor that kids love. If you have dietary needs, you can still enjoy these tenders: - Gluten-free options: Use gluten-free breadcrumbs instead of regular. This way, everyone can enjoy the meal without any worry. - Low-carb alternatives: Swap regular flour with almond flour or coconut flour. Both options give you a nice crunch while keeping carbs low. Pair your chicken tenders with tasty sides and dips: - Suggested dipping sauces: Try ranch dressing, honey mustard, or spicy sriracha. Each adds a unique kick to your tenders. - Side dish pairings: Serve them with a fresh salad, crispy fries, or steamed veggies. These sides complete your meal and add more nutrition. For more ideas, check out the Full Recipe to explore different flavors and tips! To keep your chicken tenders fresh, store them right. First, let the cooked tenders cool. Then, place them in an airtight container. You can store them in the fridge for up to three days. If you want to keep them longer, freezing is a great option. Use containers that seal tightly. Glass or plastic containers work well. If you use plastic wrap, make sure it hugs the tenders closely. This way, they won’t dry out. When you want to enjoy your leftovers, reheating is key. The best way to keep them crispy is to use the oven. Preheat your oven to 375°F (190°C) and bake for about 10 to 15 minutes. This method makes the chicken hot and crispy again. You can also use an air fryer. Set it to 375°F (190°C) and heat for about 5 to 7 minutes. This method is quick and gives great results. You can freeze both uncooked and cooked chicken tenders. For uncooked tenders, place them on a baking sheet to freeze individually first. Once they are frozen, transfer them to a freezer bag. This keeps them from sticking together. For cooked tenders, let them cool, then store them in an airtight container. They can last up to three months in the freezer. When you are ready to eat, just reheat them as mentioned earlier. For more detailed cooking methods, check the Full Recipe. Bake chicken tenders for 20 to 25 minutes at 425°F. This time gives them a golden color and keeps them juicy. Always check their internal temperature; it should reach 165°F for safety. Yes, you can make these chicken tenders ahead of time. Prepare them fully and store them in the fridge for up to 24 hours. When you're ready to eat, just pop them in the oven to reheat. This way, you save time while still enjoying a tasty meal. If you don't have buttermilk, use regular milk with a splash of vinegar or lemon juice. Let it sit for about five minutes. This method mimics buttermilk's acidity and helps tenderize the chicken just as well. Check chicken tenders with a meat thermometer. They are done when they hit 165°F inside. If you don’t have a thermometer, cut one open. The meat should be white, not pink, and the juices should run clear. Yes, chicken thighs work well in this recipe. They are more flavorful and juicy than breasts. Just cut them into strips like you would with the chicken breasts. The cooking time may be similar, so keep an eye on them. Crispy baked chicken tenders are easy and tasty. You start with simple ingredients, like chicken, buttermilk, and spices. The steps are clear, from marinating to baking. I shared tips for extra crunch and tasty flavors. Finally, you can personalize these tenders with countless variations and sides. Whether it's for a family dinner or meal prep, these tenders will impress. Enjoy making them and exploring your options!](https://joymealplan.com/wp-content/uploads/2025/06/4bfc5954-182f-42e7-9a90-e67bfbd9568b-768x768.webp)