Mango Coconut Chia Pudding Fresh and Tasty Recipe
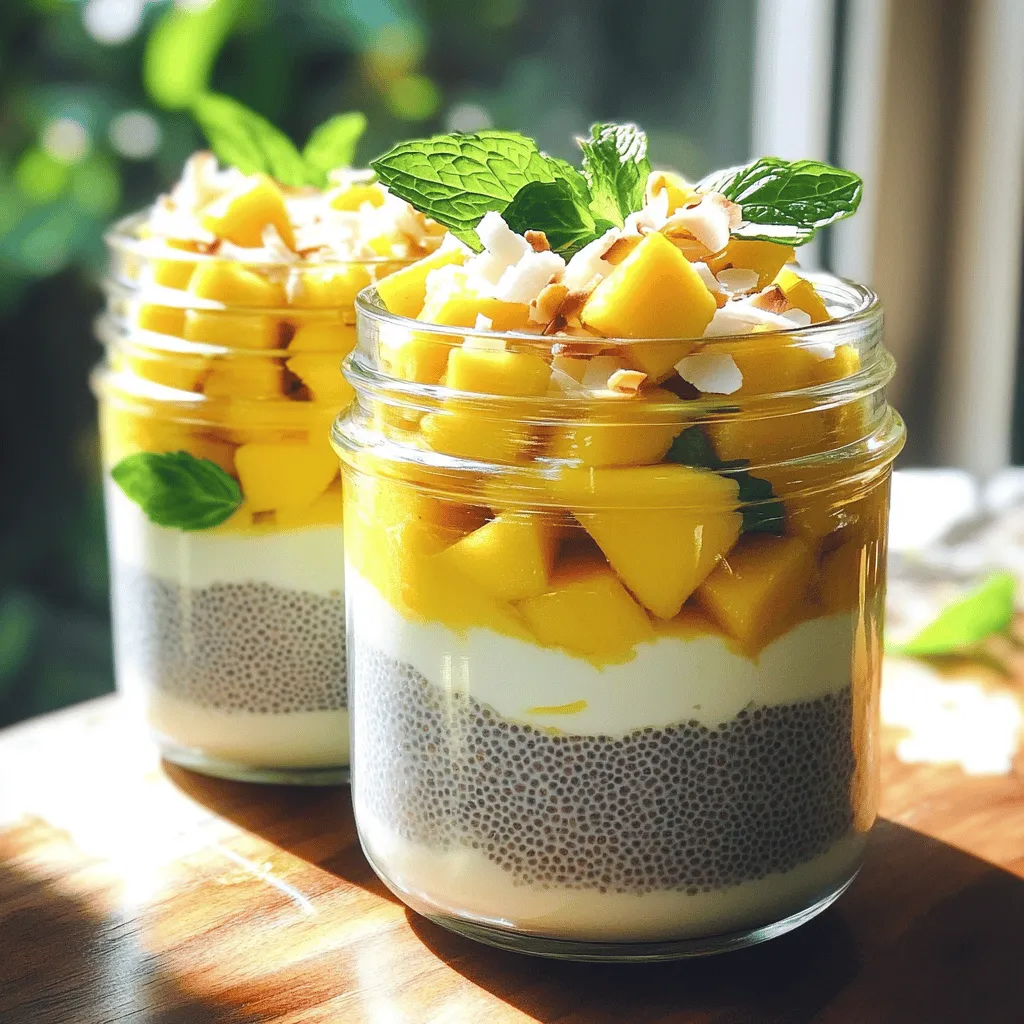
Are you ready to cool down with a refreshing treat? This Mango Coconut Chia Pudding is both tasty and easy to make! Packed with nutritious ingredients, it’s a delightful way to enjoy breakfast or dessert. In this recipe, I’ll guide you through each step, share tricks to perfect your pudding, and offer tasty variations. Let’s dive in and create something delicious together!
Ingredients
List of Ingredients for Mango Coconut Chia Pudding
– 1 cup coconut milk (canned or carton)
– 1/2 cup almond milk (or any milk of choice)
– 1/4 cup chia seeds
– 2 tablespoons maple syrup (or honey)
– 1 ripe mango, diced
– 1 teaspoon vanilla extract
– Pinch of salt
– Toasted coconut flakes (for garnish)
– Fresh mint leaves (for garnish, optional)
Key Ingredients and Their Benefits
Coconut milk gives this pudding a rich and creamy texture. It is dairy-free and full of healthy fats. Almond milk adds a light, nutty flavor. It is also low in calories.
Chia seeds are the star here. They are rich in fiber, omega-3s, and protein. When soaked, they expand and form a gel-like consistency. This helps create a satisfying pudding.
Maple syrup or honey adds natural sweetness. You can adjust this based on your taste. The ripe mango brings fresh flavor and a burst of color. It’s full of vitamins and adds a tropical twist.
Tips for Selecting the Best Ingredients
When choosing coconut milk, look for brands with fewer additives. A full-fat option makes the pudding richer. For almond milk, ensure it is unsweetened for better control over sweetness.
Select ripe mangoes that feel slightly soft when you gently squeeze them. They should have a sweet scent. Always opt for whole chia seeds over ground ones. Whole seeds give the best texture and benefits.
Finally, use fresh mint leaves for garnish only if you like their flavor. They add a nice touch to the dish’s presentation.
Step-by-Step Instructions
Preparation Process for Mango Coconut Chia Pudding
First, gather your ingredients. You need:
– 1 cup coconut milk
– 1/2 cup almond milk
– 1/4 cup chia seeds
– 2 tablespoons maple syrup
– 1 ripe mango, diced
– 1 teaspoon vanilla extract
– Pinch of salt
– Toasted coconut flakes (for garnish)
– Fresh mint leaves (optional)
In a large mixing bowl, combine the coconut milk, almond milk, maple syrup, vanilla extract, and salt. Whisk these until smooth. Next, add the chia seeds slowly while stirring. This step helps to avoid clumps. Cover the bowl with plastic wrap or a lid and place it in the fridge. Let it chill for at least 4 hours, or overnight if you can wait. This time allows the chia seeds to absorb the liquid.
Timing and Importance of Chilling
Chilling time is crucial. It helps the chia seeds swell and thicken the pudding. If you skip this step, the pudding won’t set properly. A minimum of 4 hours works, but overnight is best. The longer you chill, the creamier it becomes.
Serving Suggestions and Presentation Tips
When you’re ready to serve, take the pudding out of the fridge. Stir it gently to break up any clumps. Use individual glasses for serving. Start with a layer of pudding, then a layer of diced mango. Repeat until the glass is full. Aim for at least two layers of each. Top each serving with toasted coconut flakes for crunch. If you like, add fresh mint leaves for color and flavor. Enjoy your beautiful and tasty Mango Coconut Chia Pudding!
Tips & Tricks
Common Mistakes to Avoid
When making mango coconut chia pudding, avoid a few common mishaps. First, don’t skip the chilling time. If you don’t let it set long enough, the pudding will be runny. Second, stir the chia seeds in well. If you don’t, they may clump together. This clumping can ruin the smooth texture you want.
Enhancing Texture and Flavors
To boost the flavor, use ripe mangoes. They add natural sweetness and a fresh taste. You can also add a splash of lime juice for a zesty twist. For a creamier pudding, try using full-fat coconut milk. This will give your dessert a richer mouthfeel. If you enjoy crunchy textures, sprinkle toasted coconut flakes on top. They add a lovely crunch and nutty flavor.
How to Adjust Sweetness and Consistency
If you prefer a sweeter pudding, add more maple syrup or honey. Start with a small amount, then taste it. Adjust slowly until it’s just right for you. For a thicker pudding, add more chia seeds. Just a tablespoon can make a big difference. If it’s too thick, mix in a bit more almond milk. This keeps the pudding light and airy.

Variations
Alternative Fruits to Use
You can switch up the mango in this recipe. Try using ripe bananas for a creamy texture. Berries like strawberries or blueberries also work great. They add a nice tartness that balances well with the coconut. Pineapple gives a tropical twist, while peaches add sweetness. Just remember to keep the fruit fresh and ripe for the best flavor.
Different Milk Options and Their Effects
You can experiment with different milk types. If you want a nutty flavor, use cashew milk. Oat milk gives a creamy texture without nuts. Regular dairy milk works too, if you prefer it. Each milk will change the taste slightly. Coconut milk adds rich creaminess, while almond milk keeps it light. Choose what you like best!
Vegan and Sugar-Free Adaptations
For a vegan option, simply use maple syrup or agave instead of honey. Both sweeteners keep it plant-based while adding flavor. To make it sugar-free, try using a sugar substitute like stevia or monk fruit. These sweeteners will keep the pudding sweet without the calories. Always check the measurements, as they can vary.
Storage Info
Best Practices for Storing Chia Pudding
To keep your mango coconut chia pudding fresh, store it in an airtight container. This step helps prevent any odors from your fridge affecting the taste. Always use clean utensils to scoop out the pudding. This avoids introducing bacteria that can spoil the dish.
How Long Does it Last in the Fridge?
Your chia pudding will last for about 5 days in the fridge. It’s best to eat it within this time for the best flavor and texture. If you notice any changes in smell or appearance, it’s safer to throw it away.
Freezing Mango Coconut Chia Pudding: Is it Possible?
Yes, you can freeze mango coconut chia pudding! Just place it in a freezer-safe container, but leave some space for expansion. It can stay in the freezer for up to 3 months. When you’re ready to eat it, move it to the fridge for a day to thaw. The texture may change slightly, but it will still taste great!
FAQs
What are chia seeds and their health benefits?
Chia seeds are tiny black seeds from the Salvia hispanica plant. They are packed with nutrients. Chia seeds are high in fiber, which helps digestion and keeps you full. They also contain protein, healthy fats, and antioxidants. Eating chia seeds may support heart health. They can help lower cholesterol levels. Plus, they absorb liquid and expand, making your pudding thick and creamy.
Can I use other sweeteners for this recipe?
Yes, you can swap out maple syrup or honey for other sweeteners. Agave syrup works well if you want a vegan option. You can also use stevia or monk fruit for a low-calorie choice. Just remember that some sweeteners are sweeter than others. Start with a little and taste as you go. This way, you can find the perfect sweetness for your Mango Coconut Chia Pudding.
Is Mango Coconut Chia Pudding suitable for meal prep?
Absolutely! Mango Coconut Chia Pudding is perfect for meal prep. You can make it ahead of time and store it in the fridge. Just keep it in sealed jars or containers. It lasts up to five days, making it a great grab-and-go breakfast or snack. You can layer the pudding and mango for a pretty presentation. Just add the toasted coconut flakes right before serving for freshness.
Mango Coconut Chia Pudding is both tasty and healthy. We discussed key ingredients, their benefits, and how to pick the best ones. The step-by-step guide ensures you make it right every time, while tips help avoid mistakes. You can try fun variations and know how to store it well.
This pudding is great for any meal. Simple adjustments can make it perfect for you. Get creative and enjoy!


. To get that perfect chewy texture in your cookies, use more brown sugar than white sugar. Brown sugar has moisture, which helps keep cookies soft. Also, don’t overmix the dough. Mix until just combined. This helps keep the cookies tender. One common mistake is using cold ingredients. Always use room temperature butter and eggs. Cold ingredients can make the batter too firm. Another mistake is baking too long. Take the cookies out when the edges are golden but the centers look soft. They firm up as they cool. Use parchment paper on your baking sheet. This prevents sticking and makes cleanup easy. Always space the cookies at least 2 inches apart. This gives them room to spread while baking. Lastly, let the cookies cool on the baking sheet for a few minutes before moving them. This helps them set nicely. For a full recipe, check the section above. {{image_4}} You can make Chewy Oatmeal Raisin Cookies healthier. Try using whole wheat flour instead of all-purpose flour. You can also replace half the sugar with applesauce. This swap keeps the cookies moist and reduces the sugar content. Another option is to use honey or maple syrup for a natural sweetener. These changes keep the cookies tasty while cutting down on empty calories. To spice up your cookies, add different flavors. A pinch of nutmeg or ginger can add a nice kick. You can also mix in some chocolate chips for sweetness. If you want a fun twist, try adding a tablespoon of peanut butter. It will give the cookies a rich, nutty flavor. A splash of almond extract instead of vanilla can also elevate the taste. If you need vegan cookies, swap the egg for a flax egg. Mix one tablespoon of ground flaxseed with three tablespoons of water, then let it sit until it thickens. For a gluten-free version, use a gluten-free flour blend in place of all-purpose flour. Just make sure the oats are certified gluten-free. These swaps will make your cookies friendly for all diets while still being delicious. For the complete recipe, check out the Full Recipe section! To keep your chewy oatmeal raisin cookies fresh, store them in an airtight container. This helps prevent them from drying out. You can place a slice of bread in the container. The bread will absorb any moisture and keep the cookies soft. Store the cookies at room temperature for up to a week. If you want to keep them longer, consider freezing them. Freezing cookies is a great way to enjoy them later. To freeze your chewy oatmeal raisin cookies, let them cool completely first. Then, place them in a single layer on a baking sheet. Freeze for about an hour. Once frozen, transfer the cookies to a freezer-safe bag or container. They can last for up to three months in the freezer. When you’re ready to eat them, just thaw at room temperature or reheat in the oven. Reheating cookies brings back their fresh-baked taste. To do this, preheat your oven to 350°F (175°C). Place the cookies on a baking sheet and heat them for about 5 to 7 minutes. This warms them up and makes them soft again. You can also use a microwave. Heat each cookie for about 10-15 seconds. Enjoy them warm for the best flavor! For more tips and the full recipe, check out the [Full Recipe]. Yes, you can use quick oats. They are smaller and cook faster. This change may make your cookies softer. Rolled oats give a chewier texture. If you want chewy cookies, stick with rolled oats. Chewy oatmeal raisin cookies last about one week at room temperature. Store them in an airtight container. For longer freshness, keep them in the fridge. You can also freeze them for up to three months. If you don't like raisins, try using chocolate chips or dried cranberries. Chopped dates or apricots also work well. These options add a nice twist to the cookies. Feel free to mix and match your favorites! Yes, you can double the recipe easily. Just double each ingredient amount. Make sure to have enough space on your baking sheets. Baking in batches works well too. Enjoy sharing these cookies with friends! Check the edges of the cookies. They should be lightly golden. The centers will look soft but not wet. If they look set, they are done. Remember, they will firm up as they cool! Chewy oatmeal raisin cookies are simple and fun to make. We covered the key ingredients, step-by-step baking, and useful tips. Explore tasty variations and safe storage methods to keep them fresh. Remember to avoid common mistakes for the perfect cookie. With these insights, you can enjoy delightful treats any time. Baking is about experimenting, so feel free to try new flavors or adjustments. Happy baking!](https://joymealplan.com/wp-content/uploads/2025/06/785fb639-1a06-41d5-89d3-a942a31939ee-768x768.webp)