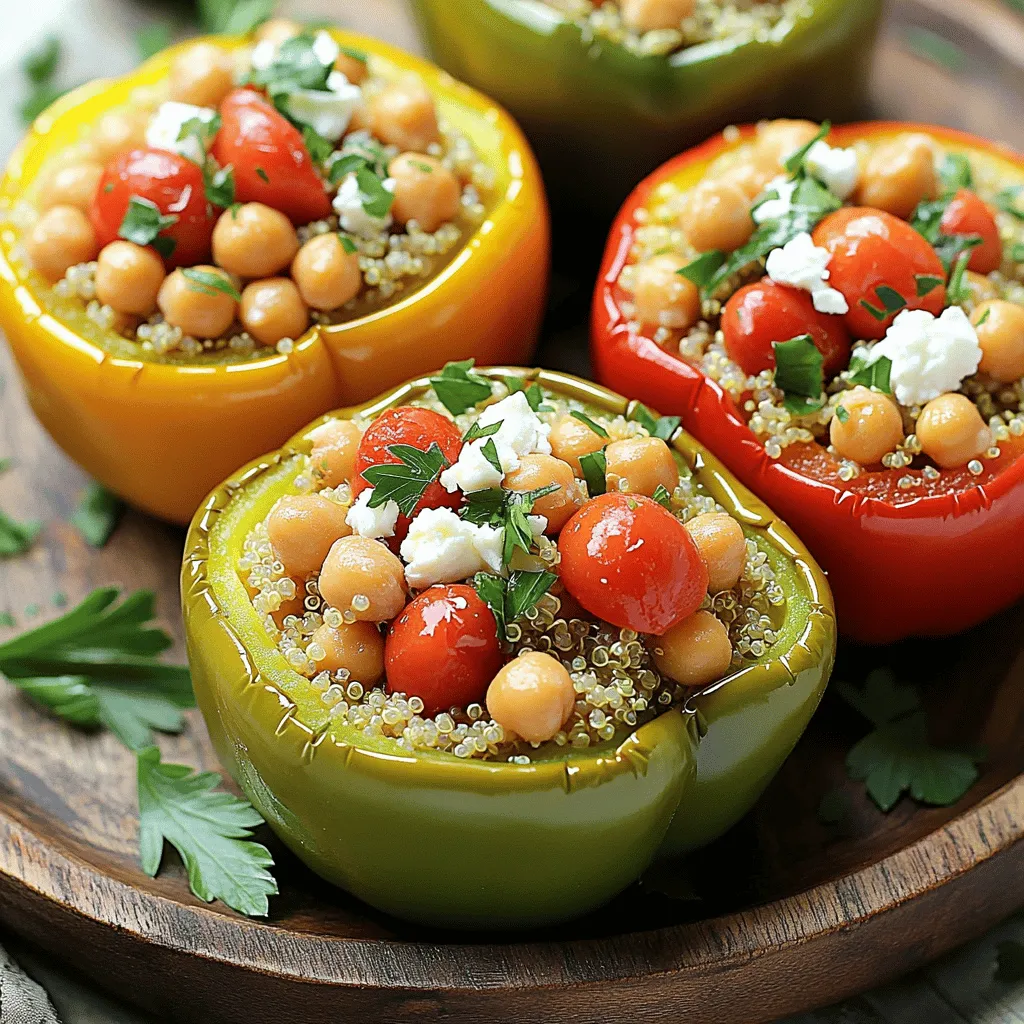
Mediterranean Quinoa Stuffed Peppers Flavorful Delight
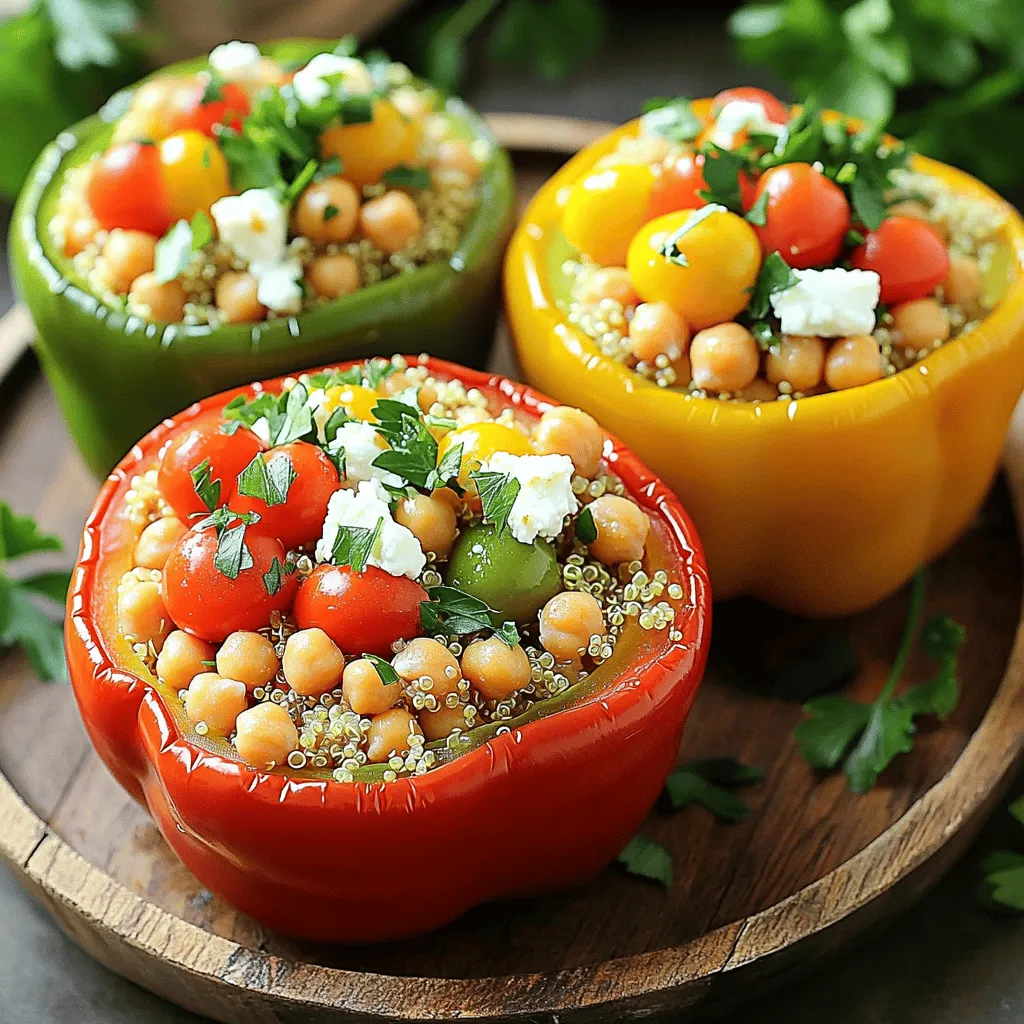
Get ready to savor a tasty twist on a classic dish with my Mediterranean Quinoa Stuffed Peppers! Packed with colorful ingredients and bursting with flavor, these stuffed peppers are not just a feast for the eyes but a healthy and satisfying meal. Whether you’re looking for a quick weeknight dinner or a show-stopping dish for guests, this recipe fits the bill. Let’s dive into the delicious details!
Ingredients
To make Mediterranean quinoa stuffed peppers, gather these fresh ingredients:
– 4 large bell peppers (any color)
– 1 cup quinoa (thoroughly rinsed)
– 2 cups vegetable broth
– 1 can (15 oz) chickpeas (drained and rinsed)
– 1 cup cherry tomatoes (halved)
– 1/2 cup black olives (pitted and sliced)
– 1/2 cup feta cheese (crumbled)
– 1/4 cup fresh parsley (finely chopped)
– 1 teaspoon dried oregano
– 1 teaspoon smoked paprika
– Salt and freshly ground black pepper (to taste)
– 2 tablespoons extra virgin olive oil (plus more for drizzling)
– Juice of 1 fresh lemon
These ingredients blend well to create a colorful and tasty dish. The bell peppers provide the perfect vessel for the filling. Quinoa is a great choice as it adds texture and protein. Chickpeas add heartiness, while cherry tomatoes and olives offer freshness and briny flavor. Feta cheese adds creamy tang, and herbs like parsley and oregano bring out vibrant notes.
Using fresh lemon juice brightens the flavors and balances the richness. The olive oil gives everything a silky finish. Each ingredient plays a role in creating layers of taste. When you take a bite, you experience a delightful mix of flavors and textures.
Step-by-Step Instructions
Preheat and Prepare Bell Peppers
– Step 1: Preheat your oven to 375°F (190°C).
– Step 2: Slice the tops off the bell peppers and remove seeds.
First, preheating the oven gets it ready for baking. This step helps cook the peppers evenly. Next, take your bell peppers and cut off the tops. Make sure to remove all the seeds inside. This way, the peppers will hold your tasty filling well. You can choose any color you like. Red, yellow, or green all work great.
Cook Quinoa
– Step 1: Bring vegetable broth to a boil.
– Step 2: Add rinsed quinoa, cover, and let simmer.
Now, let’s cook the quinoa. Start by pouring vegetable broth into a pot and bring it to a boil. Once it is bubbling, add the rinsed quinoa. Cover the pot with a lid and reduce the heat. Let it simmer for about 15 minutes. The quinoa will absorb the broth and become fluffy. This will make the filling rich and tasty.
Mix Stuffing Ingredients
– Step 1: Combine cooked quinoa with chickpeas, tomatoes, olives, feta, parsley, oregano, smoked paprika, lemon juice, salt, and pepper.
– Step 2: Gently mix until evenly combined.
In a large bowl, take your cooked quinoa. Add in the chickpeas, halved cherry tomatoes, sliced olives, and crumbled feta. Don’t forget to add the chopped parsley, oregano, smoked paprika, lemon juice, salt, and pepper. This mix is where all the flavors come together. Use a spoon to gently combine everything until you see a beautiful medley of colors and textures.
Stuff and Bake Peppers
– Step 1: Spoon quinoa mixture into bell peppers.
– Step 2: Place stuffed peppers in baking dish and cover with foil.
– Step 3: Bake for 25 minutes, then remove foil and bake for an additional 15-20 minutes.
Now comes the fun part! Use a spoon to fill each bell pepper with the quinoa mixture. Push it down a bit to make sure they are full. Place the peppers upright in a baking dish. Cover them with foil to keep moisture in while they bake. Bake for 25 minutes. After that, remove the foil and bake for another 15 to 20 minutes. The peppers will get soft and a little charred, making them so tasty!
Tips & Tricks
Cooking Tips
– Rinse your quinoa well. This step removes any bitterness.
– Taste your mix before stuffing. Adjust salt and pepper as needed.
Presentation Tips
– Choose a colorful serving platter. This makes your dish pop.
– Garnish with extra parsley. A drizzle of olive oil adds a nice touch.
Serving Suggestions
– Serve the peppers warm. They taste best fresh from the oven.
– Pair them with a light side salad or some crusty bread. This balances the meal.
Variations
Different Types of Peppers
You can use many types of peppers for this dish. Try red, yellow, or green bell peppers. Each color adds a different taste and look. Mini bell peppers are also fun. They make great bite-sized snacks. Just remember, the flavor stays rich and tasty!
Ingredient Substitutions
You have options if you want to change things up. For a creamier taste, swap feta cheese for goat cheese. If you’re going vegan, you can skip the cheese entirely. Chickpeas are great, but you can also use lentils or black beans. These swaps keep the dish healthy and delicious.
Flavor Adjustments
Want to spice things up? Add cumin or chili powder for a kick. These spices give new flavors to the dish. You can also mix in more veggies like zucchini or spinach. They add extra nutrition and color. Don’t be afraid to get creative and make this dish your own!
Storage Info
Refrigeration
Store leftovers in an airtight container for up to 3 days. This keeps the flavors fresh. When you want to enjoy them again, just take them out and heat.
Freezing
You can freeze these stuffed peppers for up to 3 months. To freeze, wrap each pepper well in plastic wrap. This stops freezer burn. When you’re ready to eat, thaw in the fridge overnight. Reheat thoroughly before serving to enjoy their full flavor.
Reheating Tips
For the best results, reheat in the oven. Set your oven to 350°F (175°C) and bake until warm. This keeps the peppers tender and tasty. If you’re short on time, use the microwave as a quick alternative. Just heat them in short bursts, checking often to avoid overcooking. Enjoy your meal!
FAQs
Can I make Mediterranean Quinoa Stuffed Peppers in advance?
Yes, prepare them up to the baking step and refrigerate. This saves time when you’re busy. You can easily pop them in the oven later for a quick meal.
Are these stuffed peppers gluten-free?
Absolutely, this recipe is naturally gluten-free. You can enjoy these stuffed peppers without worry. Gluten-free meals can be just as tasty and satisfying.
How can I make this dish more filling?
Add more protein like cooked chicken or shrimp for a heartier meal. This boosts the nutrition and makes the dish more filling. You can also consider adding beans or nuts for extra texture.
What can I use instead of quinoa?
Brown rice or cauliflower rice can be used as alternatives. Both options work well and add their own unique flavors. Experiment with these substitutes to find your favorite!
This dish of Mediterranean quinoa stuffed peppers is full of flavor and nutrition. You learned about each ingredient, how to prepare it, and even some helpful tips. Remember, you can adjust ingredients to match your taste. Try different peppers or add other veggies for variety. Whether it’s for a cozy dinner or meal prep, these peppers will satisfy. Enjoy your cooking journey, and share this recipe with friends!

. To get the best texture, use day-old rice. Fresh rice has too much moisture. When you use day-old rice, it dries out and forms separate grains. This helps create that perfect fried rice texture. You can also spread fresh rice on a tray and chill it for an hour to dry before cooking. Prepare your ingredients ahead of time. Chop the chicken and vegetables before you start cooking. This makes cooking faster and easier. You can also use frozen mixed vegetables to save time. They cook quickly and add color to your dish. Don’t overcrowd the pan. If you add too much rice or chicken at once, it will steam instead of fry. This makes your fried rice soggy. Also, avoid cooking on too low of heat. High heat helps to sear the ingredients and gives that nice flavor. Lastly, don’t forget to taste your dish before serving! Adjust the salt and soy sauce as needed to enhance the flavors. {{image_4}} You can easily make fried rice without meat. Just swap the chicken with tofu or tempeh. Use the same amount, diced small. For a vegan twist, replace the eggs with silken tofu. This creates a soft texture that works well. You can also add more veggies, like bell peppers or zucchini. They add great flavor and color. If you want to change things up, try shrimp or beef. Cook them in the same way as the chicken. You can also use leftover cooked meats. Just chop them small and add them at the end. Don’t forget to add your favorite veggies. Broccoli, snap peas, or mushrooms will bring new tastes. If you like heat, add chili paste or sriracha to your dish. Just a spoonful will spice things up. You can also mix in fresh chilies when you sauté the garlic. If you want a milder heat, try crushed red pepper flakes. They add flavor without being too hot. Enjoy experimenting with these spicy options! To store leftover chicken fried rice, let it cool first. Place it in an airtight container. Make sure the lid fits tightly to keep air out. This helps it stay fresh. Store it in the fridge for up to three days. You can also place a piece of plastic wrap over the rice before sealing the container. This extra layer helps keep moisture in. If you want to keep it longer, freezing is a great option. Divide the chicken fried rice into smaller portions. Use freezer-safe bags or containers for this. Remove as much air as you can to prevent freezer burn. Label the bags with the date. Chicken fried rice can last in the freezer for up to three months. When you are ready to eat, just thaw it in the fridge overnight. To reheat chicken fried rice, use a skillet for the best taste. Heat a little oil in the pan over medium heat. Add the rice and stir it often. This helps it heat evenly. It should take about 5-7 minutes. You can also use a microwave if you are in a hurry. Place the rice in a microwave-safe bowl. Add a splash of water to keep it moist. Cover with a lid or wrap. Heat for 2-3 minutes, stopping to stir halfway. Enjoy your meal, and don't forget to check out the Full Recipe for more delicious tips! Yes, you can make fried rice without eggs. Just skip the eggs in the recipe. Use more veggies or tofu instead. This keeps the dish tasty and filling without the eggs. Jasmine rice is the best choice for fried rice. It's soft yet slightly sticky. Day-old rice works best because it’s drier. Fresh rice may get mushy when cooked. You can store chicken fried rice in the fridge for up to three days. Make sure to keep it in an airtight container. This helps keep it fresh and safe to eat. Yes, you can use cooked or leftover chicken. This saves time and adds flavor. Just chop it into bite-sized pieces before mixing it into your fried rice. You can add soy sauce, oyster sauce, or teriyaki sauce. Each sauce adds a unique taste. Try adding a splash of sesame oil for a nutty flavor. Adjust the amount to your liking for the best results. For the full recipe, check out the details above. In this post, we've explored the key ingredients and steps for Easy Chicken Fried Rice. I shared tips to enhance texture, save time, and avoid common mistakes. We discussed fun variations and how to store your dish effectively. Remember, this dish is simple and can easily fit your tastes. Customize it the way you like. With these tips, you can create a tasty meal while enjoying your cooking journey. Now, get started and make your own fried rice masterpiece!](https://joymealplan.com/wp-content/uploads/2025/06/b80d90ba-a0f5-4453-8c89-c3fa48509676-768x768.webp)
![- 1 lb large shrimp, peeled and deveined - 2 tablespoons Cajun seasoning - 2 tablespoons olive oil, divided - 8 small corn tortillas - 1 cup shredded cabbage (green or purple for color) - 1/2 cup carrots, finely grated - 1/4 cup fresh cilantro, chopped - 1/4 cup mayonnaise - 2 tablespoons fresh lime juice - Salt and pepper to taste - Lime wedges for serving What are some good protein options for tacos? You can use chicken or fish as great swaps. You can also try tofu for a plant-based option. Each brings a unique taste to the dish. Why use fresh ingredients? Fresh ingredients enhance flavor and provide better texture. They also pack more nutrients compared to processed ones. How can I change the spice level? Adjust the Cajun seasoning to suit your taste. More seasoning gives a bold flavor; less gives a milder taste. You can also add a pinch of cayenne for extra heat. For more on making these tacos, check the Full Recipe. To start, combine the shrimp with Cajun seasoning in a medium bowl. Use two tablespoons of seasoning and one tablespoon of olive oil. Toss the shrimp well. This ensures every piece is coated in flavor. Let the shrimp marinate for 15 minutes. This step is key. It allows the spices to soak in, making the shrimp taste amazing. While the shrimp marinates, it’s time for the lime slaw. In another bowl, mix shredded cabbage, grated carrots, chopped cilantro, mayonnaise, lime juice, salt, and pepper. Stir these ingredients until they blend well. Set this aside for a bit. Letting the slaw sit helps the flavors come together. For the best texture, use fresh cabbage and finely grate the carrots. Now, let’s cook the shrimp. Heat the remaining tablespoon of olive oil in a large skillet over medium-high heat. When the oil shimmers, add the marinated shrimp in a single layer. Cook for 2-3 minutes on each side. The shrimp should turn pink and opaque when done. This shows they are cooked through. At the same time, warm the corn tortillas in a separate dry skillet. Heat each tortilla for about 30 seconds on each side. You want them soft and easy to fold. This step makes a big difference in how the tacos feel when you eat them. To assemble the tacos, take a warm tortilla. Lay a few cooked shrimp on it. Then, add a generous spoonful of lime slaw on top. For an extra pop of flavor, sprinkle more cilantro. Present the tacos on a colorful platter. Arrange lime wedges around them for a bright finish. This makes for a beautiful taco setup that is sure to impress. For the full recipe, check out the details above. Enjoy your flavorful creation! To ensure your shrimp are not overcooked, cook them just until they turn pink. This usually takes about 2-3 minutes per side. Overcooked shrimp can become rubbery and tough. Always check for that bright pink color and an opaque center. Temperature control is key when pan-frying. Heat your skillet over medium-high heat, then add olive oil. Wait until the oil shimmers before adding shrimp. This helps them cook evenly and develop a nice sear. Pair your Cajun shrimp tacos with sides like black beans or rice. A fresh salsa or guacamole also adds great flavor. For drinks, consider serving cold beer or a refreshing margarita. These pair well and enhance the taco experience. For a fun twist, create a taco bar. Set out shrimp, lime slaw, and toppings. Let your guests build their own tacos. This makes for a lively meal, perfect for gatherings or family dinners. To make this dish gluten-free, use corn tortillas. They are naturally gluten-free and hold up well. Always check your Cajun seasoning to ensure it is gluten-free. For a vegan version, swap shrimp with grilled vegetables or tofu. Use a vegan mayo for the slaw. You can also add avocado for creaminess and extra flavor. This way, everyone can enjoy these tasty tacos. You can find the Full Recipe to guide you through each step. {{image_4}} To make your Cajun shrimp tacos even more exciting, you can add extra spices. Consider using smoked paprika or cayenne pepper for more heat. A dash of garlic powder or onion powder can also deepen the flavor. You can switch up the slaw, too. Instead of cabbage, try using kale or bok choy for a crunchy texture. You could even add diced apples for a sweet twist. A spoonful of pineapple could bring a tropical vibe to your slaw. Choosing the right tortilla can change your taco game. Corn tortillas are great, but flour tortillas bring a soft, chewy feel. You can even try a whole wheat tortilla for a healthier choice. For a fun twist, use lettuce wraps instead of tortillas. This option is low-carb and fresh. You might also explore taco shells made from sweet potatoes or even jicama for a unique experience. If you want to wow your guests, upscale your tacos for a party. Use large shrimp and serve them on warm taco stands. A colorful platter with garnishes makes for a stunning display. For gatherings, consider setting up a taco bar. Lay out all the toppings and let guests build their own tacos. This not only makes it fun but also allows everyone to customize their meal. To keep your Cajun shrimp tacos fresh, store each component separately. Place the shrimp in an airtight container. They will stay good for about two days in the fridge. For the lime slaw, use a different container. It also lasts up to two days. If you want to keep them longer, you can freeze the shrimp. Just make sure to use a freezer-safe bag. Squeeze out as much air as you can. The slaw, however, does not freeze well. It can become watery when thawed. When it's time to enjoy your leftovers, reheat the shrimp gently. The best method is on the stove. Heat a skillet over low heat. Add the shrimp and cook for a few minutes until warm. You can also use a microwave. Just be careful not to overcook it. For the tortillas, warm them in a dry skillet. This helps restore their texture. Heat each tortilla for about 30 seconds on each side. This way, they stay soft and ready to fold. Enjoy your tasty tacos again with that flavor explosion! How long to marinate shrimp for maximum flavor? I recommend marinating the shrimp for about 15 minutes. This time is perfect for the Cajun seasoning to soak in. If you have more time, you can go up to 30 minutes for a deeper flavor. Can I make the slaw ahead of time? Yes, you can make the slaw ahead of time. I suggest making it a few hours before serving. This way, the flavors blend well, and it saves time when you’re ready to eat. What can I use instead of mayonnaise in the slaw? If you want to skip mayonnaise, try Greek yogurt. It adds creaminess and a bit of tang. You can also use avocado for a richer flavor. How to adjust for different dietary needs? To make it gluten-free, use corn tortillas. If you want a vegan option, replace shrimp with tofu or jackfruit and use vegan mayo for the slaw. Can I grill the shrimp instead of sautéing? Yes, grilling shrimp adds a nice smoky flavor. Just make sure to skewer them to prevent slipping through the grill. Grill each side for about 2-3 minutes until they are pink. What’s the best way to keep tortillas warm while serving? Wrap the warm tortillas in a clean kitchen towel. This keeps them soft and warm for a longer time. You can also use a tortilla warmer if you have one. For the complete recipe, check out the [Full Recipe]. This blog post covers a delicious shrimp taco recipe. We explored flavorful ingredients and their benefits. You learned how to marinate shrimp and prepare tasty lime slaw. We also covered cooking techniques and tips for perfect tacos. Finally, we discussed storage, variations, and common questions. Shrimp tacos can be fun and easy. With fresh ingredients, you can impress your guests. Enjoy trying these tips and creating your version!](https://joymealplan.com/wp-content/uploads/2025/07/f189128f-a0bc-414f-80f3-5521d4a2c85e-768x768.webp)