
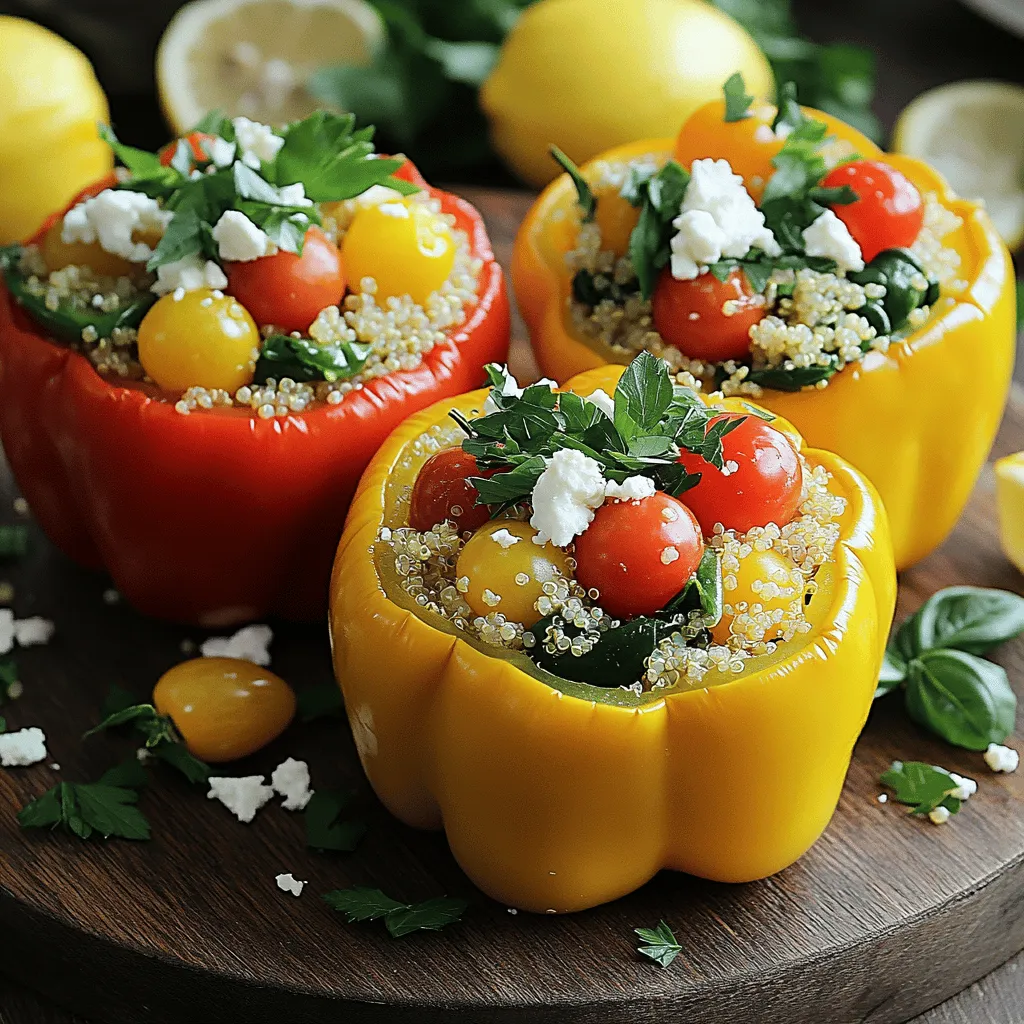
Lemon Herb Quinoa Stuffed Peppers Flavorful Delight

Are you searching for a dish that’s both healthy and bursting with flavor? Look no further than my Lemon Herb Quinoa Stuffed Peppers! This vibrant meal is packed with nutritious ingredients like quinoa, fresh herbs, and colorful bell peppers, making it a perfect choice for any occasion. In this article, I’ll guide you through simple steps to create this delicious delight. Let’s get cooking!
Ingredients
List of Ingredients
– 4 large bell peppers
– 1 cup quinoa
– 2 cups vegetable broth or water
– 1 cup cherry tomatoes
– 1 cup fresh spinach
– 1/4 cup fresh parsley
– 1/4 cup fresh basil
– 1/4 cup feta cheese (optional)
– 1 lemon (juice and zest)
– 2 cloves garlic
– 1 teaspoon extra virgin olive oil
– Salt and pepper
To make Lemon Herb Quinoa Stuffed Peppers, gather the following ingredients. Start with four large bell peppers. You can pick any color you like. Next, you need one cup of quinoa. Rinse it well before using. This keeps your dish light and fluffy.
You will also need two cups of vegetable broth or water for cooking the quinoa. For a burst of flavor, grab one cup of halved cherry tomatoes. Fresh spinach adds great texture, so use one cup of coarsely chopped leaves.
Herbs are key for this dish. Use a quarter cup each of finely chopped parsley and basil. For a creamy touch, add a quarter cup of crumbled feta cheese, but this is optional.
Don’t forget one lemon! You will need both its juice and zest. Two cloves of minced garlic enhance the taste. Finally, grab a teaspoon of extra virgin olive oil, along with salt and pepper to season.
These fresh ingredients create a delightful mix of flavors in each stuffed pepper. Each bite will offer a tasty experience, combining the zest of lemon, the warmth of herbs, and the heartiness of quinoa. Enjoy the process of preparing this meal—it’s as much fun as it is rewarding!
Step-by-Step Instructions
Preparing the Oven and Peppers
– Preheat your oven to 375°F (190°C).
– Take the bell peppers and slice the tops off. Remove the seeds inside. Place the peppers upright in a baking dish. This keeps them stable as they cook.
Cooking the Quinoa
– In a medium saucepan, mix the rinsed quinoa with vegetable broth.
– Bring this mixture to a boil. Once it boils, lower the heat. Cover it and let it simmer for about 15 minutes. The quinoa should be fluffy and all the broth absorbed.
Mixing the Filling
– In a large bowl, combine the cooked quinoa with cherry tomatoes, spinach, parsley, basil, lemon juice, lemon zest, and minced garlic.
– Stir until all ingredients mix well. Season to taste with salt and pepper.
Adding Feta Cheese
– If you like feta cheese, fold it gently into the quinoa mix. Make sure it’s spread evenly without breaking it too much.
Stuffing the Peppers
– Take each bell pepper and fill it with the quinoa mixture. Pack it in tightly. This helps the peppers keep their shape while baking.
Baking the Peppers
– Cover the baking dish with aluminum foil. This traps moisture while baking.
– Bake in the preheated oven for 25 minutes. After that, remove the foil and bake for another 10 minutes. The peppers should be soft and slightly caramelized.
Tips & Tricks
Perfecting the Quinoa
To make the best quinoa, start by rinsing it well. Rinsing removes the bitter coating called saponin. After rinsing, cook the quinoa in vegetable broth instead of water. This adds a rich flavor that makes the dish stand out.
Enhancing Flavor
You can boost the taste of your dish by adding fresh herbs. I suggest using parsley and basil for a fresh touch. You might also try oregano or thyme for a different flavor. Remember to season the quinoa mixture with salt and pepper. Taste as you go to get it just right!
Serving Suggestions
For a complete meal, pair your stuffed peppers with a green salad. A light vinaigrette will complement the flavors nicely. You can also serve them with a side of roasted veggies or a creamy yogurt dip. These sides enhance the meal and make it more filling.
Variations
Different Types of Peppers
You can use many types of peppers in this recipe. Large bell peppers are great, but mini peppers make fun appetizers. They are easy to eat and look pretty on a plate. You can also mix colors. Green, red, yellow, and orange peppers add beauty to your meal. The colors pop and make your dish more inviting.
Vegetarian and Vegan Options
If you want a dairy-free version, skip the feta cheese. The quinoa and veggies still taste great. You can add extra vegetables or legumes. Try black beans or corn for added texture. This keeps the meal filling and healthy. You can also add a splash of lime juice for extra zest.
Different Grains or Fillings
Quinoa is not your only choice. You can swap it for rice or couscous. Both options work well and can change the flavor. If you want more protein, include beans. Chickpeas or lentils are also tasty additions. They blend well with the herbs and spices. This gives you a hearty meal that everyone will enjoy.
Storage Info
Storing Leftovers
To keep your lemon herb quinoa stuffed peppers fresh, first let them cool. Place them in an airtight container. This way, they stay moist and tasty. Store the container in the refrigerator. These peppers last for about 3 to 4 days. If you want to keep them longer, freezing is a great option. Wrap each pepper in plastic wrap, then place them in a freezer bag. Remove as much air as possible. They can stay in the freezer for up to 3 months.
Reheating Instructions
When it’s time to enjoy your stuffed peppers again, reheating is simple. You can use the oven or the microwave. For the oven, preheat it to 350°F (175°C). Place the peppers on a baking dish. Cover them with foil to keep them moist. Heat for about 15 to 20 minutes. If you use the microwave, place one pepper on a plate and cover it with a damp paper towel. Heat for 2 to 3 minutes. This keeps the flavor and texture just right. Enjoy your meal as if it was freshly made!
FAQs
How long do stuffed peppers last in the fridge?
Stuffed peppers can last in the fridge for about 3 to 5 days. Store them in an airtight container. Make sure they cool completely before placing them in the fridge. This helps avoid moisture build-up, which can make them soggy.
Can I make stuffed peppers ahead of time?
Yes, you can make stuffed peppers ahead of time. Prepare them and store them unbaked in the fridge for up to 24 hours. When you’re ready to bake, just pop them in the oven. You may need to add a few extra minutes to the baking time since they will start cold.
What are some healthy sides for stuffed peppers?
Great sides for stuffed peppers include:
– A simple green salad
– Steamed broccoli or green beans
– A side of roasted sweet potatoes
These sides add color and nutrition to your meal and help balance flavors.
How do I know when the peppers are done baking?
Peppers are done when they are soft and slightly caramelized. You can test them by piercing with a fork. If it goes in easily, they are ready. The filling should also be hot throughout.
Can I customize the filling for stuffed peppers?
You can easily customize the filling! Consider adding:
– Black beans for protein
– Corn for sweetness
– Different veggies like zucchini or mushrooms
– Other grains like rice or farro
This lets you tailor the dish to your taste or dietary needs.
Stuffed bell peppers provide a tasty and healthy meal option. We explored the ingredients, preparation steps, and storage tips for this dish. You learned how to cook quinoa and mix it with fresh veggies and herbs. I shared helpful tips for adjusting flavors and suggested variations to keep it exciting.
Remember, you can make this dish fit your preferences while ensuring it stays delicious. Enjoy your cooking adventure with these stuffed peppers!

![- 2 cups cooked white or brown rice - 2 cups fresh broccoli florets, steamed until tender - 1 cup sharp cheddar cheese, shredded - 1 cup cream of mushroom soup - 1 cup milk - 1 teaspoon garlic powder - 1 teaspoon onion powder - Salt and freshly ground black pepper to taste - 1/2 cup breadcrumbs (for a crispy topping) - 2 tablespoons olive oil - Preheat oven to 350°F (175°C) - Combine rice and broccoli in a mixing bowl - Add soup, milk, spices, and cheese; mix thoroughly - Transfer to a greased baking dish and top with breadcrumbs and cheese - Cover with foil; bake for 25 minutes - Remove foil; bake for an additional 15-20 minutes Making Cheesy Broccoli Rice Casserole is simple and fun. You start with the main ingredients, mixing cooked rice with steamed broccoli. This gives you a great base. The cheddar cheese adds a rich, creamy taste. The cream of mushroom soup and milk make the mix smooth. Next, we add some seasoning. Garlic powder and onion powder give the dish a nice flavor. Salt and pepper allow you to adjust the taste just how you like it. For a crunchy topping, breadcrumbs mixed with olive oil work great. Once you have everything mixed, pour it into a greased baking dish. This keeps it from sticking. Spread it out evenly. Then comes the fun part—topping it with more cheese and breadcrumbs! Now, cover the dish with foil. This keeps the moisture in while it cooks. Bake it for 25 minutes, then remove the foil. Bake for another 15-20 minutes until the cheese is melted and the top is golden. You can find the complete recipe [Full Recipe] for more detailed steps if needed. Enjoy this tasty, warm casserole. It’s perfect for dinner or as a side dish! To boost the taste of your Cheesy Broccoli Rice Casserole, I recommend using homemade cream of mushroom soup. It adds freshness and depth that store-bought versions can't match. You can easily make it by sautéing mushrooms with butter and mixing in some cream. Another fun tip is to experiment with different cheeses. Try gouda or pepper jack for a unique twist. Each cheese brings its own flavor, making each bite exciting. To make your casserole look beautiful, garnish it with fresh parsley or chives. The green color brightens the dish and gives it a fresh taste. For an extra touch of flavor, drizzle some balsamic glaze over the top just before serving. This adds a sweet and tangy contrast that pairs well with cheesy goodness. Make sure your broccoli is steamed evenly. This ensures every piece is tender and not overcooked. If some pieces are hard, they won't blend well with the rice. After baking, let the casserole rest for about five minutes. This simple step helps it set and makes slicing easier. You will have perfect portions for serving! You can easily switch the main veggies in this dish. Swap broccoli for cauliflower or spinach. Both options taste great and add different flavors. You can also try brown rice or quinoa instead of white rice. This makes the meal healthier and adds more fiber. If you need a gluten-free option, use gluten-free breadcrumbs. This keeps the crispy topping but makes it safe for gluten-sensitive folks. For a vegan version, substitute cheese and milk with plant-based choices. Almond milk and vegan cheese work well here. Want to add more taste? Cooked chicken or turkey is a great protein boost. This makes the meal heartier. You can also sprinkle in spices like paprika or cayenne for some heat. These little changes make a big difference in flavor. {{image_4}} After enjoying your cheesy broccoli rice casserole, store any leftovers in an airtight container. This keeps the flavors fresh for up to 4 days. I recommend letting it cool down before sealing. This way, it won’t steam and get soggy. You can freeze the casserole before baking it. This method lets you enjoy it later without losing taste. Just wrap it well in plastic wrap or foil and store it in the freezer for up to 3 months. When you are ready to bake, thaw it in the fridge overnight. Adjust the baking time since it will be cold. To reheat, the oven is your best bet. It helps keep the texture nice and creamy. Just cover it with foil and heat at 350°F (175°C) until warmed through. You can also use the microwave for a quicker option. It’s great for busy days when you want a tasty meal fast. Yes, you can prepare the casserole and refrigerate or freeze it before baking. This makes it easy to have a warm meal ready when you need it. Just remember to let it thaw before baking if frozen. You can use homemade cream soup or a different canned soup option, like cream of chicken or celery. This gives you flexibility based on what you have at home. To lighten it up, use reduced-fat cheese. You can also substitute whole milk with low-fat or unsweetened almond milk. These changes still keep the dish creamy and tasty. Absolutely! It stores well and can be portioned for easy meal prepping. Just make sure to use airtight containers for freshness. Enjoy it throughout the week! - 2 cups cooked white or brown rice - 2 cups fresh broccoli florets, steamed until tender - 1 cup sharp cheddar cheese, shredded - 1 cup cream of mushroom soup (store-bought or homemade) - 1 cup milk - 1 teaspoon garlic powder - 1 teaspoon onion powder - Salt and freshly ground black pepper to taste - 1/2 cup breadcrumbs (for a crispy topping) - 2 tablespoons olive oil 1. Preheat your oven to 350°F (175°C). 2. Mix the cooked rice and steamed broccoli in a large bowl. 3. Add cream of mushroom soup, milk, garlic powder, onion powder, and half the cheese. Season with salt and pepper. Stir well. 4. Grease a 9x13 inch baking dish with olive oil. Transfer the mixture into the dish and spread evenly. 5. In a small bowl, mix breadcrumbs with olive oil. Sprinkle over the casserole. 6. Add the remaining cheese on top of the breadcrumbs. 7. Cover the dish with aluminum foil, shiny side down. Bake for 25 minutes. 8. Remove the foil and bake for another 15-20 minutes. Watch for bubbling cheese and golden breadcrumbs. 9. Let the casserole rest for 5 minutes before serving. - Serving Size: 1/6 of the casserole - Calories: Approximately 320 - Total Fat: 12g - Saturated Fat: 5g - Carbohydrates: 42g - Protein: 12g - Fiber: 3g - Sugars: 2g This blog showed you how to make a tasty Cheesy Broccoli Rice Casserole. We covered all the main ingredients, from rice and cheese to spices. You learned step-by-step how to mix and bake it perfectly. I also shared tips to enhance flavor and fun variations. Finally, you got key storage info and answers to common questions. Enjoy making this dish! It’s simple, delicious, and adaptable for everyone.](https://joymealplan.com/wp-content/uploads/2025/06/63660ef9-884f-40e9-9c69-6c7b156d354b-768x768.webp)

![To create a delicious Lemon Herb Grilled Salmon, you need fresh and simple ingredients. Here’s what you will gather: - 4 salmon fillets (approximately 6 ounces each) - 1/4 cup extra virgin olive oil - Zest from 1 large lemon - Juice of 2 fresh lemons - 3 cloves garlic, finely minced - 2 tablespoons fresh parsley, finely chopped - 2 tablespoons fresh dill, finely chopped - 1 tablespoon fresh thyme, finely chopped - Salt and freshly ground black pepper to taste - Lemon wedges, for garnishing These ingredients work together to bring out the bright and zesty flavor of the salmon. The fresh herbs add depth, while the lemon provides a refreshing kick. When you combine these elements, you create a dish that looks and tastes amazing. If you want to explore the complete process, check out the Full Recipe. To start, grab a medium bowl. Mix together: - 1/4 cup extra virgin olive oil - Zest from 1 large lemon - Juice from 2 fresh lemons - 3 cloves garlic, finely minced - 2 tablespoons fresh parsley, chopped - 2 tablespoons fresh dill, chopped - 1 tablespoon fresh thyme, chopped - Salt and pepper to taste Whisk all these ingredients together until they blend well. This mix will be your flavorful marinade. Now, take your salmon fillets. Place them in a resealable bag or shallow dish. Pour the marinade over the salmon. Make sure each piece is well coated. Seal the bag or cover the dish. Let it chill in the fridge for 30 minutes up to 2 hours. The longer it sits, the stronger the flavor will be. Preheat your grill to medium-high heat. If using a grill pan, set it to medium heat. Lightly coat the surface with olive oil to stop the fish from sticking. After marinating, remove the salmon from the bag. Let any extra marinade drip off. Discard the leftover marinade. Place the salmon skin-side down on the hot grill. Cook for about 5-6 minutes without touching it. Then, flip the salmon gently with a spatula. Grill for another 4-5 minutes. The fish should be opaque and flake easily with a fork. Once it’s done, let the salmon rest for a few minutes. This helps improve the flavor and texture. Serve the grilled salmon with fresh lemon wedges. Add a pop of citrus to enhance your dish. Enjoy your meal! For the complete recipe, check the [Full Recipe]. To grill salmon just right, aim for medium-high heat. This usually means around 375°F to 400°F. The salmon needs about 5-6 minutes on the first side. Flip it gently and grill for another 4-5 minutes. To check for doneness, use a fork. The fish should easily flake apart and look opaque. If it’s still shiny, it needs more time. For more flavors, try adding a pinch of smoked paprika or a dash of cayenne pepper. These spices can add a nice kick. Pair the salmon with sides like roasted veggies, quinoa, or a fresh salad. These dishes complement the salmon well and balance its rich taste. When plating the salmon, add a bright touch with fresh herbs. A sprinkle of parsley or dill makes it pop. Serve with lemon wedges for an extra zing. For drinks, a crisp white wine, like Sauvignon Blanc, pairs well. It enhances the meal and makes it feel special. For a non-alcoholic option, try sparkling water with lemon. It refreshes the palate and adds a lovely touch to your dinner. For the full recipe, check out the detailed steps above. {{image_4}} You can switch up the marinade to keep things fresh. Try using lime or orange juice instead of lemon. These fruits add a different twist to your salmon. You can also add spices like cayenne pepper for some heat. A touch of heat makes the dish more exciting. Grilling is great, but you have other choices too. Baking or broiling the salmon works well and keeps it moist. If it’s raining or too cold outside, use a stovetop grill pan. Just make sure it’s hot before adding the salmon for even cooking. You can make this dish fit your diet needs. For a gluten-free version, check that your spices are gluten-free. You can also skip dairy by using olive oil instead of butter. If you want to lower calories, use less oil in the marinade. These small changes keep the meal healthy while still tasting great. Try these variations to make lemon herb grilled salmon fit your taste and lifestyle. For the full recipe, check out the earlier sections! To keep your grilled salmon fresh, store it in the fridge. Place the salmon in an airtight container. This helps keep it from drying out. It should last for up to three days in the fridge. If you want to save it longer, freezing is a good option. Wrap the salmon tightly in plastic wrap, then put it in a freezer bag. You can freeze it for up to three months. Label the bag with the date so you know when to use it. When you reheat grilled salmon, you want to keep it moist. The best way is to use the oven. Preheat the oven to 275°F (135°C). Place the salmon on a baking sheet, cover it with foil, and heat for about 15 minutes. This method helps avoid drying out the fish. You can also use a microwave, but be careful. Heat it in short bursts of 30 seconds on low power. Check often to keep the flavor and texture. A splash of lemon juice can help refresh the taste. Grilling time depends on the thickness of the salmon. For fillets about 1 inch thick, grill for 5-6 minutes on one side. Flip and grill for another 4-5 minutes. Thicker fillets may need more time, so check for doneness. When the salmon is opaque and flakes easily, it's ready to eat. Yes, you can use frozen salmon. To cook it, thaw the salmon first. Place it in the fridge overnight or submerge it in cold water for about an hour. Once thawed, pat it dry and marinate as in the Full Recipe. This will help keep it moist while grilling. Lemon herb grilled salmon pairs well with fresh salads and veggies. Try serving it with: - Mixed green salad with a light vinaigrette - Steamed asparagus or green beans - Roasted potatoes seasoned with herbs - Quinoa or rice pilaf for a hearty side These dishes complement the fresh flavors of the salmon and make a complete meal. Grilling lemon herb salmon is simple and rewarding. You start with fresh salmon and a tasty marinade of olive oil, lemon, garlic, and herbs. Marinate for a short time to boost flavor. Grill it right and serve with sides for a complete meal. Experiment with different flavors and cooking methods to find your favorite. Always store leftovers properly to enjoy them later. With these tips, you’ll impress everyone at the table. Now, get ready to grill and enjoy this delicious dish!](https://joymealplan.com/wp-content/uploads/2025/06/94675a3f-7fd4-4f6d-bbd0-da6b916d26a4-768x768.webp)