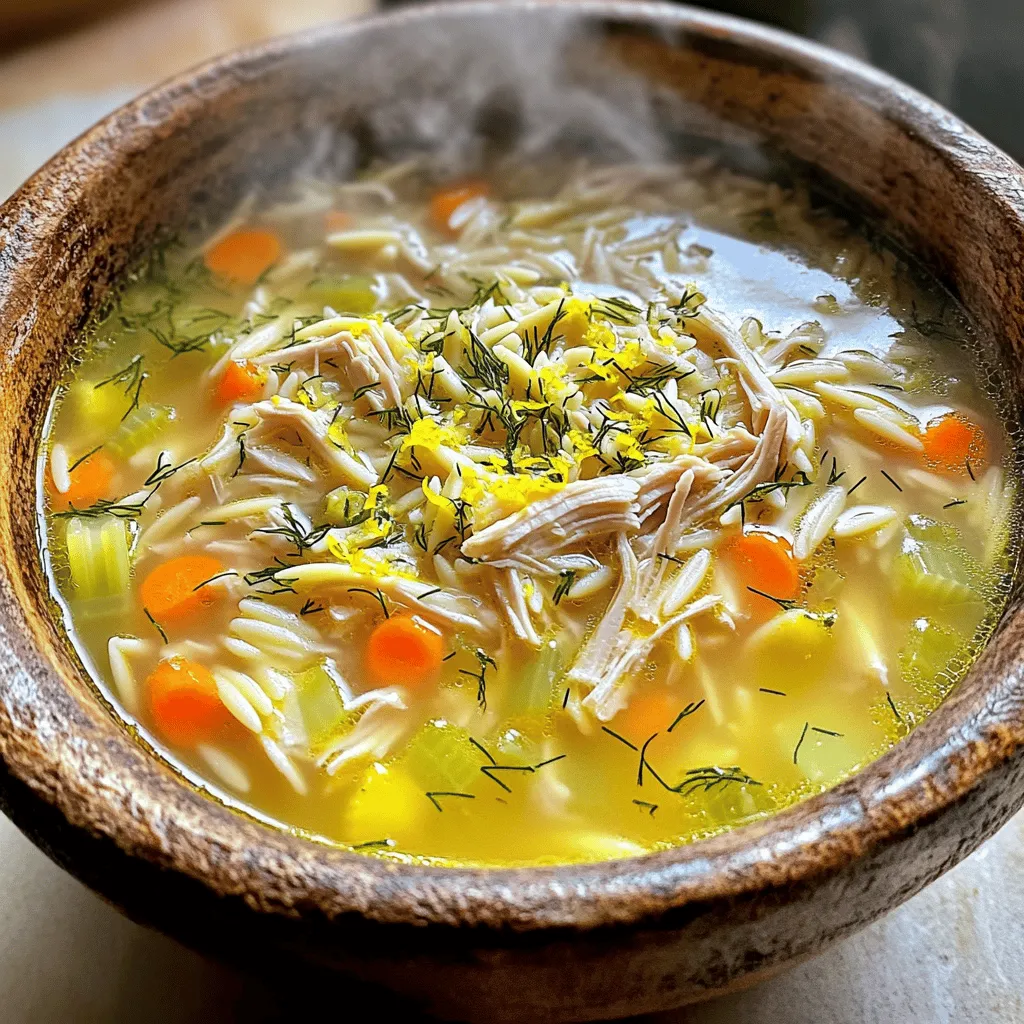
Greek Lemon Chicken Soup Flavorful and Nutritious Dish

If you’re craving a warm, cozy dish, then Greek Lemon Chicken Soup is for you! This delightful soup is packed with flavor and nutrients, making it a perfect meal for any day. I will guide you through every step, from choosing fresh ingredients to achieving that zesty taste. Whether you’re a kitchen pro or just starting, you’ll feel inspired to make this comforting dish. Let’s dive into this tasty adventure together!
Ingredients
Complete List of Ingredients
To make Greek lemon chicken soup, you need these simple ingredients:
– 1 tablespoon olive oil
– 1 medium onion, diced
– 2 garlic cloves, minced
– 3 medium carrots, sliced
– 2 celery stalks, sliced
– 1 pound boneless, skinless chicken breasts
– 6 cups chicken broth
– 1 cup orzo pasta (or rice)
– 1 teaspoon dried oregano
– Zest and juice of 1 lemon
– 2 large eggs
– Fresh dill or parsley, for garnish
– Salt and pepper to taste
Each ingredient plays a vital role in creating a tasty and hearty soup.
Fresh vs. Dried Ingredients
Using fresh ingredients can enhance the flavor of your soup. Fresh herbs, like dill or parsley, add a bright taste. Fresh garlic and onions also boost the soup’s aroma. Dried ingredients, like oregano, work well too. They are easy to store and still provide good flavor. If you use dried herbs, remember to adjust the amount. You might need less since dried herbs are stronger.
Substitutions and Alternatives
You can easily swap ingredients if needed. Here are some ideas:
– Use vegetable broth instead of chicken broth for a vegetarian option.
– Brown rice can replace orzo for a gluten-free choice.
– If you don’t have lemon, try lime juice for a different twist.
– For a creamier soup, mix in a splash of heavy cream or coconut milk.
These substitutions can help you make the soup work for your taste or diet. Enjoy experimenting!
Step-by-Step Instructions
Preparing the Aromatics
First, we start with aromatics. Heat 1 tablespoon of olive oil in a large pot over medium heat. Add 1 medium diced onion and sauté for 3-4 minutes. You want the onion to become soft and clear. Next, stir in 2 minced garlic cloves. Cook this for about 1 minute until you smell the garlic. It should not brown, just become fragrant.
Cooking the Chicken and Vegetables
Now, it’s time to add more flavors. Slice 3 medium carrots and 2 celery stalks, then add them to the pot. Sauté these for about 5 minutes. This makes them tender and tasty. Next, take 1 pound of boneless, skinless chicken breasts and place them in the pot. Pour in 6 cups of chicken broth. Increase the heat and bring it to a gentle simmer. Cook for 20-25 minutes. The chicken should be fully cooked and no longer pink.
When the chicken is done, carefully take it out and place it on a plate. Use two forks to shred the chicken into bite-sized pieces. This step adds texture to the soup.
Incorporating the Orzo and Egg Mixture
Return the shredded chicken to the pot. Stir in 1 cup of orzo pasta, 1 teaspoon of dried oregano, and the zest and juice of 1 lemon. Let this simmer for another 10-12 minutes. The orzo should be soft but still firm.
Next, we will add a creamy touch. In a small bowl, whisk 2 large eggs well. Slowly add a ladleful of hot soup to the eggs while whisking. This keeps the eggs from cooking too fast. Once mixed, pour the egg mixture back into the pot while stirring. This gives the soup a smooth and rich flavor.
Finally, taste the soup and add salt and pepper as needed. For serving, ladle the soup into bowls. Garnish with fresh dill or parsley for a bright finish. Enjoy!
Tips & Tricks
Achieving the Perfect Flavor
To get the best flavor in your Greek Lemon Chicken Soup, follow these simple tips:
– Use fresh lemon juice and zest. This adds brightness.
– Sauté the onion and garlic until soft. This builds a strong flavor base.
– Add the orzo or rice at the right time. It should cook until just tender.
– Taste and adjust salt and pepper before serving. This ensures balanced seasoning.
Common Mistakes to Avoid
Many home cooks make a few common errors. Here are some mistakes to watch for:
– Overcooking the chicken can make it dry. Cook it until it’s just done.
– Not tempering the eggs properly can lead to curdling. Always whisk in hot soup slowly.
– Forgetting to season the soup can make it bland. Season gradually as you cook.
Serving Suggestions
Serving your soup well can enhance the experience. Try these serving ideas:
– Use wide, shallow bowls for a rustic look.
– Garnish with fresh dill or parsley for color and flavor.
– Serve with crusty bread on the side for dipping.
– Pair with a simple salad for a full meal.
Variations
Gluten-Free Option
You can make this soup gluten-free easily. Simply swap the orzo pasta for gluten-free rice or a gluten-free pasta. Look for certified gluten-free products to avoid cross-contamination. The rest of the recipe stays the same. You still get a tasty dish without gluten.
Vegetarian Adaptation
To make a vegetarian version, skip the chicken. Use vegetable broth instead of chicken broth. Add chickpeas or white beans for protein. You can also add more vegetables like zucchini or spinach. This version is just as hearty and full of flavor.
Spicy Kick Additions
If you like heat, add some red pepper flakes or diced jalapeños. Stir them into the pot with the garlic to infuse the oil. You can also add a splash of hot sauce at the end for extra spice. This change gives the soup a fun twist!
Storage Info
Storing Leftovers
You can store Greek Lemon Chicken Soup in an airtight container. Let the soup cool down first. It will keep well in the fridge for up to three days. If you need more time, consider freezing it. Just remember, the longer it sits, the more it may lose its fresh taste.
Reheating Instructions
When you’re ready to enjoy your soup again, heat it gently. Use a pot on low to medium heat for the best results. Stir occasionally to warm it evenly. You can also use a microwave, but heat in short bursts. This prevents the soup from getting too hot or splattering.
Freezing Tips
If you want to freeze your soup, use freezer-safe containers. Leave some space at the top for expansion. Label each container with the date. The soup will taste best if used within three months. To thaw, move it to the fridge overnight. Then reheat it on the stove. This keeps the flavors bright and fresh.
FAQs
What is the best way to store Greek Lemon Chicken Soup?
To store Greek lemon chicken soup, let it cool first. Use an airtight container. This keeps the soup fresh for up to three days in the fridge. If you want to save it longer, freeze it. It can last up to three months in the freezer. Just make sure to label your container. When ready to eat, thaw it in the fridge overnight.
Can I use brown rice instead of orzo?
Yes, you can use brown rice instead of orzo. Brown rice adds a nutty flavor and extra fiber. Keep in mind that it takes longer to cook. You should add it to the soup earlier. Cook it for about 30-40 minutes until it’s tender. Adjust the broth amount if needed, as brown rice absorbs more liquid.
How can I make this soup creamier?
To make the soup creamier, add a splash of heavy cream or coconut milk. This will give it a rich texture. You can also blend a portion of the soup. Use an immersion blender for a smooth finish. Just remember to temper the eggs before adding them to keep it silky and smooth.
This blog post provided a clear guide on making Greek Lemon Chicken Soup. We covered the key ingredients, cooking steps, and useful tips for great flavor. You learned about variations and smart storage methods. Remember, fresh ingredients boost taste, while easy swaps can fit your needs. Use these steps for a delicious meal anyone will love. Enjoy your soup-making adventure and make it your own!
![To make easy chicken noodle soup, gather these simple ingredients: - 1 tablespoon olive oil - 1 medium onion, finely chopped - 2 carrots, peeled and sliced into thin rounds - 2 celery stalks, diced into small pieces - 3 cloves of garlic, minced - 1 pound boneless, skinless chicken breasts - 6 cups chicken broth (homemade or low-sodium) - 1 teaspoon dried thyme - 1 bay leaf - 8 ounces egg noodles - 1 cup frozen peas - Salt and freshly ground black pepper to taste - Fresh parsley, chopped (for garnish) These ingredients work together to create a warm, hearty dish. The chicken adds protein, while the veggies give great flavor. The egg noodles soak up the broth, making each bite comforting. I always choose low-sodium broth for control over salt. Using fresh parsley at the end makes the dish pop with color. For the full recipe, you can check out the detailed steps to bring this soup to life. Sautéing Aromatics Start by heating 1 tablespoon of olive oil in a large stockpot over medium heat. Once the oil is hot, add the finely chopped onion, sliced carrots, and diced celery. Sauté these for about 5-7 minutes. You want them to become tender and smell great. Next, add 3 cloves of minced garlic and sauté for another 1-2 minutes. Stir it constantly to avoid burning the garlic. Cooking the Chicken Now, it’s time for the star of the show: the chicken. Carefully place 1 pound of boneless, skinless chicken breasts into the pot. Pour in 6 cups of chicken broth, then add 1 teaspoon of dried thyme and 1 bay leaf. Bring this mixture to a boil. Once it’s boiling, reduce the heat to low. Let it simmer for about 15-20 minutes. The chicken should reach an internal temperature of 165°F (75°C). Shredding the Chicken After cooking, carefully remove the chicken from the pot using tongs or a slotted spoon. Shred the chicken into bite-sized pieces using two forks. Once shredded, return the chicken to the pot to soak up all the flavors. Adding Noodles and Peas Next, stir in 8 ounces of egg noodles and 1 cup of frozen peas. Cook the soup for an additional 7-10 minutes. The noodles should be al dente and tender, ready to enjoy. Seasoning the Soup Taste your soup! Season it with salt and freshly ground black pepper, adjusting to your liking. Don’t forget to remove the bay leaf before serving. Tips for Serving Serve the soup hot in bowls. For a nice touch, sprinkle some freshly chopped parsley on top. This adds color and a burst of flavor. Enjoy this comforting bowl of easy chicken noodle soup! For complete details, check out the Full Recipe. Choosing the Right Broth Use homemade broth for the best flavor. If you don’t have time, low-sodium store-bought broth works too. It keeps the soup light and lets other flavors shine through. How to Properly Shred Chicken After cooking the chicken, let it cool slightly. Use two forks to pull the chicken apart. This keeps it moist and tender. You can also use your hands if you prefer. Ensuring Perfect Noodles Cook the noodles separately if you want them to stay firm. Overcooked noodles can turn mushy in the soup. If you add them straight to the pot, just keep an eye on the cooking time. Adding Fresh Herbs and Spices Fresh herbs like parsley or thyme brighten the soup. You can also add a squeeze of lemon juice for a touch of zest. Experiment with flavors to find your perfect mix. Substituting Ingredients Feel free to swap out chicken for turkey or use veggie broth for a vegetarian version. You can also add other veggies like spinach or corn for extra nutrition. Slow Cooker/Instant Pot Options For a slow cooker, add all the ingredients and cook on low for 6-8 hours. In an Instant Pot, cook on high pressure for 15 minutes, then shred the chicken. Both methods make great soup with less effort. For the complete recipe, check out the [Full Recipe]. {{image_4}} - Switching to Whole Wheat Noodles Whole wheat noodles add more fiber. They make the soup heartier. Plus, they keep you full longer. - Using Low-Sodium Ingredients Low-sodium chicken broth helps control salt intake. It is great for those watching their sodium levels. You still keep all the flavor without the extra salt. - Adding Spinach or Kale Spinach or kale boosts nutrition. They add vitamins and minerals. Toss them in just before serving for a fresh taste. - Mexican Chicken Noodle Soup Add cumin and lime juice for a twist. Include black beans and corn for extra texture. This gives your soup a bright, zesty flavor. - Creamy Chicken Noodle Soup Stir in some heavy cream or coconut milk. This makes the soup rich and smooth. It feels like a warm hug in a bowl. - Spicy Chicken Noodle Soup Use red pepper flakes or jalapeños to spice things up. This adds a kick that warms you from the inside. Perfect for chilly days or when you need a little heat. For detailed steps on how to make your soup, check the Full Recipe. Store your easy chicken noodle soup in an airtight container. This keeps it fresh and tasty. Let the soup cool down before sealing it. You can keep it in the fridge for up to four days. Just remember to reheat it well before serving. If you notice any off smell or change in color, it’s best to discard it. To freeze your soup, use freezer-safe containers. Leave some space at the top, as the soup will expand. It can last up to three months in the freezer. When you’re ready to eat it, let it thaw overnight in the fridge. Reheat the soup on the stove over low heat. Stir it often to keep it warm and to avoid burning. You can also use a microwave. Just heat it in short bursts and stir in between. This keeps the soup delicious and helps it warm evenly. For the best taste, add fresh herbs or a squeeze of lemon after reheating. For the full recipe, visit the link provided. Can I use rotisserie chicken? Yes, rotisserie chicken works great! It saves time and adds rich flavor. Just shred it and add it to your soup near the end of cooking. How do I make chicken noodle soup thicker? To thicken your soup, try adding more noodles or use a cornstarch slurry. Mix equal parts cornstarch and cold water, then stir it in while the soup simmers. Can I substitute egg noodles with another type? Absolutely! You can use any pasta you like. Just adjust the cooking time based on the type of pasta you choose. Is chicken noodle soup healthy? Yes, chicken noodle soup is healthy. It offers protein from the chicken and nutrients from the veggies. Plus, it can soothe a cold! What are the calories in easy chicken noodle soup? A serving has about 250-300 calories, depending on your ingredients. It’s a light meal that fills you up. What to serve with chicken noodle soup? I love pairing it with crusty bread or a fresh salad. Both add texture and flavor to your meal. How long does it take to make chicken noodle soup? It takes about 40 minutes from start to finish. This includes prep time and cooking time, so it’s quick and easy. Can I double the recipe? Yes, you can double the recipe! Just make sure your pot is big enough. Adjust cooking time if needed, but it should stay about the same. For the full recipe, check out the detailed instructions above! This blog post covered how to make a tasty chicken noodle soup. I shared the ingredients you need, step-by-step instructions, and useful tips. Plus, you learned about healthy and flavorful variations and storage options. Remember, chicken noodle soup can be easy and fun to make. With a few tweaks, you can personalize it to fit your taste. Enjoy making this comforting dish for yourself and others!](https://joymealplan.com/wp-content/uploads/2025/06/a8abc01f-2283-4b1e-aacb-1aa29c0460c5-768x768.webp)


![- 1 block firm tofu - 1/4 cup cornstarch - 2 tablespoons vegetable oil - 1 cup cooked brown rice - 1 cup broccoli florets - 1 cup snap peas - 1 medium carrot, julienned - 1 red bell pepper, sliced into thin strips - 1/4 cup teriyaki sauce - 1 tablespoon sesame seeds - 2 green onions, sliced thinly - Optional: lime wedges for serving This recipe for crispy teriyaki tofu bowls highlights delicious flavors and fresh veggies. You start with firm tofu because it holds its shape well when cooked. Make sure to press and drain it thoroughly before cooking. This step removes extra moisture and helps achieve that perfect crunch. Next, you coat the tofu cubes in cornstarch. This coating is key for creating a crispy exterior. The cornstarch absorbs moisture and forms a crunchy crust when you sauté the tofu. For the veggies, I love using broccoli, snap peas, carrots, and red bell pepper. These not only add color but also provide a mix of textures and flavors. They pair wonderfully with the savory teriyaki sauce. Speaking of the sauce, you can use store-bought teriyaki sauce for ease or make your own at home. Either way, the sauce adds a sweet and salty kick to the dish. Adding sesame seeds and sliced green onions on top gives the bowls a nice finish. If you want a bit of zing, serve lime wedges on the side. For the full recipe, refer to the earlier section. Enjoy making these tasty crispy teriyaki tofu bowls! Start by pressing the tofu. This step removes extra moisture. Slice the tofu into bite-sized cubes. I like to use a sharp knife for clean cuts. Next, coat the tofu. Sprinkle cornstarch over the cubes in a bowl. Toss the tofu gently until each piece is coated. This coating helps achieve a crispy texture when cooking. Heat vegetable oil in a large non-stick skillet. Use medium-high heat for the perfect crisp. Once hot, add the tofu. Cook for about 8-10 minutes. Turn the cubes to cook evenly. Watch for a golden-brown color on all sides. This is how you get that crunch that everyone loves. While the tofu cooks, steam the broccoli and snap peas. Use a steamer basket over boiling water. Steam for about 3-4 minutes. You want the veggies to be bright and tender-crisp. This keeps their color and nutrients intact. For added crunch, prepare other vegetables like carrots and bell peppers as you go. Once the tofu is crispy, lower the heat. Pour teriyaki sauce over the tofu. Stir gently to coat each piece. Allow it to cook for 1-2 more minutes. This gives the sauce time to thicken and stick to the tofu. The flavor will be rich and delicious. In each serving bowl, start with a layer of brown rice. Top it with the crispy teriyaki tofu. Add the steamed broccoli, snap peas, julienned carrots, and red bell pepper slices. The colors will make your dish pop. Finally, garnish with sesame seeds and sliced green onions. This adds a nice touch and extra flavor. For an optional zest, serve lime wedges on the side. For the full recipe, check out [Full Recipe]. To make your tofu crispy, drying is key. After pressing the tofu, pat it dry well. This helps remove extra moisture. Less moisture means a better fry and a crispier texture. The oil temperature matters too. Heat your vegetable oil over medium-high heat. If the oil is too cool, the tofu will soak up oil instead of becoming crispy. A good test is to drop a small piece of tofu in the oil. If it sizzles, you're ready to fry. To make your teriyaki tofu even tastier, consider adding spices or marinades. You can sprinkle garlic powder or ginger for extra flavor. Marinating the tofu for at least 15 minutes can also deepen its taste. Choosing the right teriyaki sauce is crucial. You can buy sauce or make your own for a fresher taste. A sauce with a balance of sweet and salty works best. Look for options with natural ingredients for a healthier dish. When serving your teriyaki tofu, pair it with sides that complement the dish. Steamed rice works great, but you can also try quinoa for a nutty flavor. Adding a side salad can enhance the meal's freshness. You can customize your bowl to fit your tastes. Try swapping out vegetables based on what you like. Add more crunch with sliced radishes or extra color with yellow bell peppers. Enjoy the freedom to make it your own! For the full recipe, refer to the section above. {{image_4}} If you want to switch up the protein, tofu isn’t your only choice. You can use chicken or tempeh instead. Both options add great flavor and texture. For chicken, choose boneless, skinless thighs for juiciness. Cut them into bite-sized pieces and cook them like the tofu. Tempeh, made from fermented soybeans, offers a nutty taste. Simply slice it and coat it in cornstarch, just like the tofu. You can make your bowls even better with seasonal veggies. In spring, try asparagus or green beans. In summer, add zucchini or bell peppers. Fall offers butternut squash or Brussels sprouts. You can also mix in leafy greens like spinach or kale. They add nutrients and a vibrant color. Mushrooms are another great choice. They bring umami and a meaty bite. While store-bought teriyaki sauce is tasty, making your own is fun and easy. Combine soy sauce, honey, garlic, and ginger for a fresh taste. Simmer it until it thickens. Other sauces can work too. Try a spicy chili sauce for heat or a peanut sauce for creaminess. Each option brings its own unique flavor to your crispy tofu bowls. For the full recipe, check out the Crispy Teriyaki Tofu Bowls. To store your leftover crispy teriyaki tofu bowls, place them in an airtight container. Make sure the bowl cools down to room temperature before sealing it. This helps keep the tofu crispy and the veggies fresh. You can store these bowls in the fridge for up to three days. If you plan to enjoy them later, it's best to keep the sauce separate until you're ready to eat. For the best texture when reheating, use an oven or a skillet. Preheat your oven to 350°F (175°C) and place the tofu bowls on a baking sheet. Heat for about 10 to 15 minutes until warmed through. If using a skillet, add a splash of water to prevent sticking and cover it. This method helps retain the crispiness of the tofu and keeps the veggies tender. You can freeze these tofu bowls for later use. To do this, let the bowls cool completely. Place the tofu and veggies in a freezer-safe container. Avoid freezing the rice, as it can become mushy. These bowls can last up to three months in the freezer. When you're ready to enjoy them, thaw in the fridge overnight and reheat using the methods above. To make tofu crispy, follow these key steps: - Press the tofu: Remove as much water as you can. - Cube the tofu: Cut it into even, bite-sized pieces. - Dry the tofu: Pat each piece with a paper towel. - Coat with cornstarch: Sprinkle cornstarch evenly over the tofu. - Heat the oil: Use a hot skillet with vegetable oil. - Cook until golden: Sauté the tofu for about 8-10 minutes, turning it often. These steps help create a crispy texture that you will love. Yes, you can easily make this dish vegan. Here are some simple swaps: - Use plant-based teriyaki sauce: Check labels for non-vegan ingredients. - Add more vegetables: Use any fresh veggies you enjoy. - Try different grains: Substitute brown rice with quinoa or farro. These changes keep the dish tasty and vegan-friendly. Store your leftover teriyaki tofu bowls with these tips: - Use airtight containers: Keep air out to maintain freshness. - Refrigerate: Store in the fridge for up to 3 days. - Separate the sauce: Keep the sauce separate to avoid sogginess. These steps help retain taste and texture. Serve your teriyaki bowls in an eye-catching way. Here are some ideas: - Layer the ingredients: Start with a base of rice, then tofu, and veggies on top. - Garnish well: Add sesame seeds and green onions for flair. - Use lime wedges: Serve with lime on the side for a zesty kick. These tips make your dish look appealing and delicious. You can find the full recipe [here](#). This guide covered making teriyaki tofu bowls from start to finish. You learned about key ingredients and how to prepare everything for a tasty meal. We shared tips for crispy tofu and ideas for variations. Remember, adjust the dish to fit your taste and enjoy it fresh or stored for later. This meal is healthy, fun, and easy to customize. Dive in and have fun cooking!](https://joymealplan.com/wp-content/uploads/2025/06/6f569fa0-62f8-4b7a-b8f1-a73cdf9881a3-768x768.webp)