
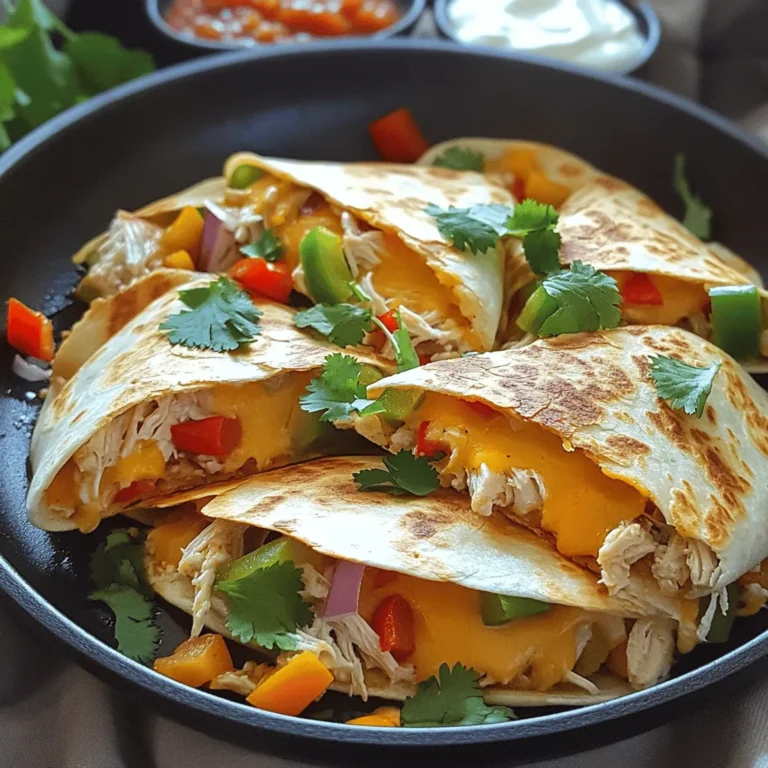
Air Fryer Buffalo Chicken Taquitos Simple and Tasty

If you crave a quick, tasty snack, you will love these Air Fryer Buffalo Chicken Taquitos! They combine spicy buffalo chicken and creamy cheese, all wrapped in a warm tortilla. This simple recipe is perfect for game day or a weeknight treat. In just a few steps, you can have a crunchy, flavorful bite that satisfies your taste buds. Let’s dive into these delicious taquitos and discover how easy they are to make!
Ingredients
Main Ingredients for Air Fryer Buffalo Chicken Taquitos
– 2 cups cooked chicken, shredded
– ½ cup buffalo sauce (adjust to taste)
– 1 cup shredded cheese (cheddar or pepper jack)
– 6 small flour tortillas
– ¼ cup cream cheese, softened
Seasonings and Optional Ingredients
– ½ teaspoon garlic powder
– ½ teaspoon onion powder
– 1 tablespoon olive oil
– Salt and pepper to taste
– Optional: chopped green onions and cilantro for garnish
In this recipe for Air Fryer Buffalo Chicken Taquitos, the key ingredients shine through. You need shredded chicken, which is the base of your filling. Use cooked chicken for easy prep. Next, buffalo sauce adds that spicy kick. Adjust the amount based on your taste.
Shredded cheese brings creaminess and great flavor. Cheddar or pepper jack works well here. The flour tortillas are your wrap, and they hold the taquitos together. Cream cheese adds richness and helps bind the filling.
For seasonings, garlic and onion powder enhance the taste. Olive oil gives a nice golden color and crispness when air frying. Salt and pepper are essential for flavor balance.
You can garnish with chopped green onions or cilantro for a fresh touch. These little extras can brighten your dish and make it look appealing. With these ingredients ready, you are set for a tasty cooking adventure!
Step-by-Step Instructions
Preparing the Buffalo Chicken Mixture
To start, grab a mixing bowl. In this bowl, add 2 cups of shredded chicken. Pour in ½ cup of buffalo sauce. Adjust the sauce to your taste for spice. Then, mix in ¼ cup of cream cheese and 1 cup of shredded cheese. I prefer cheddar or pepper jack for this recipe. Next, sprinkle in ½ teaspoon of garlic powder and ½ teaspoon of onion powder. Add salt and pepper to taste. Combine all the ingredients well. This ensures every bite is full of flavor.
Preparing the Tortillas
Now, let’s make the tortillas easy to roll. Warm them in the microwave for about 20 seconds. This softens them up nicely. Once they are warm, lay a tortilla flat on a clean surface. Scoop about 2-3 tablespoons of the buffalo chicken mixture into the center. Roll the tortilla tightly. Be sure to fold the sides inward to keep the filling inside. Repeat this for all six tortillas to make your taquitos.
Air Frying the Taquitos
Next, it’s time to cook! Preheat your air fryer to 375°F (190°C) for about 5 minutes. This helps the taquitos cook evenly. While it heats, brush or spray the outside of each taquito with olive oil. This will give them a nice, crispy finish. Once preheated, place the taquitos seam-side down in the air fryer basket. Do not overcrowd the basket; this may require cooking in batches.
Air fry the taquitos for 8-10 minutes. Flip them halfway through. This helps them become crispy on all sides. When they turn golden brown, carefully take them out. Let them cool for a few minutes before you serve. Enjoy your delicious Air Fryer Buffalo Chicken Taquitos!
Tips & Tricks
Ensuring Perfectly Crispy Taquitos
To get crispy taquitos, I use olive oil in two ways. First, I brush or spray the outside of each taquito. This helps them get a nice golden color. Second, I recommend cooking them in batches. If your air fryer is small, don’t crowd the taquitos. This way, each one gets the heat it needs to crisp up perfectly.
Flavor Enhancements
You can boost the flavor by adding more spices. A pinch of paprika or cayenne can make them zing. You can also add extra fillings. Try black beans, corn, or diced peppers for a fun twist. Mix and match to find your favorite combination.
Serving Suggestions
For dipping, ranch dressing pairs well with these taquitos. You can also serve extra buffalo sauce on the side for a spicy kick. As for sides, consider a fresh salad or some crunchy veggies. They balance the richness of the taquitos and add a nice crunch.

Variations
Different Types of Chicken
You can use different types of chicken in your taquitos. Rotisserie chicken works great. It saves time and adds flavor. Just shred it up and mix it in. If you don’t have rotisserie chicken, you can also use cooked chicken breasts or thighs. You can even use turkey if you have it on hand.
Spicing It Up
Adjusting the buffalo sauce can change the heat level. If you want more spice, add more buffalo sauce. You can also mix in jalapeños for an extra kick. For those who like it hot, a splash of hot sauce does wonders. Start small and taste as you go to find your perfect level.
Cheese Options
Cheese is key for creamy taquitos. Cheddar and pepper jack are popular options. However, you can try mozzarella for a milder taste. Cream cheese can also add a rich texture. Mixing different types of cheese can create unique flavors. Experiment to find the combination you love best.
Storage Info
Storing Leftover Taquitos
To keep your taquitos fresh, store them properly.
– Refrigeration guidelines: Place leftover taquitos in an airtight container. They will stay good in the fridge for about 3 to 4 days. Make sure they cool down to room temperature before sealing them up. This helps prevent sogginess.
– Freezing for long-term storage: For longer storage, freeze the taquitos. Wrap each taquito in plastic wrap, then place them in a freezer bag. They can last up to 2 months in the freezer. To enjoy later, just thaw them in the fridge overnight before reheating.
Reheating Suggestions
When it’s time to enjoy your taquitos again, reheating is key.
– Best methods for reheating taquitos: The air fryer is the best choice for reheating. Preheat it to 375°F (190°C). Place the taquitos in the basket and heat them for about 5 to 7 minutes. This keeps them crispy and warm.
– Maintaining crispiness when reheating: To keep your taquitos crispy, avoid using the microwave. If you do use a microwave, heat them for a short time. Use a paper towel under them to absorb moisture. This will help keep them crunchy.
FAQs
How long does it take to cook Air Fryer Buffalo Chicken Taquitos?
It takes about 25 minutes to make these taquitos. You spend 15 minutes prepping the ingredients. Then, the cooking in the air fryer takes about 8 to 10 minutes. Preheating the air fryer takes an extra 5 minutes.
Can I make these taquitos ahead of time?
Yes, you can make these taquitos ahead. Prepare the filling and roll them up. Store the rolled taquitos in the fridge for up to 24 hours. When ready to cook, just pop them in the air fryer. This saves time for busy days or parties.
What can I serve with Air Fryer Buffalo Chicken Taquitos?
These taquitos pair well with many sides and dips. Here are some great options:
– Ranch dressing for dipping
– Blue cheese dressing for a classic touch
– Celery sticks to balance the spice
– Carrot sticks for crunch
– Guacamole for a creamy addition
These sides enhance the meal and add flavors. Enjoy experimenting with your favorite combinations!
Air Fryer Buffalo Chicken Taquitos are simple and fun to make. You mix chicken, buffalo sauce, and cheese, then roll them in tortillas. Air fry to get them crispy and golden. Remember, you can switch up the ingredients based on your taste. Store leftovers in the fridge or freezer and reheat easily. These taquitos are great for parties or quick meals. Enjoy them with dips and sides for a tasty treat. Don’t hesitate to customize your recipe. Happy cooking!


![- 1 cup fresh spinach, roughly chopped - 1 cup canned or jarred artichoke hearts, drained and diced - 1 cup cream cheese, softened - ½ cup sour cream - ½ cup mayonnaise - 1 cup shredded mozzarella cheese - ½ cup grated Parmesan cheese, divided - 2 cloves garlic, minced - ½ teaspoon onion powder - ½ teaspoon red pepper flakes (optional) - Salt and freshly cracked black pepper to taste I love gathering my ingredients before I start cooking. It makes the process smooth and fun. For this creamy spinach and artichoke dip, I use fresh spinach and canned artichokes. The fresh spinach adds a nice crunch. The artichokes bring a unique flavor that pairs perfectly with the creaminess of the cheeses. You want your cream cheese soft, so set it out ahead of time. The sour cream and mayonnaise keep the dip smooth and rich. I use mozzarella for its stretchy texture and Parmesan for a sharp bite. Don’t forget the garlic! It adds a lovely aroma and depth. The onion powder gives a subtle sweetness. If you like a little heat, add red pepper flakes. Finally, season with salt and freshly cracked black pepper to taste. These ingredients come together to create a delightful dish that everyone will love. Check out the Full Recipe for complete steps to bring this dip to life! - Preheat the oven to 350°F (175°C). This step is key for even cooking. - In a large bowl, blend cream cheese, sour cream, and mayonnaise until smooth. Use a hand mixer or spatula to get a creamy texture. - Next, fold in the chopped spinach, diced artichokes, minced garlic, and both cheeses. Use a gentle hand to keep the mix fluffy. - Transfer the mixture to a greased baking dish. Make sure it spreads evenly for nice cooking. - Sprinkle the remaining Parmesan cheese on top. This will give it a golden crust. - Bake for 25-30 minutes until it is golden and bubbly. Keep an eye on it so it doesn’t burn. Following these steps will help you create a creamy spinach and artichoke dip that is sure to impress. For the complete recipe, check out the [Full Recipe]. - Use full-fat cream cheese and sour cream. This makes the dip rich and smooth. - Add a splash of heavy cream for extra richness. This enhances the creamy texture. - Substitute Greek yogurt for sour cream and mayo. This keeps the dip creamy with less fat. - Use low-fat cheese options. This helps cut calories while still keeping flavor. These tips can help you tailor the dip to your liking. Try them out for a new twist! If you want the full recipe, check out the link. {{image_4}} You can give your dip a fun twist. First, try adding cooked bacon or sausage. This addition makes the dip heartier and adds a nice smoky flavor. Another option is to spice things up. Chopped jalapeños or a splash of hot sauce can bring some heat. This adds a kick that many guests will love. Feel free to mix up your greens. You can replace spinach with kale or Swiss chard. Both greens taste great and add a different texture. For cheese lovers, try experimenting with different types of cheese. Feta adds a tangy flavor, while cheddar gives a sharp taste. These swaps can change the dip's flavor profile entirely, making it uniquely yours. For the complete recipe, check the Full Recipe. Store any leftovers in an airtight container for up to 3 days. Make sure to let the dip cool before sealing it. This helps keep the dip fresh and tasty for your next snack. When you want to enjoy it again, simply reheat it in the oven or microwave. If you have more dip than you can eat, freeze it! Place the dip in a freezer-safe container for up to 2 months. To enjoy it later, just thaw it in the refrigerator overnight. Before baking, stir it well and add a little bit of cream if it looks dry. This way, you'll have a delicious dip ready to bake whenever you want. Check the [Full Recipe] for more details on how to prepare this tasty treat! You can prepare the dip and store it in the refrigerator before baking. This makes it easy to serve later. Just mix all the ingredients and put them in a dish. Cover the dish tightly with plastic wrap or a lid. When you are ready, bake it straight from the fridge. Yes, you can enjoy it cold as a spread too. This dip tastes great on crackers or bread. Just let it chill in the fridge until you are ready to serve. Cold or hot, it’s delicious! This dip pairs well with many snacks. It’s great with tortilla chips for a crunchy bite. You can also use sliced baguette for a softer touch. Fresh vegetable sticks add a nice crunch and color. Try carrots, celery, or bell peppers for a healthy option. This blog post explored a delicious spinach and artichoke dip. We covered all the key ingredients, simple steps, and tips for making it your own. You learned how to make it creamier and healthier, plus fun variations to try. In the end, this dip is perfect for sharing at any gathering. It’s easy, tasty, and can suit any flavor choice. Enjoy making it your way!](https://joymealplan.com/wp-content/uploads/2025/05/215b829f-066f-42c4-87e7-302b3fd8aa81-768x768.webp)
