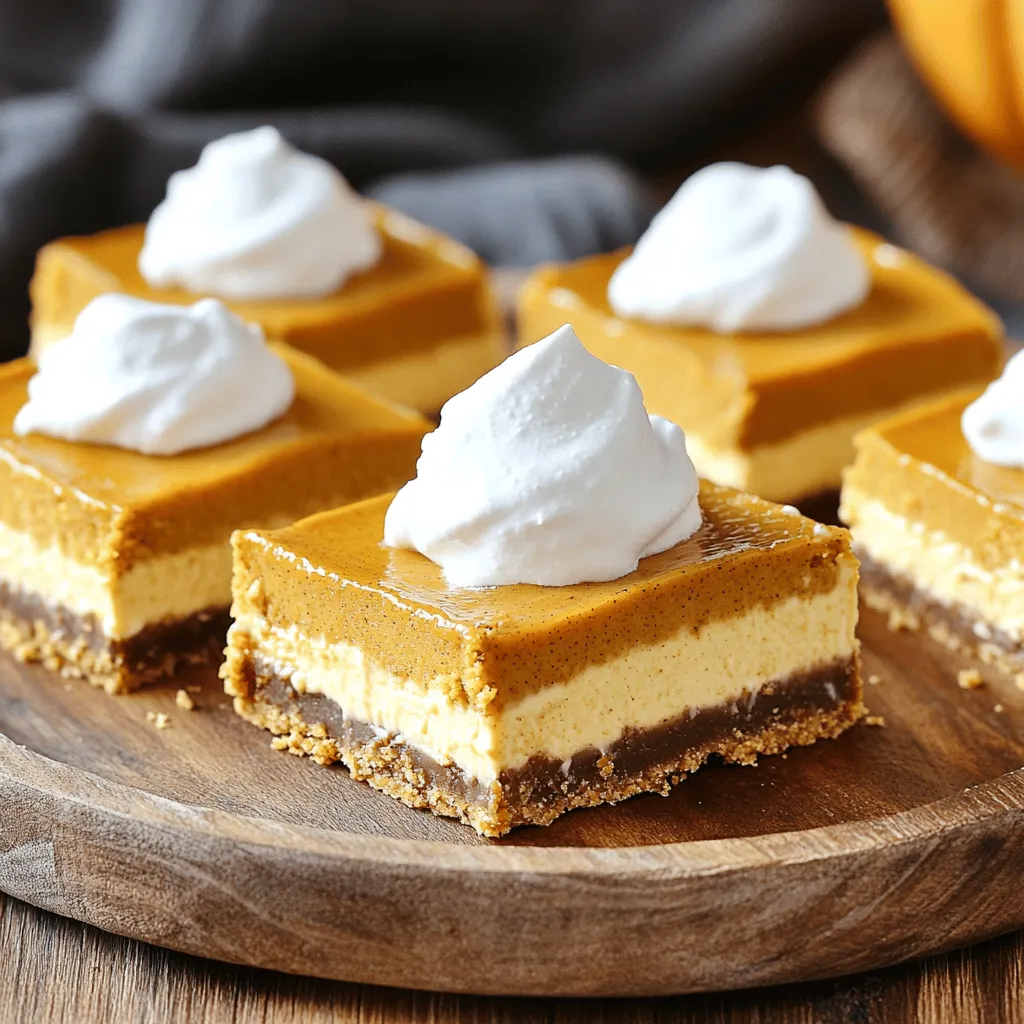
Pumpkin Pie Cheesecake Bars Delightful Fall Treat

Fall is here, and what better way to celebrate than with Pumpkin Pie Cheesecake Bars? These bars mix the creamy smoothness of cheesecake with the warm flavors of pumpkin pie. You’ll wow your family and friends with this easy, delicious dessert! In this post, I’ll guide you through the simple steps to make these tasty treats. Get ready for the perfect fall dessert that everyone will love!
Ingredients
Main Ingredients for Pumpkin Pie Cheesecake Bars
To make these tasty pumpkin pie cheesecake bars, you’ll need:
– 1 ½ cups graham cracker crumbs
– ½ cup unsalted butter, melted
– 1 tablespoon granulated sugar
– 1 teaspoon ground cinnamon
– 16 oz cream cheese, softened to room temperature
– ¾ cup granulated sugar
– 2 large eggs
– 1 cup canned pumpkin puree
– 1 teaspoon vanilla extract
– 1 teaspoon ground nutmeg
– 1 teaspoon ground ginger
– ¼ teaspoon salt
These ingredients create a creamy filling and a crunchy base. The pumpkin and spices bring a warm, fall flavor.
Optional Toppings
You can add some fun toppings to your cheesecake bars. Here are a few ideas:
– Whipped cream
– Chopped nuts, like pecans or walnuts
– A sprinkle of cinnamon or nutmeg
– Caramel sauce
These toppings can make your bars look festive and taste even better.
Equipment Needed
To prepare these bars, you’ll need some basic kitchen tools:
– 8×8 inch baking pan
– Parchment paper
– Medium mixing bowl
– Large mixing bowl
– Electric mixer
– Spatula
Having the right equipment makes the process smooth. Each tool helps you mix, bake, and serve with ease.
Step-by-Step Instructions
Prepping the Crust
Start by preheating your oven to 350°F (175°C). Grab an 8×8 inch baking pan. Line it with parchment paper, leaving some paper hanging over the sides. This helps you lift the bars out later.
In a medium bowl, mix together 1 ½ cups of graham cracker crumbs, ½ cup of melted butter, 1 tablespoon of sugar, and 1 teaspoon of ground cinnamon. Stir these ingredients until the crumbs are well combined.
Next, press this crumb mixture firmly into the bottom of your baking pan. Make sure it’s even and solid. Bake the crust for 8-10 minutes until it turns a light golden color. Once done, take it out and let it cool completely.
Making the Cheesecake Filling
Now, in a large mixing bowl, use an electric mixer to beat 16 oz of softened cream cheese until it’s smooth. Gradually add ¾ cup of sugar, mixing until fluffy.
Add 2 large eggs to the cream cheese mixture, one at a time. Make sure to blend well after each egg. Gently fold in 1 cup of canned pumpkin puree, 1 teaspoon of vanilla extract, 1 teaspoon of ground nutmeg, 1 teaspoon of ground ginger, and ¼ teaspoon of salt. Mix until everything is well combined.
Baking and Cooling Process
Carefully pour the pumpkin cheesecake mixture over the cooled crust. Use a spatula to spread it evenly. Bake in your preheated oven for 30-35 minutes. The center should be set but still jiggle a bit when you shake the pan gently.
After baking, turn off the oven and crack the door open. Let the cheesecake bars cool in the oven for about 1 hour. This step helps prevent cracks on the surface. Once cooled, move the pan to the refrigerator. Chill for at least 4 hours, or overnight for better flavor.
When you’re ready to serve, lift the bars out using the parchment paper. Cut them into squares. You can add whipped cream on top if you like!
Tips & Tricks
How to Get a Perfect Crust
To make a great crust, mix graham cracker crumbs with melted butter. Add sugar and cinnamon for extra flavor. Press the mixture firmly into the pan. Bake it until golden brown, about 8-10 minutes. Let it cool completely before adding the filling. This helps the crust stay firm.
Avoiding Cracks in Your Cheesecake Bars
Cracks can ruin the look of your cheesecake bars. To prevent this, bake them at a lower temperature. Start with a hot oven, but lower the heat after a few minutes. Once done, let the bars cool in the oven with the door slightly open. This slows the cooling process and reduces cracks.
Best Practices for Chilling
Chilling is key for great cheesecake bars. After baking, let them cool on the counter for an hour. Then, place them in the fridge for at least 4 hours. For the best flavor, let them chill overnight. This waiting time makes the bars creamy and delicious.
Variations
Swapping Different Flavorings
You can change the flavor to fit your taste. Instead of pumpkin puree, try sweet potato. It gives a nice twist. You can also play with spices. Use more cinnamon or add clove for warmth. For a chocolate kick, add cocoa powder to the crust. This will add a rich taste.
Gluten-Free Options
If you need gluten-free bars, use gluten-free graham crackers. They work just as well as regular ones. Make sure to check the labels to ensure they are truly gluten-free. You can also swap the butter for coconut oil. This keeps the bars moist and tasty.
Vegan Adaptations
To make this recipe vegan, replace cream cheese with a vegan alternative. Look for brands made from nuts or soy. Use flax eggs instead of regular eggs. Mix 1 tablespoon of flaxseed meal with 2.5 tablespoons of water for each egg. For the crust, make sure your graham crackers are vegan. This way, everyone can enjoy these delicious treats!
Storage Info
Proper Storage Methods
To keep your pumpkin pie cheesecake bars fresh, store them in the fridge. Use an airtight container or cover them tightly with plastic wrap. This method prevents moisture loss and keeps flavors intact.
How Long Can They Last?
When stored properly, these bars can last up to 5 days in the fridge. If you want to enjoy them longer, consider freezing. Just remember to check for any signs of spoilage before serving.
Best Way to Freeze
To freeze your cheesecake bars, first, let them cool completely. Cut them into squares and wrap each piece tightly in plastic wrap. Place the wrapped bars in a freezer-safe bag or container. They can stay frozen for up to 3 months. When you’re ready to eat, thaw them in the fridge overnight. Enjoy your delightful treat!
FAQs
Can I use fresh pumpkin instead of canned?
Yes, you can use fresh pumpkin. Start by roasting a pumpkin until soft. Scoop out the flesh and blend it until smooth. This gives a fresher taste, but it may have more moisture. If you use fresh pumpkin, drain any excess liquid before adding it to your mixture.
What can I substitute for cream cheese?
If you need a substitute for cream cheese, try using ricotta cheese or Greek yogurt. Both offer a creamy texture. You can also use vegan cream cheese for a dairy-free option. Just keep in mind that the flavor may change a bit.
How do I know when the bars are done baking?
To check if the bars are done, look for a slight jiggle in the center. The edges should be set, and the surface should not look wet. A toothpick inserted into the center should come out mostly clean. Remember, they will continue to set as they cool.
Can these bars be made ahead of time?
Absolutely! These bars taste great when made ahead. You can bake them a day or two in advance. Just cover them well and store them in the fridge. Chilling helps the flavors meld together and makes them even better!
You’ve learned how to make Pumpkin Pie Cheesecake Bars from scratch. I covered the key ingredients, equipment needed, and step-by-step instructions. I shared tips to avoid cracks and provided variations to fit your diet. You can also store these bars properly to keep them fresh. These tasty treats are easy to make and perfect for sharing. Enjoy making them for your next gathering or just for fun!
. Enjoy mixing these ingredients for an easy and delicious treat! Start by placing the softened cream cheese and cookie butter into a mixing bowl. Use an electric mixer to beat them together on medium speed. You want the mixture to be smooth and creamy. This base creates a rich and tasty dip. Next, add the pumpkin puree to the bowl. Blend everything together on low speed. This helps to combine the flavors well. You should see a uniform texture. Gradually sift in the powdered sugar. Add it in small amounts to avoid lumps. Mix after each addition until fully incorporated. This step ensures your dip is just sweet enough without being overpowering. Now, stir in the vanilla extract, ground cinnamon, nutmeg, ginger powder, and a pinch of salt. Mixing these ingredients together makes the dip fragrant and flavorful. Keep blending until everything is well combined. Taste your dip. If you want it sweeter or spicier, adjust it to your liking. You can add a bit more powdered sugar or spices. Blend again until mixed well. Finally, scoop the dip into a serving bowl. Cover it with plastic wrap. Place it in the fridge for at least 30 minutes. Chilling enhances the flavors and makes it even better. For the full recipe, check out the details provided earlier. Softened cream cheese is key. It makes mixing easy and helps avoid lumps. If your cream cheese is cold, it won’t blend well. Leave it out for about 30 minutes before you start. When you mix, use an electric mixer on medium speed. This helps create a smooth and creamy dip. To prevent lumps, combine the cream cheese and cookie butter first. Mix until the texture is silky. Then, add the pumpkin puree slowly. Mixing on low speed at this stage helps keep the dip smooth. You might want to tweak the sweetness. If you like it sweeter, add more powdered sugar. Remember to mix well each time you add sugar. Taste as you go! Spices can also be adjusted. If you love cinnamon, add a bit more. For a spicy kick, try adding more ginger. Personalizing the flavors makes the dip your own. Serving bowl choice matters. Use a fall-themed bowl to match the season. It makes your dip look festive. For a fun twist, try a bowl with patterns or colors that pop. When arranging dippers, think about color and texture. Place ginger snaps on one side and apple slices on the other. This contrast creates a beautiful display. For a touch of elegance, use the back of a spoon to swirl the dip. This simple detail makes the dip look gourmet. For the complete recipe, check out the Full Recipe. {{image_4}} You can make Cookie Butter Pumpkin Dip even more exciting with different flavors. Adding extra spices can really enhance the taste. Try a dash of allspice or cloves for a warm kick. If you want a sweeter note, a bit of brown sugar will do the trick. You can also add a splash of maple syrup for a rich flavor. Seasonal flavors can change the game too. Consider mixing in some finely chopped cranberries or pecans for texture. These add a nice crunch and a burst of flavor. You can also fold in some caramel sauce for a sweet twist. Each of these suggestions creates a unique dip that is fun to explore. When it comes to dipping, the options are endless! For a healthy twist, try fresh vegetable sticks like carrots or celery. These add a nice crunch and balance the sweet dip. You can also use rice cakes for a low-calorie choice. For sweet pairings, think about using pretzels or graham crackers. Their saltiness pairs well with the dip’s sweetness. You might even enjoy chocolate-covered strawberries for a fun treat. Mixing sweet and savory dippers creates a fun tasting experience. If you have dietary needs, there are great options! For gluten-free dippers, use apple slices or gluten-free cookies. These are tasty and safe for everyone. You can also swap in gluten-free graham crackers for a sweet treat. For a vegan version, use dairy-free cream cheese. Many brands offer great options that taste just as good. You can also use coconut whipped cream instead of regular cream cheese. These swaps keep the dip creamy and delicious, while fitting various diets. For the full recipe, check out the Cookie Butter Pumpkin Dip recipe to create your own delightful version! To store your leftover Cookie Butter Pumpkin Dip, place it in an airtight container. This keeps it fresh and prevents it from absorbing other fridge smells. Use a glass or plastic container with a tight lid for the best results. Make sure to let the dip cool to room temperature before sealing it. This helps avoid condensation inside the container. If you want to save some dip for later, freezing works well. First, scoop the dip into a freezer-safe container. Leave some space at the top, as the dip may expand when frozen. Seal it tightly and label it with the date. To thaw, move it to the fridge for several hours or overnight before you serve it again. Stir well after thawing to restore the smooth texture. In the fridge, your dip can last about four to five days. Look for any changes in color or smell as signs of spoilage. If it has a watery layer on top or smells off, it's best to toss it. Enjoy this dip while it’s fresh for the best taste! Yes, you can make this dip ahead of time. Just prepare the dip and place it in a bowl. Cover it tightly with plastic wrap or a lid. Store it in the fridge for up to two days. This allows the flavors to blend well. It also makes your party prep easier. Just remember to give it a good stir before serving. If you need a substitute for cookie butter, try sunflower seed butter or almond butter. They add a nutty flavor. For a sweet touch, mix in some brown sugar or maple syrup. These options are great for those with nut allergies. Each choice will give the dip a unique twist! You can serve the dip warm if you prefer. To heat it, place the dip in a microwave-safe bowl. Heat it in short bursts, stirring in between. This helps keep the texture smooth. Warm dip pairs well with dippers like pretzels or warm bread. The best dippers include: - Ginger snaps - Apple slices - Graham crackers - Soft pretzels - Carrot sticks These options bring a nice mix of flavors and textures. You can even try cookies or biscotti for a fun twist! This dip is perfect for parties! It serves about 6 to 8 people. You can easily double the recipe for larger gatherings. Guests love the creamy texture and sweet flavor. Arrange the dip with a variety of dippers for a colorful spread. This will please any crowd! For the full recipe, check out the earlier sections. This dip brings great flavors and fun for everyone. By mixing pumpkin, cookie butter, and spices, you create a delicious treat. Remember to chill for the best taste. Get creative with dippers and toppings to impress your guests. Explore variations and alternatives based on your needs. With easy storage tips, you can enjoy this dip later. Now, you're ready to delight friends and family at any gathering!](https://joymealplan.com/wp-content/uploads/2025/07/ca44b838-8d60-4193-b164-21c1eb441ebf-768x768.webp)