
One-Pot Spinach Tortellini Soup Quick and Easy Recipe
Looking for a quick, tasty meal? Try my One-Pot Spinach Tortellini Soup! This easy recipe combines fresh spinach and cheesy tortellini in just one pot. You’ll enjoy rich flavors and simple steps. Plus, clean-up is a breeze! Whether you’re short on time or want a cozy dish, this soup hits the spot. Let’s dive into the ingredients and make cooking fun!
Ingredients
Essential Ingredients for One-Pot Spinach Tortellini Soup
To make this soup, you need some key ingredients:
– 1 tablespoon olive oil
– 1 small onion, finely diced
– 2 garlic cloves, minced
– 4 cups vegetable broth
– 1 cup heavy cream (or coconut milk for a lighter choice)
– 9 ounces fresh cheese tortellini
– 2 cups fresh spinach, rinsed and chopped
– 1 teaspoon Italian seasoning
– Salt and freshly ground black pepper, to taste
– Grated Parmesan cheese for garnish (optional)
These ingredients blend well to create a creamy, rich soup that’s full of flavor. The tortellini adds a nice texture, while spinach gives a fresh taste.
Optional Ingredients and Substitutions
You can change a few things if you like. For a bit more flavor, try adding:
– Carrots, diced small
– Celery, finely chopped
– Fresh herbs like basil or parsley
If you want to keep it lighter, swap heavy cream with coconut milk. Also, feel free to use frozen tortellini if fresh is not available.
Best Tools and Equipment Needed
You don’t need many tools for this recipe. Here’s what you should have:
– A large pot for cooking
– A wooden spoon for stirring
– A sharp knife for chopping
– A cutting board for prep
With these tools, you can easily whip up this tasty soup. They help make the cooking process smooth and enjoyable.
Step-by-Step Instructions
Preparing the Base of the Soup
Start by heating 1 tablespoon of olive oil in a large pot over medium heat. Once the oil is warm, add 1 small onion, finely diced. Sauté the onion for about 3-4 minutes. You want the onion to be soft and clear. Next, add 2 minced garlic cloves to the pot. Cook the garlic for 30 seconds. Stir it well so it does not burn. The garlic should smell great.
Now, carefully pour in 4 cups of vegetable broth. Turn up the heat to bring it to a gentle boil. Once it boils, reduce the heat a bit. Stir in 1 cup of heavy cream. Let the mixture simmer for 5 minutes. Stir it from time to time to keep it from sticking.
Cooking the Tortellini
After the soup has simmered, it’s time for the tortellini. Add 9 ounces of fresh cheese tortellini to the pot. Follow the package instructions for cooking time, which is usually about 5-7 minutes. You want the tortellini to be al dente, or firm to the bite.
Finishing Touches and Serving Suggestions
Once the tortellini is tender, gently fold in 2 cups of fresh spinach. Sprinkle in 1 teaspoon of Italian seasoning. Cook for an additional 2-3 minutes. This will let the spinach wilt down nicely. Taste the soup and add salt and freshly ground black pepper to your liking.
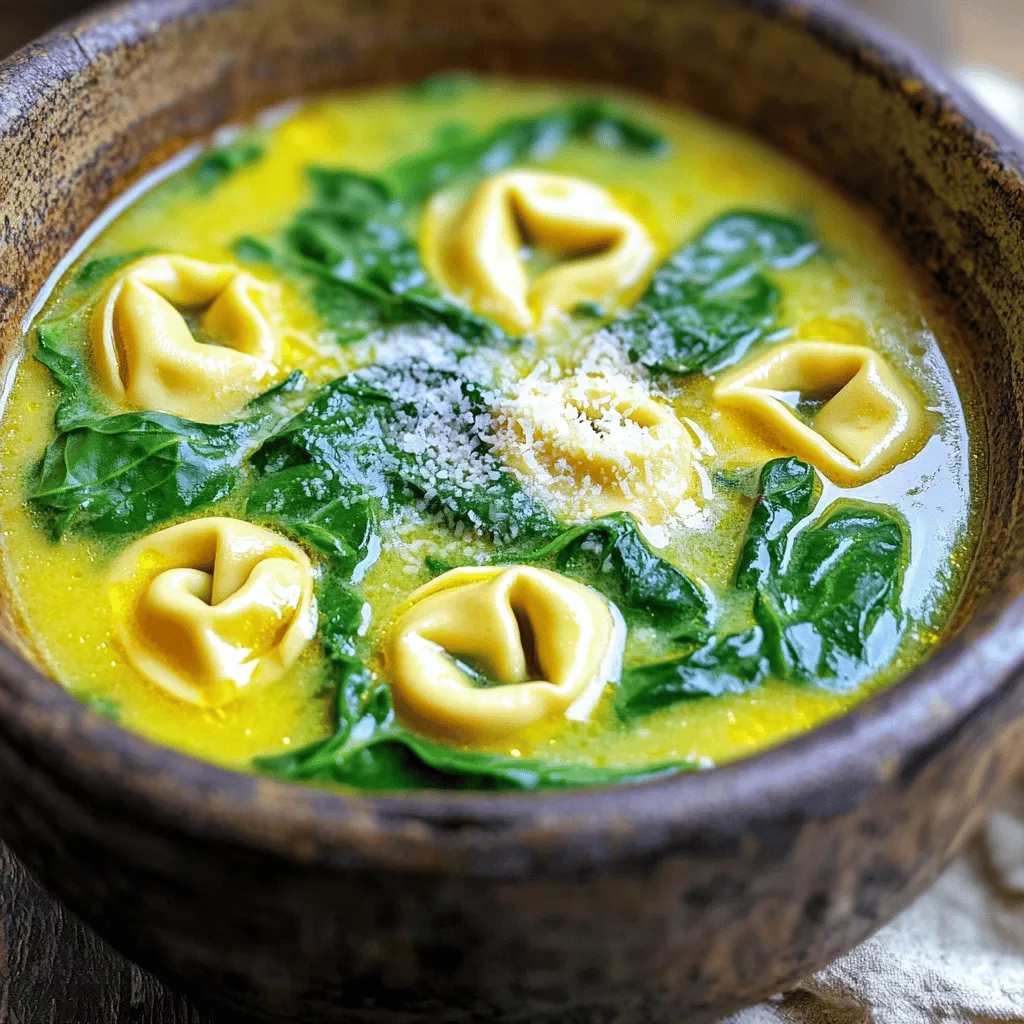
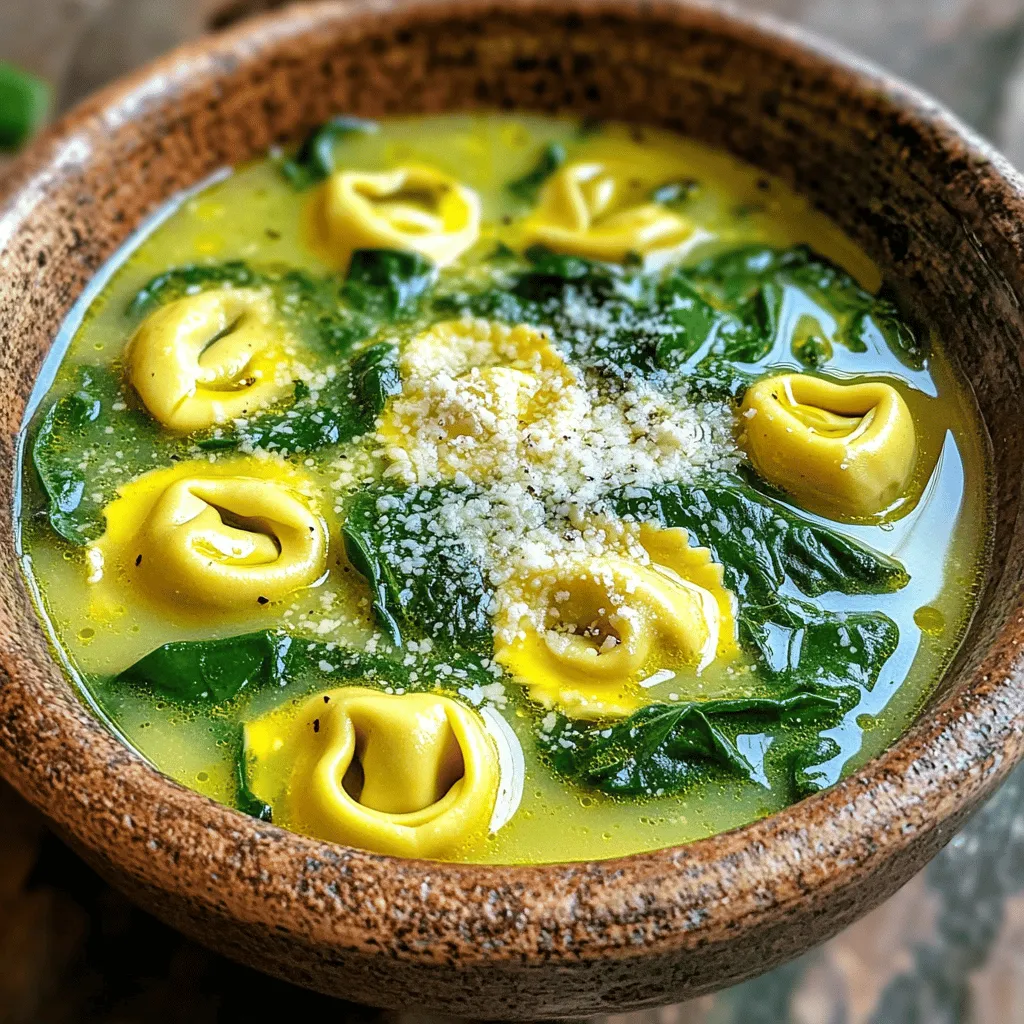
Now, it’s time to serve! Ladle the soup into large bowls. If you like, sprinkle grated Parmesan cheese on top for extra flavor. For an elegant finish, drizzle a little olive oil on top. A sprig of fresh basil or parsley adds a lovely touch too. Enjoy your warm and comforting soup!
Tips & Tricks
How to Enhance Flavor
To boost flavor in your One-Pot Spinach Tortellini Soup, use fresh herbs. Add basil or parsley right before serving. They bring a fresh taste. You can also try a squeeze of lemon juice. This will brighten the soup. If you like heat, add red pepper flakes. Just a pinch can make a big difference.
Common Mistakes to Avoid
One common mistake is overcooking the tortellini. Follow the package time closely. If you cook them too long, they can become mushy. Another mistake is not tasting as you cook. Always taste your soup before serving. Adjust the salt and pepper to your liking. Lastly, don’t add spinach too early. It cooks quickly and should be added last. This keeps it vibrant and fresh.
Perfecting the Texture
For the best texture, start with sautéing the onion until soft. This builds a good base. When adding the cream, stir often to keep it smooth. If you want a thicker soup, let it simmer longer. You can also blend a portion of the soup for a creamy feel. Just remember to leave some tortellini and spinach chunks for a nice bite!
Variations
Adding Protein: Chicken or Sausage Options
You can boost your One-Pot Spinach Tortellini Soup by adding protein like chicken or sausage. For chicken, use cooked, shredded pieces. Add them when you mix in the tortellini. If you prefer sausage, slice it and brown it first in the pot. This adds great flavor. Both options make the soup heartier and more filling.
Vegetarian and Dairy-Free Adaptations
To keep this soup vegetarian or dairy-free, swap out the heavy cream for coconut milk. This change keeps it creamy while being lighter. You can also use vegetable broth instead of chicken broth. For added flavor, include more spices or herbs. Nutritional yeast can replace Parmesan cheese for a cheesy taste without dairy.
Spice it Up: Adding Heat
If you like spice, add red pepper flakes while cooking. Start with a pinch and adjust to your taste. You can also use a dash of hot sauce in each bowl before serving. This adds a nice kick to the creamy soup. Experiment with fresh jalapeños for a fresh heat.
Storage Info
Proper Storage Techniques
To keep your One-Pot Spinach Tortellini Soup fresh, store it in an airtight container. Let the soup cool down before sealing it. Place it in the fridge if you plan to eat it within three days. Make sure to label the container with the date.
Reheating Instructions
When ready to enjoy leftovers, pour the soup into a pot. Heat it on medium-low heat. Stir often to prevent burning. You can also use a microwave. Place the soup in a microwave-safe bowl. Heat it in short bursts, stirring in between. This helps it heat evenly.
Freezing the Soup: Best Practices
If you want to freeze the soup, do it right after cooking. Use a freezer-safe container. Leave some space at the top, as liquids expand when frozen. The soup can last up to three months in the freezer. To thaw, move it to the fridge overnight before reheating.
FAQs
How long does One-Pot Spinach Tortellini Soup last?
One-Pot Spinach Tortellini Soup can last in the fridge for about 3-4 days. Store it in an airtight container. If you want to keep it longer, you can freeze it. When frozen, it can last up to 3 months. Just remember to let it cool before you freeze it.
Can I use frozen tortellini for this recipe?
Yes, you can use frozen tortellini in this soup. Just add the frozen tortellini directly to the pot during cooking. It may take a little longer to cook, about 8-10 minutes. Always check the package for the right cooking time.
Is this soup suitable for meal prep?
Absolutely! This soup is great for meal prep. You can make a big batch and store it for the week. Just remember to keep the soup and any toppings separate until you serve it. This way, everything stays fresh and tasty.
What can I serve with One-Pot Spinach Tortellini Soup?
This soup pairs well with crusty bread or a fresh salad. You can also serve it with garlic bread for a tasty twist. For a fun touch, add a sprinkle of crushed red pepper for some heat. Enjoy your meal!
One-Pot Spinach Tortellini Soup is simple to make and packed with flavor. We covered essential ingredients, cooking steps, and tips to avoid mistakes. You can enhance it with protein or spice for extra taste. Proper storage ensures your soup stays fresh for later. Keep these ideas in mind as you create your own delicious version. Cooking should be fun and rewarding, so enjoy every bowl!


. To start, you need to whisk the eggs. Take a medium bowl and crack in 4 large eggs. Add 1/2 cup of milk. Whisk them together until they are smooth. Then, season this mixture with a little salt and freshly cracked pepper. This adds flavor to your eggs. Next, we need to cook the vegetables. Heat 2 tablespoons of olive oil in a large non-stick skillet over medium heat. Once the oil is hot, add 1 small yellow onion and 1 small red bell pepper, both finely diced. Sauté them for about 4-5 minutes. You want them tender and fragrant. Now comes the fun part. Add in 1/2 cup of black beans that you’ve rinsed and drained. Sprinkle in 1 teaspoon of ground cumin for a warm flavor. Stir everything together and cook for another 2-3 minutes. This warms the beans and brings the flavors together. Then, it’s time to cook the eggs. Pour the whisked egg mixture into the skillet. Gently stir them as they begin to set. Cook for about 3-4 minutes or until the eggs are fully cooked, fluffy, and light. Once done, remove the skillet from heat. To assemble your burritos, lay a whole wheat tortilla flat on your workspace. Spoon a generous portion of the egg and bean mixture into the center. Next, top it with a few slices of avocado and a sprinkle of shredded cheese. You can choose either cheddar or pepper jack. Now, let’s fold and roll the burrito. Carefully fold the sides of the tortilla over the filling. Then, roll it up from the bottom, tucking it tightly. Repeat this with the remaining tortillas and filling. For a crispy finish, return the burritos to the skillet, seam-side down. Toast them for 1-2 minutes on each side over medium heat. This will make them golden brown and slightly crisp. Serve the burritos warm, garnished with fresh cilantro leaves and a side of salsa or hot sauce. Enjoy! Achieving Fluffy Eggs To get fluffy eggs, whisk them well with milk. Air makes the eggs rise. Cook them gently over medium heat. Stir slowly as they cook. This keeps them light and fluffy. Avoiding Overcooking Watch your eggs closely while they cook. Eggs can go from soft to dry in seconds. Remove them from heat when they are just set. They will continue to cook after being taken off the stove. Adding More Vegetables or Proteins Feel free to add more veggies like spinach or mushrooms. You can also add proteins like cooked sausage or diced ham. This makes the burrito more filling and fun. Spice Variations If you like heat, add jalapeños or a dash of hot sauce. For a different flavor, try smoked paprika or chili powder. These spices can make your breakfast so exciting. Ideal Accompaniments Serve your burritos with salsa or fresh avocado. A side of fruit adds a nice touch, too. You could even add a dollop of sour cream for creaminess. Presentation Ideas Place the burritos on a colorful plate. Add a sprinkle of cilantro on top for color. Cut them in half to show off the filling. This makes your meal look tasty and fresh. For the full recipe, check out the detailed instructions. {{image_4}} For a tasty twist, you can make vegetarian sunrise burritos. Just swap the meat for tofu or extra veggies. Tofu adds protein and absorbs flavors well. You can use bell peppers, zucchini, or spinach. This way, you still enjoy a filling meal without meat. If you want more protein, try adding sausage or bacon. Cook the sausage until it's browned and crumbled. For bacon, fry until crispy, then crumble over the eggs. This gives the burritos a hearty flavor. You can even mix both for a double protein boost. For gluten-free options, consider using corn tortillas or other gluten-free wraps. They hold the filling well and add a different taste. You can also check for store-bought gluten-free tortillas. This way, everyone can enjoy your sunrise breakfast burritos. Feel free to explore these variations to make your breakfast exciting! For the full recipe, be sure to check out the provided details. To keep your burritos fresh, follow these steps: - Refrigeration Tips: Place leftover burritos in an airtight container. Store them in the fridge. They stay good for up to three days. - Freezing Instructions: If you want to keep them longer, wrap each burrito in foil. Then, put them in a freezer bag. They can last for up to three months in the freezer. To enjoy your burritos again, use these methods: - Best Methods for Preserving Texture: The oven works best. Preheat it to 350°F. Place the burrito on a baking sheet. Heat for about 15-20 minutes. This keeps the tortilla crispy. You can also use a microwave. Wrap the burrito in a damp paper towel. Heat it for 1-2 minutes. This method is quick but may make the tortilla soft. To make Sunrise Breakfast Burritos vegetarian, just leave out the eggs. Instead, use tofu or extra veggies. You can add mushrooms, spinach, or zucchini for a tasty option. Season them well with spices like cumin and paprika to keep the flavor strong. Yes, you can make these burritos ahead of time. Prepare the filling and store it in the fridge for up to three days. You can also wrap the burritos tightly in foil and freeze them. Just reheat them in the oven or microwave when you’re ready to eat! Many sauces go well with Sunrise Breakfast Burritos. Salsa is a classic choice. It adds freshness and a bit of spice. You can also try hot sauce for heat or avocado crema for creaminess. A drizzle of ranch dressing adds a tasty twist too. To change the spice level, adjust the amount of cumin and add chili powder. For more heat, include diced jalapeños or a dash of cayenne pepper. If you prefer mild flavors, skip the spicy ingredients and focus on herbs like cilantro for freshness. Yes, there are a few good ways to warm tortillas. You can heat them in a dry skillet for about 30 seconds on each side. Alternatively, wrap them in a damp paper towel and microwave for 15-20 seconds. This keeps them soft and pliable for wrapping. In this article, we explored how to create delicious Sunrise Breakfast Burritos. You learned about essential ingredients like eggs, black beans, and fresh veggies. We broke down the steps for mixing, cooking, and assembling, plus tips for perfect eggs and custom flavors. You can also modify these burritos to fit dietary needs or preferences. Remember, these burritos are easy to store and reheat well. Enjoy your cooking journey and share your tasty results!](https://joymealplan.com/wp-content/uploads/2025/07/3ee2e162-623e-4153-8713-e8e5adb7d2c4-768x768.webp)
![- 1 cup quinoa - 2 cups vegetable broth or water - 1 can (15 oz) black beans - 1 cup corn - 1 red bell pepper - 1 small red onion - 2 cloves garlic - 1 teaspoon ground cumin - 1 teaspoon smoked paprika - Juice of 1 lime - Salt and pepper - 1 ripe avocado - Fresh cilantro To create a tasty Quinoa Black Bean Taco Bowl, you need fresh and vibrant ingredients. Start with quinoa. It is a great grain packed with protein. You’ll also need black beans from a can. They add fiber and flavor. Corn brings sweetness and texture. Next, choose a red bell pepper. Dice it finely for a pop of color and crunch. A small red onion adds a nice bite. Don’t forget garlic; it gives that savory aroma. Spices like ground cumin and smoked paprika give warmth. Lime juice adds brightness, while salt and pepper enhance all the flavors. Finally, you need a ripe avocado. Its creaminess balances the dish. Fresh cilantro is a must for a fresh touch. You can always add optional toppings to make it even better, like diced tomatoes, sliced jalapeños, sour cream, or shredded cheese. These fresh ingredients come together to create a delicious and healthy meal. For the complete recipe, check the Full Recipe. To start, grab a medium-sized saucepan. Pour in 2 cups of vegetable broth or water. Bring it to a boil over medium-high heat. Once the liquid bubbles, stir in 1 cup of rinsed quinoa. Lower the heat to a simmer and cover the pot. Cook for about 15 minutes, or until the quinoa is fluffy and absorbs all the liquid. After cooking, take it off the heat. Let it sit covered for 5 minutes. Finally, fluff the quinoa gently with a fork for the best texture. While the quinoa cooks, heat a drizzle of olive oil in a large skillet over medium heat. Add 1 small chopped red onion and 2 minced garlic cloves. Sauté them for about 2-3 minutes until the onion looks translucent and smells great. Next, stir in 1 diced red bell pepper, 1 cup of corn, and 1 can of rinsed black beans. Sprinkle in 1 teaspoon of ground cumin and 1 teaspoon of smoked paprika. Add salt and pepper to taste. Cook this mix for another 5-7 minutes, stirring often to combine all the flavors. When the quinoa is ready, add it directly to the skillet with the black bean mixture. Squeeze the juice of 1 lime over the top. Stir everything together to blend the flavors. Taste the mixture and adjust the seasoning with more salt, pepper, or lime juice as needed. To serve, spoon the quinoa and black bean mix into bowls. Top each bowl with slices of ripe avocado and a sprinkle of fresh cilantro. You can also add optional toppings like diced tomatoes, sliced jalapeños, a dollop of sour cream, or shredded cheese for extra flavor. Enjoy your Quinoa Black Bean Taco Bowl! For the full recipe, check the recipe section! To make perfect quinoa, start by rinsing it well. This helps remove a bitter coating called saponin. Use a fine-mesh strainer for easy rinsing. Rinse it under cold water for about 2 minutes. This step is key for great flavor. When cooking quinoa, you can change the water ratio for different textures. For fluffy quinoa, use a 2:1 water-to-quinoa ratio. For creamier quinoa, try a 1.5:1 ratio. Adjust the cooking time slightly based on your preference. To make your taco bowl pop, try adding spices or herbs. Fresh cilantro adds brightness. You can also use dried oregano or chili powder. A pinch of cayenne pepper gives a nice kick. For added flavor, consider a simple lime vinaigrette. Mix olive oil, lime juice, and a bit of honey. Drizzle it over your bowl for a fresh taste. You can also use a store-bought taco sauce for a quick enhancement. For a stunning bowl, layer the quinoa mixture neatly. Place the quinoa at the bottom, then add the black bean mix. Top with avocado slices and fresh cilantro. Pair your taco bowl with a light salad or tortilla chips. A refreshing drink like lemonade or iced tea works well, too. This combo makes for a satisfying meal. You can find the full recipe to guide you through the steps easily. {{image_4}} You can easily add meats or tofu to your quinoa black bean taco bowl. For meat, consider grilled chicken, shrimp, or ground turkey. Marinate the meat in lime juice, cumin, and garlic for extra flavor. For a plant-based option, use firm tofu. Cut it into cubes and marinate it the same way. Then, sauté the tofu until golden brown. This adds protein and enhances the dish. To keep the dish vegan, skip any dairy toppings like sour cream and cheese. Instead, use avocado or a cashew cream. For gluten-free preferences, ensure that all ingredients, like the vegetable broth and toppings, are labeled gluten-free. Most beans and veggies are naturally gluten-free, making this bowl a great choice. You can add seasonal vegetables to your taco bowl for a fresh twist. In spring, try asparagus or snap peas. In summer, use zucchini or bell peppers. In fall, roasted sweet potatoes or butternut squash are great. Adjust the recipe for low-carb diets by replacing quinoa with cauliflower rice or zucchini noodles. This keeps the dish light and healthy while still being delicious. Remember, you can find the full recipe to get started on your flavorful creation! Store your Quinoa Black Bean Taco Bowl in an airtight container. This helps keep it fresh. You can refrigerate leftovers for up to 4 days. If you want to enjoy it later, make sure it cools down before sealing. To freeze the bowl, allow it to cool completely. Then, scoop it into freezer-safe bags. Remove as much air as possible before sealing. You can freeze it for up to 3 months. For reheating, take it out of the freezer and thaw it overnight in the fridge. You can also reheat it in the microwave. After storage, add a splash of lime juice to refresh the flavor. You can also mix in a bit of olive oil to improve the texture. If the quinoa seems dry, add a little water while reheating. This keeps your dish tasty and vibrant. Enjoy your delicious creation! To make this taco bowl vegan, swap out any non-vegan toppings. For sour cream, use a dairy-free alternative. You can also replace shredded cheese with vegan cheese. Make sure all ingredients, like vegetable broth, are free from animal products. Yes, you can prepare components ahead of time. Cook the quinoa and black bean mixture. Store them in separate airtight containers in the fridge. This way, you can quickly assemble your taco bowl when ready to eat. If you don’t have quinoa, try brown rice or farro. Both grains work well and add a nice texture. You can also use cauliflower rice for a lower-carb option. Each alternative will give a different flavor and feel. To adjust for fewer servings, simply halve the ingredients. For example, use ½ cup of quinoa and 1 cup of vegetable broth. Keep the same ratio for beans, corn, and spices. This ensures your dish remains flavorful and balanced. For the full recipe, check [Full Recipe]. This blog post covered a tasty quinoa black bean taco bowl. You learned the main ingredients, how to cook them, and tips for storage. Each step makes it easy to create a healthy meal. You can swap ingredients or adjust for your taste. This dish fits various diets and is simple to make ahead. Enjoy creating your own bowl and experimenting with flavors. You now have the knowledge to make this meal your own and share it with others.](https://joymealplan.com/wp-content/uploads/2025/07/6e9207d6-3743-4f58-9f6b-68921fd9a64f-768x768.webp)