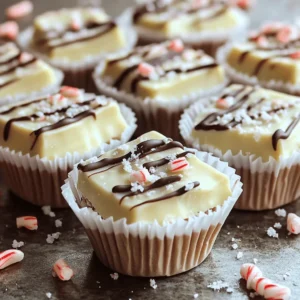
White Chocolate Peppermint Bark Bites Delightful Treat
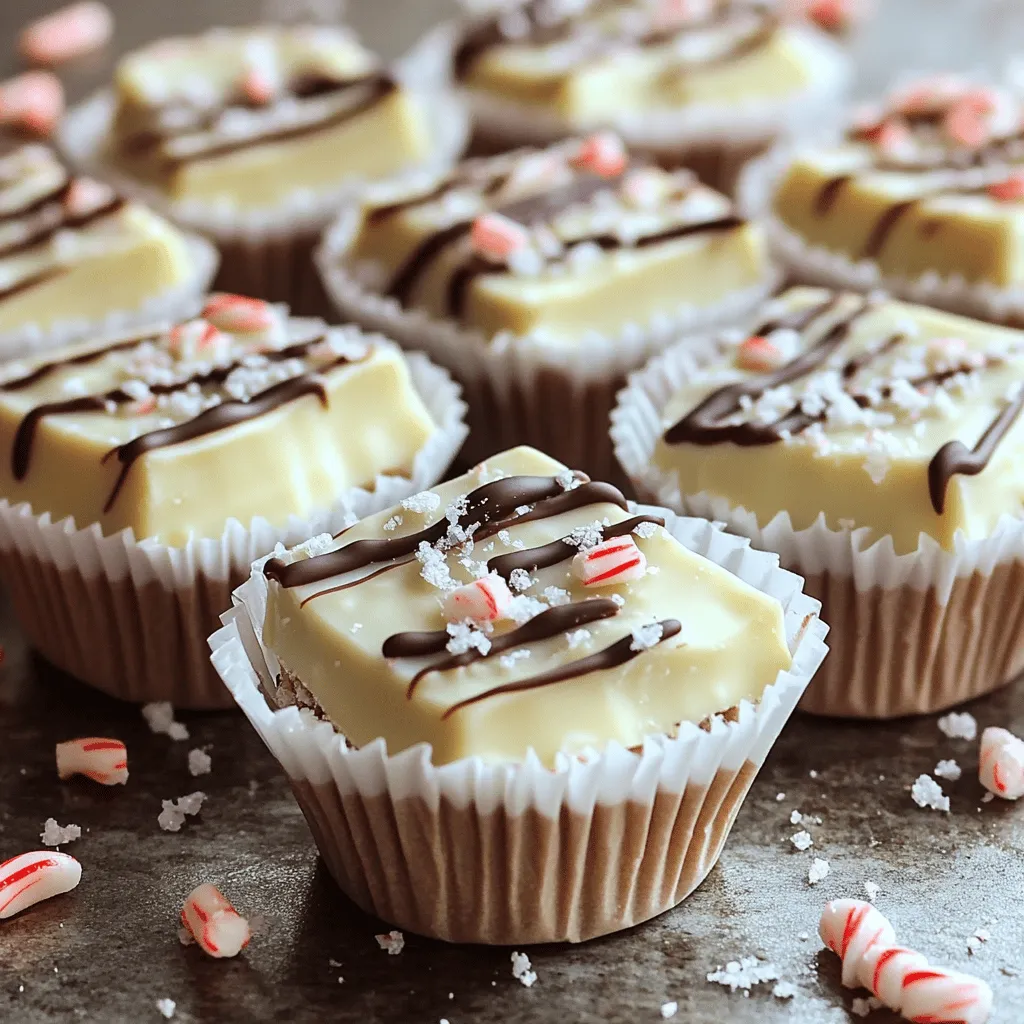
Are you ready for a holiday treat that will make your taste buds dance? White Chocolate Peppermint Bark Bites are both easy to make and delicious. With creamy white chocolate, crunchy peppermint, and a touch of dark chocolate drizzle, these bites are perfect for parties or cozy nights at home. Follow me as I guide you through each simple step to create these festive delights that everyone will love!
Ingredients
To create White Chocolate Peppermint Bark Bites, gather these simple ingredients:
– 8 oz white chocolate, finely chopped
– 1/2 cup crushed peppermint candies (or crushed candy canes)
– 1/4 cup dark chocolate chips (for drizzling)
– Pinch of sea salt
– Mini cupcake liners (for serving)
These ingredients come together to make a sweet and festive treat. The white chocolate provides a creamy base, while the crushed peppermint adds a refreshing crunch. Dark chocolate drizzle enhances the flavor and looks beautiful. The sea salt gives a nice balance to the sweetness.
When choosing your white chocolate, make sure it has real cocoa butter. This will melt better and taste richer. For the crushed peppermint, you can use store-bought candies or make your own by crushing candy canes. Either way, they bring a holiday spirit to your bites.
Use mini cupcake liners to make serving easy and fun. They also help keep your bites neat and tidy. This way, you can enjoy these treats with friends and family without any mess.
Now that you have your ingredients ready, you’re all set to make these delightful bites!
Step-by-Step Instructions
Preparation of Baking Sheet
– Lay out parchment paper.
– Place mini cupcake liners on the baking sheet.
This step keeps your workspace clean. It also makes serving easy later.
Melting the White Chocolate
– Microwave 8 oz of finely chopped white chocolate.
– Heat in 30-second intervals and stir after each.
Be careful not to overheat the chocolate. It should melt smoothly and not burn.
Mixing in Peppermint
– Fold in 1/2 cup of crushed peppermint candies.
Make sure the candies mix evenly into the melted chocolate. This adds flavor and a festive look.
Filling the Liners
– Use a spoon to portion the mixture into the cupcake liners.
Fill each liner about halfway full. This leaves space for toppings.
Adding Toppings
– Sprinkle some reserved crushed peppermint on top.
– Add a pinch of sea salt to each.
These toppings enhance the flavor. They also give your bites a cute look.
Chilling the Bites
– Refrigerate the baking sheet until firm (about 30 minutes).
This helps the chocolate set properly.
Preparing Dark Chocolate Drizzle
– Melt 1/4 cup of dark chocolate chips in a bowl.
Use the same microwave method as before, stirring until smooth.
Drizzling Over Bites
– Use a fork or piping bag to drizzle the dark chocolate.
This adds a beautiful touch to each bite.
Final Setting
– Chill the bites again for 15 minutes.
This step allows the dark chocolate to set completely.
Serving Suggestions
– Carefully peel the bites from the cupcake liners.
– Arrange them on a platter.
These bites look great on a festive plate. Enjoy your sweet treat!
Tips & Tricks
Ensuring Perfectly Melted Chocolate
To melt white chocolate, use a microwave-safe bowl. Microwave in 30-second bursts. After each burst, stir well. This helps the chocolate melt evenly. Do not let it overheat, as it can burn easily. If the chocolate is lumpy, keep stirring. It will become smooth and shiny.
Best Practices for Clean Drizzling
For a tidy drizzle of dark chocolate, use a piping bag. Fill a bag with melted dark chocolate. Snip a tiny corner of the bag. This gives you control over the drizzle. If you don’t have a piping bag, a fork works too. Just dip it in the chocolate and let it drizzle over the bites.
Storing Unsalted Bites
To keep your white chocolate peppermint bark bites fresh, store them in an airtight container. Place parchment paper between layers to avoid sticking. Keep the container in a cool, dry place. They stay best at room temperature. If you want to keep them longer, you can freeze them. Just wrap each bite in plastic wrap before freezing.

Variations
Flavor Variations
You can add a splash of peppermint extract to boost the minty flavor. This small change makes your bites even more refreshing. Just be careful with the amount. A little goes a long way. Start with a few drops and taste. Adjust it if you want more.
Alternative Toppings
Mix it up by using different types of chocolate or nuts. Instead of dark chocolate, try semi-sweet or milk chocolate for a new taste. You can also sprinkle nuts like almonds or walnuts on top. This adds crunch and flavor. Choose toppings that you love. Get creative!
Seasonal Twists
You can customize these bites for other holidays. For fall, add a pinch of cinnamon or nutmeg. For spring, try adding colorful sprinkles. These small changes keep the treats fun and festive. They make great gifts too. Let your imagination guide you!
Storage Info
Optimal Storage Conditions
To keep your White Chocolate Peppermint Bark Bites fresh, store them in a cool, dry place. Do not expose them to heat or moisture. A sealed container works best. This helps retain their flavor and texture.
Freezing Tips
If you want to save some bites for later, freezing is a great option. Place the bites in a single layer on a baking sheet. Freeze them for about two hours. Once set, transfer them to a freezer-safe bag. This method keeps them from sticking together.
Shelf Life
These delightful treats can last about two weeks at room temperature. If frozen, they can stay good for up to three months. For the best flavor and texture, enjoy them within the first month.
FAQs
How do you make White Chocolate Peppermint Bark Bites?
To make these bites, start by melting 8 oz of white chocolate. Use a microwave-safe bowl and heat it in 30-second intervals, stirring well each time. Once smooth, fold in 1/3 cup of crushed peppermint candies. Portion the mix into mini cupcake liners. Sprinkle more crushed peppermint and a pinch of sea salt on top. Chill them for 30 minutes. Drizzle with melted dark chocolate, then chill again for 15 minutes before serving.
Can I use other types of chocolate instead of white chocolate?
Yes, you can! Dark or milk chocolate works well too. Each type provides a different taste. Dark chocolate gives a richer flavor. Milk chocolate adds creaminess. You can even mix different chocolates for a fun twist.
What is the best way to crush peppermint candies?
To crush peppermint candies, place them in a resealable plastic bag. Use a rolling pin or a meat mallet to crush them into small pieces. Ensure they are not too fine, as some texture adds to the bites. An alternative is to use a food processor for a quicker method.
How long can I store White Chocolate Peppermint Bark Bites?
You can store these bites for about two weeks. Keep them in an airtight container. Store them in a cool, dry place. If you live in a warm area, the fridge is a better option.
Can I add more toppings to these bites?
Absolutely! You can add nuts, dried fruit, or even different chocolate drizzles. Get creative and make them your own. Just be sure to balance flavors so they complement the peppermint.
Are these treats suitable for gifting?
Yes, these treats make great gifts! Pack them in decorative boxes or jars. You can add a personal note or label. They look festive and taste delightful, making them perfect for sharing.
You learned how to make delicious White Chocolate Peppermint Bark Bites. We covered the ingredients, step-by-step instructions, and tips for perfect results. Remember to mix melted chocolate carefully and use a piping bag for neat drizzle designs. Feel free to experiment with flavors and toppings. These bites are great for holidays or as gifts. Enjoy making and sharing this tasty treat!
![- 3 cups unsweetened shredded coconut - 1/2 cup sweetened condensed milk - 2 large egg whites - 1/4 teaspoon vanilla extract - 1/4 teaspoon almond extract - Pinch of salt - 1/2 cup dark chocolate chips (optional) These ingredients create the base for your coconut macaroons. The unsweetened shredded coconut gives it that chewy texture. Sweetened condensed milk adds creaminess and sweetness, making each bite delightful. The egg whites are crucial for lightness and fluffiness. The extracts bring in a lovely depth of flavor. If you want to add a twist, dark chocolate chips can add a rich touch. - Gluten-free options: This recipe is naturally gluten-free, perfect for those with gluten issues. - Nut-free alternatives: You can enjoy these macaroons without nuts, making them safe for nut allergies. - Vegan substitutions: For a vegan version, try using aquafaba instead of egg whites and a plant-based condensed milk. These options help everyone enjoy this treat. Whether you have dietary needs or just want to try something new, there’s a way for you to make these coconut macaroons. You can find the full recipe above to get started! Start by preheating your oven to 325°F (160°C). This step is key to baking your macaroons evenly. While the oven heats, line a baking sheet with parchment paper. This helps prevent sticking and makes cleaning up easier later. In a large mixing bowl, combine 3 cups of unsweetened shredded coconut and 1/2 cup of sweetened condensed milk. Add 1/4 teaspoon of vanilla extract, 1/4 teaspoon of almond extract, and a pinch of salt. Stir well until everything is mixed together nicely. Now, in a separate bowl, take 2 large egg whites and whip them until they form stiff peaks. This is an important step because it gives your macaroons a light and airy texture. Next, gently fold the whipped egg whites into the coconut mixture. Use a spatula and be careful not to stir too hard. You want to keep the air in the egg whites. Fold until the egg whites are just mixed in; some lumps are okay. Using a tablespoon or a small cookie scoop, portion out the mixture onto the prepared baking sheet. Make sure to space each mound about 2 inches apart. This allows them to spread a bit while baking. Now, place the baking sheet in your preheated oven. Bake the macaroons for about 20 to 25 minutes. You want them to turn a lovely golden brown. Once done, take the tray out and let the macaroons cool for about 5 minutes on the sheet. This helps them firm up. After that, transfer them to a wire rack to cool completely. For those who love chocolate, you can melt some dark chocolate chips and dip the bottoms of each macaroon. Let the chocolate set on the parchment paper. Enjoy these delightful treats from the full recipe! To make great coconut macaroons, focus on the egg whites. Whipping them correctly is key. Use a clean bowl and beaters. Beat until stiff peaks form. This step adds lightness to the macaroons. Avoid overmixing when you fold them into the coconut mix. Gently combine the ingredients. Some lumps are okay. A light touch keeps the texture airy and nice. You can boost the flavor of your macaroons in fun ways. Try adding a pinch of cinnamon or nutmeg for warmth. These spices bring depth and richness. Another idea is to add citrus zest. Lemon or lime zest gives a fresh twist. Just a small amount can make a big difference in taste. How you serve your macaroons can impress your guests. Place them on a decorative platter to catch the eye. You can garnish with shredded coconut or fresh fruit. This adds color and flair. Arrange them in clusters for an inviting look. These small touches make your dessert stand out and look professional. For the full recipe, check out the Tropical Coconut Macaroons section. {{image_4}} You can make your macaroons even better by adding chocolate. Start by melting dark chocolate chips. Use a microwave-safe bowl. Heat in 30-second bursts, stirring after each. This helps prevent burning. Alternatively, you can use a double boiler for even heating. Once the chocolate is melted, dip the bottom of each macaroon in it. Make sure to coat it well. Place the dipped macaroons back on the parchment paper. Let the chocolate harden before serving. This adds a rich flavor that complements the coconut. Want to add some nuts? Almonds and pecans work great. Simply chop them finely and mix them in with the coconut. This adds a nice crunch to the soft macaroons. If you have nut allergies, you can skip the nuts. The recipe still tastes great without them. You can also use seeds like sunflower or pumpkin for a similar texture. Always be cautious and adjust based on your needs. There are endless flavor combinations for your macaroons. One tasty option is coconut-lime. Just add lime zest and a bit of lime juice to the coconut mixture. This gives a fresh twist. Another option is vanilla bean macaroons. Instead of vanilla extract, use the seeds from a vanilla bean. This adds a lovely fragrance and flavor. You can also mix in spices like cinnamon for a warm touch. Each variation brings a new taste to your delightful tropical treats. For the complete recipe, refer to the [Full Recipe]. Store your coconut macaroons at room temperature for the best taste. Keep them in a cool, dry place. Use an airtight container to keep them fresh. This helps avoid moisture and keeps them soft. If you live in a warm climate, consider refrigerating them. The cold can help them last longer. However, be aware that refrigeration may change their texture slightly. To freeze macaroons, let them cool completely first. Once cooled, place them in a single layer on a baking sheet. Freeze for about one hour. This step prevents them from sticking together. After they are firm, transfer them to a freezer-safe bag or container. When you want to enjoy a macaroon, take it out of the freezer. Let it thaw in the fridge overnight. For a quick thaw, leave it at room temperature for a few hours. Coconut macaroons can last up to one week at room temperature. If stored in the fridge, they can last for about two weeks. Check for signs of spoilage before eating. Look for changes in texture, color, or a sour smell. If you see any of these, it’s best to toss them out. Yes, you can make coconut macaroons without egg whites. Instead, use ground flaxseed or chia seeds mixed with water. This mixture acts as a binder. For every egg white, mix 1 tablespoon of ground flaxseed or chia seeds with 2.5 tablespoons of water. Let it sit for about 10 minutes to thicken. This will give your macaroons a nice texture while keeping them egg-free. To keep your macaroons from falling apart, mix the ingredients gently. Overmixing can cause them to break. When you fold in the egg whites, do it slowly and carefully. This helps maintain air and keeps the macaroons light. Make sure to space them well on the baking sheet. This allows them to bake evenly. A good tip is to form them tightly with your hands. This will help them hold their shape during baking. Leftover shredded coconut can be used in many ways. You can add it to smoothies for extra texture. It works well in oatmeal or yogurt for a tropical twist. Consider making coconut pancakes or muffins. You can also toast it for a crunchy topping on salads or desserts. If you enjoy baking, use it in granola or energy balls. This way, you won't waste any coconut, and you'll enjoy its rich flavor in other dishes. You now know how to make coconut macaroons from scratch. We covered the essential ingredients, step-by-step instructions, and storage tips. You learned about variations, dietary options, and how to enhance flavors. Give these tasty treats a try! They are fun to make and share. Don’t forget to experiment with flavors or coatings. Enjoy your baking, and let your creativity shine!](https://joymealplan.com/wp-content/uploads/2025/06/e4df15b8-ca64-4a89-a5eb-245e13ac6d80-768x768.webp)
![- 2 cups all-purpose flour - 1/4 cup granulated sugar - 1 tablespoon baking powder - 1/2 teaspoon salt - 1/2 cup unsalted butter, cold and cut into small cubes - Zest of 1 large lemon - 1/2 cup fresh blueberries (or frozen blueberries, thawed and drained) - 1/2 cup heavy cream - 1 large egg, at room temperature - 1 teaspoon pure vanilla extract - 1 tablespoon freshly squeezed lemon juice The ingredients are simple but full of flavor. I love using fresh blueberries for their burst of sweetness. If you can't find fresh ones, frozen work well too. Just make sure to thaw and drain them first. The zest of lemon adds a bright touch that pairs perfectly with the blueberries. It’s key to use cold butter. This helps create flaky layers in the scones. The heavy cream gives richness, while the egg adds structure. - You can use whole milk or buttermilk instead of heavy cream. - For a different sweetness, try brown sugar or honey. - Feel free to swap blueberries for other fruits like raspberries or cranberries. These variations let you play with flavors. It’s fun to experiment and find your favorite twist! If you want a vegan option, replace the egg with a flaxseed mixture. Just combine one tablespoon of flaxseed meal with three tablespoons of water, and let it sit for a few minutes until it thickens. You can find the full recipe for these delightful scones in the section above. 1. Preheat your oven to 400°F (200°C). Line a baking sheet with parchment paper. 2. In a large bowl, mix 2 cups of all-purpose flour, 1/4 cup of granulated sugar, 1 tablespoon of baking powder, and 1/2 teaspoon of salt. Stir well with a whisk. 3. Add 1/2 cup of cold, cubed unsalted butter to the flour mix. Use your fingers or a pastry cutter. Work it until it looks like coarse crumbs, with some larger pieces remaining. 1. Gently fold in the zest of 1 large lemon and 1/2 cup of fresh blueberries. Be careful not to crush them. 2. In a separate bowl, whisk together 1/2 cup of heavy cream, 1 large egg, 1 teaspoon of pure vanilla extract, and 1 tablespoon of freshly squeezed lemon juice. Mix until smooth. 3. Pour the wet mix into the dry mix. Stir with a spatula until just combined. The dough should be slightly sticky. 1. Transfer the dough to a floured surface. Knead it lightly about 3 to 4 times until it comes together. Form it into a circle about 1-inch thick. 2. Cut the dough into 8 wedges, like slicing a pizza. Place them on the lined baking sheet, leaving space between each scone. 3. Bake for 15-20 minutes. Check for a golden brown top and use a toothpick to see if it comes out clean. 4. Let the scones cool on the baking sheet for 5 minutes. Then, move them to a wire rack to cool completely. For the complete recipe, check the Full Recipe section. To make great scones, start with cold butter. Cold butter helps create flaky layers. Cut it into small cubes before mixing. This keeps the butter pieces intact. When you mix, use a gentle touch. Overmixing can lead to tough scones. Mix just until combined; it’s okay if the dough is slightly sticky. To make your scones stand out, add spices or herbs. A pinch of cinnamon can bring warmth. Fresh basil or thyme can add a unique twist. For a glaze, mix powdered sugar with lemon juice. This adds a sweet and tangy finish. Serve your scones warm for the best taste. Serve your scones on a beautiful plate. Add a dusting of powdered sugar for flair. Pair them with clotted cream or butter for a rich experience. You can even add fresh berries on the side for color. A simple yet elegant display makes your scones shine. To get the full recipe, check out the Lemon Blueberry Dream Scones. {{image_4}} You can change the flavor of your scones easily. Try using other fruits like raspberries or cranberries. These fruits add a new twist to the classic recipe. You can also switch to citrus fruits. Instead of lemon, use orange or lime zest for a fresh taste. Each fruit brings its own unique flavor. Don't be afraid to experiment! If you need gluten-free scones, simply swap the all-purpose flour for a gluten-free blend. Many brands make great options that work well in baking. For a vegan version, replace the butter with coconut oil or a vegan butter. Use a plant-based milk instead of heavy cream. You can also use a flax egg to replace the regular egg. These changes can still yield tasty scones. Make your scones fun for special occasions! Add festive spices like cinnamon or nutmeg for fall events. For holidays, try adding a cranberry glaze. You can shape your scones into hearts for Valentine's Day or stars for the Fourth of July. These special touches make your treats stand out. You can find the full recipe to try these variations at home! To keep your scones fresh, store them in an airtight container. You can place parchment paper between layers to avoid sticking. This helps maintain their texture. If you have a lot, use a resealable bag. Make sure to squeeze out excess air. Your Lemon Blueberry Scones will stay tasty for up to three days at room temperature. When reheating scones, the goal is to keep them soft. You can use an oven or a microwave. For the oven, preheat it to 350°F (175°C). Wrap each scone in foil to keep them moist. Heat for about 10 minutes. If using the microwave, place a scone on a plate. Cover it with a damp paper towel. Microwave it for about 15-20 seconds. For longer storage, freezing is a great option. Wrap each scone tightly in plastic wrap. Then, place them in a freezer-safe bag. They can last up to three months. When you are ready to eat them, thaw in the fridge overnight. Then, reheat as mentioned above. Enjoy the fresh taste again! For the complete recipe, check out the [Full Recipe]. Can I make these Lemon Blueberry Scones ahead of time? Yes, you can prepare the dough and chill it. Wrap it in plastic wrap and store in the fridge overnight. Bake when you are ready. What is the best way to freeze scones? To freeze scones, bake them first. Let them cool, then place in an airtight bag. They stay fresh for about three months. How do I know when my scones are done baking? Scones are done when they turn golden brown. You can also insert a toothpick into the center. If it comes out clean, they are ready. Can I use frozen blueberries? Yes, frozen blueberries work well. Just make sure to thaw and drain them first. This helps avoid extra moisture in your scone dough. What should I do if my dough is too sticky? If your dough is sticky, add a bit more flour. Sprinkle a little at a time while mixing gently. You want it to be a soft dough, not too wet. Can I add more lemon zest for a stronger flavor? Absolutely! Adding more lemon zest gives a bright and fresh taste. Just be mindful not to overpower the blueberries. What other flavors pair well with lemon and blueberry? Lemon and blueberry go well with herbs like thyme or basil. You can also try adding a hint of almond extract for a unique twist. In this post, we explored how to make perfect Lemon Blueberry Scones. We covered ingredients, step-by-step instructions, essential tips, variations, and storage methods. With simple techniques, you can create delicious scones that impress everyone. Remember, using cold butter is key for the right texture. Experiment with flavors and enjoy your tasty treats. Now, go bake some scones and share them with friends and family!](https://joymealplan.com/wp-content/uploads/2025/07/84e54135-a0a0-42e2-a72a-4461fccf9179-768x768.webp)