No Bake Chocolate Peppermint Cheesecake Bars Delight

Get ready to indulge in a sweet, creamy treat with my No Bake Chocolate Peppermint Cheesecake Bars! Perfect for any occasion, these bars bring a delightful blend of rich chocolate and refreshing peppermint without the hassle of baking. In this guide, I’ll walk you through easy steps, essential tips, and fun variations to make these bars your own. Trust me, you won’t want to miss this delicious dessert!
Ingredients
To make your No Bake Chocolate Peppermint Cheesecake Bars, gather these ingredients:
– 1 ½ cups chocolate graham cracker crumbs
– ½ cup unsweetened cocoa powder
– ½ cup unsalted butter, melted
– 1 cup cream cheese, softened to room temperature
– ½ cup powdered sugar
– 1 teaspoon peppermint extract
– 2 cups whipped cream (or 1 tub of store-bought whipped topping)
– ½ cup semi-sweet chocolate chips
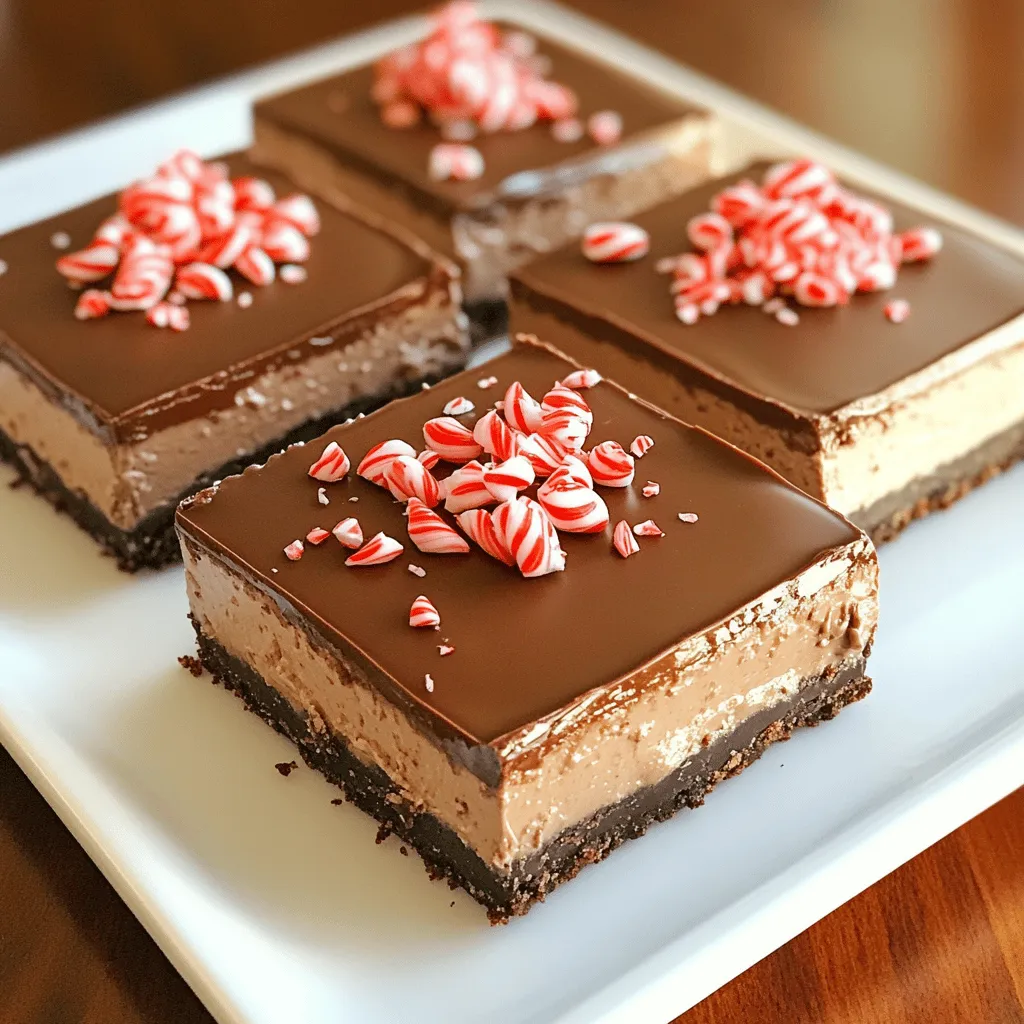
– Crushed peppermint candies for garnish
These ingredients work together to create a rich and creamy treat. The chocolate graham cracker crumbs form a sweet base, while the cream cheese gives the bars their creamy texture. The unsweetened cocoa powder adds depth, and the peppermint extract brings that festive flavor.
Whipped cream makes the filling light and fluffy. The semi-sweet chocolate chips provide a delicious drizzle, and crushed peppermint candies add a fun crunch on top. Each ingredient plays a vital role in making these bars a hit.
Step-by-Step Instructions
Preparing the Crust
– In a medium bowl, combine 1 ½ cups of chocolate graham cracker crumbs, ½ cup of unsweetened cocoa powder, and ½ cup of melted unsalted butter.
– Mix the ingredients well with a spatula or fork. The mixture should be crumbly yet hold together when pressed.
– Transfer the crust mixture into a 9×9 inch baking pan.
– Use the back of a measuring cup or your fingers to press the mixture evenly into the bottom of the pan.
– Place the pan in the refrigerator. This helps the crust firm up while you make the filling.
Making the Cheesecake Filling
– In a large mixing bowl, beat 1 cup of softened cream cheese with an electric mixer.
– Continue until the cream cheese is smooth and creamy.
– Gradually add ½ cup of powdered sugar and 1 teaspoon of peppermint extract to the cream cheese.
– Mix well until all ingredients are fully blended and there are no lumps.
Assembling the Cheesecake Bars
– Carefully add 2 cups of whipped cream to the cream cheese mixture.
– Use a spatula to gently fold in the whipped cream. Be cautious to keep the light and airy texture.
– Once combined, pour the creamy cheesecake filling over the chilled crust.
– Use a spatula to spread and smooth the cheesecake mixture across the surface.
Chocolate Drizzle and Chilling
– Melt ½ cup of semi-sweet chocolate chips in a microwave-safe bowl.
– Heat in 30-second intervals, stirring in between, until the chocolate is melted and smooth.
– Drizzle the melted chocolate over the cheesecake layer using a fork or piping bag.
– Return the assembled cheesecake bars to the refrigerator to chill for at least 4 hours.
– This helps the filling firm up, making it easier to slice.
Tips & Tricks
Achieving the Perfect Cheesecake Texture
To make your cheesecake smooth, start with softened cream cheese. Cold cream cheese makes lumps. Leave it out for about 30 minutes before mixing. This helps it blend well and gives you a nice, creamy texture.
When folding in whipped cream, be gentle. Use a spatula to scoop from the bottom. This keeps the air in the whipped cream. If you mix too hard, the filling can become dense. You want it light and fluffy, just like clouds.
Serving Suggestions
For the best look, garnish with crushed peppermint candies. They add a festive touch and a nice crunch. You can also drizzle extra melted chocolate on top. It makes the bars even more enticing.
When serving, present the bars on a pretty platter. A sprig of mint on top makes them pop. Use fun holiday-themed plates to add cheer. This small touch can make your dessert shine during any celebration.
Variations
Alternative Flavor Combinations
You can easily change the flavor of your cheesecake bars. Instead of peppermint extract, try using vanilla or almond extract. This swap can give your bars a new twist. For a crunchy topping, consider crushed Oreos instead of peppermint candies. This adds a sweet contrast to the creamy cheesecake. You can mix and match flavors to create your own unique treat.
Healthier Modifications
Want to make a lighter version? You can use lower-calorie cream cheese. This keeps the rich flavor without the extra calories. For a lighter topping, substitute whipped cream with Greek yogurt. It adds creaminess while giving you a boost of protein. These changes make it easier to enjoy your dessert without guilt.
Storage Info
Best Storage Practices
To keep your no bake chocolate peppermint cheesecake bars fresh, follow these tips:
– Refrigerate: Store the leftover bars in the fridge. Use an airtight container to keep them fresh.
– Layering: Place parchment paper between layers if stacking. This helps to prevent sticking.
Freezing Instructions
Freezing these cheesecake bars is simple. Here’s how to do it:
– Wrap well: First, cut the bars into squares. Wrap each piece tightly in plastic wrap.
– Use containers: Place the wrapped bars in a freezer-safe container. Label it with the date.
– Thawing: When you’re ready to enjoy, remove a bar from the freezer. Let it thaw in the fridge for a few hours.
– Serving tips: Serve chilled for the best taste and texture.
FAQs
Can I make these cheesecake bars ahead of time?
Yes, you can make these cheesecake bars ahead of time. I recommend making them at least one day before you plan to serve them. This gives the flavors a chance to develop. The optimal refrigeration time is about four hours, but overnight is even better for the best taste.
What can I use if I don’t have peppermint extract?
If you don’t have peppermint extract, you can use other options. Try using mint extract for a similar flavor. You can also use crushed peppermint candies, but they will add texture. Vanilla extract works too, but it won’t have the same minty taste.
How do I know when the cheesecake is set?
You can tell the cheesecake is set by checking a few signs. The filling should feel firm to the touch and should not jiggle. Another tip is to insert a toothpick into the center. If it comes out clean, it’s ready. Be sure to chill it long enough for a nice, firm texture.
You learned how to make delicious cheesecake bars step by step. We covered the right ingredients, from chocolate graham for the crust to whipped cream for the filling. Tips on achieving the perfect texture and creative serving ideas add to your success. Whether you want to try new flavors or store leftovers, you have the info you need. Enjoy making these treats and share them with friends and family. Simple steps lead to great flavors, so get started and impress everyone with your cheesecake bars!

![- Ripe avocados: Choose avocados that feel soft but not mushy. Ripe avocados add creaminess. They bring healthy fats and nutrients to the mousse. When selecting avocados, look for dark green skin. A little give when pressed is a good sign. Avoid avocados with large dark spots or cracks. - Cocoa powder: The type of cocoa powder you use matters. Choose high-quality, unsweetened cocoa for the best flavor. Dutch-processed cocoa has a smooth taste. Regular cocoa has a rich chocolate flavor. Both are great choices. - Sweeteners: Maple syrup and agave syrup are both tasty options. Maple syrup gives a unique flavor. It adds a slight caramel note. Agave syrup is milder and sweeter. It blends well without changing the taste much. You can adjust the sweetness based on your preference. - Non-dairy milk options: You can use almond, coconut, or oat milk. Almond milk is light and nutty. Coconut milk adds creaminess and a hint of tropical flavor. Oat milk is thick and wholesome. Any of these choices work well to create a smooth texture. - Flavor enhancers: Vanilla extract adds warmth and depth. A little cinnamon gives an extra layer of flavor. Both options are simple and enhance the chocolate taste. You can try adding a pinch to see what you like best. - Garnish suggestions: Dark chocolate shavings are a rich topping. They add elegance and extra chocolate flavor. Fresh berries like raspberries or strawberries bring brightness. Their color and tartness balance the rich mousse perfectly. These garnishes make the dish even more appealing. You can find the full recipe at the beginning of this article. First, you need to prepare your avocados. To peel and pit them easily, slice the avocado in half. Twist the halves apart. Use a spoon to scoop out the pit. Then, scoop the green flesh into a bowl. Next, measure your ingredients. For this mousse, you will need: - 2 ripe avocados, peeled and pitted - 1/2 cup unsweetened cocoa powder - 1/3 cup maple syrup (or agave syrup) - 1/4 cup almond milk (or any non-dairy milk of your choice) - 1 teaspoon vanilla extract - 1/4 teaspoon sea salt - A pinch of cinnamon (optional) Combine all these ingredients in a food processor. Now, let’s blend for that creamy texture. Start blending on high speed. Stop occasionally to scrape down the sides. This ensures everything mixes well. Blend until it’s smooth. Taste your mousse after blending. If you desire more sweetness, add extra maple syrup. Blend again to mix in the syrup. Adjust to your liking for the best flavor. Chilling the mousse is very important. It allows the flavors to develop and the mousse to thicken. Cover the individual dishes with plastic wrap. Chill them in the fridge for at least 30 minutes. For serving, get creative! Garnish your mousse with dark chocolate shavings or fresh berries. This adds a pop of color and texture. You can serve it in small bowls or glasses for a fun touch. Enjoy your rich and creamy vegan chocolate avocado mousse! - Over-blending the mousse: Blending too long makes it thin. Blend just until smooth. You want a creamy texture, not soup. - Using unripe avocados: Unripe avocados are hard and bitter. Always pick ripe ones. They should feel slightly soft. - Balancing sweetness: Taste your mousse before serving. If it's too bitter, add more maple syrup. Start with a little more. Keep tasting until it’s just right. - Experimenting with additional flavorings: You can try adding a pinch of espresso or a drop of peppermint extract. These flavors can make the mousse even more exciting. - Best food processors for smooth blending: Look for a powerful food processor. A 600-watt model works well. It blends the ingredients evenly and quickly. - Storage containers for chilling the mousse: Use small bowls with lids. This keeps the mousse fresh. Glass containers are a great choice. They help keep the mousse cool and tasty. For the full recipe, check out the [Full Recipe]. {{image_4}} You can make your Vegan Chocolate Avocado Mousse even more fun by adding nut butters. Try almond or peanut butter for a rich and creamy taste. These nut butters enhance the texture and add healthy fats. You can also infuse flavors like coffee or mint. A splash of coffee brings a deep, bold taste. Mint adds a refreshing twist that brightens up the dessert. Both options create a unique mousse that surprises and delights. For those with dietary needs, gluten-free variations are easy to make. All the ingredients in this mousse are naturally gluten-free. This makes it a great choice for anyone avoiding gluten. You can also opt for sugar-free alternatives. Using stevia or monk fruit keeps the mousse sweet without added sugar. These substitutes do not change the creamy texture. You can enjoy a guilt-free treat that still tastes amazing. Transform your mousse into parfaits for a stunning dessert. Layer the mousse with fresh fruits or granola in clear cups. This adds color and texture, making your dessert look beautiful. You can use the mousse as a filling for cakes or other desserts. It works well between layers of cake or as a filling for tart shells. This gives you a chance to be creative with your presentation. For the complete recipe, check out the Full Recipe section. To keep your Vegan Chocolate Avocado Mousse fresh, follow these steps: - Chill the mousse: After making it, cover your mousse with plastic wrap or a lid. This helps prevent air from getting in. - Use airtight containers: Store the mousse in airtight containers. This keeps it from absorbing other flavors in the fridge. - Refrigerate promptly: Place it in the fridge as soon as it's ready. This helps maintain its creamy texture. The mousse stays fresh for about 3 to 5 days in the fridge. Always check for any changes in smell or texture before serving. Can you freeze Vegan Chocolate Avocado Mousse? Yes, you can! Freezing is a great option if you want to store it longer. - Portion it out: Divide the mousse into small portions before freezing. This makes it easy to thaw only what you need. - Use freezer-safe containers: Make sure to use containers that are safe for freezing. This prevents freezer burn. When you're ready to enjoy it again, follow these steps to thaw: - Thaw in the fridge: Place the frozen mousse in the fridge overnight. This keeps it at a safe temperature while it thaws. - Stir before serving: After thawing, give the mousse a quick stir. This helps regain its smooth texture. By following these storage and freezing tips, you can enjoy your Vegan Chocolate Avocado Mousse at its best. For the complete recipe, check out the Full Recipe section. Yes, you can use different sweeteners. Honey or agave syrup works well too. Each sweetener changes the taste slightly. Honey adds a floral note, while agave is milder. You can experiment to find your favorite. Just keep the amount similar to maple syrup for the best results. This mousse stays fresh for about three days in the fridge. Store it in an airtight container to keep it from drying out. The mousse may thicken as it sits, so stirring it gently can help restore its creamy texture. Enjoy it within this timeframe for the best flavor and quality. Yes, this dessert is quite healthy! Avocados are full of good fats and nutrients. They can boost heart health and provide fiber. Cocoa powder is also rich in antioxidants, adding to the health benefits. This mousse is a guilt-free treat that satisfies your sweet tooth while nourishing your body. Absolutely! To make it nut-free, choose oat milk or soy milk instead of almond milk. Both options work well and keep the mousse creamy. Ensure your cocoa powder is also nut-free. With these swaps, you can enjoy this tasty dessert without any nut allergy concerns. Vegan Chocolate Avocado Mousse is simple and fun to make. You learned about key ingredients like ripe avocados, cocoa powder, and sweeteners. I shared tips on preparation, blending, and storing your mousse. Mixing in flavors or making parfaits adds creativity. Remember, use ripe avocados for the best taste. This mousse is healthy and easily customizable for different diets. Enjoy your tasty treat, and don't hesitate to share your own variations!](https://joymealplan.com/wp-content/uploads/2025/06/f08f53b2-ba89-49fb-bc73-48bd2b3a08b2-768x768.webp)