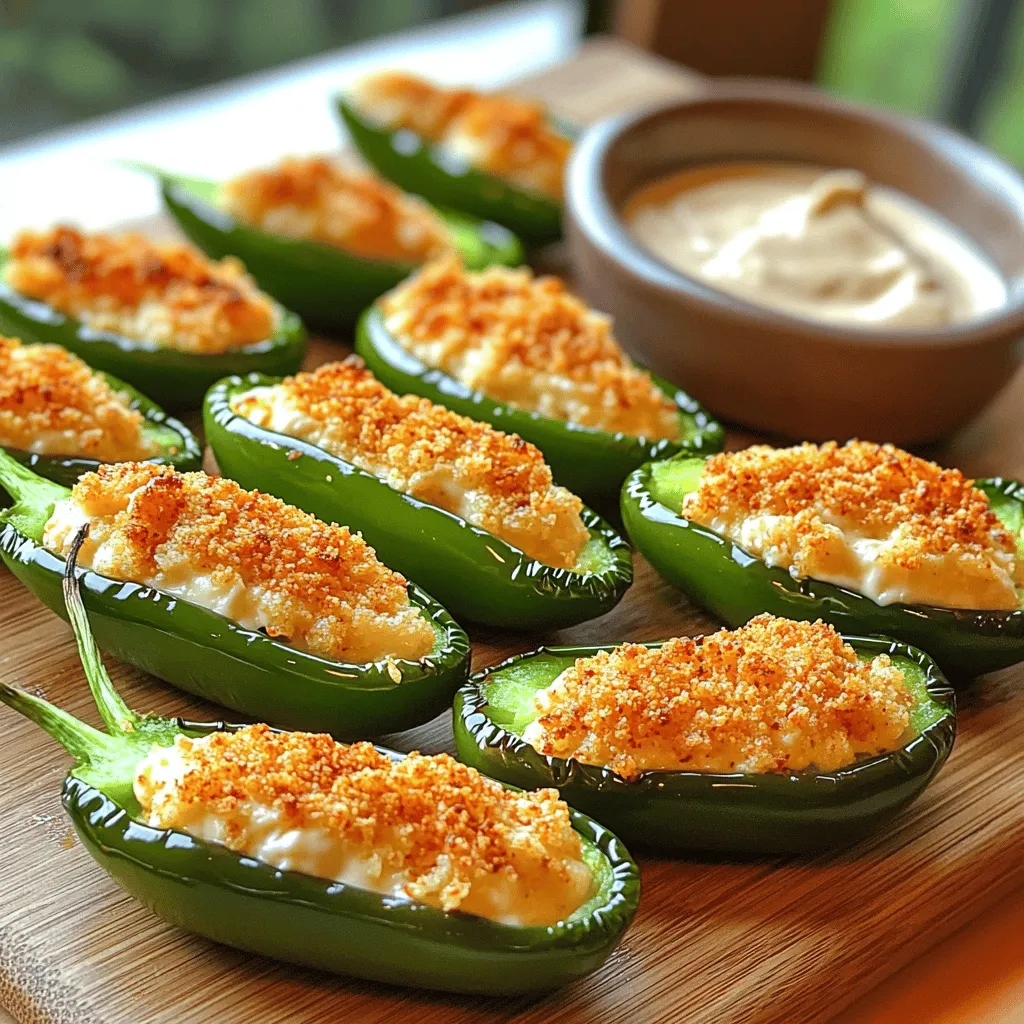
Air Fryer Jalapeño Poppers Crunchy and Flavorful Snack

Are you ready for a snack that’s both crunchy and packed with flavor? Air fryer jalapeño poppers are the perfect bite-sized treat for game days, parties, or just a fun night at home. With a creamy cheese filling and crispy panko coating, these poppers are simple to make and a real crowd-pleaser. Join me as I share the best tips and tricks to prepare this delicious snack!
Ingredients
List of Required Ingredients
– 12 fresh jalapeño peppers
– 8 oz cream cheese, softened to room temperature
– 1 cup shredded sharp cheddar cheese
– 1/2 cup panko breadcrumbs
– 1 teaspoon garlic powder
– 1 teaspoon onion powder
– 1/2 teaspoon smoked paprika
– Salt and pepper, to taste
– Olive oil spray
Selecting fresh jalapeños is key for great poppers. Look for peppers that feel firm and bright. They should not have wrinkles or soft spots. Choose medium-sized jalapeños for a good balance of heat and flavor. The heat can vary by size, so be mindful of your spice level.
If you want to switch things up, consider these substitutions:
– Use Greek yogurt or sour cream instead of cream cheese for a tangy twist.
– Try pepper jack or mozzarella for a different cheese experience.
These simple swaps can change the flavor and make your dish unique. Now, get ready to make the crunchiest, most flavorful jalapeño poppers ever!
Step-by-Step Instructions
Prepping the Air Fryer
First, preheat your air fryer to 375°F (190°C). This step helps cook the poppers evenly. While it heats up, check the basket. Make sure it is clean and dry. A clean basket ensures good air circulation.
Preparing the Jalapeños
To prepare the jalapeños, start by slicing each pepper in half lengthwise. Use a small spoon or knife to scoop out the seeds and white membranes. This helps reduce the heat. If you love spice, leave some seeds in for a kick.
Making the Cheese Filling
Now, let’s make the cheese filling. In a bowl, mix 8 oz of softened cream cheese with 1 cup of shredded cheddar cheese. Add 1 teaspoon each of garlic powder and onion powder. Then, sprinkle in 1/2 teaspoon of smoked paprika. Don’t forget to season with salt and pepper. Mix until everything is smooth and creamy.
Stuffing and Coating
Take a jalapeño half and fill it with the cheese mixture. Press it in well so the filling stays inside. In another bowl, place 1/2 cup of panko breadcrumbs. Lightly spray the tops of the stuffed peppers with olive oil. This helps the breadcrumbs stick better. Dip the oiled side into the breadcrumbs, covering it evenly.
Air Frying Process
Now, it’s time to air fry! Place the stuffed jalapeños in a single layer in the air fryer basket. Make sure they are not touching. This helps them cook evenly. Air fry for about 10-12 minutes. Keep an eye on them until they turn golden brown and the cheese is bubbly.
Serving Suggestions
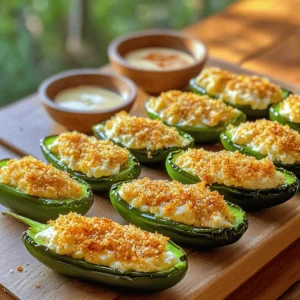
Once they are ready, use tongs to take them out. Let them cool for a few minutes on a plate. This waiting time helps the flavors develop. For a lovely presentation, serve them on a bright platter. Add some chopped herbs on top for color. Pair with ranch or blue cheese dip for a refreshing contrast.
Tips & Tricks
Achieving the Perfect Crunch
To get that perfect crunch, use olive oil spray. This spray helps the breadcrumbs get golden and crispy. Just a light spritz on top of the poppers makes a big difference.
For even coating, sprinkle the panko breadcrumbs on after spraying. Dip each oiled jalapeño half in the breadcrumbs. Make sure to cover all the tops. This step ensures that every bite is crunchy.
Flavor Enhancements
To boost flavor, add spices or herbs to the cheese filling. Garlic powder and onion powder are great choices. You can also try adding fresh herbs like cilantro or parsley.
Experiment with cheese blends too. Sharp cheddar is tasty, but mixing it with pepper jack adds spice. Go ahead and play around with flavors to find your favorite.
Common Mistakes to Avoid
Avoid overstuffing the jalapeños. If you pack them too tightly, the filling can spill out while cooking. Keep the filling generous, but not overflowing.
Do not overcrowd the air fryer basket. Give each jalapeño space to cook evenly. If they are too close, they won’t crisp up right. Cook them in batches if needed for the best results.
Variations
Spicy Variations
Want more heat? Keep some jalapeño seeds in the mix. The seeds add an extra kick. You can also try spicy cheese options. Pepper jack or habanero cheddar both work great. These choices will spice up your poppers nicely.
Vegetarian/Dietary Variants
If you’re vegan, swap in vegan cream cheese. This keeps the flavor while meeting dietary needs. For a gluten-free option, use gluten-free panko breadcrumbs. You can find these at many grocery stores. These simple changes let everyone enjoy the dish.
Flavor Profile Alterations
Try a Southwest twist by adding black beans to the filling. This gives your poppers a hearty feel. You can also make Mediterranean-style poppers. Just add crumbled feta for a tangy touch. These variations keep things fun and exciting in the kitchen.
Storage Info
Proper Storage Techniques
To store leftover jalapeño poppers, let them cool down completely. Place them in an airtight container. You can refrigerate them for up to three days. If you want to keep them longer, freezing is a good option. Wrap each popper tightly in plastic wrap, then place them in a freezer bag. This keeps them fresh and prevents freezer burn.
Reheating Instructions
Reheating in the air fryer is the best method. Preheat your air fryer to 350°F (175°C). Place the jalapeño poppers in a single layer in the basket. Heat them for about 5-7 minutes until they are warm and crispy again. If you don’t have an air fryer, you can use an oven. Set it to 350°F (175°C) and bake the poppers on a tray for about 10-15 minutes.
Shelf Life
Jalapeño poppers last about three days in the fridge. If frozen, they can last up to three months. Always check for signs of spoilage. If they smell off or look discolored, it’s best to toss them. Trust your senses; they guide you well!
FAQs
How long do you air fry jalapeño poppers?
You should air fry jalapeño poppers for about 10-12 minutes. This time works for most air fryer models. Some models may cook faster, so check them after 8 minutes. If you want a crispier finish, you can add an extra 2-3 minutes. Always ensure they turn golden brown and the cheese bubbles.
Can you make jalapeño poppers ahead of time?
Yes, you can prep jalapeño poppers ahead of time. Stuff the jalapeños and coat them with breadcrumbs. Place them in the fridge for up to 24 hours. When ready, just air fry them as needed. If you want to freeze them, wrap them well in plastic wrap. They will last for about three months in the freezer.
What can I serve with air fryer jalapeño poppers?
You can serve jalapeño poppers with many tasty sides. Some great options are:
– Ranch dressing
– Blue cheese dip
– Salsa
– Guacamole
– Fresh veggies like carrot and cucumber sticks
These sides add more flavor and coolness to balance the heat.
Are jalapeño poppers healthy?
Jalapeño poppers can be a fun snack, but they have some calories. Each popper has cream cheese and cheddar cheese, which adds fat. However, they can fit into a balanced diet if you enjoy them in moderation. You can make them healthier by using low-fat cheese or adding more veggies.
How do I lower the spice level in jalapeño poppers?
To make jalapeño poppers milder, here are some tips:
– Remove all seeds and membranes from the peppers, as they hold most heat.
– Use mild cheese instead of sharp cheddar.
– Mix in some sour cream or yogurt into the cheese filling to cool it down.
– Choose larger jalapeños, which tend to be less spicy than smaller ones.
You now have all the details to make tasty air fryer jalapeño poppers. We covered key ingredients, from jalapeños to seasonings. I shared tips for picking fresh peppers and suggestions for substitutions. You learned step-by-step instructions to prepare, stuff, and air fry these snacks. Remember the tricks for crunch and flavor, and explore variations to suit your taste. Store leftovers wisely and reheat for best results. Enjoy experimenting with these delicious poppers!
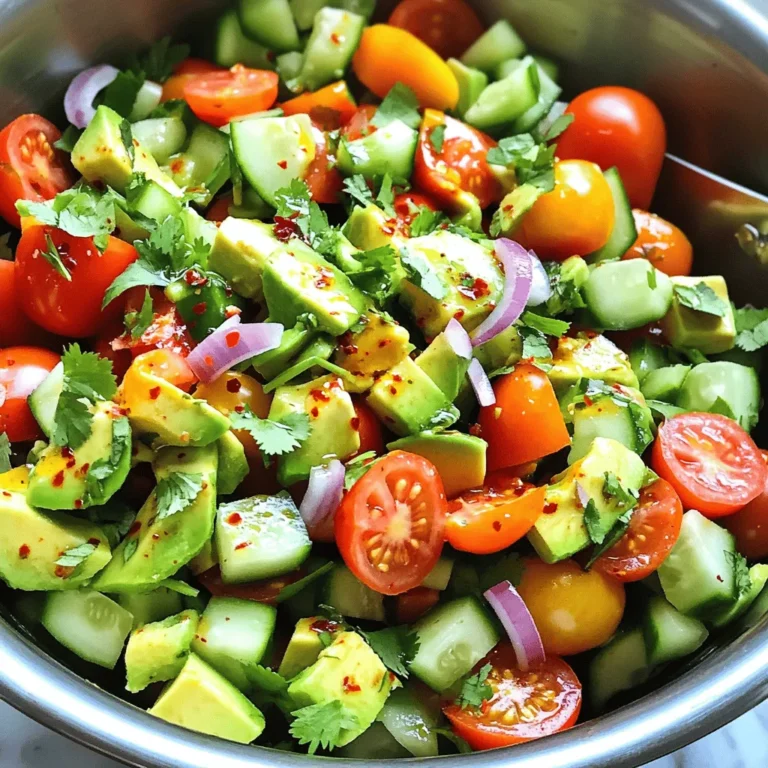
![To make a fresh and tasty Asian cucumber salad, you need simple ingredients. Here’s what you’ll need: - 2 large cucumbers, thinly sliced - 1 medium carrot, peeled and julienned - 1 red bell pepper, cored and thinly sliced - 3 green onions, thinly chopped - 1/4 cup fresh cilantro leaves, roughly chopped - 1 tablespoon sesame seeds, lightly toasted These veggies give the salad crunch and color. Cucumbers add freshness, while carrots and bell peppers bring sweetness. You can also add extras to make your salad unique. Here are some ideas: - Sliced radishes for extra crunch - Chopped peanuts for a nutty flavor - Thinly sliced jalapeños for a spicy kick Feel free to mix and match based on what you like or have at home! A great dressing makes the salad shine. Here’s what you need for the dressing: - 3 tablespoons rice vinegar - 2 tablespoons soy sauce (preferably low-sodium) - 1 tablespoon sesame oil - 1 teaspoon granulated sugar - 1/2 teaspoon chili flakes (adjust according to heat preference) - Salt, to taste This dressing combines sour, salty, and sweet flavors, making every bite delightful. You can find the full recipe in the main document for all the steps! First, grab your sharp knife and cutting board. Start with the cucumbers. Slice them thinly. You want them to be about the thickness of a quarter. This helps them soak up the dressing well. Next, peel the carrot and cut it into thin strips. This is called julienning. For the red bell pepper, remove the seeds and slice it thinly too. Finally, chop the green onions and cilantro. Now, let's make the dressing. In a small bowl, mix the rice vinegar, soy sauce, sesame oil, granulated sugar, and chili flakes. Use a whisk or a fork to blend it well. Make sure the sugar dissolves completely. Taste it! If you want it sweeter, add a little more sugar. If you like it spicier, throw in more chili flakes. In a large mixing bowl, combine all your chopped vegetables. Pour the dressing over them. Use tongs to toss everything together. Make sure all the veggies get coated well. Let the salad sit for about 15 to 20 minutes. This helps the flavors meld together. Before serving, sprinkle the toasted sesame seeds on top. Toss gently one more time and serve. Enjoy your fresh and zesty Asian Cucumber Salad! For a full recipe, check [Full Recipe]. Choose cucumbers that feel firm and look smooth. Avoid cucumbers with soft spots or wrinkles. Check for bright color and no blemishes. The best cucumbers are crisp and vibrant. You can also pick Japanese or Persian cucumbers for a sweeter taste. These varieties are often less bitter than regular cucumbers. To boost the flavor of your salad, consider adding fresh herbs. Mint and basil work well. You can also try lime juice for a zesty kick. If you like it spicy, add more chili flakes or sliced jalapeños. For a sweet touch, include some diced mango or pineapple. Each addition offers a unique twist to the dish. Presentation matters when serving your salad. Use a large, shallow bowl to display it nicely. You can also serve it in individual bowls for a more personal touch. Add a sprinkle of extra sesame seeds on top for crunch. A few cilantro leaves can brighten the dish. For color, consider a light dusting of chili flakes, too. These small touches make the salad look as good as it tastes. {{image_4}} You can easily make this salad heartier by adding protein. Cooked shrimp, chicken, or tofu work well. For shrimp, try lightly boiling or grilling them. For chicken, use grilled or shredded cooked chicken. Tofu can be cubed and pan-fried for a crispy texture. Simply mix your choice of protein into the salad before serving. This boosts flavor and nutrition. Fruits and nuts add a fun twist to Asian cucumber salad. Consider adding mango or pineapple for sweetness. Thinly slice these fruits and toss them in with the veggies. Nuts like cashews or almonds bring a nice crunch. Toast them lightly for extra flavor. Just sprinkle them on top before serving for a delightful texture. You can easily adjust the spice levels to fit your taste. If you prefer a milder salad, reduce or omit the chili flakes. For a spicier kick, add more chili flakes or some sliced fresh chili. You can also try sriracha or chili oil for a different heat profile. Taste as you go to find your perfect balance. For the full recipe, check out the Crisp and Zesty Asian Cucumber Salad. To keep your Asian cucumber salad fresh, store it in an airtight container. Make sure all the air is out to prevent sogginess. Place the container in the fridge. The cool temperature helps maintain the crispness of the cucumbers. Always use clean utensils when serving to avoid contamination. This salad tastes best cold, so you don't need to reheat it. If you want to serve it later, take it out of the fridge about 10 minutes before serving. This helps the flavors to come alive again. Toss the salad gently to mix everything well before serving. You can add a few fresh herbs or sesame seeds for extra flavor just before serving. The salad will stay fresh in the fridge for about 2 to 3 days. After that, the cucumbers may start to lose their crunch. I don’t recommend freezing this salad. The texture of the cucumbers will change when frozen and thawed. For the best taste, enjoy your salad within a couple of days after you make it. Check out the Full Recipe for more details! Yes, you can make Asian Cucumber Salad ahead of time. It tastes great after sitting a bit. I recommend prepping it a few hours before serving. This lets the flavors meld well. If you want to make it a day in advance, that works too. Just keep it covered in the fridge. The cucumbers may lose some crunch, but the taste will still shine. You can easily swap some ingredients for this salad. If you don't have rice vinegar, use apple cider vinegar. For soy sauce, tamari works well for a gluten-free option. Don't have sesame oil? Olive oil can be a good choice. Feel free to add other veggies like radishes or avocado. You can make it your own! Asian Cucumber Salad stays fresh for about 2-3 days in the fridge. Keep it in a sealed container to maintain flavor and crunch. As time passes, the cucumbers may soften a bit. To enjoy it at its best, eat it sooner rather than later. For the full recipe, check out the section above. This article covered how to make a tasty Asian cucumber salad. We discussed key ingredients and flavors, along with useful tips for choosing fresh cucumbers. I shared easy steps for prepping, dressing, and combining your salad. You also learned about variations and how to store leftovers properly. In the end, this salad is fresh, versatile, and simple to make. Enjoy your cooking!](https://joymealplan.com/wp-content/uploads/2025/06/ec355424-4335-4c9e-817d-5cfd4eb3a0ec-768x768.webp)

![To make Pickle Ranch Snack Crackers, you need the following ingredients: - 1 cup all-purpose flour - 1/2 cup cornmeal - 1 teaspoon baking powder - 1/2 teaspoon baking soda - 1/2 teaspoon salt - 1 tablespoon ranch seasoning mix - 1/4 cup dill pickle juice - 1/4 cup melted butter (cooled slightly) - 1/2 cup shredded cheddar cheese - 1/4 cup dill pickle slices (finely chopped) You can swap some ingredients if needed. For the all-purpose flour, try using whole wheat flour for added fiber. If you prefer a gluten-free option, use a gluten-free flour blend. Instead of cornmeal, you can use fine breadcrumbs for a different texture. If you want to skip the ranch seasoning, use herbs like dill, garlic powder, or onion powder to create your own flavor. Each serving, which is about two crackers, provides: - Calories: 120 - Total Fat: 8g - Saturated Fat: 4g - Cholesterol: 20mg - Sodium: 150mg - Carbohydrates: 10g - Fiber: 1g - Sugar: 1g - Protein: 3g These crackers are tasty and balanced, making them a fun snack for any occasion. You can enjoy them without guilt! 1. Preheat your oven to 350°F (175°C). This is key for baking. 2. Line a baking sheet with parchment paper. This helps with easy cleanup. 3. In a large bowl, mix the flour, cornmeal, baking powder, baking soda, salt, and ranch seasoning. Use a whisk to mix well. 4. Slowly add the dill pickle juice and melted butter. Stir until a dough forms. 5. Fold in the cheddar cheese and chopped dill pickles. Make sure they spread evenly in the dough. 6. Roll the dough into small balls, about the size of a quarter. Place them on the sheet, leaving space between them. 1. Flatten each ball gently with a fork or your fingers. Aim for even thickness. 2. Bake the crackers for 12-15 minutes. Watch closely for a light golden brown color. 1. Once baked, let the crackers cool on the sheet for a few minutes. 2. Transfer them to a wire rack to cool completely. This makes them crispier. 3. For a fun serving idea, arrange them on a colorful platter. Add fresh dill sprigs or serve with ranch dip for a tasty snack. Enjoy your Pickle Ranch Snack Crackers! You can find the full recipe above for more details. To get the right texture for your Pickle Ranch Snack Crackers, focus on mixing. Combine the dry ingredients well to avoid lumps. When adding the wet ingredients, mix just until combined. Overmixing can make your crackers tough. Roll the dough into small balls. Keep them uniform in size to ensure even baking. Flatten them gently for a crispier edge. To boost flavor, consider adding more ranch seasoning. You could also try garlic powder or onion powder. A pinch of cayenne can add a nice kick if you like spice. Adding herbs like dill or parsley can enhance the pickle flavor. For extra richness, sprinkle some grated Parmesan cheese on top before baking. One common mistake is using hot melted butter. It can change the dough's texture. Be careful not to skip the cooling step after baking. Allowing them to cool helps the crackers firm up. Also, don’t crowd the baking sheet. If they are too close, they may stick together. Check them often while baking to avoid burning. For a full recipe, refer to the complete instructions. {{image_4}} You can add fun twists to Pickle Ranch Snack Crackers. Want some heat? Try adding cayenne pepper or crushed red pepper flakes. Just a pinch will do! For a cheesy version, swap in pepper jack cheese instead of cheddar. Mixing in some garlic powder can also boost flavor. These tweaks keep your snack game exciting! If you need a gluten-free option, use gluten-free all-purpose flour. It works well in this recipe. You can also try almond flour for a nutty taste. Make sure your ranch seasoning is gluten-free too. This way, everyone can enjoy these tasty crackers without worry. These crackers shine when paired with dips. Creamy ranch dip is a favorite, but you can also serve them with hummus or guacamole. For a fun party snack, arrange them on a platter with fresh veggies. They also taste great with cheese slices or charcuterie. Each bite will surprise your guests! Explore the [Full Recipe] to start making your own delicious Pickle Ranch Snack Crackers today! Store your Pickle Ranch Snack Crackers in an airtight container. This keeps them fresh and crisp. You can use a glass jar or a plastic container. Make sure they are completely cool before sealing. If you live in a humid area, consider adding a small bag of rice to absorb moisture. When stored properly, these crackers can last up to one week. They taste best in the first few days. After that, they may lose some crunch. If you want to keep them longer, you can freeze them. Just place them in a freezer-safe bag or container. If your crackers lose their crunch, you can reheat them. Preheat your oven to 300°F (150°C). Spread the crackers on a baking sheet in a single layer. Heat them for about 5-7 minutes. Check often to avoid burning. Let them cool before enjoying again. For the full recipe, refer to the earlier section. Pickle Ranch Snack Crackers are tasty, crunchy treats. They mix the flavors of dill pickles and ranch dressing. These snacks are perfect for parties or game nights. They are easy to make at home with simple ingredients. To make Pickle Ranch Snack Crackers at home, follow these steps: 1. Preheat your oven to 350°F (175°C). 2. Line a baking sheet with parchment paper. 3. Mix flour, cornmeal, baking powder, baking soda, salt, and ranch seasoning in a bowl. 4. Add dill pickle juice and cooled melted butter. Stir to form a dough. 5. Fold in cheddar cheese and chopped pickles. 6. Roll the dough into small balls. Flatten each ball on the baking sheet. 7. Bake for 12-15 minutes until golden. 8. Let them cool on a wire rack. For the full recipe, check the details provided above. Pickle Ranch Snack Crackers can be a fun snack. They contain some healthy ingredients like cheese and pickles. However, they also have butter and flour, which add calories. Enjoy them in moderation as part of a balanced diet. You can find Pickle Ranch Snack Crackers at many grocery stores. Look in the snack aisle or near the crackers. Some stores may also sell them online. Check popular websites for easy shopping options. These crackers pair well with many dips and spreads. Serve them with ranch dressing, creamy dip, or hummus. You can also enjoy them with cheese or fresh veggies. They make a great snack for any gathering. This blog post covers everything about Pickle Ranch Snack Crackers. We discussed the key ingredients, including substitutions, and shared helpful nutritional data. You learned precise steps for preparation and baking, along with cooling tips for best results. I shared easy tricks to get the perfect texture and flavor. You now know various tasty variations to try and how to store them properly. Finally, you have answers to common questions about these delicious snacks. Enjoy making and sharing your own Pickle Ranch Snack Crackers!](https://joymealplan.com/wp-content/uploads/2025/07/696f27ca-dd07-4295-82fd-de9c637e8141-768x768.webp)