Greek Lemon Chicken Soup Avgolemono Comfort Dish
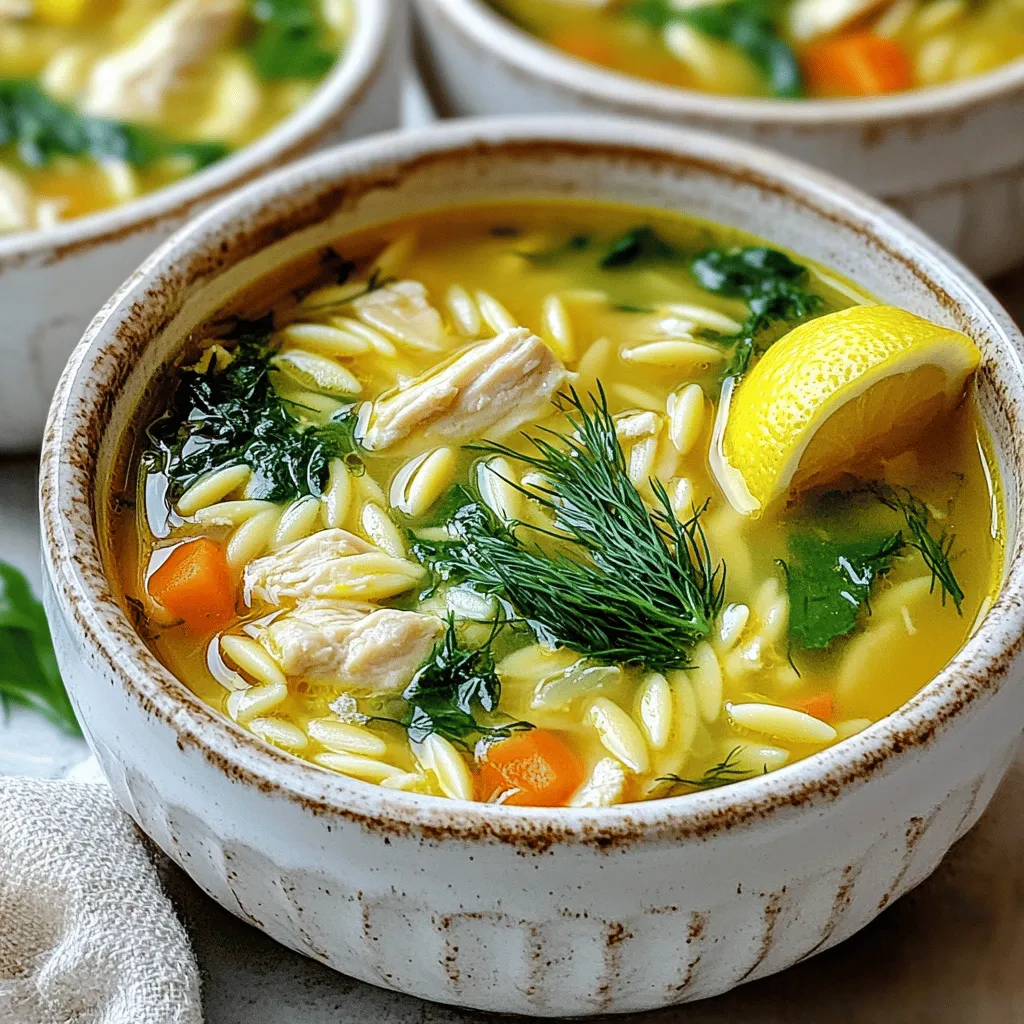
If you crave a warm, hearty dish that brings comfort, look no further! Greek Lemon Chicken Soup, or Avgolemono, is the answer. This delightful soup combines tender chicken, bright lemon, and fluffy orzo for a bowl full of warmth. In this post, I’ll guide you through every step to create a delicious version at home, complete with tips, variations, and storage advice. Let’s dive into this easy and comforting recipe!
Ingredients
Main Ingredients
– 1 lb boneless, skinless chicken breast
– 6 cups chicken broth
– 1 cup orzo pasta
Flavor Enhancers
– 3 large eggs
– 1/4 cup freshly squeezed lemon juice
– Zest of 1 medium lemon
Vegetables & Seasonings
– 1 cup baby spinach
– 1 medium onion
– 2 cloves garlic
– 2 tablespoons extra virgin olive oil
– Salt and black pepper
The main ingredients for Greek Lemon Chicken Soup Avgolemono start with chicken. I use 1 pound of boneless, skinless chicken breast. It gives a nice flavor and texture. Next, I add 6 cups of chicken broth. This broth forms the soup’s heart. It adds richness and warmth to the dish.
Next, I stir in 1 cup of orzo pasta. Orzo gives a lovely bite and makes the soup filling.
For flavor, I whisk together 3 large eggs, 1/4 cup of freshly squeezed lemon juice, and zest from 1 medium lemon. This mix creates that famous Avgolemono sauce. It adds a creamy, tangy twist to the soup.
Then, I add vegetables. I toss in 1 cup of baby spinach for color and nutrition. I also use 1 medium onion and 2 cloves of garlic. These aromatics build a strong flavor base.
Finally, I drizzle in 2 tablespoons of extra virgin olive oil. This step enhances the soup’s richness. I season with salt and black pepper to taste. Each element works together to create a comforting bowl of soup that warms the soul.
Step-by-Step Instructions
Preparing the Base
Start by heating the olive oil in a large pot over medium heat. Once the oil is hot, add the diced onion. Sauté the onion for about five minutes, until it turns clear and a bit golden. Then, stir in the minced garlic and cook for one more minute. This step adds great flavor to the soup.
Next, it’s time to add the chicken. Toss in the diced chicken breast and season it with salt and black pepper. Cook the chicken for about five to seven minutes. Stir it occasionally until it is fully cooked and no longer pink. This ensures your soup has tender chicken pieces.
Adding the Broth and Pasta
Now, it’s time to pour in the chicken broth. Bring the mixture to a gentle simmer. Once it’s bubbling lightly, add the orzo pasta. Stir the pasta into the broth and cook for about eight to ten minutes. You want the orzo to be tender but still firm to the bite, or al dente. This texture adds a nice bite to your soup.
Creating the Avgolemono Mixture
While the soup simmers, prepare the Avgolemono mixture. In a separate bowl, whisk together the eggs, lemon juice, and lemon zest. Keep whisking until the mixture is smooth and well combined. This mix adds a creamy and tangy flavor to the soup.
To temper the egg mixture, slowly add a ladleful of hot soup into the bowl while whisking. This step is key to avoid cooking the eggs too fast. If you skip this, the eggs might curdle in the soup. Once well mixed, gradually pour this tempered egg mixture back into the pot. Stir gently to combine everything.
Finishing the Soup
Now, add the baby spinach to the soup. Let it wilt in the hot soup for about one to two minutes. This adds a fresh color and a healthy touch. After the spinach is wilted, taste the soup. Adjust the seasoning with more salt and pepper if needed. Remove the pot from heat when everything is heated through. Your Greek Lemon Chicken Soup Avgolemono is now ready to serve!
Tips & Tricks
Perfecting the Spinach Addition
To keep spinach fresh and tasty, add it at the end. This way, it wilts just right. The heat from the soup cooks the spinach without losing its bright green color. Use baby spinach for a tender bite. Remember to rinse it well before adding to the pot. This removes dirt and helps keep nutrients intact.
Preventing Egg Curdling
To prevent curdling, temper the eggs. Start by whisking the eggs, lemon juice, and zest in a bowl. Then, slowly add a ladle of hot soup to this mix. Whisk constantly as you pour. This step warms the eggs gradually. After that, pour the egg mixture back into the soup slowly while stirring. This keeps your soup creamy and smooth.
Enhancing Flavor Profiles
For a richer flavor, add fresh herbs like dill or parsley. You can sprinkle them on top just before serving. A pinch of black pepper boosts the taste too. Don’t forget to taste your soup before serving. Adjust salt and pepper as needed. You can also try a dash of paprika for a little warmth.

Variations
Vegetarian Version
You can easily make a vegetarian version of Avgolemono. Simply swap the chicken for hearty vegetables or tofu. Try using zucchini, carrots, or bell peppers. These veggies add great flavor and texture. Tofu can also be a great protein source. Ensure you season the tofu well. Cook it until golden for a nice crunch. This way, you keep the essence of the dish while making it plant-based.
Alternative Grains
Another fun twist is to use different grains. Instead of orzo, consider rice or quinoa. Both options cook well in the soup and absorb the flavors nicely. Rice gives a classic feel, while quinoa adds a nutty taste and boosts protein. Choose what you like best or have on hand. This change keeps the dish exciting and nutritious.
Regional Twists
Greek regions have their own takes on Avgolemono. In some areas, cooks add lentils or chickpeas for extra depth. Others may use local herbs like oregano or mint. Each region has unique flavors that change the soup’s character. Explore these variations for a taste of Greece from different parts. You might find a new favorite way to enjoy this comforting dish!
Storage Info
Refrigeration Guidelines
To store leftovers safely, let the soup cool down first. Transfer it to an airtight container. Place it in the fridge. Avgolemono will stay fresh for three to four days. Make sure you label the container with the date. This helps you keep track of how long it has been there.
Freezing Suggestions
If you want to freeze Avgolemono, do it before adding the eggs. The egg mixture can separate when thawed. Pour the cooled soup into freezer-safe containers. Leave some space at the top for expansion. It can last up to three months in the freezer. When you’re ready to enjoy it, just thaw it overnight in the fridge.
Reheating Instructions
To reheat the soup, do it slowly on the stove over low heat. This helps keep the texture smooth. Stir often to prevent sticking. If it seems too thick, add a splash of chicken broth or water. Heat until warm but not boiling. Boiling can cause the eggs to curdle. Enjoy your comforting bowl of Avgolemono!
FAQs
What is Avgolemono, and what does it mean?
Avgolemono is a Greek soup made with chicken, lemon, and eggs. The word itself comes from “avgo” meaning egg and “lemono” meaning lemon. This dish holds a special place in Greek culture. It often brings comfort during family gatherings. The bright lemon flavor adds a refreshing twist. The creamy texture makes it a favorite for many.
Can I make Avgolemono in advance?
Yes, you can make Avgolemono ahead of time. Prepare the soup base without adding the eggs. This keeps the texture smooth. Store the soup in the fridge for up to three days. When ready to serve, reheat the soup gently. Then, whisk in the egg and lemon mix just before serving. This keeps the soup fresh and creamy.
How do I ensure my soup is creamy?
To make your soup creamy, use a few key techniques. First, temper the egg mixture by slowly adding hot soup to it. This step prevents the eggs from curdling. Whisk the eggs and lemon juice until smooth. Gradually mix them into the soup while stirring. This creates a velvety texture that is signature to Avgolemono.
Can I use store-bought broth instead of homemade?
Yes, store-bought broth is a great option if you’re short on time. It can save you effort and still taste good. However, homemade broth has richer flavor and depth. If you choose store-bought, look for low-sodium options. This lets you control the saltiness of your soup. Always taste and adjust seasonings to suit your preference.
In this article, we covered how to make a delicious Avgolemono soup. We discussed the key ingredients like chicken, broth, and orzo. I shared step-by-step instructions, tips for better flavor, and variations for different diets.
Remember, the right techniques can make your soup creamy and full of taste. Enjoy your cooking and make this soup your own! You can experiment with flavors and ingredients. Enjoy your culinary journey with Avgolemono!

![- 8 lasagna noodles - 2 cups cooked chicken, shredded - 1 cup ricotta cheese - 2 cups mozzarella cheese, shredded (divided) - 1 cup grated Parmesan cheese - 2 cups Alfredo sauce (store-bought or homemade) - 1 teaspoon garlic powder - 1 teaspoon Italian seasoning - Salt and pepper to taste - Fresh parsley, chopped (for garnish) Gathering these ingredients is the first step. Start with lasagna noodles. They are the base for your roll-ups. Make sure to have cooked chicken ready. Shredded chicken works best. You can use leftover chicken or cook some fresh. Ricotta cheese adds creaminess. Mozzarella cheese gives a nice stretch when melted. Parmesan cheese adds a sharp flavor. Alfredo sauce is key for richness. You can buy it or make your own. Garlic powder and Italian seasoning bring extra taste. Don't forget salt and pepper to enhance all the flavors. Fresh parsley adds a pop of color. It also freshens the dish. With all your ingredients lined up, you’re set to create a delicious meal. For the full recipe, check the details above. - Preheat oven to 375°F (190°C). - Grease a 9x13 inch baking dish with cooking spray or butter. This helps prevent sticking. - Boil a large pot of water. Add salt for flavor. - Cook lasagna noodles until al dente, usually about 8-10 minutes. - Drain the noodles carefully in a colander. Lay them flat on a clean kitchen towel. This helps them dry slightly and prevents sticking. - In a mixing bowl, combine: - 2 cups cooked chicken, shredded - 1 cup ricotta cheese - 1 cup mozzarella cheese, shredded - 1 teaspoon garlic powder - 1 teaspoon Italian seasoning - Salt and pepper to taste - Stir the mixture well until everything is blended. Aim for a smooth filling with no lumps. - Spread a thin layer of Alfredo sauce on the bottom of the greased dish. - For each lasagna noodle, take 2-3 tablespoons of the filling. Spread it evenly along the noodle's length. - Roll the noodle up tightly from one end to the other, keeping the filling inside. Place the roll seam-side down in the dish. Repeat with all noodles. - Pour the remaining Alfredo sauce evenly over the roll-ups. - Sprinkle the remaining mozzarella and Parmesan cheese on top. - Cover the dish tightly with foil and bake for 25 minutes. - After 25 minutes, remove the foil and bake for another 15 minutes. This helps the cheese bubble and turn golden. - Let the dish cool for a few minutes before slicing. Garnish with fresh parsley before serving. For the complete recipe, check the full recipe section! If you want to switch things up, you can replace ricotta cheese with cottage cheese or cream cheese. Both options still give a creamy taste. For mozzarella, try using provolone or gouda. Both melt well and add great flavor. When it comes to Alfredo sauce, you can use store-bought for speed. If you prefer homemade, blend butter, cream, and parmesan for a rich taste. Homemade sauce can be thicker and creamier, which enhances your roll ups. To get the perfect noodle texture, boil them until just al dente. This keeps them sturdy enough to roll without tearing. After cooking, place the noodles on a clean kitchen towel to absorb excess water. For cheese melting and browning, use full-fat cheese. It melts beautifully and creates a golden crust. Keep the dish covered with foil for the first part of baking. Remove the foil later to allow the cheese to brown nicely. Pair your roll ups with a fresh salad or garlic bread. A light Caesar salad adds a crisp contrast to the creamy dish. Garlic bread complements the flavors and adds a warm touch. For garnishing, sprinkle fresh parsley on top just before serving. You can also drizzle extra Alfredo sauce over the roll ups for a tasty finish. This adds color and makes your dish look fancy. For the full recipe, check out [Full Recipe]. {{image_4}} You can boost your roll-ups by adding veggies. Spinach and mushrooms work well here. Just sauté them first to soften. Mix these veggies into your filling for extra flavor and nutrition. This makes the dish colorful and adds a nice crunch. While Alfredo is rich and creamy, you can switch it up. Try using marinara sauce for a tangy twist. Pesto can also bring a fresh, herby taste. Each sauce gives your roll-ups a new life. Feel free to experiment and find your favorite! For those with dietary needs, there are options. Use gluten-free lasagna noodles to keep it safe. For a dairy-free choice, look for dairy-free cheese. Many brands offer great flavors that melt well. These swaps let everyone enjoy this delicious meal! For the complete recipe, check out the Full Recipe section. After enjoying your Chicken Alfredo Lasagna Roll Ups, let them cool down. Place them in an airtight container. Make sure to cover them well. This keeps them fresh and tasty in the fridge. You can store leftovers for up to three days. When you are ready to eat again, reheat them in the oven. Set it to 350°F (175°C). Cover the dish with foil to avoid drying out. Heat for about 20 minutes. If you prefer the microwave, heat in short bursts. Check every minute until hot. To freeze your roll ups, follow these steps: 1. Cool Completely: Let them cool in the fridge first. 2. Wrap Well: Use plastic wrap to cover each roll up tightly. 3. Use a Freezer Bag: Place wrapped roll ups in a freezer bag. Remove as much air as you can. 4. Label and Date: Write the date on the bag for easy tracking. You can freeze these roll ups for up to three months. When you want to eat, move them to the fridge overnight to thaw. After thawing, reheat as mentioned above. In the fridge, your Chicken Alfredo Lasagna Roll Ups last three days. If you freeze them, they stay good for three months. Always check for any signs of spoilage before enjoying them again. Storing them properly helps keep their flavors intact and delicious. For the full recipe, check out the details provided earlier. Yes, you can make Chicken Alfredo Lasagna Roll Ups ahead of time. Prepare them up to the baking step. Cover the dish and store it in the fridge for up to 24 hours. When ready to bake, add a few extra minutes to the cooking time. This makes meal prep easy. To make this recipe vegetarian, swap the chicken for sautéed vegetables. Good choices include mushrooms, spinach, or zucchini. Use the same filling method with ricotta and mozzarella. This keeps the creamy texture and flavor you love. Serve Chicken Alfredo Lasagna Roll Ups with a fresh salad. A Caesar or mixed greens salad pairs nicely. Garlic bread or crusty rolls also complement this dish. You can add a light soup for a complete meal. If your Alfredo sauce is runny, try adding more cheese. Grated Parmesan or mozzarella works well. You can also simmer the sauce on low heat. This helps it thicken. Use cornstarch mixed with water as a last resort to thicken it. Absolutely! You can use cooked turkey or ham instead of chicken. Shredded beef or pork also works well. Just ensure the meat is tender and flavorful, as this adds depth to your roll-ups. You can create a delicious Chicken Alfredo Lasagna Roll Ups meal. This recipe included key ingredients, clear steps, and useful tips. It’s easy to customize, whether for dietary needs or personal taste. You can serve them with sides to make it a feast. Don’t forget about storing leftovers properly for quick meals. Enjoy making these tasty roll ups. You’ll impress your guests and family with their creamy flavor and cheesy goodness. These roll ups make cooking fun and simple.](https://joymealplan.com/wp-content/uploads/2025/06/3bb75aa4-aa5d-45cb-bb96-cf9b565c5d71-768x768.webp)

. - Preheat the oven to 400°F (200°C). - Line the sheet pan with parchment paper. - Whisk together olive oil, garlic, lemon juice, lemon zest, dill, salt, and pepper. - This mix adds flavor and moisture to your salmon. - Coat salmon fillets with the marinade. - Arrange cherry tomatoes and asparagus on the sheet pan. - Make sure the veggies are spread out for even cooking. - Transfer the pan to the oven and bake for 15-20 minutes. - The salmon will be done when it flakes easily with a fork. - Check that the asparagus is tender but still crisp. - Let the dish rest for a few minutes before serving. - Garnish with lemon slices and optional dill for a fresh look. I love how easy this dish is to prepare. You can find the Full Recipe for more details. To ensure salmon is perfectly cooked, use a fork to test it. When it flakes easily, it’s done. Aim for an internal temperature of 145°F. This way, your salmon will be moist and tender. Resting time is key after cooking. Let the salmon sit for about 5 minutes before serving. This helps the juices redistribute, making each bite more flavorful. Serving directly from the pan gives a cozy feel. It makes the meal feel more relaxed and invites everyone to dig in. For plating, use a large plate. Place a salmon fillet in the center. Arrange the asparagus and tomatoes around it. A touch of fresh dill on top adds color and flavor. To boost flavor, consider adding spices like paprika or smoked sea salt. Fresh herbs like basil or parsley can also work well. For marinades, try mixing honey with soy sauce for a sweet twist. You can also use a splash of white wine to elevate the dish. For the full recipe, check the links above. {{image_4}} You can easily swap salmon for other fish like trout or cod. These fish cook similarly and absorb flavors well. If you want a different protein, try chicken breasts. They work great too. For vegetarian or vegan options, use tofu or tempeh. Both can soak up the lemon garlic marinade and bring great taste. Using seasonal vegetables can brighten your dish. In spring, try green beans or baby carrots. Summer is perfect for zucchini or bell peppers. In fall, consider sweet potatoes or Brussels sprouts. Winter brings root vegetables like parsnips and turnips. If you want to switch out asparagus or tomatoes, don't hesitate. Broccoli or cauliflower can add nice crunch and flavor. Experimenting with herbs and spices opens new doors. Try fresh basil or parsley for a bright twist. If you want a bolder taste, use smoked paprika or cumin. You can also play with sweet and savory. Adding fruits like pineapple or peaches can bring a fun contrast to the dish. Mixing flavors can create a memorable meal! For the full recipe, check out the [Full Recipe]. Store any leftover salmon and veggies in the fridge. Use airtight containers to keep them fresh. Make sure the lid fits tightly. This helps maintain flavor and texture. It's best to eat leftovers within two days for the best taste. To reheat salmon, use low heat to avoid drying it out. You can use the oven or microwave. For the oven, set it to 350°F (175°C) and warm for about 10 minutes. If using the microwave, place salmon on a plate and cover it with a damp paper towel. Heat in short bursts of 30 seconds until warmed through. You can freeze cooked salmon and veggies for later. Wrap each piece tightly in plastic wrap, then place in a freezer bag. Be sure to remove as much air as possible. For thawing, move them to the fridge for a few hours or overnight. This keeps the salmon tasty and moist. How long to bake salmon at different temperatures? For salmon, the general rule is to bake it at 400°F for 15-20 minutes. If you choose 375°F, it may take 20-25 minutes. At 425°F, check it after 12-15 minutes. Cooking time varies with thickness and oven accuracy. Always check for doneness to avoid overcooking. Can I use frozen salmon for this recipe? Yes, you can use frozen salmon. Just be sure to thaw it first. Place it in the fridge overnight or use cold water for quicker thawing. Pat the salmon dry before adding the marinade. This helps it absorb the flavors better. What temperature should salmon be cooked to? Salmon should reach an internal temperature of 145°F. Use a meat thermometer to check. When done, it should flake easily with a fork. The color will change from bright pink to opaque. How can I tell when the salmon is done? You can tell salmon is ready when it flakes easily. Press it gently with a fork. If it breaks apart, it's done. The color should be a light pink with a slightly opaque appearance. What sides pair well with lemon garlic salmon? Great sides include rice, quinoa, or a fresh salad. Roasted potatoes or steamed veggies also work well. These sides complement the salmon's bright flavors. You might want to add a squeeze of lemon on top. Is it okay to substitute any ingredients? Yes, you can substitute ingredients. Use any firm fish if you don't have salmon. For veggies, try broccoli or zucchini. You can swap fresh herbs with dried ones, but use less. Adjust the flavors to suit your taste! For the complete recipe, check out the Full Recipe section. This blog post showed you how to make a delicious lemon garlic salmon dish. We covered the main ingredients, easy steps for cooking, and tips for great results. You learned about variations and storing leftovers for later. Cooking should be fun, and this recipe is simple and tasty. Try it out and enjoy your meal. Once you master this dish, feel free to experiment with your own flavors and sides. Happy cooking!](https://joymealplan.com/wp-content/uploads/2025/07/8e928ca0-d1e7-48e9-9001-0d995acac6dc-768x768.webp)
. To start, you need to whisk the eggs. Take a medium bowl and crack in 4 large eggs. Add 1/2 cup of milk. Whisk them together until they are smooth. Then, season this mixture with a little salt and freshly cracked pepper. This adds flavor to your eggs. Next, we need to cook the vegetables. Heat 2 tablespoons of olive oil in a large non-stick skillet over medium heat. Once the oil is hot, add 1 small yellow onion and 1 small red bell pepper, both finely diced. Sauté them for about 4-5 minutes. You want them tender and fragrant. Now comes the fun part. Add in 1/2 cup of black beans that you’ve rinsed and drained. Sprinkle in 1 teaspoon of ground cumin for a warm flavor. Stir everything together and cook for another 2-3 minutes. This warms the beans and brings the flavors together. Then, it’s time to cook the eggs. Pour the whisked egg mixture into the skillet. Gently stir them as they begin to set. Cook for about 3-4 minutes or until the eggs are fully cooked, fluffy, and light. Once done, remove the skillet from heat. To assemble your burritos, lay a whole wheat tortilla flat on your workspace. Spoon a generous portion of the egg and bean mixture into the center. Next, top it with a few slices of avocado and a sprinkle of shredded cheese. You can choose either cheddar or pepper jack. Now, let’s fold and roll the burrito. Carefully fold the sides of the tortilla over the filling. Then, roll it up from the bottom, tucking it tightly. Repeat this with the remaining tortillas and filling. For a crispy finish, return the burritos to the skillet, seam-side down. Toast them for 1-2 minutes on each side over medium heat. This will make them golden brown and slightly crisp. Serve the burritos warm, garnished with fresh cilantro leaves and a side of salsa or hot sauce. Enjoy! Achieving Fluffy Eggs To get fluffy eggs, whisk them well with milk. Air makes the eggs rise. Cook them gently over medium heat. Stir slowly as they cook. This keeps them light and fluffy. Avoiding Overcooking Watch your eggs closely while they cook. Eggs can go from soft to dry in seconds. Remove them from heat when they are just set. They will continue to cook after being taken off the stove. Adding More Vegetables or Proteins Feel free to add more veggies like spinach or mushrooms. You can also add proteins like cooked sausage or diced ham. This makes the burrito more filling and fun. Spice Variations If you like heat, add jalapeños or a dash of hot sauce. For a different flavor, try smoked paprika or chili powder. These spices can make your breakfast so exciting. Ideal Accompaniments Serve your burritos with salsa or fresh avocado. A side of fruit adds a nice touch, too. You could even add a dollop of sour cream for creaminess. Presentation Ideas Place the burritos on a colorful plate. Add a sprinkle of cilantro on top for color. Cut them in half to show off the filling. This makes your meal look tasty and fresh. For the full recipe, check out the detailed instructions. {{image_4}} For a tasty twist, you can make vegetarian sunrise burritos. Just swap the meat for tofu or extra veggies. Tofu adds protein and absorbs flavors well. You can use bell peppers, zucchini, or spinach. This way, you still enjoy a filling meal without meat. If you want more protein, try adding sausage or bacon. Cook the sausage until it's browned and crumbled. For bacon, fry until crispy, then crumble over the eggs. This gives the burritos a hearty flavor. You can even mix both for a double protein boost. For gluten-free options, consider using corn tortillas or other gluten-free wraps. They hold the filling well and add a different taste. You can also check for store-bought gluten-free tortillas. This way, everyone can enjoy your sunrise breakfast burritos. Feel free to explore these variations to make your breakfast exciting! For the full recipe, be sure to check out the provided details. To keep your burritos fresh, follow these steps: - Refrigeration Tips: Place leftover burritos in an airtight container. Store them in the fridge. They stay good for up to three days. - Freezing Instructions: If you want to keep them longer, wrap each burrito in foil. Then, put them in a freezer bag. They can last for up to three months in the freezer. To enjoy your burritos again, use these methods: - Best Methods for Preserving Texture: The oven works best. Preheat it to 350°F. Place the burrito on a baking sheet. Heat for about 15-20 minutes. This keeps the tortilla crispy. You can also use a microwave. Wrap the burrito in a damp paper towel. Heat it for 1-2 minutes. This method is quick but may make the tortilla soft. To make Sunrise Breakfast Burritos vegetarian, just leave out the eggs. Instead, use tofu or extra veggies. You can add mushrooms, spinach, or zucchini for a tasty option. Season them well with spices like cumin and paprika to keep the flavor strong. Yes, you can make these burritos ahead of time. Prepare the filling and store it in the fridge for up to three days. You can also wrap the burritos tightly in foil and freeze them. Just reheat them in the oven or microwave when you’re ready to eat! Many sauces go well with Sunrise Breakfast Burritos. Salsa is a classic choice. It adds freshness and a bit of spice. You can also try hot sauce for heat or avocado crema for creaminess. A drizzle of ranch dressing adds a tasty twist too. To change the spice level, adjust the amount of cumin and add chili powder. For more heat, include diced jalapeños or a dash of cayenne pepper. If you prefer mild flavors, skip the spicy ingredients and focus on herbs like cilantro for freshness. Yes, there are a few good ways to warm tortillas. You can heat them in a dry skillet for about 30 seconds on each side. Alternatively, wrap them in a damp paper towel and microwave for 15-20 seconds. This keeps them soft and pliable for wrapping. In this article, we explored how to create delicious Sunrise Breakfast Burritos. You learned about essential ingredients like eggs, black beans, and fresh veggies. We broke down the steps for mixing, cooking, and assembling, plus tips for perfect eggs and custom flavors. You can also modify these burritos to fit dietary needs or preferences. Remember, these burritos are easy to store and reheat well. Enjoy your cooking journey and share your tasty results!](https://joymealplan.com/wp-content/uploads/2025/07/3ee2e162-623e-4153-8713-e8e5adb7d2c4-768x768.webp)