Maple Glazed Carrot Cake Irresistible Dessert Recipe
If you love desserts that are both sweet and satisfying, you’ll adore this Maple Glazed Carrot Cake. It’s moist, flavorful, and topped with a rich maple glaze that takes it to another level. In this post, I’ll share the easy steps and secret tips for making this irresistible treat. Whether you’re baking for a special occasion or just want a tasty dessert, this recipe is a must-try. Let’s get started!
Ingredients
List of Essential Ingredients
To make a delicious maple glazed carrot cake, gather the following key ingredients:
– 2 cups all-purpose flour
– 2 cups grated carrots (about 4 medium carrots)
– 1 cup granulated sugar
– 1/2 cup packed brown sugar
– 1 cup vegetable oil
– 4 large eggs
– 1 teaspoon vanilla extract
– 1 teaspoon baking powder
– 1 teaspoon baking soda
– 1 teaspoon ground cinnamon
– 1/2 teaspoon ground nutmeg
– 1/2 teaspoon salt
– For the Maple Glaze:
– 1 cup powdered sugar
– 3 tablespoons pure maple syrup
– 1 tablespoon milk or plant-based milk
Optional Ingredients for Enhanced Flavor
You can enhance the flavor of your cake with these optional ingredients:
– 1/2 cup chopped walnuts
– 1/2 cup raisins
Adding walnuts gives a nice crunch, while raisins add sweetness. Both boost the cake’s texture.
Tools and Equipment Needed
Make sure you have these tools ready for the best baking experience:
– Two 9-inch round cake pans
– Mixing bowls
– Whisk
– Sifter
– Spatula
– Cooling racks
– Measuring cups and spoons
These tools will help you mix and bake with ease. Enjoy the process and watch your cake rise beautifully!
Step-by-Step Instructions
Preparing the Oven and Cake Pans
Start by preheating your oven to 350°F (175°C). This is a key step for baking. While the oven warms up, prepare two 9-inch round cake pans. Grease each pan with butter or oil. Next, dust them lightly with flour to prevent sticking. Set the pans aside for later.
Mixing Wet Ingredients
In a large mixing bowl, combine the granulated sugar, brown sugar, and vegetable oil. Use a whisk to blend them well until the mixture is smooth. This step adds sweetness and moisture to your cake. Then, add four large eggs one by one. Mix well after each egg. Finally, stir in one teaspoon of vanilla extract for extra flavor.
Combining Dry Ingredients
In a separate bowl, sift together the all-purpose flour, baking powder, baking soda, ground cinnamon, ground nutmeg, and salt. This process aerates the flour, helping your cake rise nicely. Gradually add the dry mixture to the wet ingredients. Mix gently until just combined. Avoid overmixing to keep the cake light and fluffy.
Baking the Cake
Evenly divide the batter between the two prepared cake pans. Smooth the tops with a spatula. Place the pans in the preheated oven. Bake for 25-30 minutes. To check if it’s done, insert a toothpick into the center. It should come out clean. If it does, your cake is ready!
Cooling and Preparing for Glaze
Once baked, take the cakes out of the oven. Let them cool in the pans for about 10 minutes. After that, carefully invert them onto wire cooling racks. This step allows the cakes to cool completely. Cooling is important for a good glaze finish.
Applying the Maple Glaze
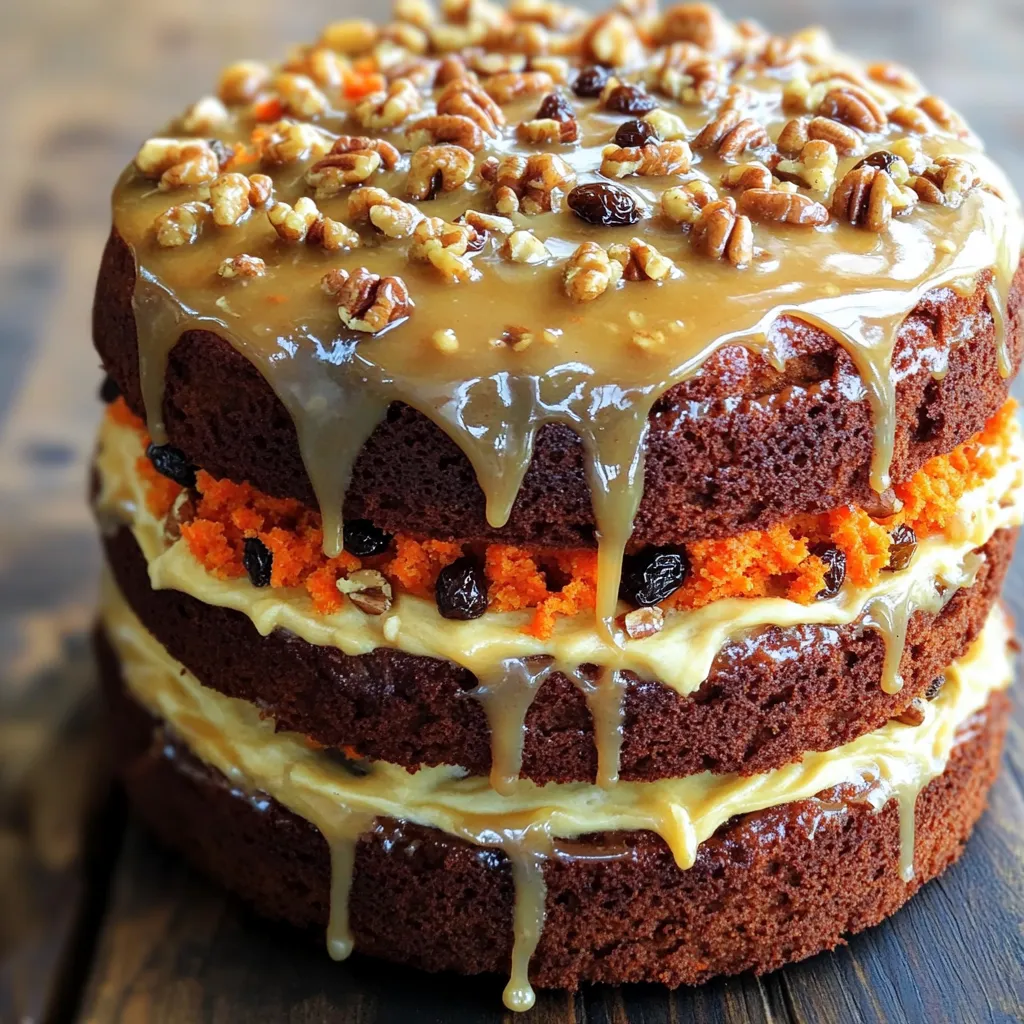
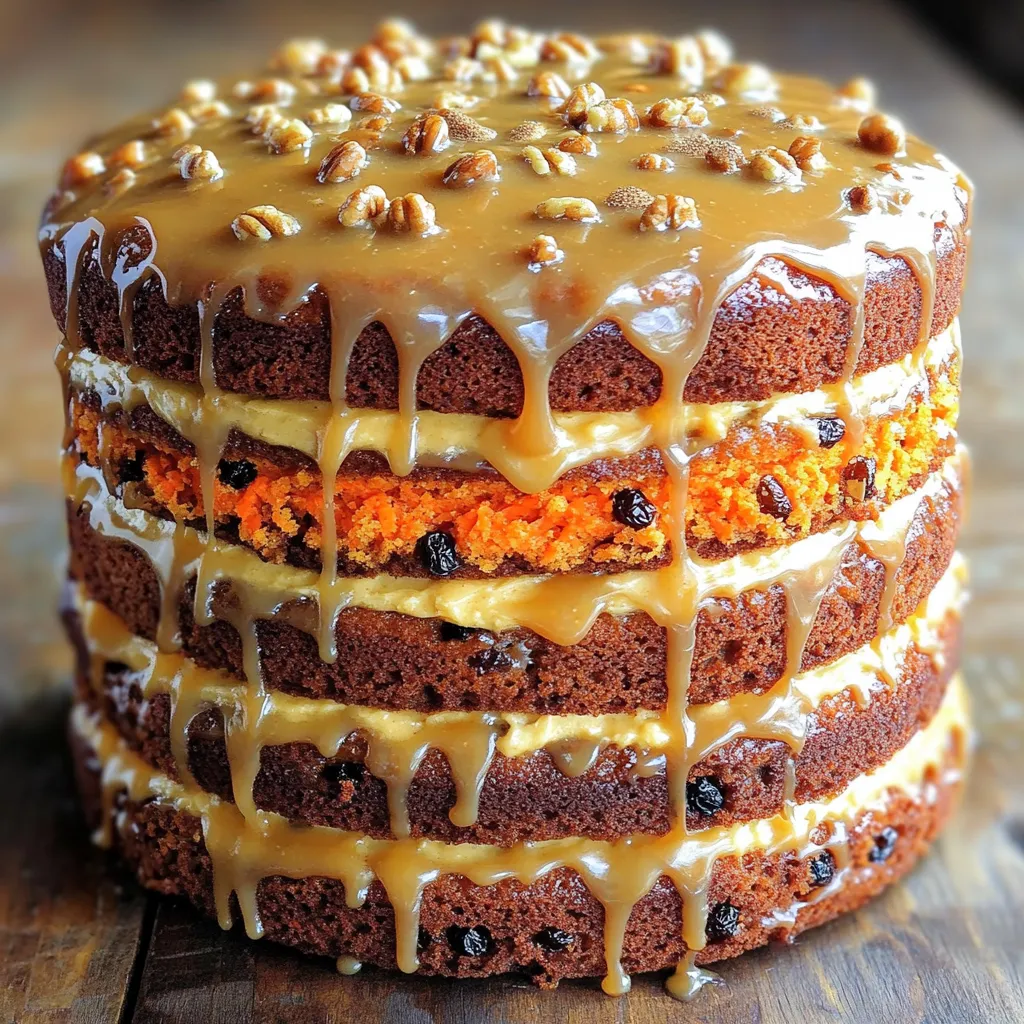
In a small bowl, whisk together the powdered sugar, pure maple syrup, and milk. Mix until smooth and creamy. If the glaze is too thick, add a bit more milk. If it’s too thin, add more powdered sugar. When the cakes are cool, place one layer on a serving plate. Drizzle some glaze over the top. Then, add the second layer on top. Drizzle the remaining glaze over it and let it drip down the sides for a beautiful finish.
Tips & Tricks
Achieving the Perfect Cake Texture
To get a soft and fluffy cake, mix your wet and dry ingredients well. Be careful not to overmix. When you fold in the carrots, do it gently. This helps keep the cake light. Also, make sure your eggs are at room temperature. This step helps your batter blend better.
How to Enhance Maple Flavor
To boost the maple taste in your cake, use pure maple syrup in the glaze. You can also add a bit of maple extract to the batter. This will deepen the flavor. Consider using dark maple syrup, as it has a richer taste.
Presentation Tips for Serving
A lovely cake deserves a beautiful look. When you glaze the cake, let it drip down the sides. This creates a nice effect. You can sprinkle ground cinnamon on top for color. Adding extra chopped walnuts gives a nice crunch. Consider using small carrot decorations for fun touches.
Variations
Alternative Add-ins for the Batter
You can customize your carrot cake by adding fun ingredients. Here are a few ideas:
– Pineapple: Add 1 cup of crushed pineapple for moisture and sweetness.
– Coconut: Mix in 1/2 cup of shredded coconut for a tropical twist.
– Zucchini: Substitute half of the carrots with grated zucchini for extra veggies.
These add-ins enhance flavor and texture while keeping the cake moist.
Healthier Substitutions for Ingredients
If you want to make your cake a bit healthier, consider these swaps:
– Whole Wheat Flour: Use whole wheat flour instead of all-purpose flour for more fiber.
– Applesauce: Replace half of the oil with unsweetened applesauce to cut fat.
– Honey or Maple Sugar: Swap granulated sugar for honey or maple sugar to lower the glycemic index.
These changes keep the cake delicious while improving its nutritional value.
Different Glaze Options
While the maple glaze is delightful, you can try other options to mix things up:
– Cream Cheese Frosting: Blend 8 oz of cream cheese with 1 cup of powdered sugar for a rich topping.
– Chocolate Ganache: Melt chocolate with cream for a decadent glaze.
– Lemon Glaze: Combine powdered sugar with lemon juice for a zesty touch.
Each glaze provides a unique flavor that can change the cake’s profile. Enjoy experimenting!
Storage Info
Best Practices for Storing Leftover Cake
To keep your maple glazed carrot cake fresh, store it in an airtight container. This helps retain moisture and flavor. If you have leftover slices, wrap them tightly with plastic wrap before placing them in the container. Keep the cake at room temperature for up to three days. If you need to store it longer, consider freezing it.
How to Freeze Maple Glazed Carrot Cake
Freezing your cake is easy. First, let the cake cool completely. Then, slice it into individual pieces if you prefer. Wrap each slice in plastic wrap, then place them in a freezer-safe bag or container. Label the bag with the date. You can freeze the cake for up to three months. To enjoy, simply thaw it in the fridge overnight.
Reheating Tips for Enjoying Later
When you’re ready to enjoy your cake again, remove it from the fridge or freezer. For best results, let it sit at room temperature for about 30 minutes. If you like warm cake, place it in the microwave for 10-15 seconds. Be careful not to overheat it, as this can dry it out. Enjoy your cake with a drizzle of fresh maple glaze if desired!
FAQs
Can I make this cake ahead of time?
Yes, you can make this cake ahead of time. Bake the cake and let it cool. Wrap it tightly in plastic wrap. Store it at room temperature for one day. For longer storage, freeze it for up to three months. When ready to serve, thaw it overnight in the fridge. Glaze it just before serving for the best taste.
How do I know when my cake is done baking?
Check if your cake is done by inserting a toothpick into the center. If it comes out clean, the cake is ready. You can also gently press the top. It should spring back if it’s done. Keep an eye on the time, usually 25-30 minutes.
Can I use a different glaze for this cake?
Yes, you can use a different glaze if you like. Cream cheese frosting works well with carrot cake. You could also try a simple sugar glaze or a lemon glaze for a fresh twist. Just make sure it complements the flavors of the cake.
Can I substitute ingredients in this recipe?
Yes, you can substitute some ingredients. Use whole wheat flour instead of all-purpose flour for a healthier option. You can replace granulated sugar with coconut sugar or honey. If you want a nut-free cake, leave out the walnuts. For a dairy-free version, use plant-based milk.
What types of frosting pair well with carrot cake?
Carrot cake pairs nicely with cream cheese frosting. You can also try buttercream frosting for a sweeter taste. A maple buttercream adds a nice touch too. If you want something lighter, whipped cream or a glaze works great as well.
We covered how to make a delicious maple glazed carrot cake from start to finish. I shared key ingredients and essential tools you’ll need. We went through each step of the baking process, from mixing to glazing. I also included tips for achieving the perfect texture and ways to enhance flavor. Finally, you learned how to store and reheat leftovers.
By following these steps, you can create a flavorful cake that’s sure to impress. Enjoy every bite!

![For my Lemon Poppy Seed Zucchini Muffins, I use these ingredients: - 1 cup grated zucchini (squeeze out excess moisture) - 1 cup all-purpose flour - 1/2 cup whole wheat flour - 1/4 cup poppy seeds - 1 teaspoon baking powder - 1/2 teaspoon baking soda - 1/2 teaspoon salt - 1/2 teaspoon ground cinnamon - 1/2 cup granulated sugar - 1/4 cup brown sugar, packed - 2 large eggs - 1/2 cup vegetable oil - 1/4 cup plain Greek yogurt - Zest of 1 lemon (about 1 tablespoon) - 2 tablespoons fresh lemon juice Using fresh zucchini is key. It keeps your muffins moist. Fresh lemon juice and zest add bright flavors. These ingredients work together to create a light and fluffy treat. If you have dietary needs, you can substitute some ingredients: - For gluten-free muffins, replace all-purpose flour with a gluten-free blend. - Use almond milk or coconut milk in place of Greek yogurt for a dairy-free option. - You can swap the granulated sugar with coconut sugar for a lower glycemic option. To enhance flavor, consider adding: - 1/2 cup chopped nuts, like walnuts or pecans. - 1/2 cup chocolate chips for a sweet twist. - A pinch of nutmeg or ginger for a warm spice note. Feel free to experiment! These small changes can lead to new and exciting flavors in your muffins. For the complete recipe, check out the [Full Recipe]. 1. Preheat your oven to 350°F (175°C). This step is key for even baking. 2. Prepare a muffin tin by lining it with paper liners or lightly greasing it with cooking spray. I like to use liners for easy removal and cleanup. 3. Mix the dry ingredients in a medium bowl. Combine all-purpose flour, whole wheat flour, poppy seeds, baking powder, baking soda, salt, and ground cinnamon. Whisk until well blended. This helps mix the leavening agents evenly. 4. In a large bowl, blend the granulated sugar and brown sugar. Add the lemon zest and whisk until mixed. This adds a bright flavor to your muffins. 5. Add the eggs one at a time, whisking well after each. This helps create a smooth, fluffy batter. Then, pour in the vegetable oil, Greek yogurt, and lemon juice. Mix until smooth. 1. Carefully fold the dry ingredients into the wet mixture. Stir gently until just combined. Avoid overmixing to keep your muffins tender. 2. Fold in the grated zucchini. Make sure it is evenly distributed without overworking the batter. The zucchini adds moisture and flavor. 1. Divide the batter evenly among the muffin cups. Fill each cup about two-thirds full. This allows space for the muffins to rise. 2. Bake in the preheated oven for 18-22 minutes. Check for doneness by inserting a toothpick into the center. If it comes out clean, your muffins are ready. 3. Let the muffins cool in the tin for about 5 minutes. Then, transfer them to a wire rack to cool completely. This helps them maintain their shape and texture. For the complete recipe, check the [Full Recipe]. Enjoy the delightful taste of lemon poppy seed zucchini muffins! To make moist lemon poppy seed zucchini muffins, focus on a few key techniques: - Squeeze the Zucchini: Grate your zucchini, then squeeze out the excess moisture. This step prevents the batter from becoming too wet. - Measure Accurately: Use measuring cups for both dry and wet ingredients. This helps your muffins rise and stay light. When you measure, remember that even small variations can change the texture. Accurate measurements make a big difference in your results. Avoid these common missteps to keep your muffins light and fluffy: - Overmixing: When you combine the dry and wet ingredients, mix gently. Overmixing can lead to tough muffins. - Filling Too Full: Fill the muffin cups about two-thirds full. If you fill them too high, they might sink in the middle. By following these tips, you can make sure your lemon poppy seed zucchini muffins turn out perfectly every time. For the complete recipe, check out the [Full Recipe]. {{image_4}} You can make lemon poppy seed zucchini muffins even more exciting by adding spices. Try mixing in 1/2 teaspoon of nutmeg or 1/2 teaspoon of ginger for a warm twist. These spices add depth and enhance the citrus flavor. Fruits can also change the taste of your muffins. You might consider adding 1/2 cup of blueberries or 1/2 cup of cranberries. These fruits will bring a burst of sweetness and tartness. Just fold them into the batter gently to keep the muffins fluffy. If you want to make vegan lemon poppy seed zucchini muffins, it's easy. Substitute the eggs with 1/2 cup of unsweetened applesauce or 1/4 cup of ground flaxseed mixed with 1/2 cup of water. Both options work well for binding the ingredients. For those wanting lower sugar options, you can use 1/4 cup of honey or 1/4 cup of maple syrup instead of granulated sugar. If you need a sugar-free version, try a sugar substitute that measures like sugar. These variations help you enjoy the muffins while fitting your dietary needs. You can still delight in the great taste of lemon poppy seed zucchini muffins. For the full recipe, check out the details provided earlier. To keep your lemon poppy seed zucchini muffins fresh, store them in an airtight container at room temperature. If you add a paper towel inside, it helps absorb moisture. This method keeps the muffins soft and tasty. When stored this way, they can last for about 2 to 3 days. After that, they may start to dry out or lose their flavor. If you want to save muffins for later, freezing is a great option. Allow the muffins to cool completely, then wrap each muffin tightly in plastic wrap. Place them in a freezer-safe bag or container. They can stay fresh in the freezer for up to 3 months. When you’re ready to eat a muffin, take it out of the freezer. Let it thaw in the fridge overnight or at room temperature for a few hours. For the best taste, reheat them in the oven at 350°F for about 10 minutes. You can also use the microwave for about 20-30 seconds. This warms them up and brings back their soft texture. Enjoy your muffins just like the day you baked them! To make lemon poppy seed zucchini muffins, start by prepping your oven and muffin tin. 1. Preheat your oven to 350°F (175°C). 2. Grate 1 cup of zucchini and squeeze out extra moisture. 3. In one bowl, mix 1 cup all-purpose flour, 1/2 cup whole wheat flour, 1/4 cup poppy seeds, 1 teaspoon baking powder, 1/2 teaspoon baking soda, 1/2 teaspoon salt, and 1/2 teaspoon ground cinnamon. 4. In another bowl, combine 1/2 cup granulated sugar, 1/4 cup brown sugar, and the zest of 1 lemon. 5. Add 2 large eggs, followed by 1/2 cup vegetable oil, 1/4 cup Greek yogurt, and 2 tablespoons of lemon juice. 6. Mix until smooth. Fold in the dry ingredients, then add the zucchini. 7. Fill muffin cups two-thirds full. Bake for 18-22 minutes. This quick overview gives you all the steps needed to create delicious muffins. Check the Full Recipe for more details. Yes, you can freeze these muffins. Here’s how: - Let the muffins cool completely after baking. - Place them in an airtight container or a freezer bag. - Label the bag with the date and type of muffin. - Store in the freezer for up to 3 months. When ready to eat, thaw them in the fridge overnight or on the counter for a few hours. You can warm them in the oven for a fresh-baked taste. Dense muffins can happen for a few reasons: - Overmixing the batter can create too much gluten. - Not using enough leavening agents like baking powder or baking soda can also lead to density. - Using too much zucchini without squeezing out moisture may add extra weight. To prevent dense muffins, mix the batter gently and ensure you measure ingredients correctly. Following these tips will help you achieve light and fluffy muffins. In summary, we covered how to make Lemon Poppy Seed Zucchini Muffins. You learned about the key ingredients and possible substitutions for dietary needs. I shared step-by-step instructions, tips to perfect your muffins, and various flavor options. Remember, measuring accurately and not overmixing are key for success. These muffins can be stored well, either short-term or long-term, for your convenience. With a bit of practice, you can enjoy delicious muffins tailored to your taste preferences. Happy baking!](https://joymealplan.com/wp-content/uploads/2025/07/b4c3b954-0106-4660-8231-7250b8c7a63e-768x768.webp)
![To make these tasty cookies, you need simple ingredients that work well together. Here is what you will need: - 1 cup unsalted butter, softened to room temperature - 1 cup powdered sugar, plus extra for dusting - 1 teaspoon pure vanilla extract - 2 cups all-purpose flour, sifted - 1/2 teaspoon pure almond extract - 1/4 teaspoon sea salt - 1 cup raspberry jam (store-bought or homemade) - 1/2 cup sliced almonds (for topping) These key ingredients create a rich and buttery base for the cookies. The powdered sugar adds sweetness, while the extracts bring depth of flavor. The raspberry jam provides a fruity burst in every bite. You can customize these cookies to suit your taste. Here are some optional ingredients to consider: - Different jams: Swap raspberry jam for strawberry, apricot, or blueberry for new flavors. - Citrus zest: Add a teaspoon of lemon or orange zest for a bright twist. - Chopped nuts: Use pecans or walnuts instead of almonds for a different crunch. These optional ingredients let you make the cookies your own. Feel free to mix and match to create your perfect treat. For the complete details on how to put these ingredients together, check out the Full Recipe. To start, gather your ingredients. You will need butter, powdered sugar, vanilla extract, almond extract, flour, sea salt, raspberry jam, and sliced almonds. First, preheat your oven to 350°F (175°C). Line a baking sheet with parchment paper to avoid sticking. In a large bowl, cream the softened butter and powdered sugar. Use an electric mixer on medium speed for about 3-4 minutes. You want the mixture to be light and fluffy. Next, add in the vanilla and almond extracts. Beat until smooth. In another bowl, mix the sifted flour and sea salt. Gradually add this to the butter mix. Stir gently, just until it forms a dough. Avoid overmixing. With a tablespoon, scoop the dough and roll it into balls. Place them on the baking sheet about 2 inches apart. Now, make a small indentation in each dough ball using your thumb or a spoon. This will hold the jam. Spoon 1/2 teaspoon of raspberry jam into each well. Be careful not to overflow. Next, sprinkle sliced almonds around the jam. Press them lightly into the dough for a nice crunch. Bake in the preheated oven for 15-18 minutes. Look for a light golden brown on the edges. Once baked, let the cookies rest for 5 minutes on the sheet. Then, transfer them to a wire rack to cool completely. When cool, dust them with extra powdered sugar for a nice touch. For a beautiful presentation, arrange the cookies on a decorative plate. Scatter fresh raspberries around them for color. Enjoy your delicious Raspberry Almond Thumbprint Cookies! For the full recipe, refer to the earlier section. To bake the best raspberry almond thumbprint cookies, follow these tips: - Use softened butter: This helps create a creamy texture. - Sift your flour: Sifting aerates the flour, leading to lighter cookies. - Space them out: Place cookies 2 inches apart on the baking sheet. This prevents them from sticking together. - Check the time: Bake until the edges are light golden brown, about 15-18 minutes. Many home bakers face pitfalls while baking. Avoid these common mistakes: - Overmixing the dough: This makes cookies tough. Mix just until combined. - Not measuring flour correctly: Use a spoon to fill the measuring cup, then level it off. - Skipping the cooling time: Let the cookies rest before moving them. This helps them set. You can add extra flavors to your cookies for a twist. Consider these options: - Zest of lemon or orange: A little zest brightens the cookie's taste. - Chopped dark chocolate: Mix in for a rich contrast to the raspberry jam. - Coconut flakes: Add for a tropical touch and added texture. These tips will help you create the perfect batch of raspberry almond thumbprint cookies. For the complete recipe, check the Full Recipe section. {{image_4}} You can use different jam flavors in these cookies. Try strawberry or apricot for a fresh twist. Blueberry jam also works well and adds a nice color. Each jam gives the cookies its own unique taste. Experimenting with flavors keeps things exciting. If you want to change the nuts, you have many choices. Pecans or walnuts add a rich flavor. You can even skip the nuts if you prefer a nut-free cookie. Just remember, the crunch will be lost, but the jam will still shine. To make gluten-free thumbprint cookies, use a gluten-free flour blend. Brands like Bob’s Red Mill or King Arthur Flour work well. Just check that the blend has xanthan gum to bind everything together. This way, everyone can enjoy these tasty treats! Follow the [Full Recipe] for the main steps and enjoy your baking journey! To keep your Raspberry Almond Thumbprint Cookies fresh, store them in an airtight container. This will help keep them soft and tasty. If you stack them, place wax paper between layers. This helps prevent sticking. You can also use a cookie tin for a charming touch. When stored properly, these cookies will last about one week at room temperature. If you place them in the fridge, they may last up to two weeks. However, cold air can dry them out. So, if you want the best taste, enjoy them fresh! Freezing cookies is a great idea for later cravings. Allow the cookies to cool completely first. Then, place them in a single layer on a baking sheet. Freeze them for about an hour. After that, transfer them to a freezer-safe bag. They can last up to three months in the freezer. When ready to eat, thaw them in the fridge overnight or let them sit at room temperature for a few hours. For the full recipe, check out the details above! If you don’t have almond extract, you can use vanilla extract instead. This will still give your cookies great flavor. You can also try hazelnut extract for a unique twist. The cookies will still taste delicious! Yes, you can use other nuts! If you prefer, try pecans, walnuts, or even pistachios. Just chop them finely and use them in place of sliced almonds. Each nut adds a different flavor and texture. To make cookies softer, add an extra tablespoon of butter. This will give them a chewier texture. For firmer cookies, bake them a minute longer. Keep an eye on them to avoid overbaking. Adjusting these small details can really change your cookie experience. Raspberry almond thumbprint cookies are easy and fun to make. You learned about key ingredients, simple steps, and helpful tips to bake them perfectly. We also explored tasty variations and storage methods. If you follow these instructions and suggestions, your cookies will impress. Enjoy sharing this sweet treat with others. Baking can be simple and rewarding. So, gather your ingredients and start creating!](https://joymealplan.com/wp-content/uploads/2025/07/b4014d7b-fb87-49bc-9ed6-2b0ba339c469-768x768.webp)