Pumpkin Cream Pie Delightful and Creamy Recipe
Ready to impress your friends and family with a delicious Pumpkin Cream Pie? This creamy treat blends rich pumpkin flavor with a smooth filling for the perfect dessert. In this article, I’ll walk you through all the steps, from choosing the right ingredients to baking tips that ensure success. Let’s dive in and make your next gathering a hit with this delightful recipe!
Ingredients
List of Ingredients Required
– 1 ½ cups pumpkin puree
– 1 cup heavy cream
– ¾ cup packed brown sugar
– ½ cup granulated sugar
– 3 large eggs
– 1 teaspoon pure vanilla extract
– 1 teaspoon ground cinnamon
– ½ teaspoon ground nutmeg
– ½ teaspoon ground ginger
– ¼ teaspoon ground cloves
– 1 pre-made pie crust (or homemade, if preferred)
– 1 cup whipped cream for topping
– Optional: crushed ginger snap cookies for garnish
Explanation of Ingredients
First, you need pumpkin puree. This gives the pie its rich flavor and color. Heavy cream makes the pie smooth and creamy. Brown sugar adds a deep sweetness, while granulated sugar balances it out. Eggs help set the pie, making it firm. Vanilla extract adds a nice aroma. The spices bring warmth: cinnamon, nutmeg, ginger, and cloves add a cozy, festive touch. You can use a pre-made pie crust for ease or make your own. Whipped cream tops it off, making each bite light and fluffy. Crushed ginger snap cookies can add a fun crunch.
Substitutions for Common Ingredients
If you can’t find pumpkin puree, you can use fresh pumpkin. Just cook and mash it. For a lighter option, use half-and-half instead of heavy cream. If you want less sugar, cut the amounts in half. You can swap eggs with flaxseed meal mixed with water for a vegan option. If you don’t have vanilla extract, try almond extract for a twist. You can also use different spices, like allspice or cardamom, if you want a new flavor.
Step-by-Step Instructions
Prepping the Oven and Pie Crust
First, set your oven to 350°F (175°C). This step warms the oven for baking. If you use a pre-made pie crust, fit it into a 9-inch pie pan. If you want to make your crust, prepare your dough. Shape it into the pan and blind bake it for about 10 minutes. It should be lightly golden. Let your crust cool for a bit before adding the filling.
Making the Pumpkin Filling
In a large mixing bowl, combine 1 ½ cups of pumpkin puree and 1 cup of heavy cream. Whisk the two together until smooth. Next, add ¾ cup of brown sugar and ½ cup of granulated sugar. Keep whisking until well mixed. Now, add 3 large eggs one at a time. Mix well after each egg. Then, stir in 1 teaspoon of pure vanilla extract for extra flavor.
Now it’s time to spice things up! Sprinkle in 1 teaspoon of ground cinnamon, ½ teaspoon of ground nutmeg, ½ teaspoon of ground ginger, and ¼ teaspoon of ground cloves. Use a whisk or spatula to ensure that all spices blend well into the pumpkin mixture.
Baking and Cooling Process
Carefully pour the spiced pumpkin filling into your prepared pie crust. Use a spatula to smooth out the top. Place the pie in your preheated oven. Bake for about 45 to 50 minutes. Your pie is ready when it is set. A knife inserted in the center should come out clean.
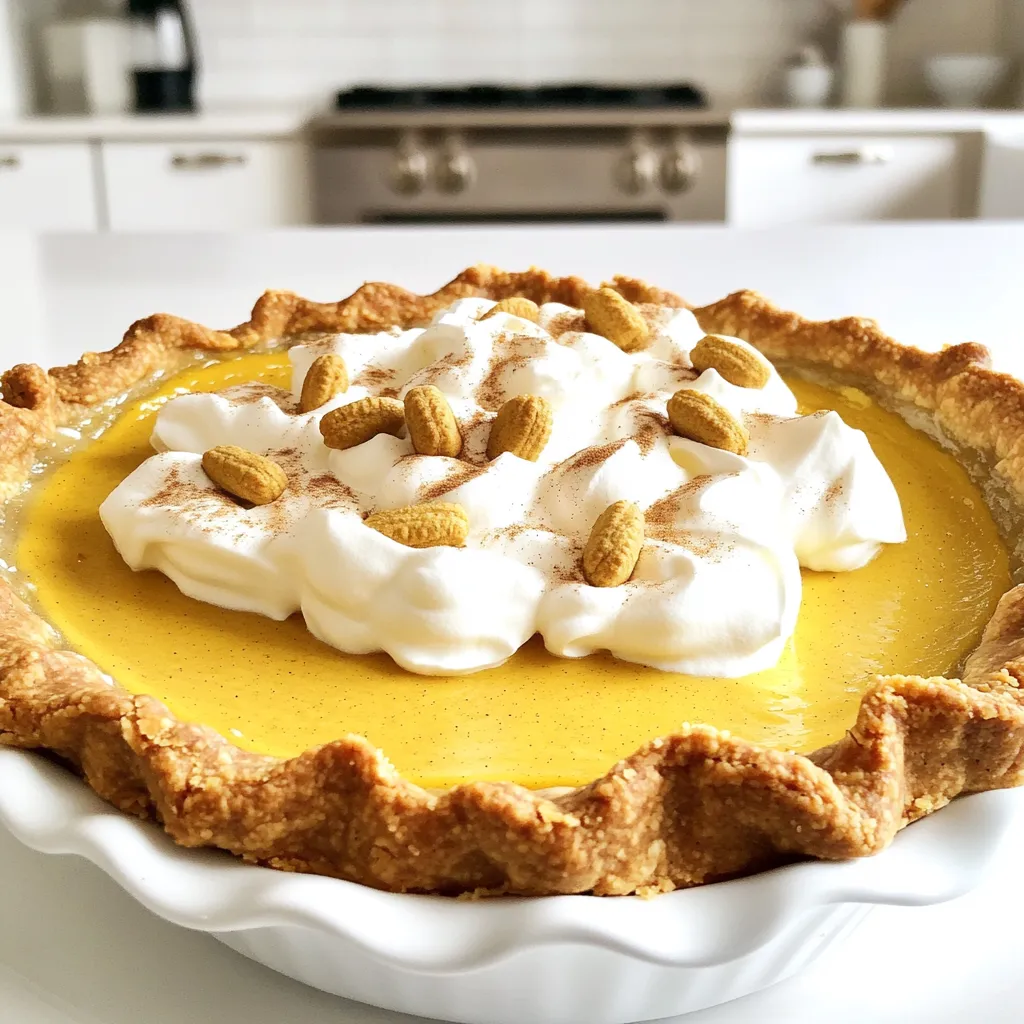
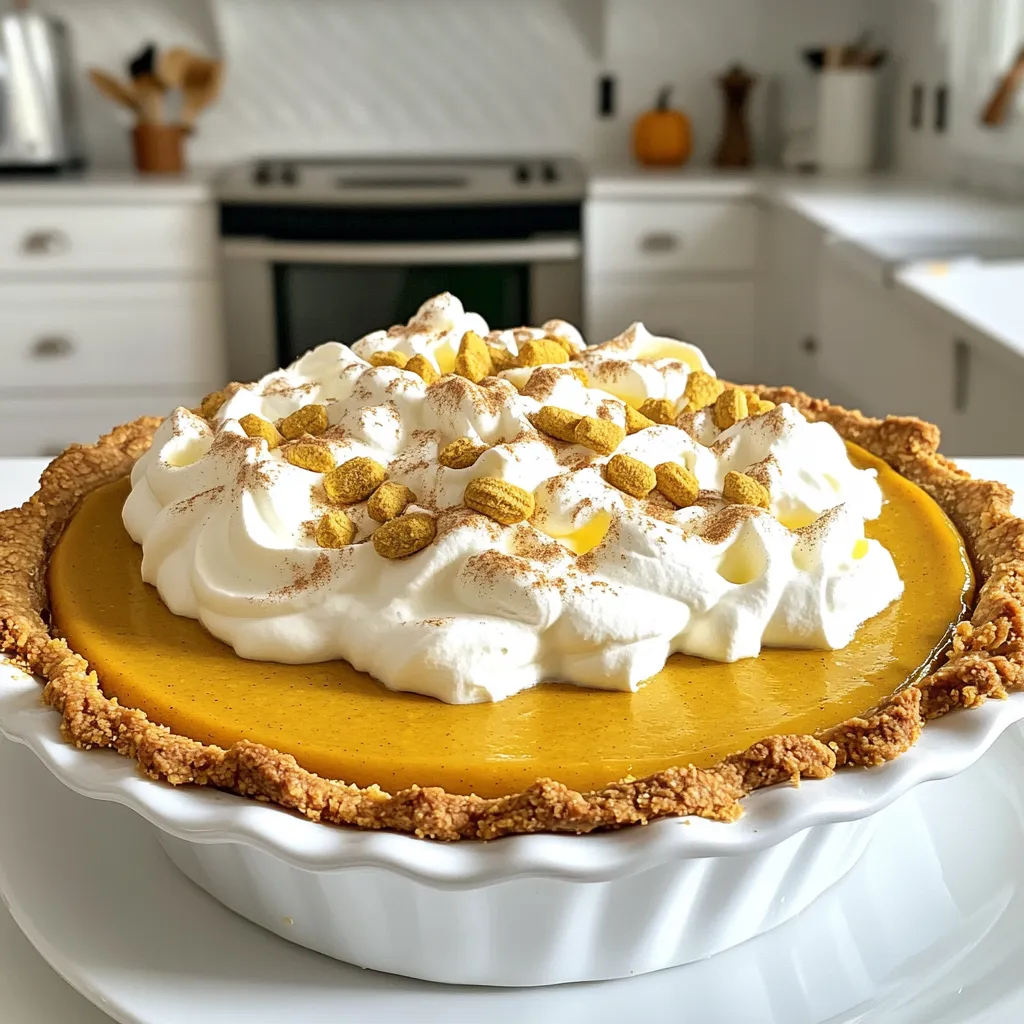
After baking, remove the pie from the oven. Let it cool to room temperature. Once cooled, refrigerate the pie for at least 3 hours. This helps it set perfectly. When ready to serve, top with whipped cream and crushed ginger snap cookies for a fun twist. Enjoy!
Tips & Tricks
Perfecting the Pumpkin Cream Pie
To make your pumpkin cream pie shine, follow these tips:
– Use fresh pumpkin puree for a rich flavor.
– Whisk the filling well to ensure a smooth texture.
– Let the pie cool before refrigerating. This helps it set better.
– Use a pie crust that fits well in your pan. This avoids spills.
– Bake until the center is firm, not jiggly.
Common Mistakes to Avoid
Here are some common mistakes to watch out for:
– Skipping the cooling step can lead to a runny pie.
– Overbaking will dry out the filling. Keep an eye on the time.
– Not mixing the spices well can leave clumps. Stir thoroughly.
– Using cold ingredients can affect texture. Bring eggs and cream to room temp.
Serving Suggestions and Presentation Ideas
Make your pie look and taste great with these ideas:
– Top with fresh whipped cream for a light finish.
– Sprinkle crushed ginger snap cookies for crunch.
– Serve with a side of vanilla ice cream for a treat.
– Use a pie server to cut clean slices. This keeps the shape intact.
– Garnish with a sprinkle of cinnamon for a pretty touch.
Variations
Alternative Spices and Flavor Enhancements
You can change the taste of your pumpkin cream pie by using different spices. Instead of cinnamon, try cardamom for a unique twist. You can also mix in a bit of cocoa powder for a rich chocolate flavor. For a warm touch, add a dash of allspice or even some fresh grated orange zest. These small changes can make your pie stand out.
Crust Options: Homemade vs. Store-bought
Choosing the right crust is key. A homemade crust gives you complete control over the flavor and texture. It can be flaky and buttery, enhancing the pie’s overall taste. If you’re short on time, a store-bought crust is a great option too. Many are tasty and save you effort. Just remember to follow the package instructions for the best results.
Dairy-free and Vegan Options
If you want a dairy-free or vegan version, make some easy swaps. Use coconut cream instead of heavy cream for a rich flavor. You can also replace eggs with flaxseed meal. Just mix one tablespoon of flaxseed with three tablespoons of water, and let it sit for a few minutes. This will create a gel-like texture that’s perfect for baking. With these swaps, everyone can enjoy this delightful pie!
Storage Info
How to Properly Store Pumpkin Cream Pie
To keep your pumpkin cream pie fresh, place it in the fridge. Use a pie cover or plastic wrap to seal it. This keeps the pie moist and flavorful. Always store it within two hours of serving. If you leave it out, bacteria can grow.
Freezing Instructions and Tips
You can freeze pumpkin cream pie for later. First, let the pie cool completely. Then, wrap it tightly in plastic wrap. After that, place it in a freezer bag or container. This prevents freezer burn. When you want to enjoy it, thaw in the fridge overnight.
How Long Does It Last?
In the fridge, your pumpkin cream pie lasts about 3 to 4 days. If you freeze it, it can last up to 2 months. Just make sure to check for signs of spoilage before you eat it. If it looks or smells off, it’s better to discard it.
FAQs
Can I use fresh pumpkin instead of pumpkin puree?
Yes, you can use fresh pumpkin. Start by cooking the pumpkin until soft. Cut it in half, remove the seeds, and bake at 350°F (175°C) for about 45 minutes. Once cooked, scoop out the flesh and blend it until smooth. This gives you fresh puree. Just make sure to measure 1 ½ cups for the recipe. Fresh pumpkin adds a nice flavor and texture.
How do I know when the pie is done baking?
The pie is done when it is set and firm. To check, insert a knife into the center. If it comes out clean, your pie is ready. It will jiggle slightly but should not be runny. Bake for 45-50 minutes for the best results. Keep an eye on it to prevent overbaking.
What can I use as a topping for Pumpkin Cream Pie?
Whipped cream is the classic topping. It adds a light, airy texture. You can also use crushed ginger snap cookies for crunch. This adds flavor and looks great too. Other ideas include caramel sauce or chocolate drizzle for a sweet touch. You can even sprinkle some cinnamon on top for extra flavor.
In this blog post, we covered how to make a great pumpkin cream pie. We discussed the key ingredients, step-by-step instructions, and tips for perfection. Remember to avoid common mistakes and explore fun variations. Proper storage keeps your pie fresh longer. You can also find answers to FAQs for any last-minute worries. Now that you have the knowledge, it’s time to bake a delicious pie and impress everyone! Enjoy your tasty creation!

![- 1 cup rolled oats - 2 ripe bananas - 1 cup almond milk - 1 teaspoon baking powder - 1 teaspoon vanilla extract - 1 tablespoon honey or maple syrup (optional) - 1/2 teaspoon ground cinnamon - Pinch of salt - Coconut oil or cooking spray for greasing Using rolled oats is key. They give your pancakes a hearty texture. Bananas add natural sweetness and moisture. Almond milk keeps it light and dairy-free. If you want sweetness, use honey or maple syrup. A touch of cinnamon gives warmth and flavor. Coconut oil or cooking spray is important to keep the pancakes from sticking. Choose either based on your preference. This recipe is simple. You can find the full recipe above to guide you through the steps. Enjoy making these delicious pancakes! Start by blending 1 cup of rolled oats. You want to blend them until they are fine and powdery. This oat flour acts as the main ingredient. Next, add 2 ripe bananas that you have mashed well. Then, pour in 1 cup of almond milk. This mix gives your pancakes a nice texture. Now it’s time to make the batter. Add 1 teaspoon of baking powder, 1 teaspoon of vanilla extract, and 1 tablespoon of honey or maple syrup if you want them sweeter. Don’t forget to add 1/2 teaspoon of ground cinnamon and a pinch of salt. Blend everything together until it is smooth and uniform. The batter should look nice and creamy. Let the batter rest for about 5-10 minutes. This helps it thicken. While the batter rests, heat a skillet over medium heat. Grease it with coconut oil or cooking spray to prevent sticking. Once hot, pour about 1/4 cup of batter for each pancake. Cook until bubbles form on top, which takes about 2-3 minutes. Then, flip them over. Cook for another 2-3 minutes until they are golden brown. Repeat this with the rest of the batter. You can find the full recipe [here]. To get the best texture, let the batter rest for 5-10 minutes. This helps it thicken. A thicker batter makes fluffier pancakes. Adjust the heat on your skillet. Cook on medium heat to avoid burning. If the pan is too hot, the outside cooks fast while the inside stays raw. You can change the sweetness. Instead of honey, try maple syrup or agave. Each will give a unique taste. For more flavor, think about adding spices. Nutmeg and ginger are great choices. They add warmth and depth. A pinch of each can really enhance the pancakes. For a beautiful plate, stack your pancakes high. Top them with fresh banana slices. A drizzle of honey or syrup makes them shine. You can also sprinkle crunchy nuts on top. For a creamy touch, serve with Greek yogurt. It adds richness and pairs well with the pancakes. {{image_4}} You can easily make these pancakes gluten-free. Use certified gluten-free oats. This ensures you avoid cross-contamination. Many brands offer oats that fit this need. If you are lactose intolerant, try almond milk or coconut milk. Both options work great in this recipe. They add a nice creaminess without the dairy. Want to add more fun to your pancakes? Toss in some chocolate chips or nuts. They give a sweet crunch that’s hard to resist. You can also use walnuts or pecans for added texture. You might like to incorporate fruit purees too. Applesauce or pumpkin puree can boost flavor and moisture. Vanilla or almond extract can add depth to the taste. Meal prep is easy with these pancakes. You can make a big batch and freeze extras. Just stack them with parchment paper between each pancake. This keeps them from sticking together. These pancakes pair well with yogurt or fresh fruit. A dollop of Greek yogurt adds protein. Fresh berries or banana slices on top make a lovely presentation. For the full recipe, check it out above. Enjoy your delicious and healthy banana oat pancakes! To keep your pancakes fresh, store them properly. If you have leftover pancakes, place them in an airtight container. You can refrigerate them for up to three days. This keeps them soft and tasty. For longer storage, freeze your pancakes. Lay them flat on a baking sheet. Once they freeze, transfer them to a freezer bag. This way, they won't stick together. You can freeze them for up to three months. When you're ready to enjoy your pancakes again, reheating is simple. The best way is to use a toaster or a skillet. If you choose a skillet, heat it on low. Add a tiny bit of coconut oil or spray. Place the pancakes in the skillet for about one minute on each side. This keeps them warm and fluffy. If you're in a hurry, you can use the microwave. Heat the pancakes for about 20-30 seconds. But be careful, as this may make them a bit chewy. For the best taste, always try to reheat them gently. Enjoy your Healthy Banana Oat Pancakes! For the full recipe, check out the details above. Yes, you can use quick oats. Quick oats are thinner and cook faster. This can affect the texture of your pancakes. Rolled oats give a heartier feel. If you use quick oats, your pancakes may be softer. You might also need less liquid since quick oats absorb liquid differently. Experiment and see what you like best. To make these pancakes vegan, swap out the milk and honey. Use almond milk or any plant-based milk. For sweetness, try maple syrup instead of honey. You can skip the egg, as this recipe is already egg-free. These changes keep the pancakes tasty and plant-based. If the batter is too thick, add a bit more milk to loosen it. Start with one tablespoon at a time. Blend it again after each addition. This helps keep the flavor strong while adjusting the texture. A good batter should pour easily, but not be runny. These pancakes last about 3 to 5 days in the fridge. Keep them in an airtight container to stay fresh. You can reheat them in the microwave or on a skillet. Just make sure they are heated through for the best taste. Yes, you can make the batter ahead of time. Store it in the fridge for up to 24 hours. If you wait longer, the oats may absorb too much liquid. Just add a little milk before cooking to get the right consistency. This makes breakfast quick and easy! For the full recipe, check out the detailed guide. To make these healthy banana oat pancakes, start by blending the rolled oats until they turn into a fine flour. Then mix in the mashed bananas and almond milk. This creates a smooth batter. It is important to let the batter rest for 5-10 minutes. This helps thicken the batter and improves texture. Here are some key points to remember for successful pancakes: - Always blend the oats until fine for the best texture. - Use ripe bananas for natural sweetness. - Let the batter rest; it makes a big difference. - Grease your skillet well to prevent sticking. - Cook until bubbles form, then flip carefully. These tips will help you create pancakes that are light, fluffy, and full of flavor. Enjoy making them! You learned about making delicious pancakes with simple, healthy ingredients. We covered the essential items, step-by-step cooking instructions, and helpful tips. We also explored variations to fit diets and preferences. Lastly, we discussed how to store leftovers and answered common questions. With these insights, you can create tasty pancakes that everyone will enjoy. Get cooking and delight your family or friends with these easy-to-make treats!](https://joymealplan.com/wp-content/uploads/2025/07/586e6978-884d-467f-992a-f783d71f0243-768x768.webp)