
Crack Chicken Gnocchi Creamy Comfort Food Delight


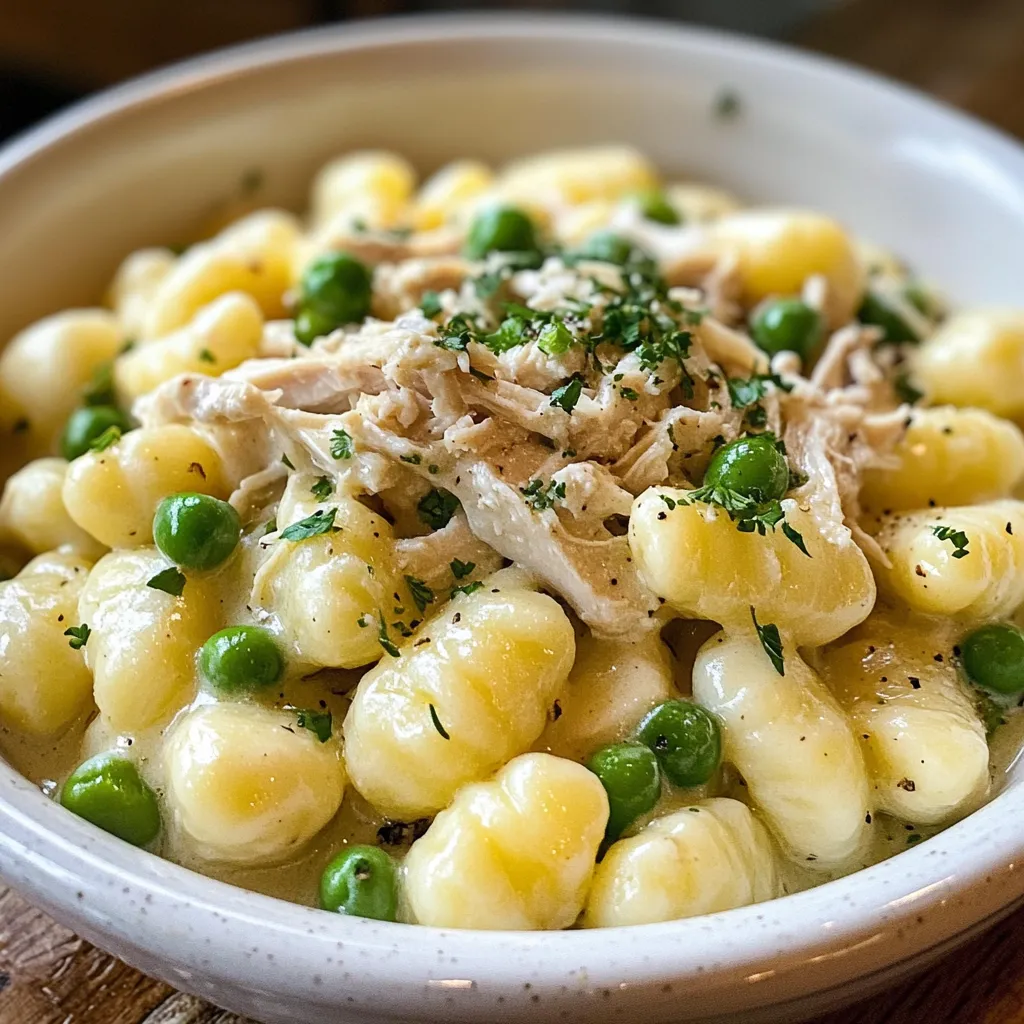
Crack Chicken Gnocchi is a creamy delight that warms the soul. This dish combines tender chicken, chewy gnocchi, and a rich cheese sauce for the ultimate comfort food. In this post, I’ll share easy steps, tips, and variations to make this recipe your own. Whether you’re cooking for family or friends, everyone will love this tasty meal. Get ready to enjoy a bowl of creamy goodness that’s sure to please!
Why I Love This Recipe
- Quick and Easy: This recipe comes together in just 20 minutes, making it perfect for busy weeknights.
- Comfort Food: The creamy texture and cheesy flavor make it a delightful comfort food that everyone will love.
- Versatile Ingredients: Using shredded chicken and gnocchi allows for flexibility; you can easily swap in leftover meats or different veggies.
- Kid-Friendly: The combination of flavors and textures is appealing to kids, ensuring a clean plate at the dinner table!
Ingredients
Main Ingredients
– 1 pound cooked and shredded chicken breast
– 1 package (16 oz) potato gnocchi
– 2 cups low-sodium chicken broth
– 1 cup cream cheese, softened to room temperature
– 1 cup shredded sharp cheddar cheese
Seasonings and Extras
– 1 packet ranch seasoning mix
– 2 cloves garlic, finely minced
– 1 tablespoon olive oil
– 1 cup frozen peas
Garnishes
– 1 teaspoon freshly cracked black pepper
– Fresh parsley, chopped (for garnish, optional)
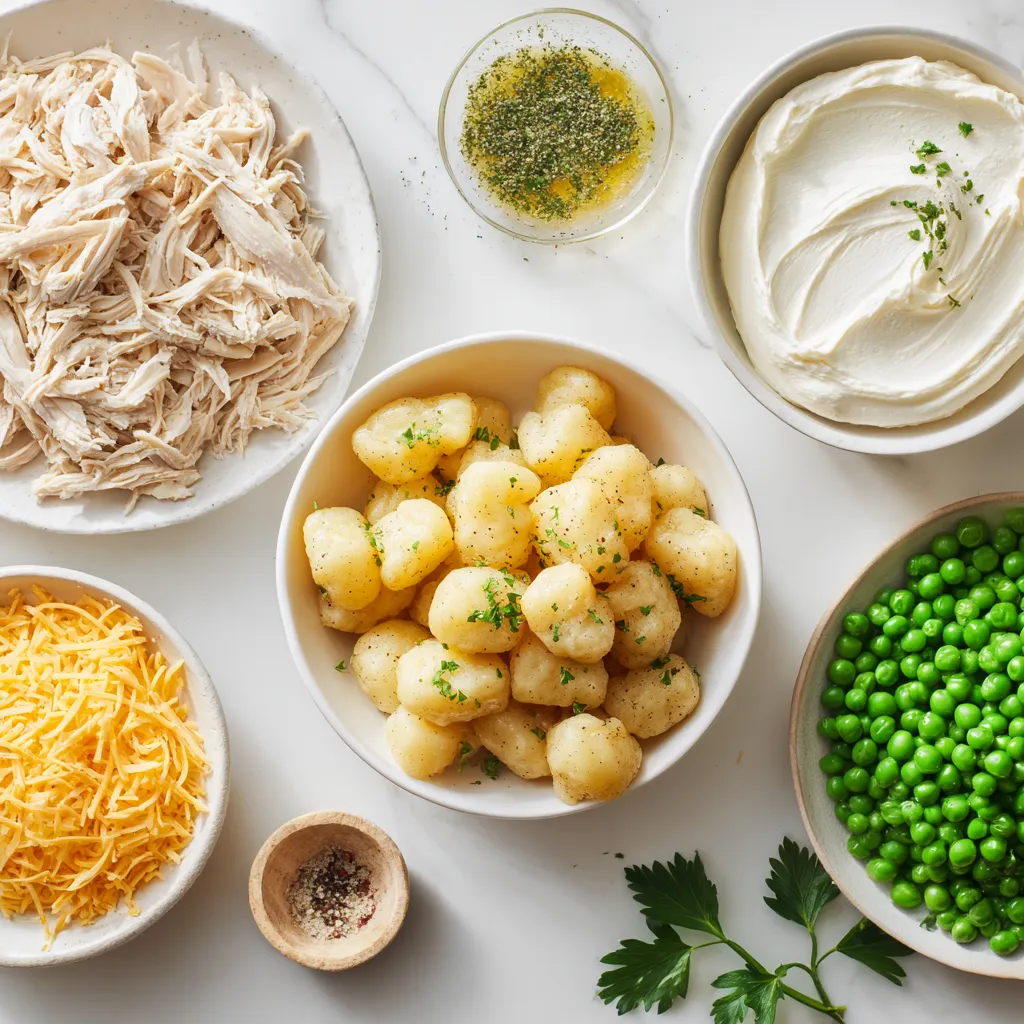
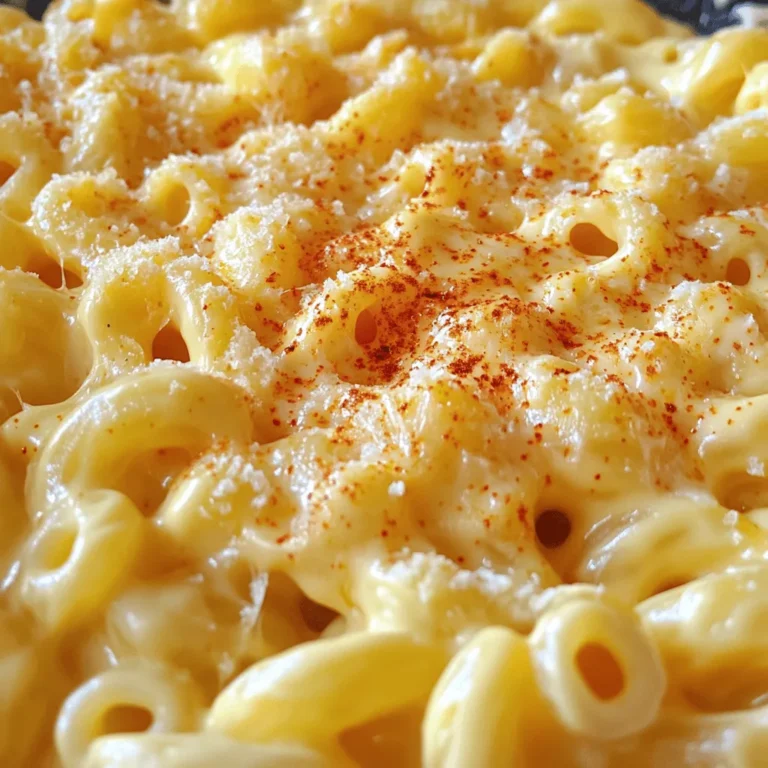
I love using these fresh and simple ingredients for Crack Chicken Gnocchi. The cooked chicken gives the dish its hearty base. I always use shredded chicken, as it blends well into the creamy sauce. The potato gnocchi adds a soft texture. It cooks quickly and pairs perfectly with the sauce.
Low-sodium chicken broth brings depth to the dish. It keeps the flavor rich without being too salty. Cream cheese and cheddar create that oh-so-creamy sauce we all crave. Together, they melt into a delightful mix.
Ranch seasoning adds a burst of flavor. I love the way it boosts the taste without extra steps. Minced garlic brings warmth and aroma to the dish. Olive oil helps sauté the garlic and chicken, enhancing the flavors.
Frozen peas add a touch of sweetness and color. They warm up quickly in the skillet. Finally, I sprinkle black pepper for a bit of spice. Fresh parsley is optional but looks lovely as a garnish. It brightens the dish and adds freshness.
With these ingredients, you can create a comforting meal that delights everyone. Each bite offers creamy goodness, making it a family favorite.
Step-by-Step Instructions
Cooking the Gnocchi
Start by boiling low-sodium chicken broth in a large pot. Bring it to a gentle boil over medium heat. Once the broth is bubbling, add the potato gnocchi. Cook the gnocchi as per the package instructions, which usually takes about 2-3 minutes. You will know they are done when they float to the surface. This means they are ready to enjoy!
Preparing the Chicken Mixture
While the gnocchi cooks, heat a large skillet over medium heat with olive oil. Once hot, add the minced garlic. Sauté the garlic for about 1 minute until it smells nice and turns golden. Then, add the cooked and shredded chicken to the skillet. Sprinkle in the ranch seasoning mix. Stir this together and let it cook for an additional 2-3 minutes. This allows the flavors to blend well.
Creating the Creamy Sauce
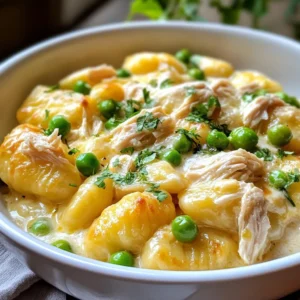
Now, lower the heat and add the softened cream cheese and shredded cheddar cheese to the skillet. Stir the mixture until both cheeses melt. This creates a smooth and creamy sauce. Next, carefully drain any extra broth from the gnocchi and transfer them into the skillet. Gently fold in the frozen peas. Season with freshly cracked black pepper. Let everything heat together for about one more minute until the peas are warm and tender. Enjoy the creamy goodness!
Tips & Tricks
Perfecting Creaminess
To make a smooth cheese sauce, start with softened cream cheese. This helps it melt easily. Add it slowly to the warm skillet. Stir constantly to blend it with the chicken. The heat helps the cheese become creamy. If the sauce is too thick, add a splash of chicken broth. This keeps it silky and rich.
Best Practices for Gnocchi
To know when gnocchi is fully cooked, watch for them to float. When they rise to the top, they are done. This usually takes about 2 to 3 minutes. Be careful not to overcook them. Overcooked gnocchi can become mushy. If you want to test one, just take it out and taste it.
Flavor Enhancements
Adding herbs or spices boosts the taste. Fresh herbs like parsley or thyme work great. You can also sprinkle in red pepper flakes for a kick. Mix in a bit of lemon zest for brightness. Experiment with different seasonings to find what you love best. Each adds a unique twist to your dish.
Pro Tips
- Use Fresh Ingredients: Fresh garlic and high-quality chicken can elevate the flavor of this dish significantly. Opt for freshly shredded chicken instead of pre-packaged for the best results.
- Customize the Cheese: Experiment with different types of cheese, such as mozzarella or gouda, to create a unique flavor profile. Just ensure they melt well for a creamy texture.
- Don’t Skip the Peas: Adding frozen peas not only enhances the nutrition of the dish but also provides a lovely pop of color. They add a subtle sweetness that balances the savory flavors.
- Leftovers Make Great Lunches: This dish reheats beautifully, making it perfect for meal prep. Store leftovers in an airtight container and enjoy them for lunch throughout the week!
Variations
Protein Alternatives
You can switch out the chicken for other cooked proteins. Turkey works great in this dish. It adds a leaner taste and pairs well with the creamy sauce. Steak can also be a delicious choice. Just chop it into small pieces, and mix it in. Both options deliver a savory twist to your gnocchi.
Vegetarian Option
Want to go meatless? You can easily replace the chicken with plant-based proteins. Options like tofu or tempeh soak up flavors well. Try using chickpeas for a hearty texture and protein boost. This way, you keep the creamy goodness while making it vegetarian-friendly.
Adding Vegetables
Enhance the nutrition of your dish by adding more vegetables. Spinach or kale can bring color and nutrients. Just toss them in when you add the peas. You can also use bell peppers or carrots for a pop of sweetness. The more veggies, the healthier and tastier your Crack Chicken Gnocchi will be!
Storage Info
Storing Leftovers
To store leftovers, let the dish cool down to room temperature. Then, place it in an airtight container. Store it in the fridge if you plan to eat it within a few days. For longer storage, freeze it in a freezer-safe container. Make sure to leave some space for expansion. This will help keep the flavors fresh.
Reheating Guidelines
When reheating, do it slowly. Use a stove or a microwave. If using a stove, add a splash of chicken broth to keep it moist. Heat over low heat, stirring often. If using a microwave, cover it with a microwave-safe lid. Heat in short bursts, stirring in between. This prevents the dish from drying out.
Shelf Life
In the fridge, Crack Chicken Gnocchi lasts about 3-4 days. In the freezer, it can last up to 3 months. For best taste, try to eat it sooner rather than later. Always check for any off smells or changes in texture before eating. This ensures you enjoy the dish at its best.
FAQs
What is Crack Chicken Gnocchi?
Crack Chicken Gnocchi is a creamy dish made with chicken and gnocchi. It has gained popularity for its rich taste and comfort factor. The dish combines tender potato gnocchi with shredded chicken, cream cheese, and cheddar cheese for a delightful meal. Ranch seasoning adds a unique flavor, making it perfect for family dinners or gatherings.
Can I make this recipe ahead of time?
Yes, you can prepare this dish ahead of time. Cook the gnocchi and main mixture separately. Store them in airtight containers in the fridge. When you’re ready to serve, simply reheat them together in a skillet. Add a splash of chicken broth if needed to keep it creamy. This method saves time and keeps the flavors fresh.
What can I serve with Crack Chicken Gnocchi?
For sides, I recommend light salads or steamed vegetables. A fresh green salad with a lemon vinaigrette pairs well. Roasted broccoli or green beans also complement the dish nicely. You can even add crusty bread to soak up the creamy sauce. These options create a balanced meal that everyone will enjoy.
This blog post covered a delightful Crack Chicken Gnocchi recipe. We explored main ingredients like chicken, gnocchi, and cheeses. I shared step-by-step instructions, helpful tips, and fun variations. You can also learn storage info and answer common questions.
In closing, this creamy dish is easy and fun to customize. Enjoy your cooking and make it your ow
Creamy Crack Chicken Gnocchi Delight
Ingredients
- 1 pound cooked and shredded chicken breast
- 1 package (16 oz) potato gnocchi
- 2 cups low-sodium chicken broth
- 1 cup cream cheese, softened to room temperature
- 1 cup shredded sharp cheddar cheese
- 1 packet ranch seasoning mix
- 2 cloves garlic, finely minced
- 1 tablespoon olive oil
- 1 cup frozen peas
- 1 teaspoon freshly cracked black pepper
- to taste Fresh parsley, chopped (for garnish, optional)
Instructions
- In a large pot, pour in the low-sodium chicken broth and bring it to a gentle boil over medium heat.
- Once the broth is boiling, add the potato gnocchi. Cook according to the package instructions, usually around 2-3 minutes, or until the gnocchi float to the surface, indicating they’re done.
- While the gnocchi cooks, heat the olive oil in a separate large skillet over medium heat. Add the minced garlic and sauté for about 1 minute, stirring constantly until it's fragrant and golden.
- Incorporate the cooked and shredded chicken into the skillet, then sprinkle in the ranch seasoning mix. Stir and cook for an additional 2-3 minutes, allowing the flavors to meld and the chicken to warm thoroughly.
- Lower the heat and add the softened cream cheese and shredded cheddar cheese to the skillet. Stir continuously until both cheeses melt into a creamy, cohesive mixture.
- Once the gnocchi is cooked, carefully drain any excess broth and transfer the gnocchi into the skillet with the chicken mixture.
- Gently fold in the frozen peas and season the dish with freshly cracked black pepper. Allow everything to heat together for about another minute, until the peas are warmed through and tender.
- Remove the skillet from heat and let it sit for a minute to settle before serving.

![- 4 large bell peppers (any color of your choice) - 1 cup quinoa, thoroughly rinsed - 2 cups vegetable broth - 1 can (15 oz) black beans, drained and rinsed - 1 cup corn kernels - 1 small red onion, finely chopped - 2 cloves garlic, minced - 1 teaspoon ground cumin - 1 teaspoon smoked paprika - 1 teaspoon chili powder - Salt and freshly cracked black pepper, to taste - 1 cup diced tomatoes - 1 cup shredded cheese - Fresh cilantro or parsley for garnish This recipe is full of vibrant colors and flavors. The bell peppers add sweetness and crunch. Quinoa provides protein, making it a healthy meal choice. I love using black beans for their creaminess and fiber. Corn adds a nice sweetness and texture too. You can choose any color of bell pepper you like. Each color brings a unique taste. Red, yellow, and green all work well. The quinoa must be rinsed to remove saponin, a bitter coating. This step makes the quinoa taste better. Using vegetable broth instead of water boosts flavor. The spices, like cumin and smoked paprika, add warmth and depth. Garlic and onion give a great base flavor. Don't forget to adjust salt and pepper to your taste. I recommend adding cheese on top for a nice finish. It melts beautifully and adds richness. You can use cheddar or a Mexican blend, based on your preference. For a pop of color, garnish with fresh cilantro or parsley. For the complete recipe, check out the [Full Recipe]. - Preheat your oven to 375°F (190°C). - Slice the tops off four large bell peppers. Remove the seeds and membranes. - Stand the peppers upright in a baking dish. This keeps them stable while cooking. - In a saucepan, add one cup of rinsed quinoa and two cups of vegetable broth. - Bring the mixture to a boil over medium heat. - Once boiling, lower the heat and cover the pot. Simmer for about 15 minutes. - Fluff the quinoa with a fork when it’s done. - In a large bowl, combine the cooked quinoa with one can of black beans, one cup of corn, and one small chopped red onion. - Add two minced garlic cloves, one teaspoon of cumin, smoked paprika, and chili powder. - Season with salt and pepper to taste. - Fold in one cup of diced tomatoes before stuffing the peppers. - Carefully spoon the quinoa mixture into each pepper. Pack it down gently. - Top each stuffed pepper with one cup of shredded cheese. - Cover the dish with aluminum foil to keep the moisture in. - Place the covered dish in the preheated oven. Bake for 25 to 30 minutes. - Remove the foil and bake for another 10-15 minutes until the cheese is golden. This recipe brings together flavors and nutrition in a fun way. You’ll enjoy the vibrant colors and tastes! For the complete recipe, check out the Full Recipe. To get the best quinoa, start by rinsing it well. This removes any bitter coating. Use a fine mesh strainer for this step. Next, combine one part quinoa with two parts vegetable broth. This adds flavor. Cook on medium heat until it boils, then lower the heat and cover. Let it simmer for about 15 minutes. The quinoa should be fluffy and all the liquid gone. Spices make a big difference. I love adding ground cumin, smoked paprika, and chili powder for warmth. You can also mix in fresh herbs like cilantro or parsley for freshness. If you want more kick, add chopped jalapeños. Olives give a nice briny taste too. Feel free to get creative with your flavors! Make your dish pop! Serve the stuffed peppers on a bed of fresh greens. This adds color and crunch. You can sprinkle extra cheese on top before serving. A squeeze of lime over the peppers brightens the dish. Consider drizzling with a creamy sauce, like ranch or yogurt, for added richness. For the full recipe, check the details above. {{image_4}} You can make quinoa stuffed peppers vegan by swapping out cheese and broth. Use a plant-based cheese or skip it entirely. For broth, substitute with water or vegetable stock. Add more flavor by mixing in nutritional yeast. For protein, try lentils or chickpeas. Add veggies like spinach, kale, or mushrooms for extra nutrients. Quinoa isn't your only option. You can use rice or couscous. Both grains offer a nice texture. If you want to add meat, chicken, turkey, or even crumbled tofu work great. Just cook the proteins before mixing them into the filling. You can also add diced olives or sun-dried tomatoes for a flavor boost. Feel free to experiment with various pepper types. Bell peppers are common, but try poblano or jalapeño for a kick. Sweet peppers make the dish mild, while spicy peppers add heat. Using different sizes can change your serving style. Smaller peppers can be appetizers, while larger ones can be main dishes. To store your quinoa stuffed peppers after cooking, let them cool first. Place them in an airtight container. This keeps them fresh and tasty. You can store them in the fridge for up to four days. If you want to enjoy them later, be sure to keep the peppers whole. This helps them stay moist. If you want to freeze your stuffed peppers, wrap each one in plastic wrap. Then, place them in a freezer-safe bag or container. This method helps prevent freezer burn. You can freeze them for up to three months. When you are ready to eat, take them out and thaw them overnight in the fridge. Reheat them in the oven at 350°F (175°C) for about 20-25 minutes. This keeps the peppers nice and warm. You can also microwave them for faster results but be careful not to overcook. Enjoy your meal with a burst of flavor! For the full recipe, check out the earlier sections. Yes, you can prepare quinoa stuffed peppers ahead. Cook the quinoa and mix it with the other ingredients. You can stuff the peppers and store them in the fridge for up to 24 hours. If you want, you can bake them later. This saves time on busy days. Look for a few signs. The peppers should be tender but still firm. The filling inside should be hot and bubbly. The cheese on top should melt and turn golden brown. These are good signs your stuffed peppers are ready to enjoy. Yes, you can use other grains. Brown rice, couscous, or farro work well. Each grain has its own cooking time. For brown rice, cook it for about 40-45 minutes. Couscous cooks quickly in about 5 minutes. Adjust cooking times based on the grain you choose. I suggest a few side dishes. A simple salad with mixed greens adds freshness. You can also serve rice or a grain like quinoa on the side. If you want a warm side, consider roasted veggies. These pair well with the stuffed peppers and add color to your plate. Absolutely! This recipe uses quinoa, which is gluten-free. The other ingredients, like beans and veggies, are also gluten-free. Just make sure to check labels on canned goods. This helps ensure no gluten sneaks in. Enjoy this healthy meal worry-free! Quinoa stuffed peppers offer a balanced meal using simple, fresh ingredients. We explored the preparation, cooking tips, and variations. Remember to rinse your quinoa for the best flavor and texture. You can easily adjust the recipe for different diets or flavor profiles. Feel free to experiment with other grains or proteins. Enjoy these tasty peppers now or save some for later. Your kitchen adventures can lead to satisfying meals that everyone loves.](https://joymealplan.com/wp-content/uploads/2025/06/105cb204-6c23-4ed0-80a6-bb54efeb7f27-768x768.webp)
. First, fill a large pot with water. Add a good amount of salt. Bring the water to a rolling boil. Once it boils, add the spaghetti. Cook it until it’s al dente, which usually takes about 8 to 10 minutes. Don't forget to check the package for exact times. After cooking, drain the pasta. Make sure to save about half a cup of the starchy water for later. Set the pasta aside. While the pasta cooks, it’s time to make the sauce. Grab a food processor. Add the ripe avocado flesh, minced garlic, lemon juice, basil, and olive oil. Blend everything together until it’s smooth and creamy. If your sauce looks too thick, don’t worry. Just add a bit of the reserved pasta water. Blend again until you reach your desired consistency. Now that the pasta is ready, return it to the pot. Keep the heat low. Pour the creamy avocado sauce over the warm pasta. Gently toss everything together. Make sure every strand of spaghetti gets coated in the sauce. To make your creamy avocado pasta shine, use ripe avocados. Ripe avocados blend smoothly and offer a rich texture. They should feel soft but not mushy. Next, gradually add pasta water when blending your sauce. This step helps to reach your desired creaminess. Start with a little, then add more as needed. Salt and pepper play a key role in flavor. Always taste before serving. If it feels bland, add more salt or pepper. You can also adjust with Parmesan cheese. This cheese adds a savory note and enhances the dish's richness. If you prefer a vegetarian option, skip the cheese and rely on the avocados for flavor. First impressions matter, especially in food. Garnish with cherry tomatoes for a pop of color. Their sweetness pairs well with the creamy sauce. Next, sprinkle some red pepper flakes for heat. This touch not only looks good but adds a nice kick. Remember, we eat with our eyes first, so make it beautiful! {{image_4}} If you want a gluten-free dish, you can swap regular pasta for gluten-free options. Look for pasta made from brown rice, quinoa, or lentils. These types work well and keep the same great taste. Cook them according to the package directions. This way, everyone can enjoy this creamy avocado pasta. To make this dish vegan, skip the Parmesan cheese. Instead, you can add nutritional yeast. It gives a cheesy flavor without the dairy. Just mix in about 1/4 cup of nutritional yeast into the avocado sauce. This keeps your dish creamy and rich while staying plant-based. You can boost protein by adding grilled chicken or shrimp. Cook the proteins separately until done. Then, slice the chicken or toss the shrimp in with the pasta. The added protein makes this dish heartier and more filling. It’s a great way to turn a light meal into a satisfying feast. For the full recipe, check out the Creamy Avocado Pasta Delight. After making creamy avocado pasta, you may want to save some for later. Store any leftovers in airtight containers. This keeps the pasta fresh and avoids any unwanted odors. Place it in the fridge within two hours of cooking. Enjoy the leftovers within three days for the best taste. If you want to freeze the sauce, that's an option too. To do this, pour the creamy avocado sauce into freezer-safe bags or containers. Make sure to remove as much air as possible to prevent freezer burn. The sauce will stay fresh for about three months. When you’re ready to use it, thaw it in the fridge overnight. When it's time to enjoy your leftovers, reheating is key. The best way to reheat creamy avocado pasta is on the stove. Place the pasta in a pan over low heat. Add a splash of water or olive oil to help loosen the sauce. Stir gently until warm. Avoid the microwave if you can, as it can make the sauce grainy. Enjoy your meal! For the full recipe of creamy avocado pasta, check the earlier section. Yes, you can use frozen avocado. Frozen avocado is convenient and often cheaper. It may not have the same taste as fresh, but it still works well. Just thaw the avocado before blending. This way, you get a creamy sauce without waiting for ripe avocados. If you want a dairy-free option, try nutritional yeast. It adds a cheesy flavor without dairy. You can also use a vegan cheese blend. These substitutes keep the dish tasty while catering to different diets. Feel free to experiment with flavors until you find what you love. Creamy avocado pasta stays fresh for about 2 days in the fridge. Store it in an airtight container. To prevent browning, cover the pasta tightly. If you notice any changes in color or smell, it’s best to toss it. Enjoy your leftovers quickly for the best taste! This recipe combines ripe avocados, pasta, and garlic for a creamy dish. You can adjust ingredients to fit your taste. Adding cheese or protein can enhance flavors. Don't forget to store leftovers properly to enjoy later. Cooking can be fun and simple. Now it's your turn to make this delicious pasta! Enjoy every bite.](https://joymealplan.com/wp-content/uploads/2025/06/e38e2670-4076-4ca9-b5ff-23e6aadb6cf7-768x768.webp)